个人笔记-----Vue中多个router-view应用
单个 <router-view/> 和多个 <router-view/> 的区别,
单个 <router-view/> 只是一个区域的变化,不需要设置name属性,在设置路由的时候单个<router-view/>使用的是component,
多个<router-view/>里面需要设置一个name属性,设置路由的时候单个<router-view/>使用的是components,
————————————————
<div>
<router-view/>
<router-view class="left" name="nav" />
<router-view class="right" name="con" />
</div>
然后在router.js中进行配置,注意:component改成要components,components是一个对象了,nav:AboutNav,左侧的nav就是<router-view name="nav" /> 标签里的 name属性值,nav:AboutNav,右侧的AboutNav就是引用组件时候import AboutNav from './views/AboutNav.vue'中的AboutNav。
import AboutCon from './views/AboutCon.vue'
import AboutNav from './views/AboutNav.vue'
{
path: '/about',
name: 'about',
components:
{
nav:AboutNav,
con:AboutCon
}
}
--------------------
other
vue同一个页面可以有多个router-view
参考:https://blog.csdn.net/u011615787/article/details/80075240
分别给router-view定义一个name,默认显示的可以不用定义
自己先在components文件夹内写4个组件,准备放入4个router-viewer标签,我的分别是
app.vue
|
1
2
3
4
5
6
7
8
9
10
11
12
13
14
15
16
17
18
19
20
21
22
23
24
25
26
27
28
29
30
31
32
33
34
35
36
37
38
39
40
41
42
43
44
45
46
47
48
49
50
51
52
53
54
|
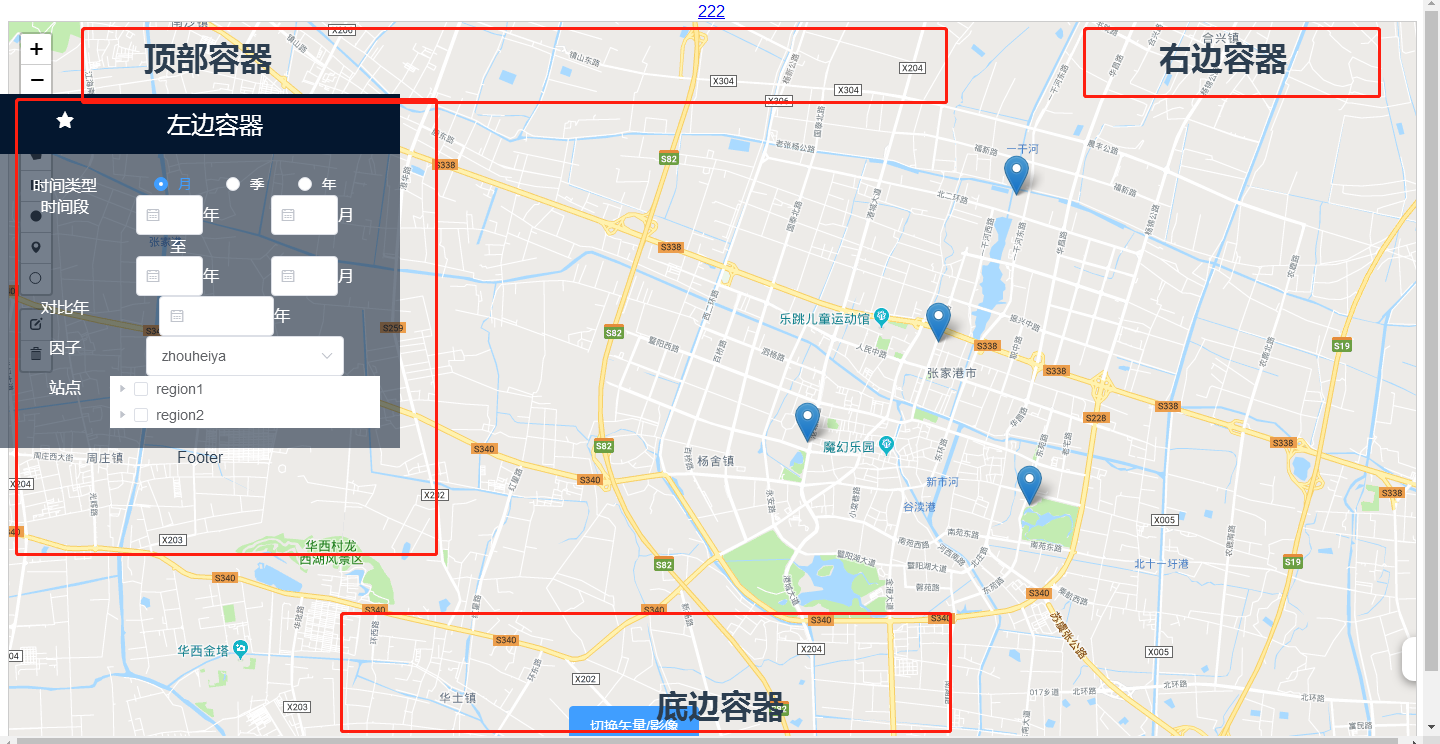
<template> <div id="app"> <!-- <img src="./assets/logo.png"> --> <!-- <container-Left/> --> <router-link to="/HelloWorld" > 222 </router-link> <router-view/> <router-view name="left" class="area left"/> <router-view name="right" class="area right"/> <router-view name="logo" class="area "/> <router-view name="bottom" class="area bottom"/> </div></template><script>import containerLeft from './components/containerLeft.vue'export default { name: 'App', components:{ containerLeft, }}</script><style>#app { font-family: 'Avenir', Helvetica, Arial, sans-serif; -webkit-font-smoothing: antialiased; -moz-osx-font-smoothing: grayscale; text-align: center; color: #2c3e50; /* margin-top: 60px; */}.area{ width: 400px; height:400px; border:1px red soild; position: absolute; top:20px; z-index: 1002;}.left{ left:0px; top:100px;}.right{ right: 0px;}.bottom{ top: 90%; width: 100%; height: 30px;}</style> |
路由文件router/index.js
核心:
|
1
2
3
4
5
6
7
8
9
10
11
12
13
14
15
16
17
18
19
20
21
22
23
24
25
26
27
28
29
30
31
32
33
34
35
36
37
38
39
40
41
42
43
44
45
46
47
48
49
50
51
52
53
54
55
56
57
58
|
import Vue from 'vue'import Router from 'vue-router'import HelloWorld from '@/components/HelloWorld'import Veaflet from '@/components/Veaflet'import containerLeft from '@/components/containerLeft'import containerRight from '@/components/containerRight'import containerTop from '@/components/containerTop'import containerBottom from '@/components/containerBottom'import lefttree from '@/components/lefttree'Vue.use(Router)// 创建一个路由器实例// 并且配置路由规则const router = new Router({ routes: [ { path: '/', name: 'Veaflet', meta:{title:'Veaflet'}, components:{ default: Veaflet, left:containerLeft, right:containerRight, logo:containerTop, bottom:containerBottom } }, { path: '/HelloWorld', name: 'HelloWorld', meta:{title:'HelloWorld'}, component: HelloWorld }, { path: '/containerLeft', name: 'containerLeft', meta:{title:'containerLeft'}, component: containerLeft }, { path: '/lefttree', name: 'lefttree', meta:{title:'lefttree'}, component: lefttree } ]}) //修改动态网页标题 beforeEach 导航钩子,路由改变前触发 router.beforeEach((to,from,next) =>{ //window.document.title = to.meta.title; window.document.title = to.name; next(); }) router.afterEach((to,from,next) =>{ window.scrollTo(0,0); }) export default router; |
运行效果如图:
个人笔记-----Vue中多个router-view应用的更多相关文章
- vue中$route 和$router的区别
在vue中会出现一种情况 const url=this.$route.query.returnURL; this.$router.push(url); $router和$route的区别傻傻的分 ...
- 关于Vue中,$this.router.push到当前页面,只是传入参数不同,页面不刷新的问题解决
在页面的watch中,监听$router的变化 watch: { $route (to, from) { this.$router.go(0) } } 其中this.$router.go(0)为刷新页 ...
- vue中$router.push打开新窗口
在vue中使用 this.$router.push({ path: '/home' }) 默认是替代本窗口 如果想新开一个窗口,可以使用下面的方式: let routeData = this.$ro ...
- Vue学习笔记七:Vue中的样式
目录 两种样式 class样式 内联样式 两种样式 Vue中使用样式方式有两种,一种是class样式,一种是内联样式也就是style class样式 class样式使用的方式有5种,HTML如下 &l ...
- Vue中router两种传参方式
Vue中router两种传参方式 1.Vue中router使用query传参 相关Html: <!DOCTYPE html> <html lang="en"> ...
- vue中$watch源码阅读笔记
项目中使用了vue,一直在比较computed和$watch的使用场景,今天周末抽时间看了下vue中$watch的源码部分,也查阅了一些别人的文章,暂时把自己的笔记记录于此,供以后查阅: 实现一个简单 ...
- [Vue 牛刀小试]:第十二章 - 使用 Vue Router 实现 Vue 中的前端路由控制
一.前言 前端路由是什么?如果你之前从事的是后端的工作,或者虽然有接触前端,但是并没有使用到单页面应用的话,这个概念对你来说还是会很陌生的.那么,为什么会在单页面应用中存在这么一个概念,以及,前端路由 ...
- vue中$router以及$route的使用
路由基本概念 route,它是一条路由. { path: '/home', component: Home } routes,是一组路由. const routes = [ { path: '/hom ...
- Vue 中的Vue Router一级路由,二级路由,三级路由以及跳转
今天编写了一下Vue中的路由 先用命令行新建一个空的项目,并且我知道要用路由,就下载了路由的相关依赖 vue init webpack demo5 完毕之后进入所在的项目 cd demo5 之后用vs ...
随机推荐
- python 获取当前py文件所在的位置 及对应的文件名称
# 导入sys整个模块 import sys # 使用sys模块名作为前缀来访问模块中的成员 print(sys.argv[0]) 当前文件名:12.py 程序运行结果: ============== ...
- Leetcode 春季打卡活动 第一题:225. 用队列实现栈
Leetcode 春季打卡活动 第一题:225. 用队列实现栈 Leetcode 春季打卡活动 第一题:225. 用队列实现栈 解题思路 这里用了非常简单的思路,就是在push函数上做点操作,让队头总 ...
- 高性能内存图数据库RedisGraph(三)
这篇文章,我将介绍截止目前,RedisGraph的最新版本(v2.4)对Cypher语言的支持情况. 1.模式(patterns) RedisGraph已支持Cypher中所有的模式. 2.类型(ty ...
- FormData提交文件(十四)
问题 在通过ajax提交表单时,表单中有Excel文件,在后台还需要读取excel文件中的数据,普通的提交方式无法实现.可以通过创建FormData对象的方式. 代码示例: 前端: 创建想要提交的fo ...
- 《手把手教你》系列技巧篇(十一)-java+ selenium自动化测试-元素定位大法之By tag name(详细教程)
1.简介 按宏哥计划,本文继续介绍WebDriver关于元素定位大法,这篇介绍By ClassName.看到ID,NAME这些方法的讲解,小伙伴们和童鞋们应该知道,要做好Web自动化测试,最好是需要了 ...
- [NOI 2021] 轻重边 题解
提供一种和不太一样的树剖解法(一下考场就会做了qwq),尽量详细讲解. 思路 设重边为黑色,轻边为白色. 首先,先将边的染色转化为点的染色(即将 \(u\) 节点连向父节点的边的颜色转化为 \(u\) ...
- Unity3D学习笔记3——Unity Shader的初步使用
目录 1. 概述 2. 详论 2.1. 创建材质 2.2. 着色器 2.2.1. 名称 2.2.2. 属性 2.2.3. SubShader 2.2.3.1. 标签(Tags) 2.2.3.2. 渲染 ...
- SQL SERVER Date列和Time列合并成一列处理报表数据
问题原由: intouch项目中,利用intouch脚本来存储数据时,存入的时间格式为:date,time分开存储.在报表需求中,有需要利用查询两个时间段之间的数据. 问题解决: 1.直接写脚本(写出 ...
- js学习笔记之自调用函数、闭包、原型链
自调用函数 var name = 'world!'; // console.log(typeof name) (function () { console.log(this.name, name, ...
- python2 与 python3 依赖包冲突问题
原文链接 https://www.2cto.com/database/201805/749294.html 执行pip的时候取的是/usr/bin这里的pip,查看这里是否存在pip3,没有的话需 ...