
web整合Spring
Spring整合Web开发
时间:2017-2-2 02:17
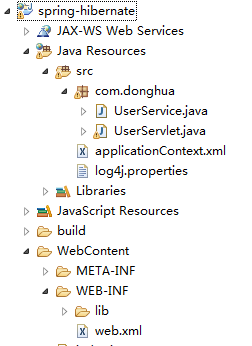
——导入jar包
1、导入Spring开发基本jar包
spring-beans-3.2.0.RELEASE.jar
2、导入commons-logging.jar
3、导入Spring Web开发jar包
spring-web-3.2.0.RELEASE.jar
——简单测试
1、编写一个Service
2、编写一个Servlet
3、编写配置文件
4、编写log4j.properties
5、访问Servlet调用Service方法
但是在测试的过程中发现:
每次执行Servlet的时候都会加载Spring环境,如何解决?
* 将加载的信息内容保存到ServletContext中,ServletContext对象是全局对象,服务器启动时就会创建,在创建ServletContext时就会加载Spring环境。
* 可以创建一个监听器:ServletContextListener,用于监听ServletContext对象的创建和销毁。
这件事情spring-web-3.2.0.RELEASE.jar帮助我们完成了。
——配置监听器
将Spring容器的初始化操作,交由Web容器负责。
1、配置核心监听器:ContextLoaderListener
Spring提供的ContextLoaderListener实现了ServletContextListener接口。
2、配置全局参数:contextConfigLocation
用于指定Spring框架的配置文件的位置。
默认在XmlWebApplicationContext类中指定为WEB-INF目录下:
public static final String DEFAULT_CONFIG_LOCATION = "/WEB-INF/applicationContext.xml";
如果需要修改默认目录,可以通过初始化参数进行修改:
<param-name>contextConfigLocation</param-name>
——获得WebApplicationContext对象
因为Spring容器已经交由Web容器初始化和管理,所以获得WebApplicationContext对象需要依赖ServletContext对象:
通常直接在Servlet中获取:
WebApplicationContext context = WebApplicationContextUtils.getWebApplicationContext(getServletContext());
底层也是通过:getServletContext().getAttribute(WebApplicationContext.ROOT_WEB_APPLICATION_CONTEXT_ATTRIBUTE);来获得。
另一种获取方式:
WebApplicationContext context = (WebApplicationContext) getServletContext().getAttribute(WebApplicationContext.ROOT_WEB_APPLICATION_CONTEXT_ATTRIBUTE);
通常使用第一种方式来获得ApplicationContext对象。
### \u8BBE\u7F6E###
log4j.rootLogger = debug,stdout,D,E
### \u8F93\u51FA\u4FE1\u606F\u5230\u63A7\u5236\u62AC ###
log4j.appender.stdout = org.apache.log4j.ConsoleAppender
log4j.appender.stdout.Target = System.out
log4j.appender.stdout.layout = org.apache.log4j.PatternLayout
log4j.appender.stdout.layout.ConversionPattern = [%-5p] %d{yyyy-MM-dd HH:mm:ss,SSS} method:%l%n%m%n
### \u8F93\u51FADEBUG \u7EA7\u522B\u4EE5\u4E0A\u7684\u65E5\u5FD7\u5230=E://logs/error.log ###
log4j.appender.D = org.apache.log4j.DailyRollingFileAppender
log4j.appender.D.File = E://study_fold/logs/log.log
log4j.appender.D.Append = true
log4j.appender.D.Threshold = DEBUG
log4j.appender.D.layout = org.apache.log4j.PatternLayout
log4j.appender.D.layout.ConversionPattern = %-d{yyyy-MM-dd HH:mm:ss} [ %t:%r ] - [ %p ] %m%n
### \u8F93\u51FAERROR \u7EA7\u522B\u4EE5\u4E0A\u7684\u65E5\u5FD7\u5230=E://logs/error.log ###
log4j.appender.E = org.apache.log4j.DailyRollingFileAppender
log4j.appender.E.File =E://study_fold/logs/error.log
log4j.appender.E.Append = true
log4j.appender.E.Threshold = ERROR
log4j.appender.E.layout = org.apache.log4j.PatternLayout
log4j.appender.E.layout.ConversionPattern = %-d{yyyy-MM-dd HH:mm:ss} [ %t:%r ] - [ %p ] %m%n
——示例代码
Servlet:
public class UserServlet extends HttpServlet
{
private static final long serialVersionUID = 1L;
Logger log = Logger.getLogger(UserServlet.class);
/**
* Default constructor.
*/
public UserServlet() {
// TODO Auto-generated constructor stub
}
/**
* @see HttpServlet#doGet(HttpServletRequest request, HttpServletResponse response)
*/
protected void doGet(HttpServletRequest request, HttpServletResponse response) throws ServletException, IOException
{
WebApplicationContext con = WebApplicationContextUtils.getWebApplicationContext(getServletContext());
UserService us = (UserService) con.getBean("userService");
response.getWriter().println(us.getName());
us.sayHello();
for(int i=0; i<10; i++)
{
log.debug("debug message..."+i);
log.error("debug message..."+i);
}
}
/**
* @see HttpServlet#doPost(HttpServletRequest request, HttpServletResponse response)
*/
protected void doPost(HttpServletRequest request, HttpServletResponse response) throws ServletException, IOException {
// TODO Auto-generated method stub
doGet(request, response);
}
}
----------------------------------------------------------------------------------------------------------------------------
web.xml
<?xml version="1.0" encoding="UTF-8"?>
<web-app xmlns:xsi="http://www.w3.org/2001/XMLSchema-instance" xmlns="http://java.sun.com/xml/ns/javaee" xsi:schemaLocation="http://java.sun.com/xml/ns/javaee http://java.sun.com/xml/ns/javaee/web-app_3_0.xsd" version="3.0">
<listener>
<listener-class>org.springframework.web.context.ContextLoaderListener</listener-class>
</listener>
<servlet>
<servlet-name>UserServlet</servlet-name>
<servlet-class>com.donghua.UserServlet</servlet-class>
</servlet>
<servlet-mapping>
<servlet-name>UserServlet</servlet-name>
<url-pattern>/UserServlet</url-pattern>
</servlet-mapping>
<context-param>
<param-name>contextConfigLocation</param-name>
<param-value>classpath:applicationContext.xml</param-value>
</context-param>
</web-app>
----------------------------------------------------------------------------------------------------------------------------
spring配置文件:
<?xml version="1.0" encoding="UTF-8"?>
<beans xmlns="http://www.springframework.org/schema/beans" xmlns:xsi="http://www.w3.org/2001/XMLSchema-instance" xmlns:context="http://www.springframework.org/schema/context" xsi:schemaLocation="
http://www.springframework.org/schema/beans http://www.springframework.org/schema/beans/spring-beans.xsd
http://www.springframework.org/schema/context http://www.springframework.org/schema/context/spring-context.xsd">
<bean id="userService" class="com.donghua.UserService">
<property name="name" value="Test Name"/>
</bean>
</beans>
----------------------------------------------------------------------------------------------------------------------------
UserService:
public class UserService
{
private String name;
public String getName() {
return name;
}
public void setName(String name) {
this.name = name;
}
public void sayHello()
{
System.out.println("Hello Spring Web STE");
}
}
浏览器输入:http://localhost:8083/spring-hibernate/UserServlet
Test Name
web整合Spring的更多相关文章
- web整合Spring和Hibernate
上一篇是简单整合web和Spring, 这一篇是整合hibernate: 连接池c3p0: spring5.0, hibernate5.0 jars: ------------------------ ...
- 《SSM框架搭建》三.整合spring web
感谢学习http://blog.csdn.net/zhshulin/article/details/37956105#,还是修改了spring到最新的版本和接口开发示例 根据前一篇日志,已经有了myb ...
- 【Java EE 学习 81】【CXF框架】【CXF整合Spring】
一.CXF简介 CXF是Apache公司下的项目,CXF=Celtix+Xfire:它支持soap1.1.soap1.2,而且能够和spring进行快速无缝整合. 另外jax-ws是Sun公司发布的一 ...
- Maven 整合 spring profile实现多环境自动切换
Maven 整合 spring profile实现多环境自动切换 时间:2014-03-19 15:32来源:Internet 作者:Internet 点击:525次 profile主要用在项目多环境 ...
- TinyFrame续篇:整合Spring IOC实现依赖注入
上一篇主要讲解了如何搭建基于CodeFirst的ORM,并且在章节末我们获取了上下文对象的实例:BookContext.这节主要承接上一篇,来讲解如何整合Spring IOC容器实现控制反转,依赖注入 ...
- Ehcache 整合Spring 使用页面、对象缓存
Ehcache 整合Spring 使用页面.对象缓存 Ehcache在很多项目中都出现过,用法也比较简单.一 般的加些配置就可以了,而且Ehcache可以对页面.对象.数据进行缓存,同时支持集群/分布 ...
- webservice 服务端例子+客户端例子+CXF整合spring服务端测试+生成wsdl文件 +cxf客户端代码自动生成
首先到CXF官网及spring官网下载相关jar架包,这个不多说.webservice是干嘛用的也不多说. 入门例子 模拟新增一个用户,并返回新增结果,成功还是失败. 大概的目录如上,很简单. Res ...
- (转)Ehcache 整合Spring 使用页面、对象缓存
Ehcache在很多项目中都出现过,用法也比较简单.一般的加些配置就可以了,而且Ehcache可以对页面.对象.数据进行缓存,同时支持集群/分布式缓存.如果整合Spring.Hibernate也非常的 ...
- 整合spring,springmvc和mybatis
我创建的是maven项目,使用到的依赖架包有下面这些: <dependencies> <dependency> <groupId>org.springframewo ...
随机推荐
- Springboot中注解@Configuration源码分析
Springboot中注解@Configuration和@Component的区别 1.先说结论,@Configuration注解上面有@Component注解,所以@Component有的功能@Co ...
- OpenFaaS实战之一:部署
欢迎访问我的GitHub https://github.com/zq2599/blog_demos 内容:所有原创文章分类汇总及配套源码,涉及Java.Docker.Kubernetes.DevOPS ...
- PphpStorm常用操作整理
本地修改记录:在项目名称上右键,点击Local History | Show History.你可以看到项目文件各个历史版本:Alt+Shift+C,可以看到项目最近的修改.这就是它的版本集成功能特性 ...
- 【强连通分量】Proving Equivalences
[题目链接]hdu-2767 [题目描述] Consider the following exercise, found in a generic linear algebra textbook. L ...
- LinuxMint 19/Ubuntu 19.10重置开始菜单以及任务栏
====================== 问题:任务栏以及开始菜单弄不见了 解决方法: 快捷键打开终端,输入重置命令: dconf reset -f /
- 构建前端第8篇之---Webstom搭建ES6运行环境
张艳涛 写于2021-1-22 一.在有webstorm和node.js前提下,安装全局的babel npm install babel-cli babel-eslint -g 二.在terminal ...
- element UI rules prop对应关系
- Python - dict 字典的多种遍历方式
前置知识 for 循环详解:https://www.cnblogs.com/poloyy/p/15087053.html 使用 for key in dict 遍历字典 可以使用 for key in ...
- 🏆【Java技术专区】「探针Agent专题」Java Agent探针的技术介绍(1)
前提概要 Java调式.热部署.JVM背后的支持者Java Agent: 各个 Java IDE 的调试功能,例如 eclipse.IntelliJ : 热部署功能,例如 JRebel.XRebel. ...
- 等Excel工作簿关闭后自动加密压缩备份2019年10月9日.ahk
;; 等Excel工作簿关闭后自动加密压缩备份2019年10月9日.ahk;; 腾讯QQ号 595076941; 作者:徐晓亮(weiyunwps618); 写作日期:2019年5月15日; 版本号: ...