SpringSecurity:简单入门
SpringSecurity能做什么
SpringSecurity是一个安全框架,使用它可以让我们的系统变得安全一点,它可以对登陆系统的用户进行验证和授权
一个安全的系统需要做的事情很多,比如:防SQL注入、XSS攻击、CSRF等等,
还需要对每一个登陆系统的用户进行权限认证,即决定了每个用户能做什么、不能做什么
在权限管理之前,还得对用户进行授权,授权后根据权限区分用户
授予和权限认证就是SpringSecurity主要做的事情
很重要的一点是,在SpringBoot中使用,可以让原本对开发者来说复杂的SpringSecurity变得简单易用
当然SpringSecurity也有很明显的缺点,就是导入依赖之后,就默认实现了很多奇奇怪怪的东西,让人感觉莫名其妙
SpringSecurity怎么使用
1、首先使用maven导入依赖包
这里是直接在SpringBoot中集成的
     <dependency>

            <groupId>org.springframework.boot</groupId>

            <artifactId>spring-boot-starter-security</artifactId>

        </dependency>

        <dependency>

            <groupId>org.springframework.security</groupId>

            <artifactId>spring-security-test</artifactId>

            <scope>test</scope>

        </dependency>
2、创建一个Controller类测试一下,所以还要导入web依赖包
SecretController.java
 1 import org.springframework.web.bind.annotation.GetMapping;

 2 import org.springframework.web.bind.annotation.RestController;

 3

 4 @RestController

 5 public class SecretController {

 6     @GetMapping("/secret")

 7     public String getSecret(){

 8         return "this is secret";

 9     }

10 }
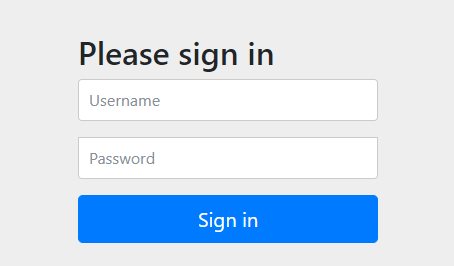
然后运行项目我们直接访问 http://localhost:8080/secret ,会发现页面重定向了,跳转到了一个登陆页面
我们甚至没有设置登陆用户名和密码
这个地方SpringSecurity默认的用户名是user,密码是动态生成的,在日志中会显示
这就是SpringSecurity强大的地方,仅仅是导入了依赖包,就默认进行了登陆验证,当然这也是弊端,因为我们根本不知道它是怎么配置的。
上面是SpringSecurity为我们默认配置的一个登陆页面,下面我们自己进行配置
2、使用SpringSecurity的配置(简单的例子)
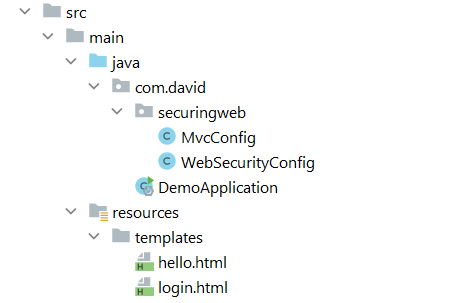
这里是整个例子的文件结构还有pom.xml,以及使用了thymeleaf,所以要导入依赖
文件结构
pom.xml
 1 <?xml version="1.0" encoding="UTF-8"?>

 2 <project xmlns="http://maven.apache.org/POM/4.0.0"

 3          xmlns:xsi="http://www.w3.org/2001/XMLSchema-instance"

 4          xsi:schemaLocation="http://maven.apache.org/POM/4.0.0 http://maven.apache.org/xsd/maven-4.0.0.xsd">

 5     <modelVersion>4.0.0</modelVersion>

 6

 7     <groupId>org.example</groupId>

 8     <artifactId>SecurityTest</artifactId>

 9     <version>1.0-SNAPSHOT</version>

10

11     <parent>

12         <groupId>org.springframework.boot</groupId>

13         <artifactId>spring-boot-starter-parent</artifactId>

14         <version>2.5.2</version>

15     </parent>

16

17     <dependencies>

18         <dependency>

19             <groupId>org.springframework.boot</groupId>

20             <artifactId>spring-boot-starter-web</artifactId>

21         </dependency>

22

23         <dependency>

24             <groupId>org.springframework.boot</groupId>

25             <artifactId>spring-boot-starter-thymeleaf</artifactId>

26         </dependency>

27

28         <dependency>

29             <groupId>org.springframework.boot</groupId>

30             <artifactId>spring-boot-starter-security</artifactId>

31         </dependency>

32     </dependencies>

33

34     <properties>

35         <maven.compiler.source>8</maven.compiler.source>

36         <maven.compiler.target>8</maven.compiler.target>

37     </properties>

38

39 </project>
首先我们要自己创建一个login页面,以及登录以后访问的页面
login.html
 1 <!DOCTYPE html>

 2 <html xmlns="http://www.w3.org/1999/xhtml" xmlns:th="https://www.thymeleaf.org"

 3       xmlns:sec="https://www.thymeleaf.org/thymeleaf-extras-springsecurity3">

 4 <head>

 5     <title>Spring Security Example </title>

 6 </head>

 7 <body>

 8 <div th:if="${param.error}">

 9     Invalid username and password.

10 </div>

11 <div th:if="${param.logout}">

12     You have been logged out.

13 </div>

14 <form th:action="@{/login}" method="post">

15     <div><label> User Name : <input type="text" name="username"/> </label></div>

16     <div><label> Password: <input type="password" name="password"/> </label></div>

17     <div><input type="submit" value="Sign In"/></div>

18 </form>

19 </body>

20 </html>
hello.html
 1 <!DOCTYPE html>

 2 <html xmlns="http://www.w3.org/1999/xhtml" xmlns:th="https://www.thymeleaf.org"

 3       xmlns:sec="https://www.thymeleaf.org/thymeleaf-extras-springsecurity3">

 4 <head>

 5     <title>Hello World!</title>

 6 </head>

 7 <body>

 8 <h1 th:inline="text">Hello [[${#httpServletRequest.remoteUser}]]!</h1>

 9

10 </body>

11 </html>
然后再MVC里面配置一下这两个页面,才可以通过url进行访问,MVC的配置需要实现WebMvcConfigurer接口
MvcConfig.java
 1 import org.springframework.context.annotation.Configuration;

 2 import org.springframework.web.servlet.config.annotation.ViewControllerRegistry;

 3 import org.springframework.web.servlet.config.annotation.WebMvcConfigurer;

 4

 5 @Configuration

 6 public class MvcConfig implements WebMvcConfigurer {

 7

 8     @Override

 9     public void addViewControllers(ViewControllerRegistry registry) {

10

11         registry.addViewController("/").setViewName("login");

12         registry.addViewController("/hello").setViewName("hello");

13         registry.addViewController("/login").setViewName("login");

14     }

15 }
然后我们需要进行SpringSecurity的配置,定义页面访问请求时,用户需要哪些权限,需要继承WebSecurityConfigurerAdapter类进行配置
现在配置中自己定义了一个用户(在实际项目中从数据库获取),而不再是由SpringSecurity默认定义
WebSecurityConfig.java
 1 import org.springframework.context.annotation.Bean;

 2 import org.springframework.context.annotation.Configuration;

 3 import org.springframework.security.config.annotation.web.builders.HttpSecurity;

 4 import org.springframework.security.config.annotation.web.configuration.EnableWebSecurity;

 5 import org.springframework.security.config.annotation.web.configuration.WebSecurityConfigurerAdapter;

 6 import org.springframework.security.core.userdetails.User;

 7 import org.springframework.security.core.userdetails.UserDetails;

 8 import org.springframework.security.core.userdetails.UserDetailsService;

 9 import org.springframework.security.crypto.bcrypt.BCryptPasswordEncoder;

10 import org.springframework.security.crypto.password.PasswordEncoder;

11 import org.springframework.security.provisioning.InMemoryUserDetailsManager;

12

13 @Configuration

14 @EnableWebSecurity

15 public class WebSecurityConfig extends WebSecurityConfigurerAdapter {

16 /*

17 @EnableWebSecurity注解让springsecurity集成springmvc

18  */

19     @Override

20     protected void configure(HttpSecurity http) throws Exception {

21 /*

22 定义了哪些路径访问是需要权限的,哪些不用

23 /和/login两个url是不需要权限就可以访问的

24 /hello需要有“USER”权限才能够访问

25  */

26         http.authorizeRequests()

27                 .antMatchers("/hello")

28                 .hasRole("USER")

29                 .and()

30                 .formLogin()

31                 .loginPage("/login")

32                 .permitAll();

33     }

34

35

36     @Bean

37     public PasswordEncoder passwordEncoder(){

38         /*

39         声明一个加密工具的Bean,供用户进行加密时调用

40          */

41         return new BCryptPasswordEncoder();

42     }

43

44     @Bean

45     @Override

46     protected UserDetailsService userDetailsService() {

47         /*

48         设置了一个预先存储在系统中的用户

49         赋予用户“USER”权限,才能够访问hello页面

50          */

51         String username = "user";

52         String password = "password";

53         UserDetails user = User.withUsername(username).password(new BCryptPasswordEncoder().encode(password)).roles("my").build();

54         return new InMemoryUserDetailsManager(user);

55     }

56 }
现在运行项目,在没有登录之前,访问/hello会被重定向到login页面,登录之后就能访问hello页面了
如果把上面代码里,用户的角色权限“USER”改成其他的,登录之后访问\hello则会抛出403错误,因为权限不够
SpringSecurity:简单入门的更多相关文章
- SpringSecurity简单入门
1.简介 Spring Security是一个能够为基于Spring的企业应用系统提供声明式的安全访问控制解决方案的安全框架.它提供了一组可以在Spring应用上下文中配置的Bean,充分利用了Spr ...
- spring security 简单入门
spring security 简单入门示例 一.概述 Spring Security是一个能够为基于Spring的企业应用系统提供声明式的安全访问控制解决方案的安全框架 . 其中最主要的安全操作有两 ...
- 用IntelliJ IDEA创建Gradle项目简单入门
Gradle和Maven一样,是Java用得最多的构建工具之一,在Maven之前,解决jar包引用的问题真是令人抓狂,有了Maven后日子就好过起来了,而现在又有了Gradle,Maven有的功能它都 ...
- [原创]MYSQL的简单入门
MYSQL简单入门: 查询库名称:show databases; information_schema mysql test 2:创建库 create database 库名 DEFAULT CHAR ...
- Okio 1.9简单入门
Okio 1.9简单入门 Okio库是由square公司开发的,补充了java.io和java.nio的不足,更加方便,快速的访问.存储和处理你的数据.而OkHttp的底层也使用该库作为支持. 该库极 ...
- emacs最简单入门,只要10分钟
macs最简单入门,只要10分钟 windwiny @2013 无聊的时候又看到鼓吹emacs的文章,以前也有几次想尝试,结果都是玩不到10分钟就退出删除了. 这次硬着头皮,打开几篇文章都看完 ...
- 【java开发系列】—— spring简单入门示例
1 JDK安装 2 Struts2简单入门示例 前言 作为入门级的记录帖,没有过多的技术含量,简单的搭建配置框架而已.这次讲到spring,这个应该是SSH中的重量级框架,它主要包含两个内容:控制反转 ...
- Docker 简单入门
Docker 简单入门 http://blog.csdn.net/samxx8/article/details/38946737
- Springmvc整合tiles框架简单入门示例(maven)
Springmvc整合tiles框架简单入门示例(maven) 本教程基于Springmvc,spring mvc和maven怎么弄就不具体说了,这边就只简单说tiles框架的整合. 先贴上源码(免积 ...
- git简单入门
git简单入门 标签(空格分隔): git git是作为程序员必备的技能.在这里就不去介绍版本控制和git产生的历史了. 首先看看常用的git命令: git init git add git comm ...
随机推荐
- testt
一级标题 二级标题 三级标题 四级标题 l 1
- Gitlab 定时备份
要求 1.为了能够备份和恢复,请确保你的系统上安装了Rsync #Debian/Ubauntu sudo apt-get install rsync # RHEL/Centos sudo yum in ...
- web自动化页面元素不能键盘输入
一.背景 web自动化中存在一部分元素属性是readonly属性,导致我们在使用自动化代码的时候无法使用sendkeys()方法传入数据,以12306网站选择出发日期为例,见下图 二.json语句处理 ...
- Python 操作 MySQL 的5种方式
不管你是做数据分析,还是网络爬虫,Web 开发.亦或是机器学习,你都离不开要和数据库打交道,而 MySQL 又是最流行的一种数据库,这篇文章介绍 Python 操作 MySQL 的5种方式,你可以在实 ...
- java001-泛型
泛型出现的意义: 为编码阶段的不确定性和转化做视觉设计 将运行期遇到的问题转移到编译期,省去了强转的麻烦 package com.xiaolin.basic; /** * 泛型:将运行期遇到的问题转移 ...
- STP、生成树的算法
STP.生成树的算法 一.STP 1)STP概述 2)交换网络环路的产生 3)STP简介 4)STP的工作原理 5)S ...
- ADB命令 连接WIFI检测序列号
利用ADB 电脑与手机相连 查看序列号: adb shell getprop ro.serialno 查看机器的SN号 adb shell getprop 查看机器的全部信息参数 查看IP地址: a ...
- 关于高校表白App的NABCD项目分析
N(Need,需求) 首先,针对本校男多女少 的具体情况,为广大本校大学生提供一个更加宽广的平台: 其次,针对当前各高校均有校园表白墙的实际情况,各表白墙难以整合在一起,使得信息不够集中的现状,我们小 ...
- Collection集合工具类
Ⅷ.Collections 工具类 java.util.Collections Collections 集合工具类,用来对集合进行操作,部分重要方法如下: 1.public static <T& ...
- 从新建文件夹开始构建ShadowPlay Engine游戏引擎(4)
本篇序言 这次博客更新距离上次的时间间隔变短了好多,因为最近硬是抽出了一大部分时间来进行引擎的开发.而且运气很好的是在写链表这种很"敏感"的的数据结构的时候并没有出现那种灾难性的后 ...