Flex布局,绝对定位,层叠布局Stack的详细讲解
Flex布局
Flex布局也叫做:伸缩布局,当子盒子的总和溢出父盒子时默认进行压缩显示
线性布局的原理是基于Flex来设计的。
Flex布局默认主轴是:水平向右的,交叉轴垂:直向下
单行或者单列的情况下,优先使用线性布局
线性布局的性能由于Flex布局
FLex布局我们可以根据 direction 来调整主轴的方向
direction:FlexDirection.Row 主轴水平向右的
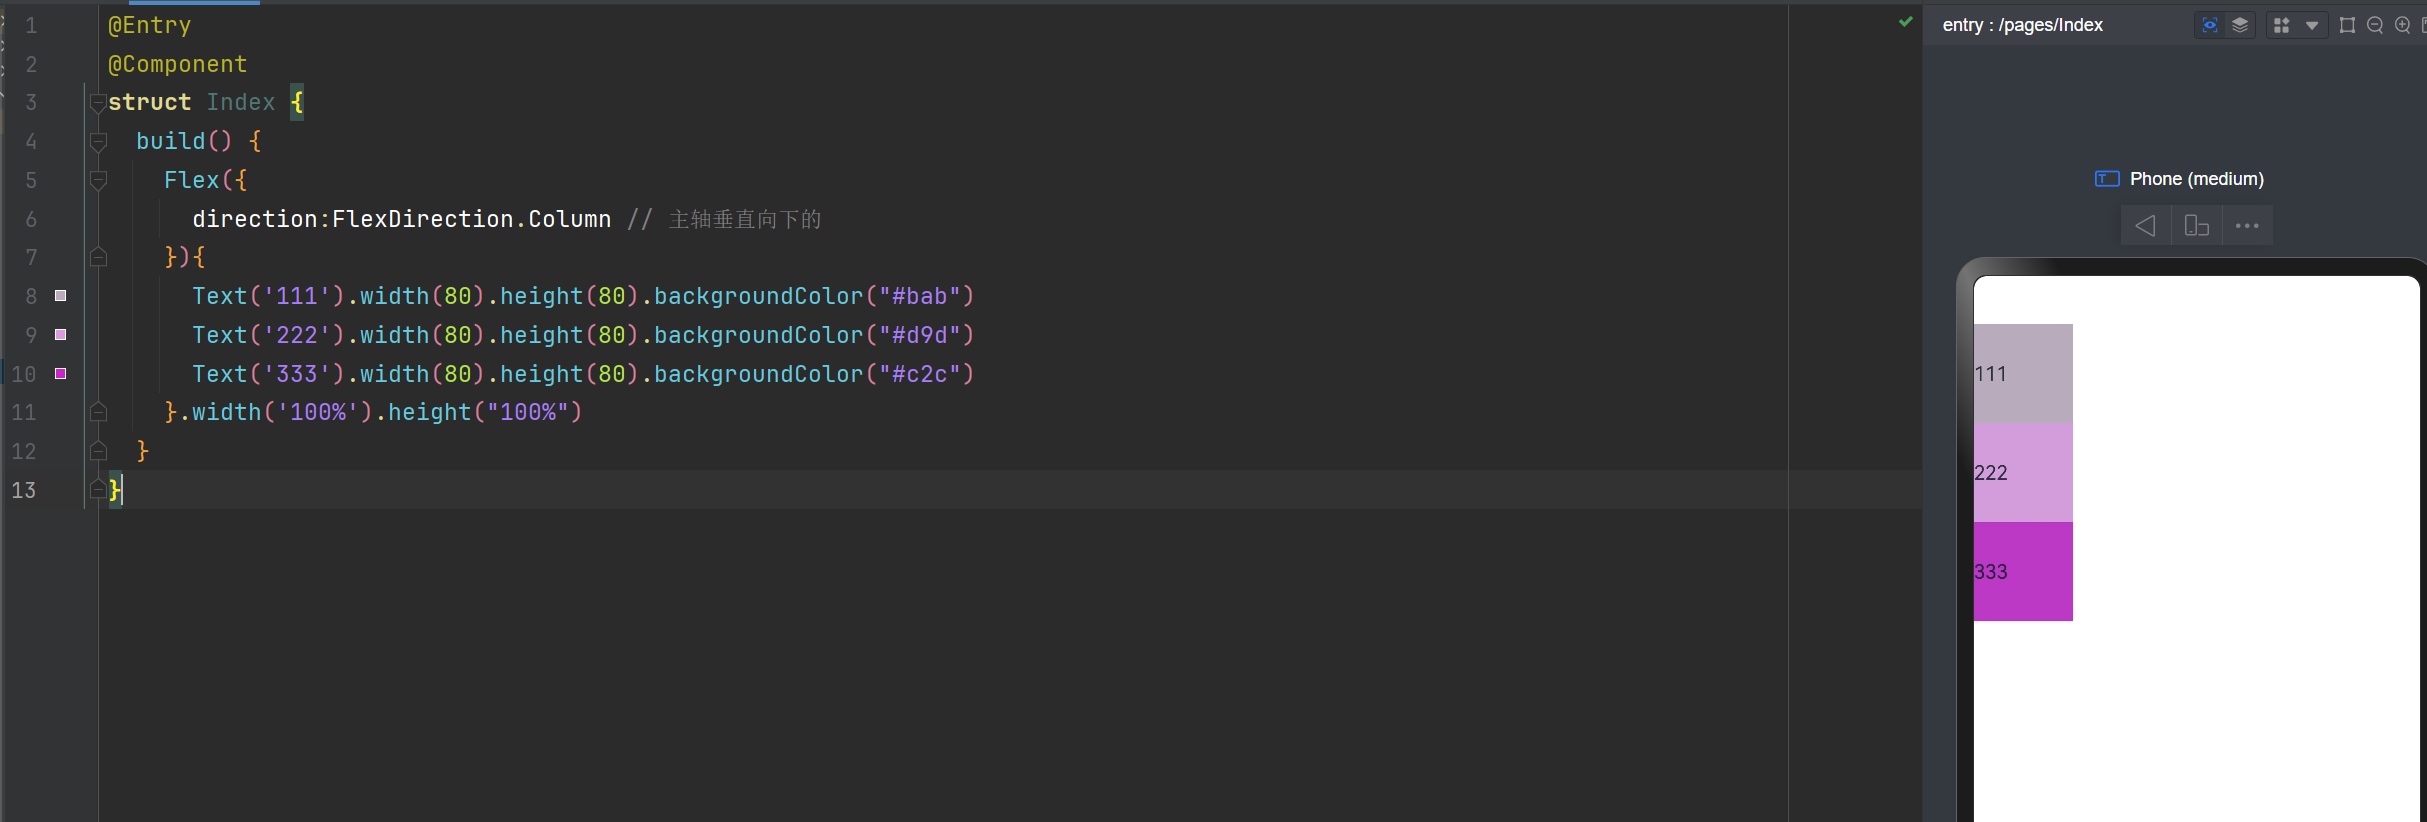
direction:FlexDirection.Column 主轴垂直向下的
direction:FlexDirection.RowReverse 主轴水平向左,与Row
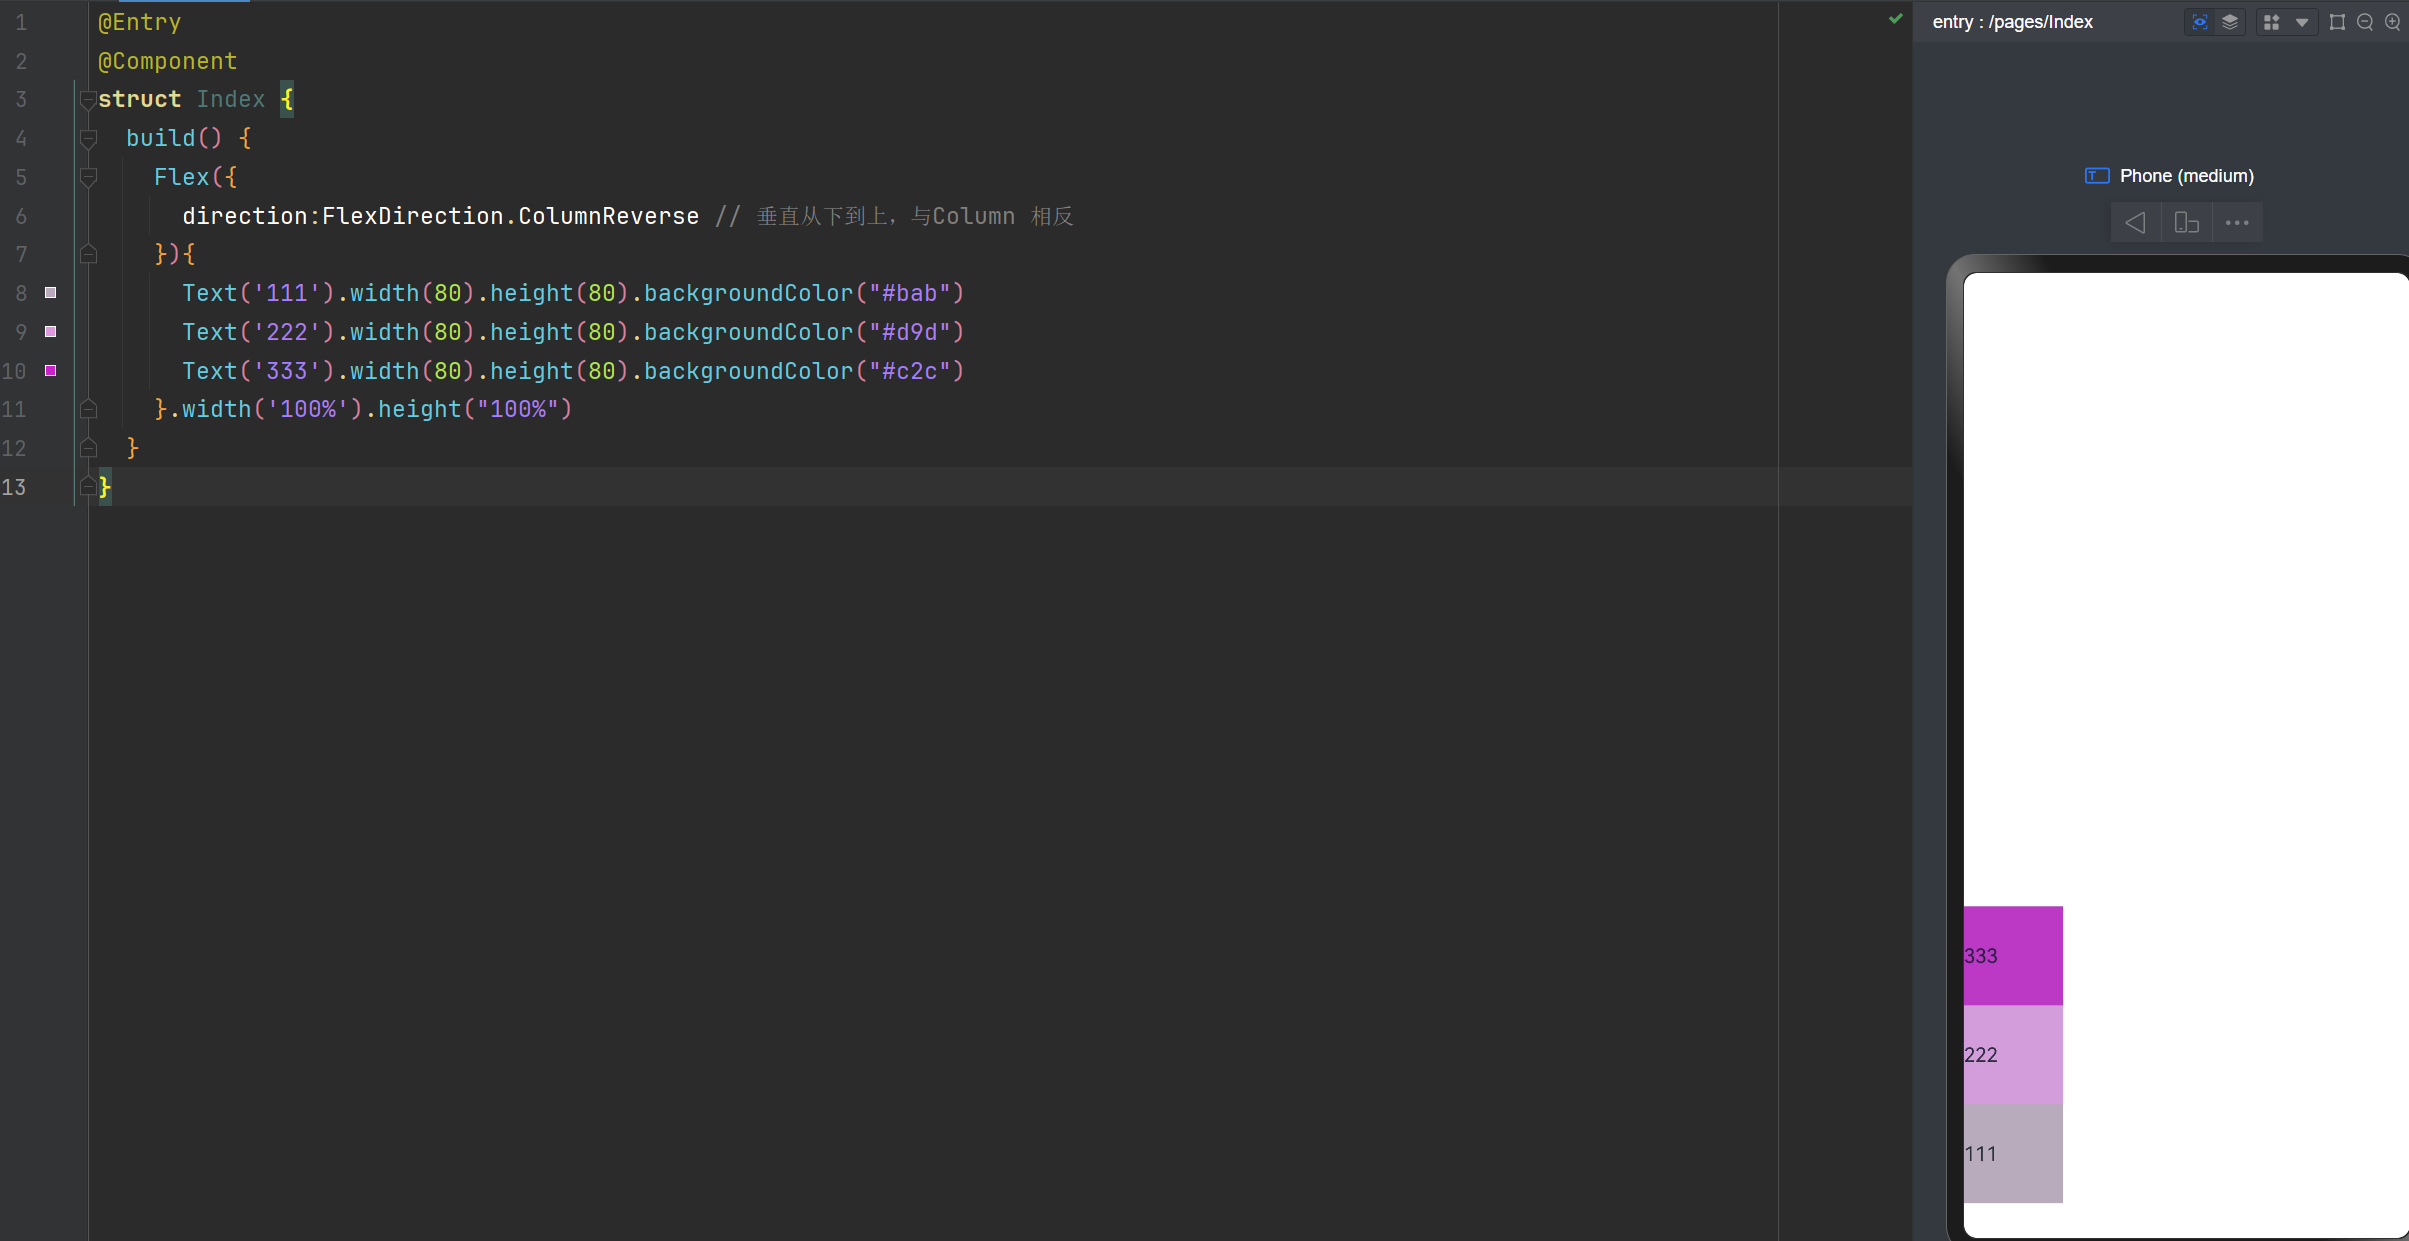
direction:FlexDirection.ColumnReverse 垂直从下到上,与Column 相反
Flex布局主轴垂直向下
@Entry

@Component

struct Index {

  build() {

    Flex({

      direction:FlexDirection.Column // 主轴垂直向下的

    }){

      Text('111').width(80).height(80).backgroundColor("#bab")

      Text('222').width(80).height(80).backgroundColor("#d9d")

      Text('333').width(80).height(80).backgroundColor("#c2c")

    }.width('100%').height("100%")

  }

}
Flex布局主轴:垂直从下到上
@Entry

@Component

struct Index {

  build() {

    Flex({

      direction:FlexDirection.ColumnReverse // 垂直从下到上,与Column 相反

    }){

      Text('111').width(80).height(80).backgroundColor("#bab")

      Text('222').width(80).height(80).backgroundColor("#d9d")

      Text('333').width(80).height(80).backgroundColor("#c2c")

    }.width('100%').height("100%")

  }

}
主轴的对齐方式,与之前学习的线性布局方式是一样的哈
justifyContent:FlexAlign.Start在最起始位置;
justifyContent:FlexAlign.Center在中间;
justifyContent:FlexAlign.End 在最末端;
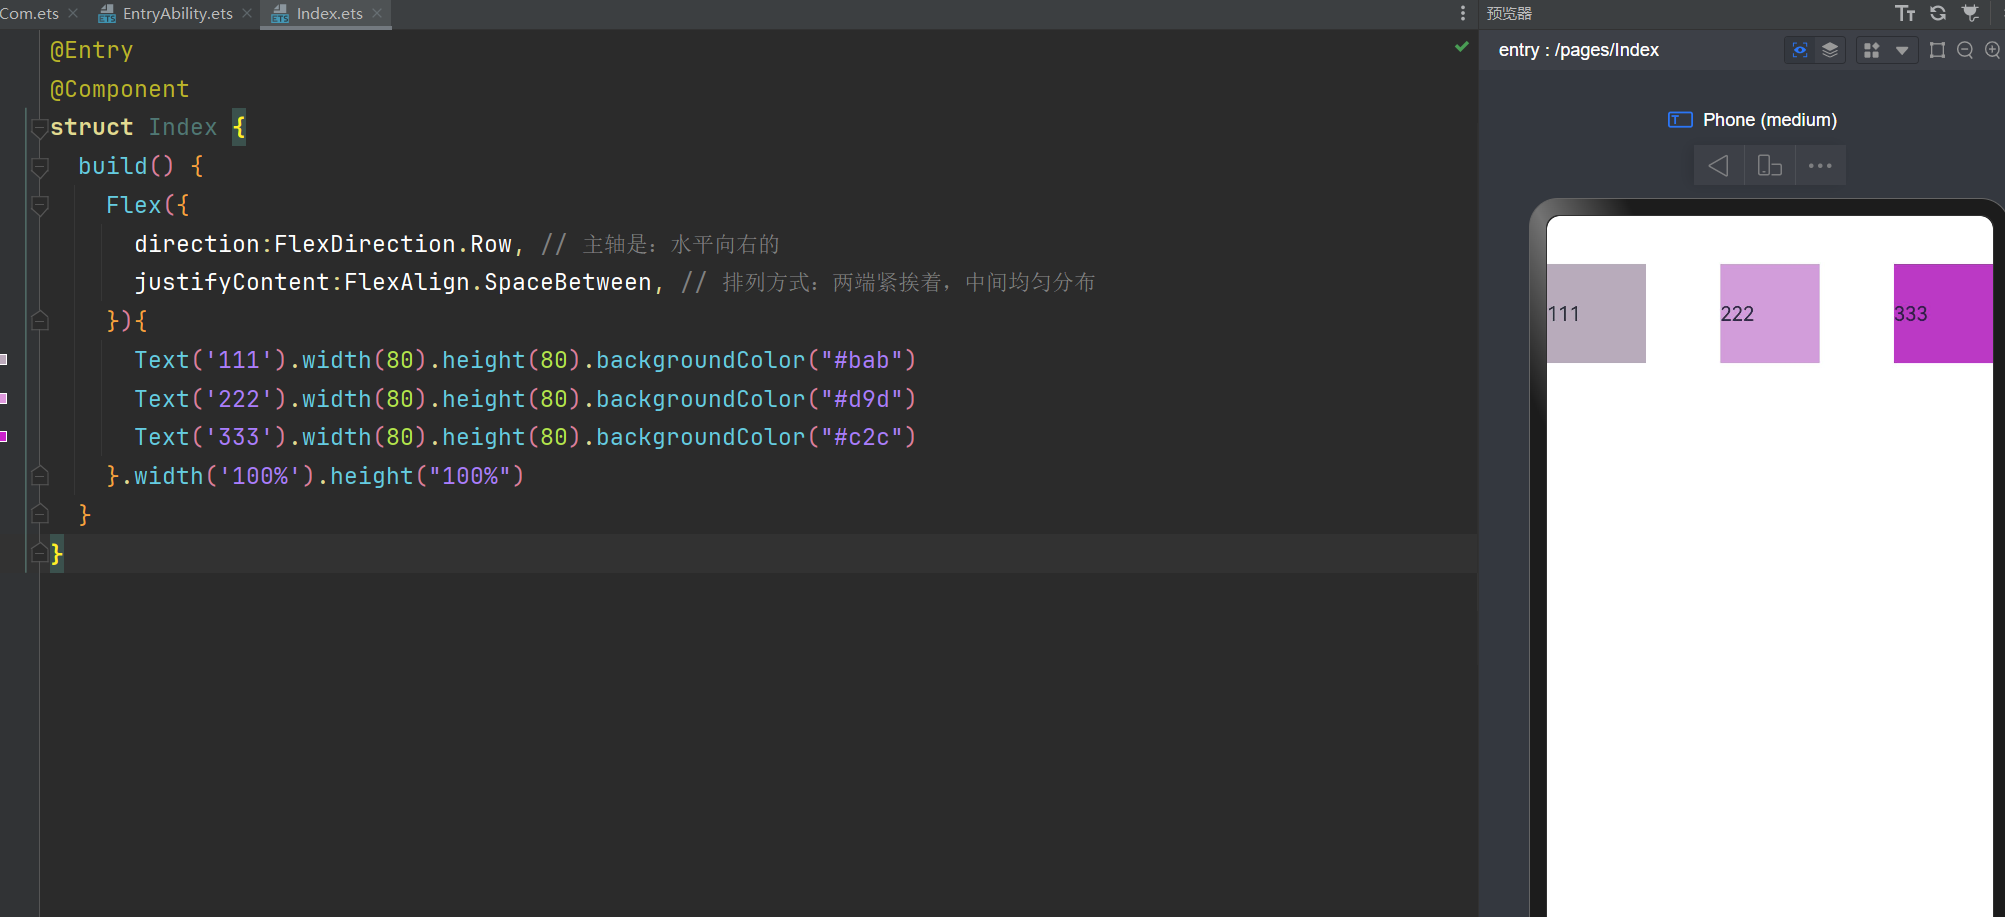
justifyContent:FlexAlign.SpaceBetween 两端紧挨着,中间均匀分布。与css3的一样。
justifyContent:FlexAlign.SpaceAround 两端有一点间距(0.5),中间间距(1)均匀分布。与css3的一样。
justifyContent:FlexAlign.SpaceEvenly 间隙是均匀的。
主轴水平向右,排列方式间隙均匀
@Entry

@Component

struct Index {

  build() {

    Flex({

      direction:FlexDirection.Row, // 主轴是:水平向右的

      justifyContent:FlexAlign.SpaceEvenly // 排列方式:间隙均匀

    }){

      Text('111').width(80).height(80).backgroundColor("#bab")

      Text('222').width(80).height(80).backgroundColor("#d9d")

      Text('333').width(80).height(80).backgroundColor("#c2c")

    }.width('100%').height("100%")

  }

}

主轴水平向右,排列方式:两端紧挨着,中间均匀分布
@Entry

@Component

struct Index {

  build() {

    Flex({

      direction:FlexDirection.Row, // 主轴是:水平向右的

      justifyContent:FlexAlign.SpaceBetween, // 排列方式:两端紧挨着,中间均匀分布

    }){

      Text('111').width(80).height(80).backgroundColor("#bab")

      Text('222').width(80).height(80).backgroundColor("#d9d")

      Text('333').width(80).height(80).backgroundColor("#c2c")

    }.width('100%').height("100%")

  }

}
交叉轴的对齐方式
alignItems: ItemAlign.Start 顶部
alignItems: ItemAlign.Center 居中
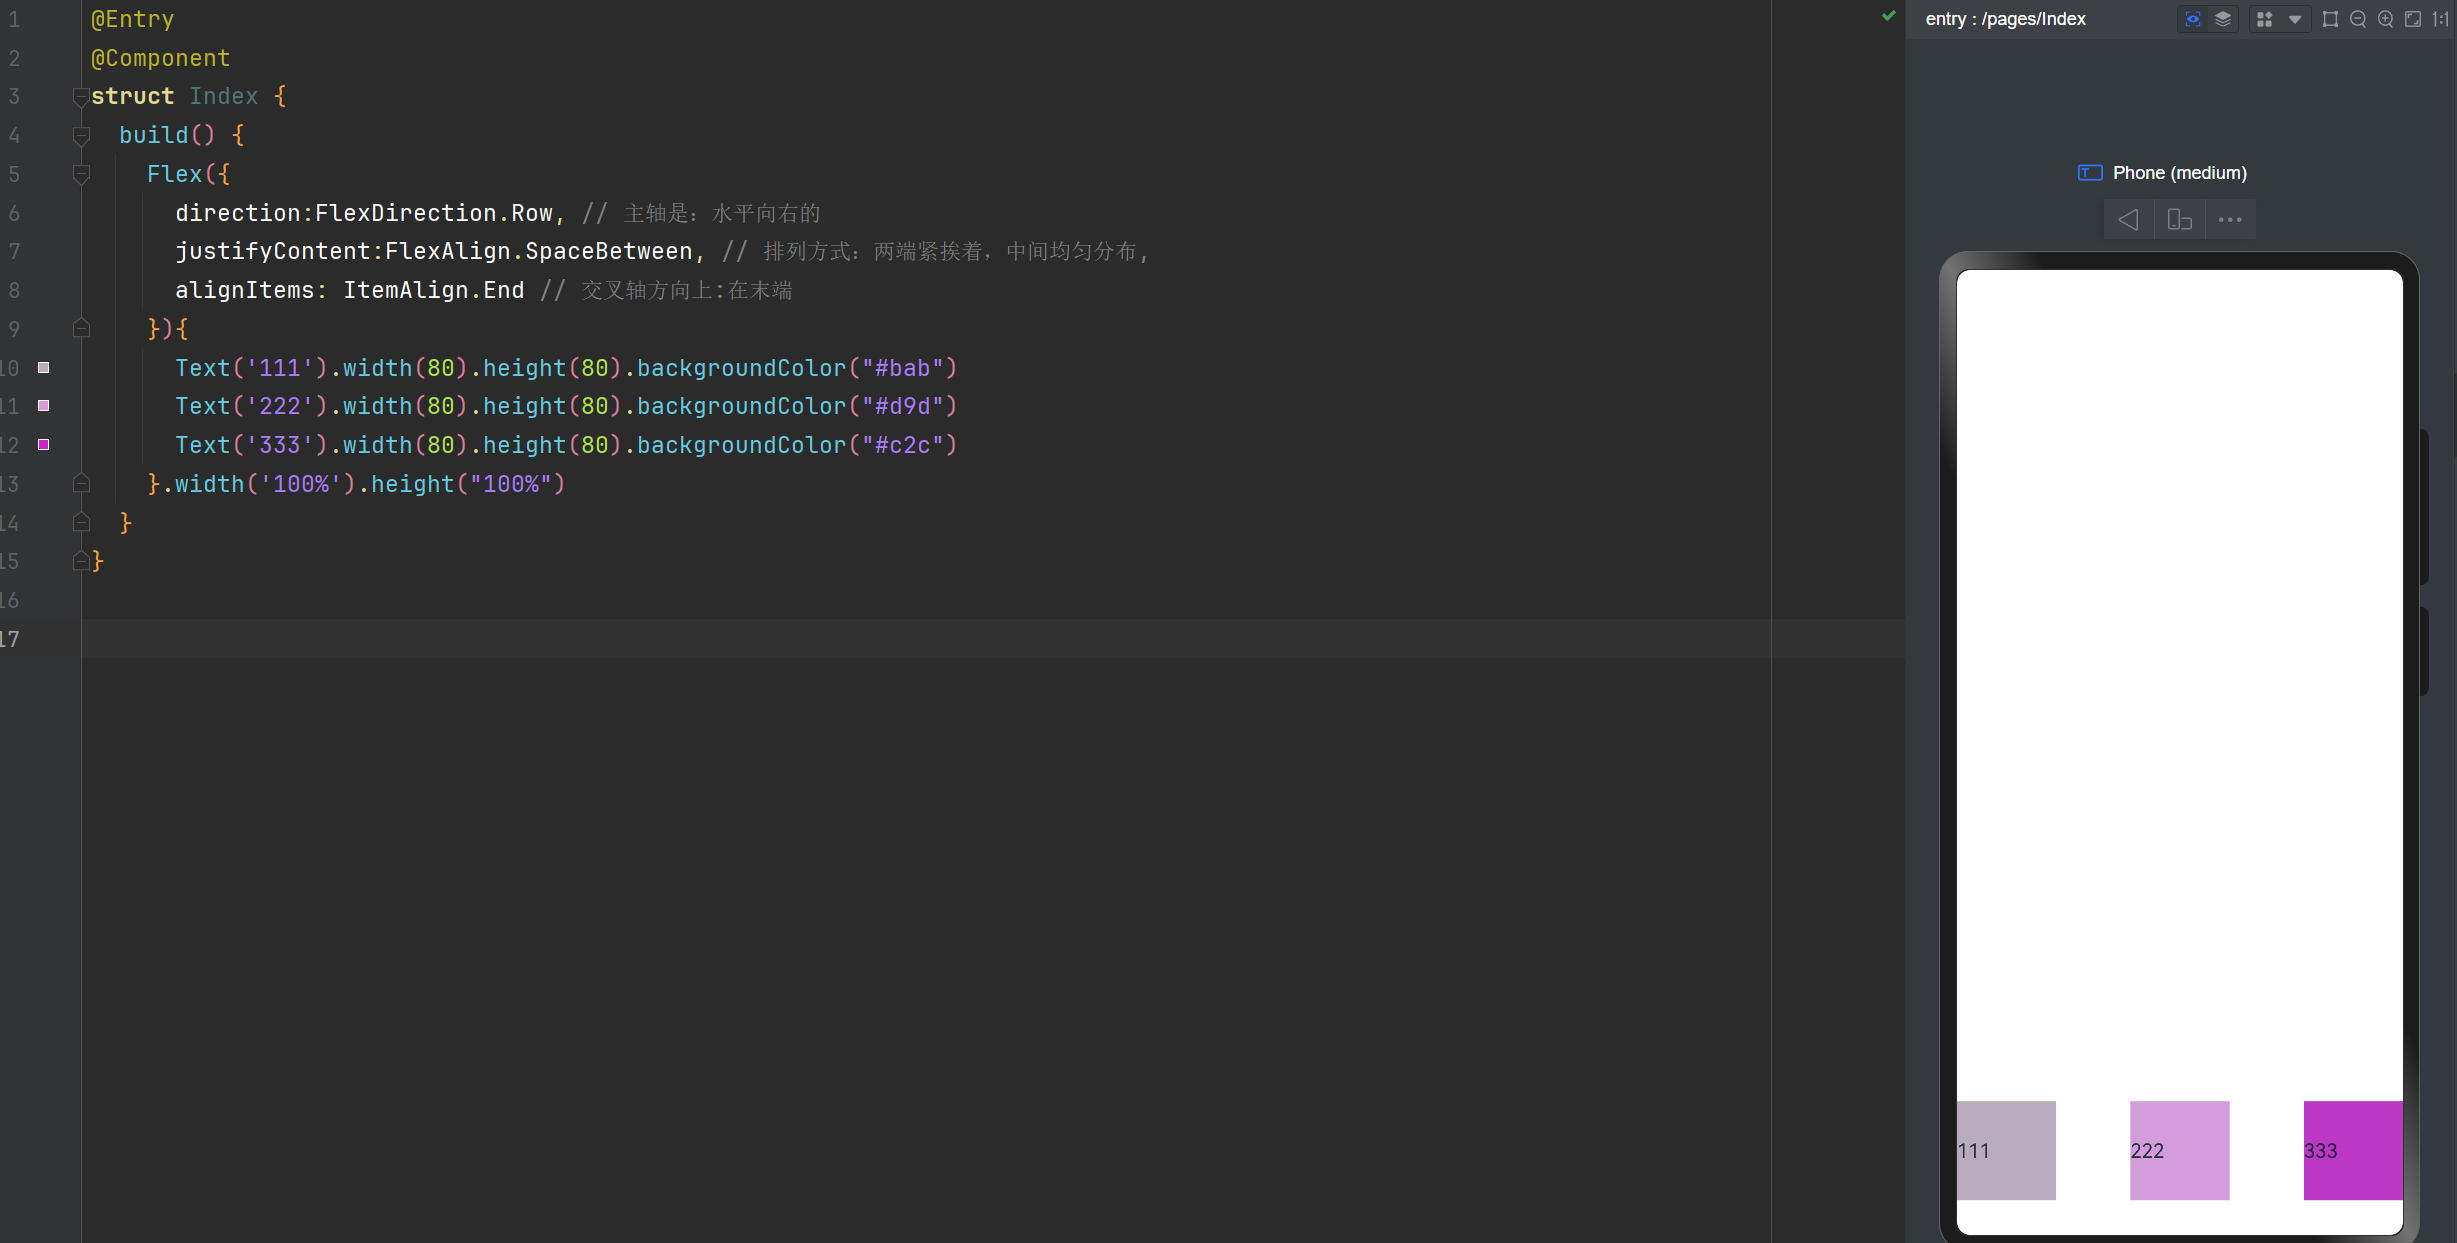
alignItems: ItemAlign.End 底部
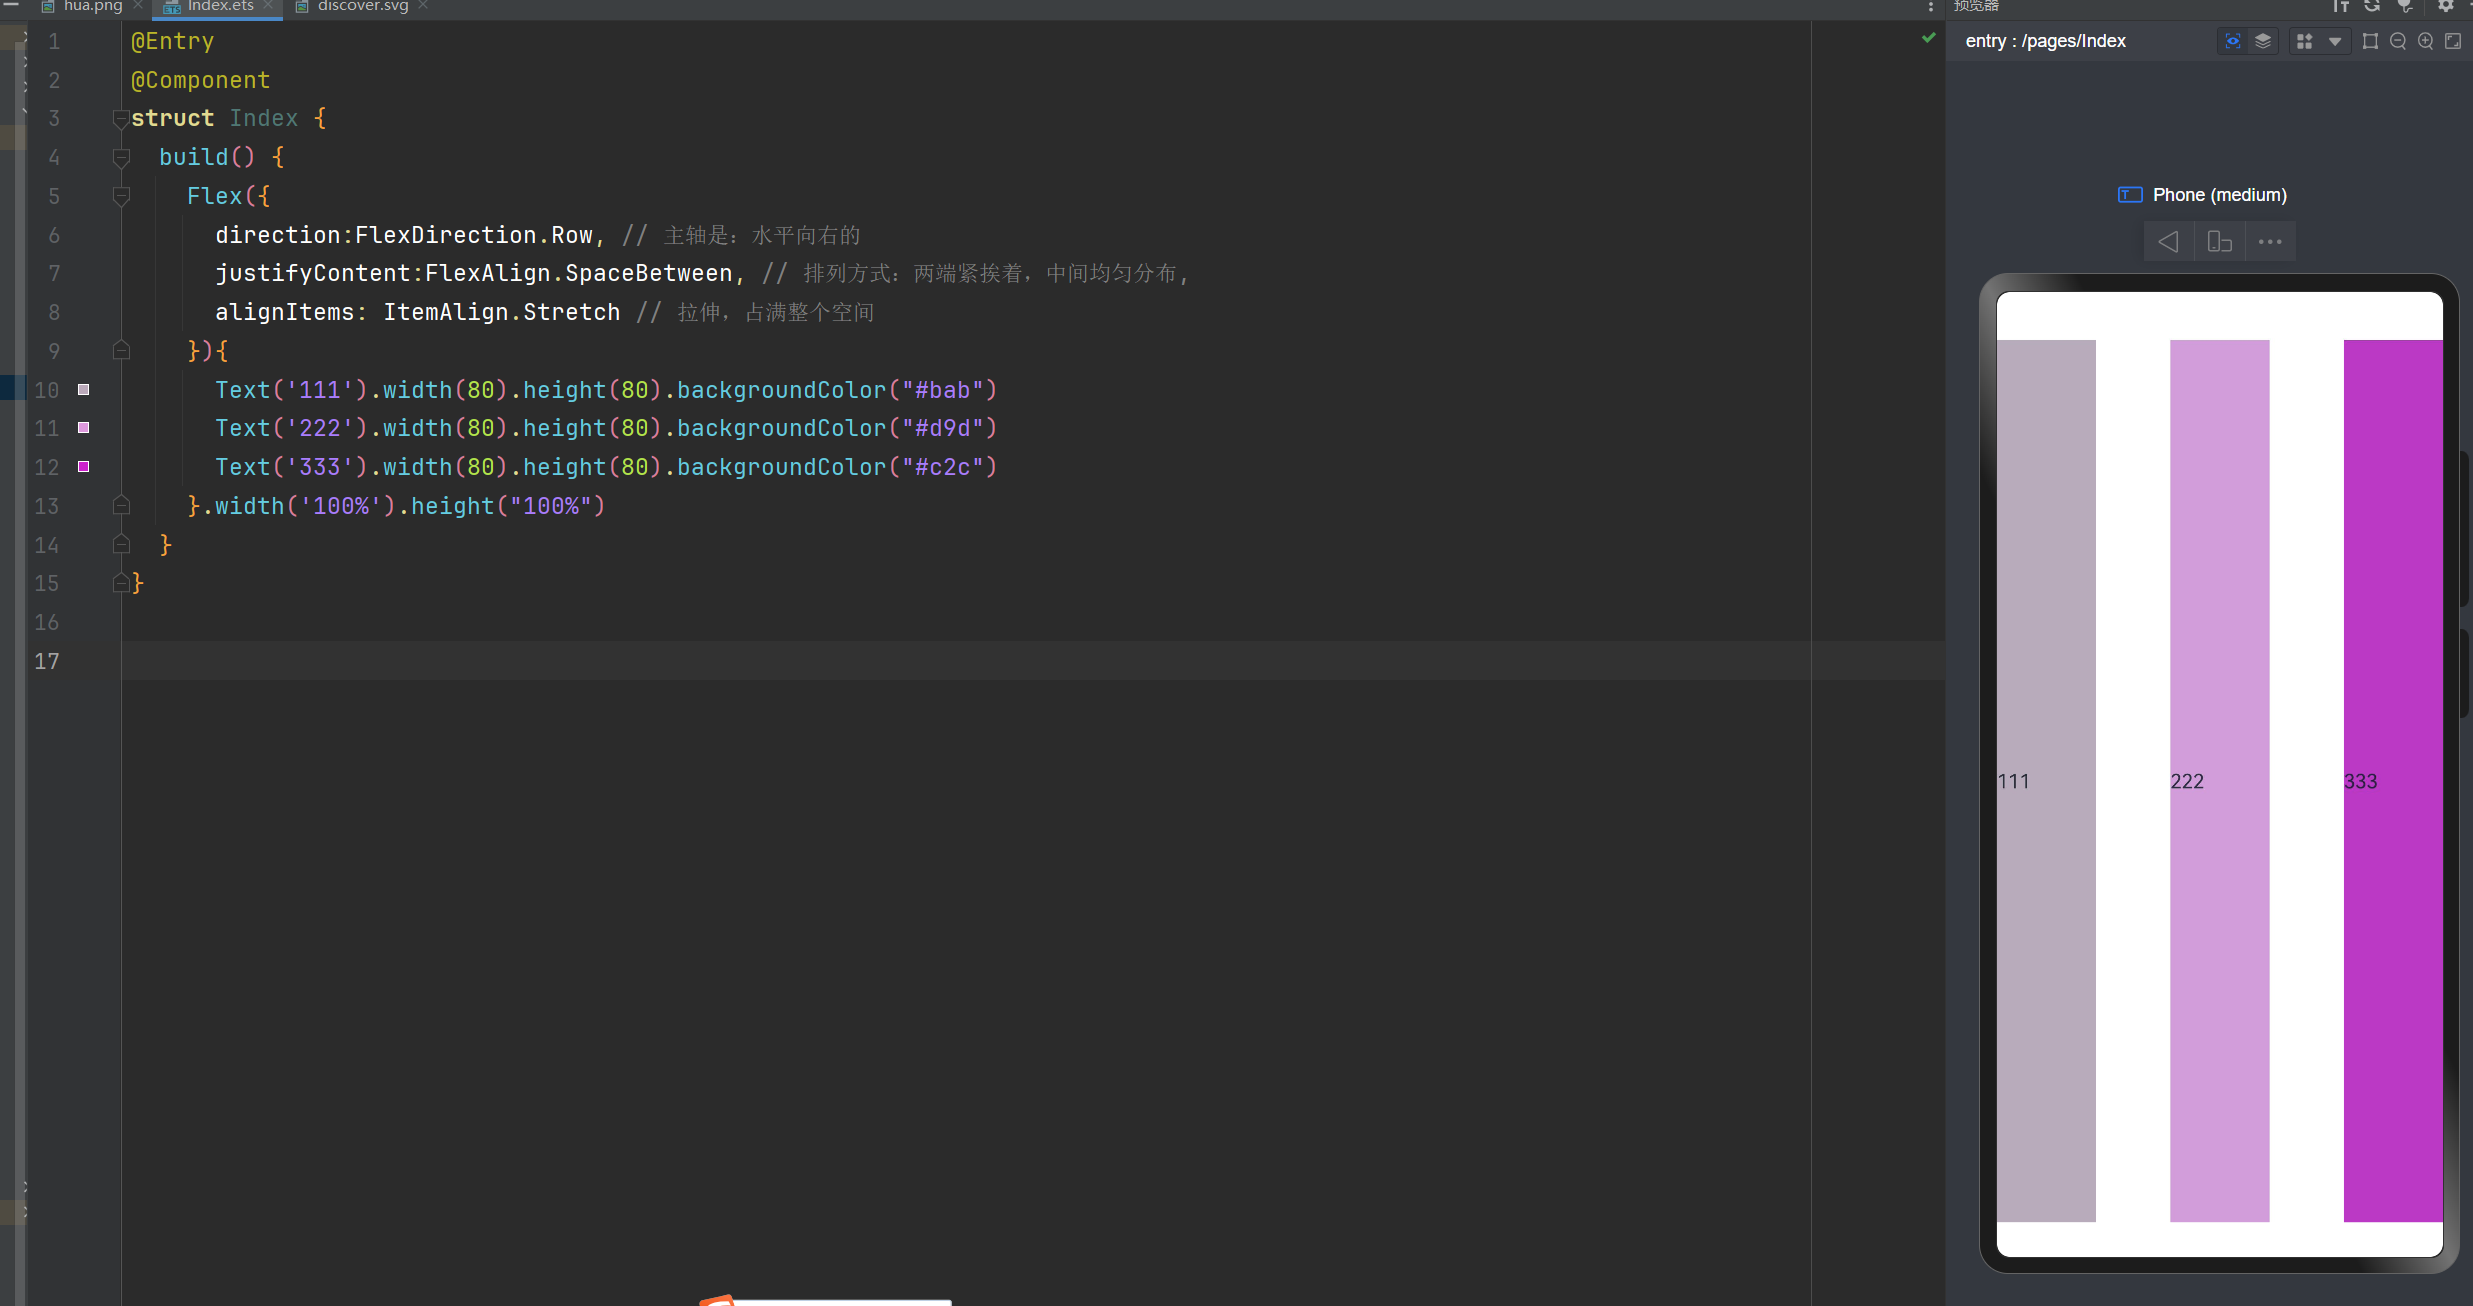
alignItems: ItemAlign.Stretch 拉伸,占满整个空间
交叉轴的对齐方式: 垂直方向拉伸,占满整个空间
@Entry

@Component

struct Index {

  build() {

    Flex({

      direction:FlexDirection.Row, // 主轴是:水平向右的

      justifyContent:FlexAlign.SpaceBetween, // 排列方式:两端紧挨着,中间均匀分布,

      alignItems: ItemAlign.Stretch // 交叉轴的对齐方式:  垂直方向拉伸,占满整个空间

    }){

      Text('111').width(80).height(80).backgroundColor("#bab")

      Text('222').width(80).height(80).backgroundColor("#d9d")

      Text('333').width(80).height(80).backgroundColor("#c2c")

    }.width('100%').height("100%")

  }

}
交叉轴对齐方式:在末端
@Entry

@Component

struct Index {

  build() {

    Flex({

      direction:FlexDirection.Row, // 主轴是:水平向右的

      justifyContent:FlexAlign.SpaceBetween, // 排列方式:两端紧挨着,中间均匀分布,

      alignItems: ItemAlign.End // 交叉轴方向上:在末端

    }){

      Text('111').width(80).height(80).backgroundColor("#bab")

      Text('222').width(80).height(80).backgroundColor("#d9d")

      Text('333').width(80).height(80).backgroundColor("#c2c")

    }.width('100%').height("100%")

  }

}
是否换行
wrap: FlexWrap.Wrap 换行
wrap: FlexWrap.NoWrap 不换行。在使用Flex布局时,如果不进行换行,子元素的宽度大于父元素。会进行挤压
wrap: FlexWrap.WrapReverse 换行翻转
不换行
在使用Flex布局时,如果不进行换行,子元素的宽度大于父元素。会进行挤压
@Entry

@Component

struct Index {

  build() {

    Flex({

      wrap:FlexWrap.NoWrap

    }){

      Text('111').width(180).height(80).backgroundColor("#bab")

      Text('222').width(180).height(80).backgroundColor("#d9d")

      Text('333').width(180).height(80).backgroundColor("#c2c")

      Text('444').width(180).height(80).backgroundColor("#ccc")

    }.width('100%').height("100%")

  }

}

换行显示
@Entry

@Component

struct Index {

  build() {

    Flex({

      wrap:FlexWrap.Wrap

    }){

      Text('111').width(180).height(80).backgroundColor("#bab")

      Text('222').width(180).height(80).backgroundColor("#d9d")

      Text('333').width(180).height(80).backgroundColor("#c2c")

    }.width('100%').height("100%")

  }

}

换行翻转
@Entry

@Component

struct Index {

  build() {

    Flex({

      wrap:FlexWrap.WrapReverse

    }){

      Text('111').width(180).height(80).backgroundColor("#bab")

      Text('222').width(180).height(80).backgroundColor("#d9d")

      Text('333').width(180).height(80).backgroundColor("#c2c")

    }.width('100%').height("100%")

  }

}

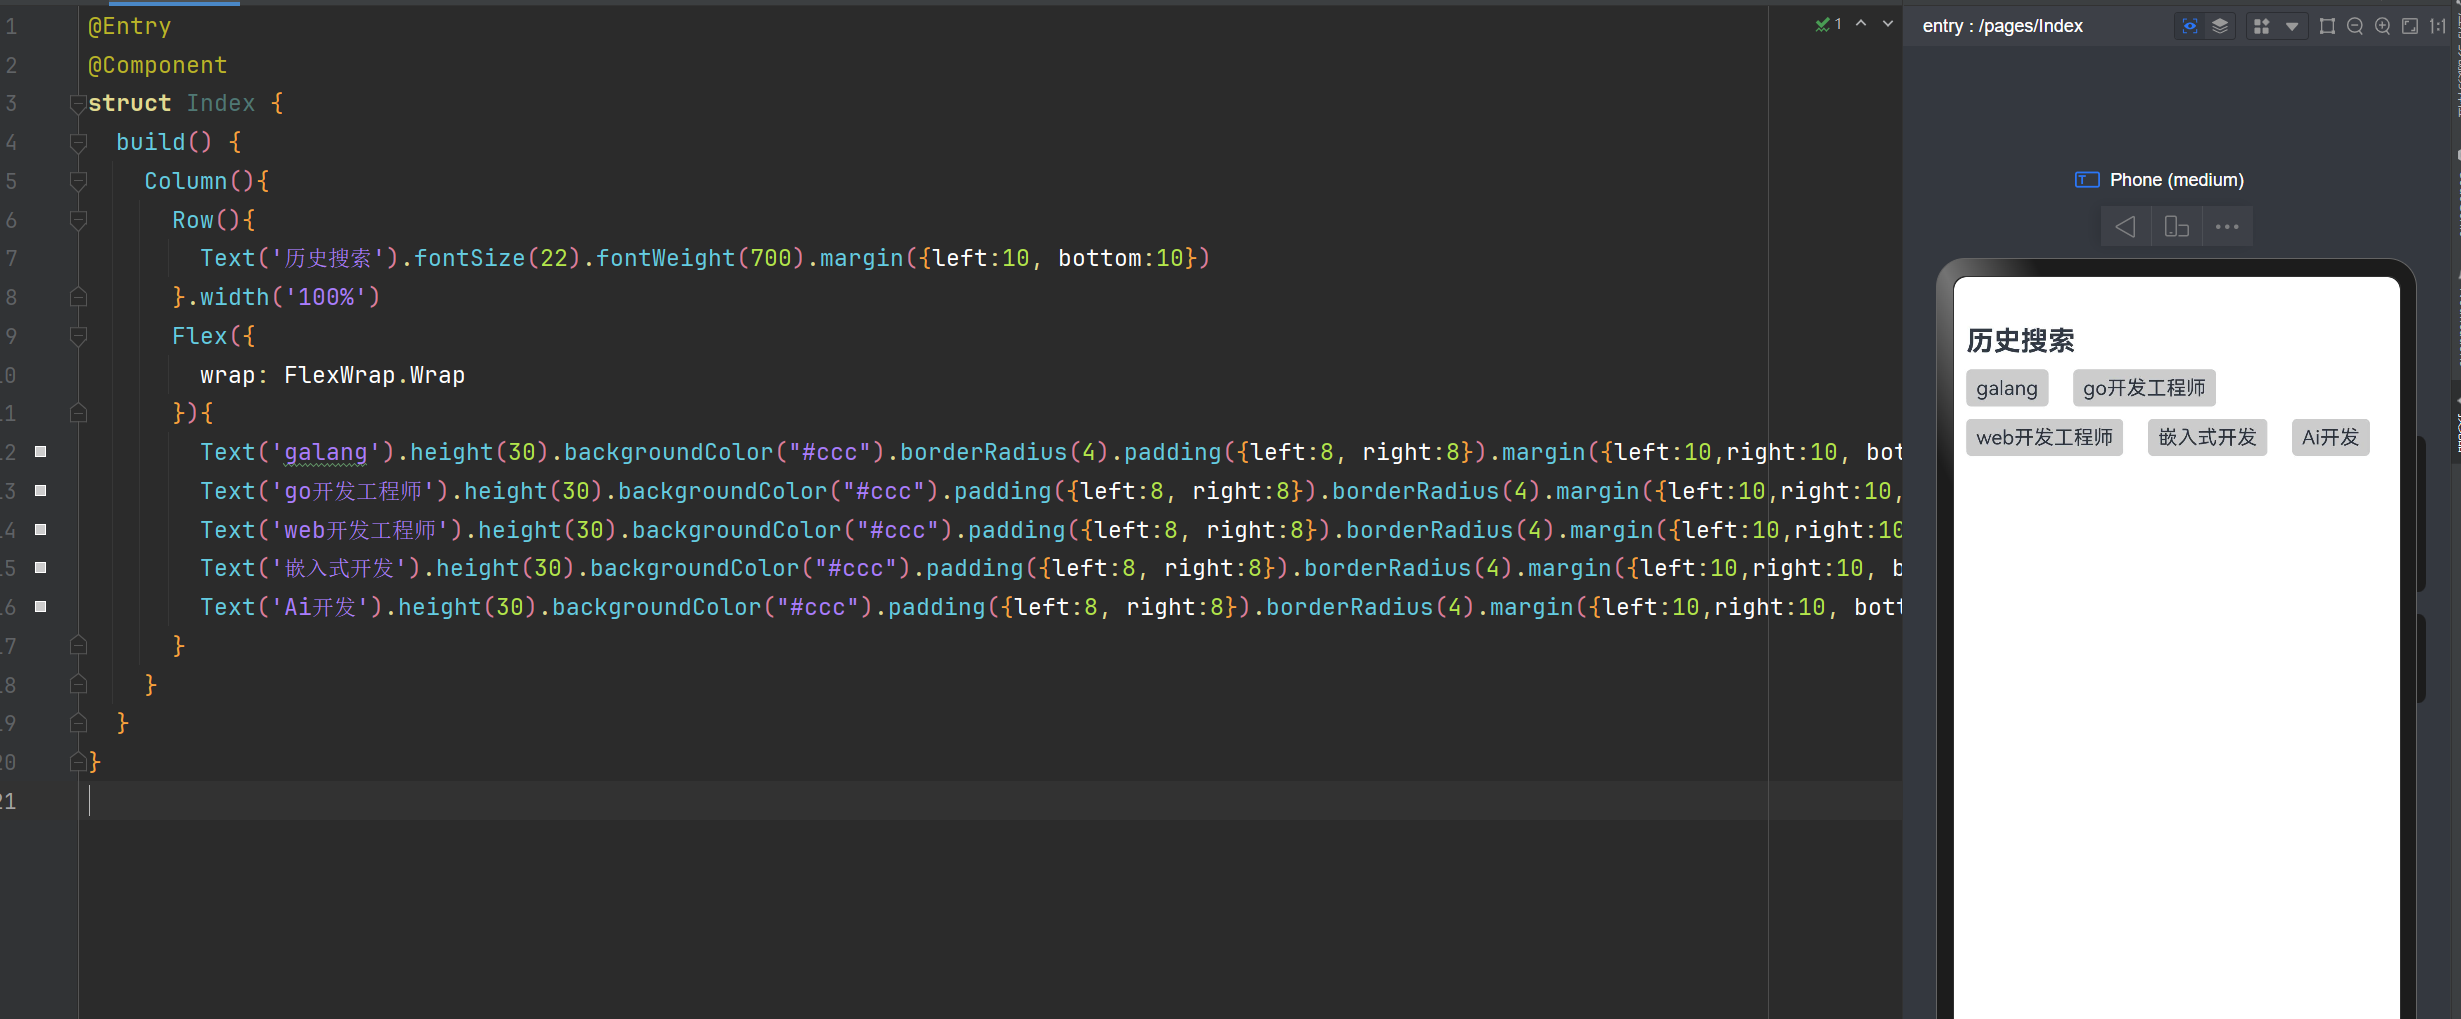
实现XX直聘搜索历史记录
@Entry

@Component

struct Index {

  build() {

    Column(){

      Row(){

        Text('历史搜索').fontSize(22).fontWeight(700).margin({left:10, bottom:10})

      }.width('100%')

      Flex({

        wrap: FlexWrap.Wrap

      }){

        Text('galang').height(30).backgroundColor("#ccc").borderRadius(4).padding({left:8, right:8}).margin({left:10,right:10, bottom:10})

        Text('go开发工程师').height(30).backgroundColor("#ccc").padding({left:8, right:8}).borderRadius(4).margin({left:10,right:10, bottom:10})

        Text('web开发工程师').height(30).backgroundColor("#ccc").padding({left:8, right:8}).borderRadius(4).margin({left:10,right:10, bottom:10})

        Text('嵌入式开发').height(30).backgroundColor("#ccc").padding({left:8, right:8}).borderRadius(4).margin({left:10,right:10, bottom:10})

        Text('Ai开发').height(30).backgroundColor("#ccc").padding({left:8, right:8}).borderRadius(4).margin({left:10,right:10, bottom:10})

      }

    }

  }

}
绝对定位
绝对定位后的组件不再占用自身原有位置,可以实现层叠效果,原本的位置就不进行占用了。
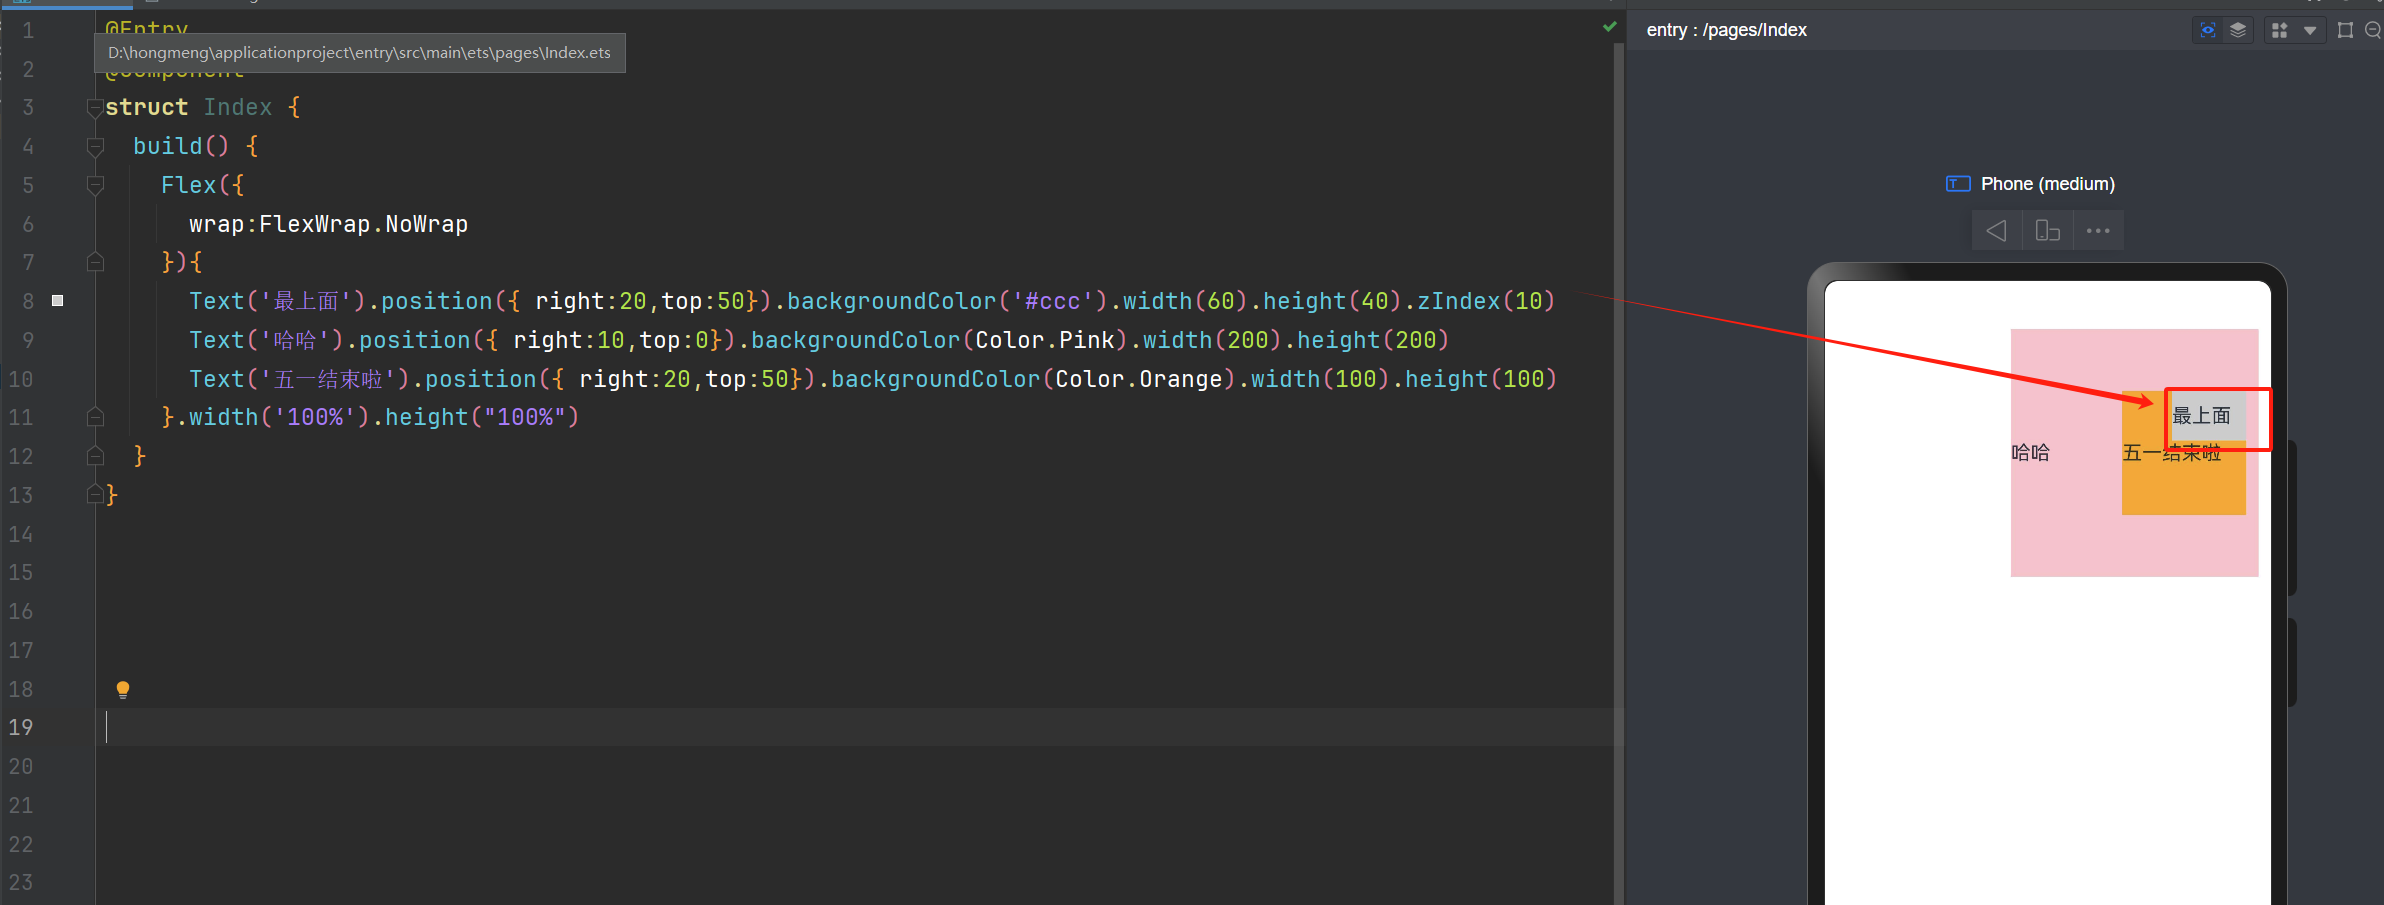
默认情况下,绝对定位的堆叠层级与组件的加载顺序有关,在最后的组件往往在最上面。
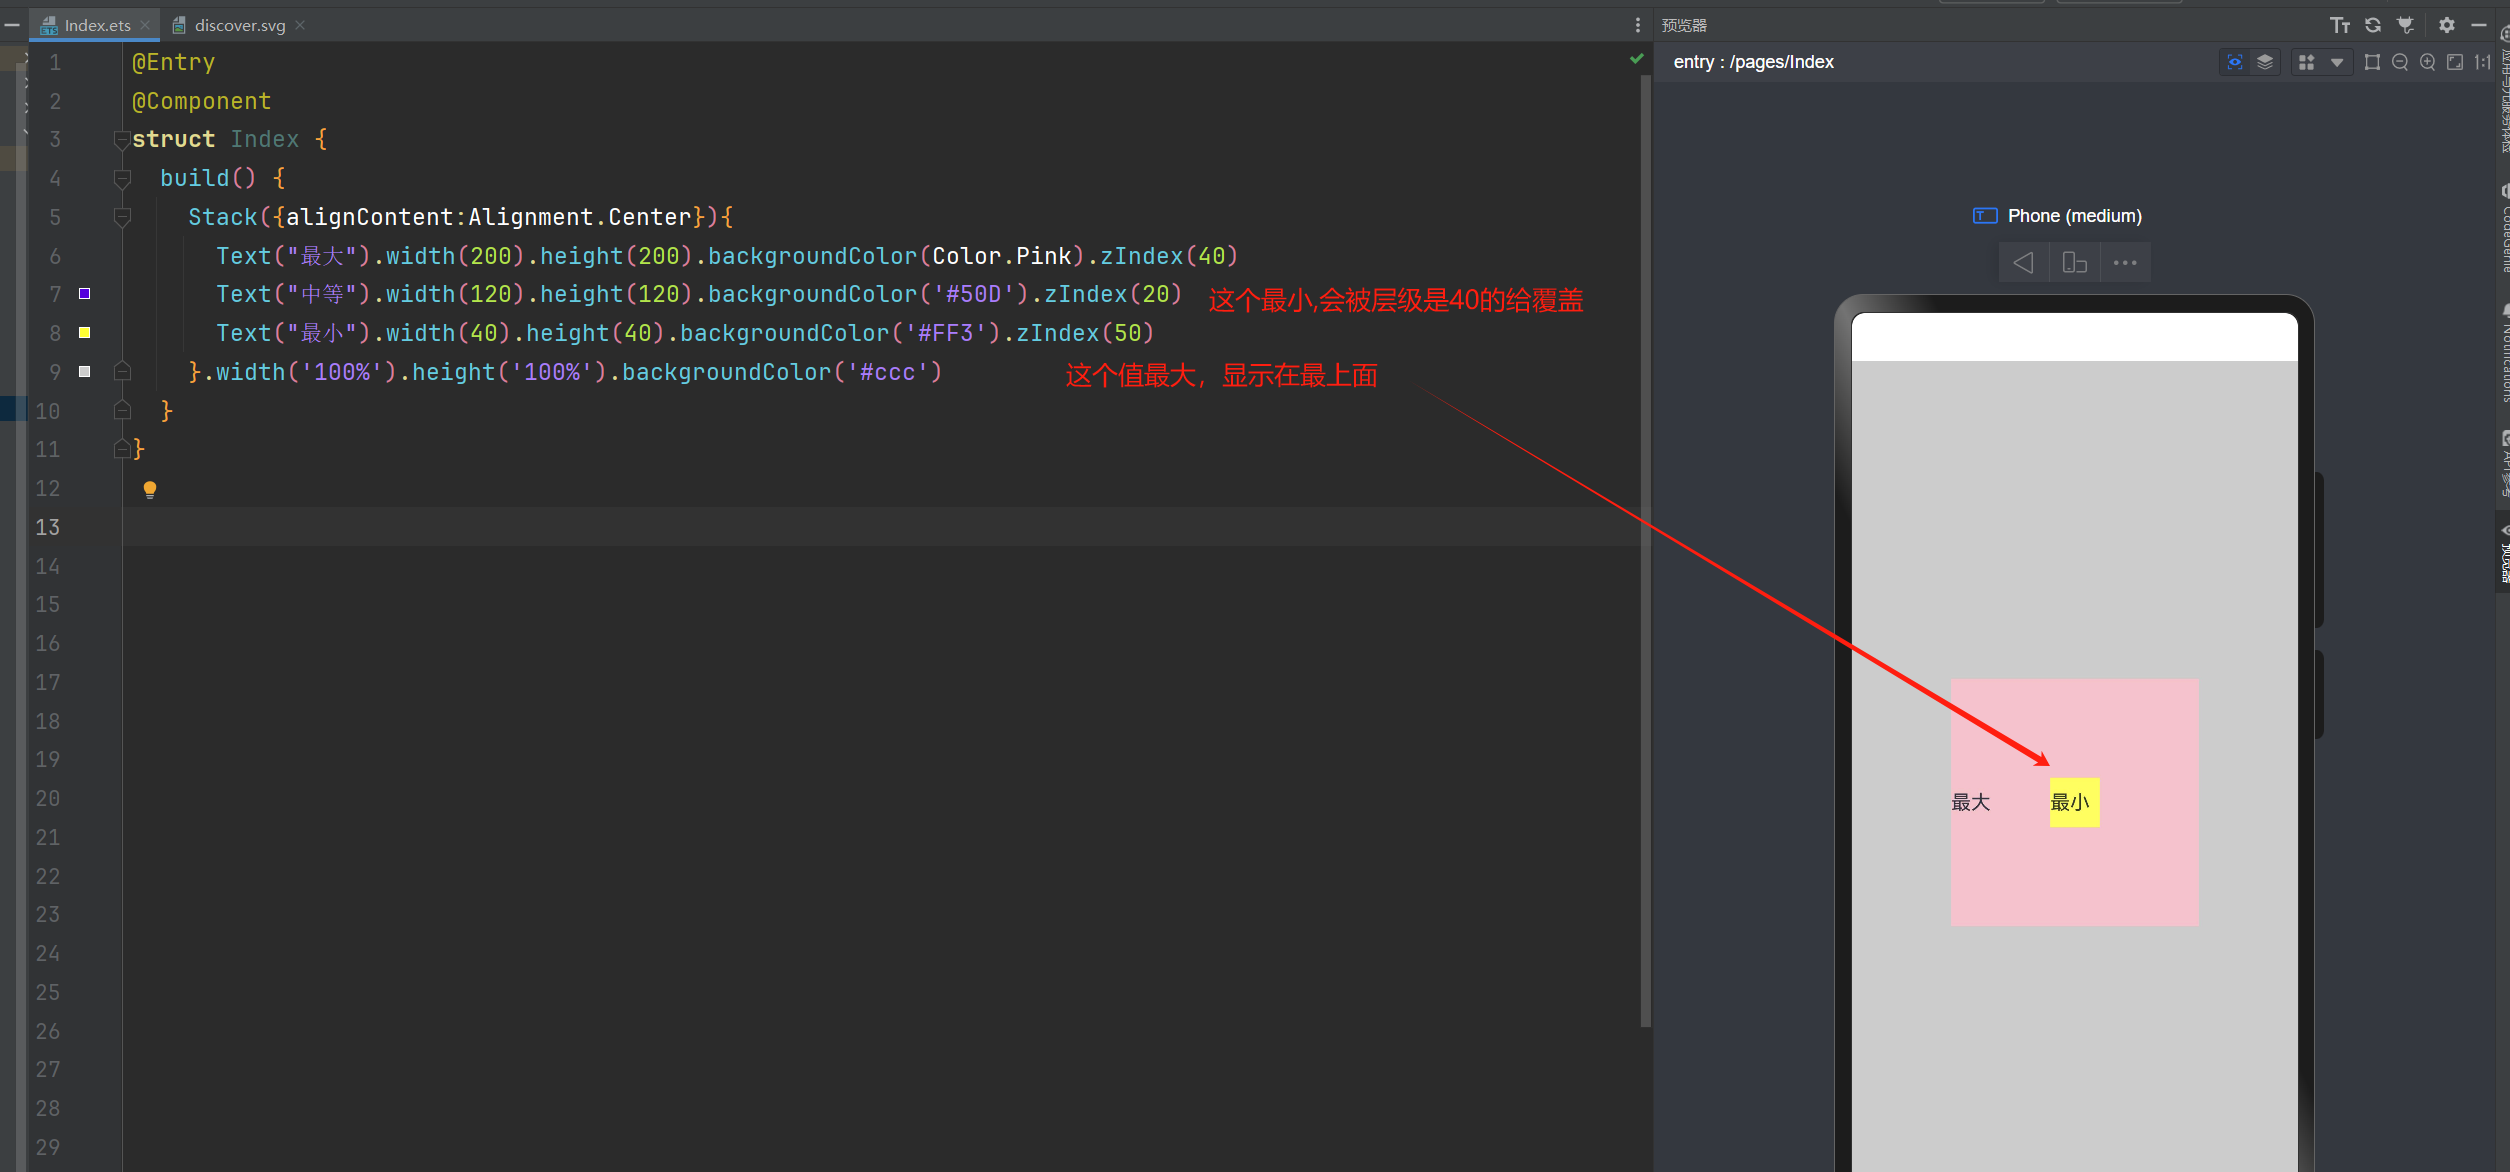
如果使用了ZIndex,就与ZIndex的值大小有关,谁值越大,谁就在最上面。
语法:组件.position({x:数值,y:数值}) 或者 组件.position({right:数值,top:数值})
你也可以这样写:Text('使用定位').position({ right:10,top:0}).backgroundColor(Color.Pink)
@Entry

@Component

struct Index {

  build() {

    Flex({

      wrap:FlexWrap.NoWrap

    }){

      Text('我使用了绝对定位').position({ right:10,top:0}).backgroundColor(Color.Pink)

    }.width('100%').height("100%")

  }

}


ZIndex的使用
@Entry

@Component

struct Index {

  build() {

    Flex({

      wrap:FlexWrap.NoWrap

    }){

      Text('最上面').position({ right:20,top:50}).backgroundColor('#ccc').width(60).height(40).zIndex(10)

      Text('哈哈').position({ right:10,top:0}).backgroundColor(Color.Pink).width(200).height(200)

      Text('五一结束啦').position({ right:20,top:50}).backgroundColor(Color.Orange).width(100).height(100)

    }.width('100%').height("100%")

  }

}
层叠布局
层叠布局:堆叠容器,子组件按照顺序依次入栈,后一个子组件覆盖前一个子组件。
层叠布局具有较强的组件层叠能力。
场景:卡片层叠效果等,如购物车等
特点:层叠操作更简洁,编码效率高。(绝对定位的优势是更灵活)
我们可以通过alignContent来控制显示的位置
语法:Stack({alignContent:Alignment.Start}){ })
alignContent的属性值通过有下面这9个属性值
| 值 | 说明 |
|---|---|
| Alignment.TopStart | 子组件对齐到容器的左上角(Top-Left) |
| Alignment.Top | 子组件水平居中,并紧贴容器的顶部 |
| Alignment.TopEnd | 子组件对齐到容器的右上角(Top-Right) |
| Alignment.Start | 子组件垂直居中,并紧贴容器的左侧(Left) |
| Alignment.Center | 子组件在容器的中心位置(水平和垂直居中) |
| Alignment.End | 子组件垂直居中,并紧贴容器的右侧(Right) |
| Alignment.BottomStart | 子组件对齐到容器的左下角(Bottom-Left) |
| Alignment.Bottom | 子组件水平居中,并紧贴容器的底部 |
| Alignment.BottomEnd | 子组件对齐到容器的右下角(Bottom-Right) |
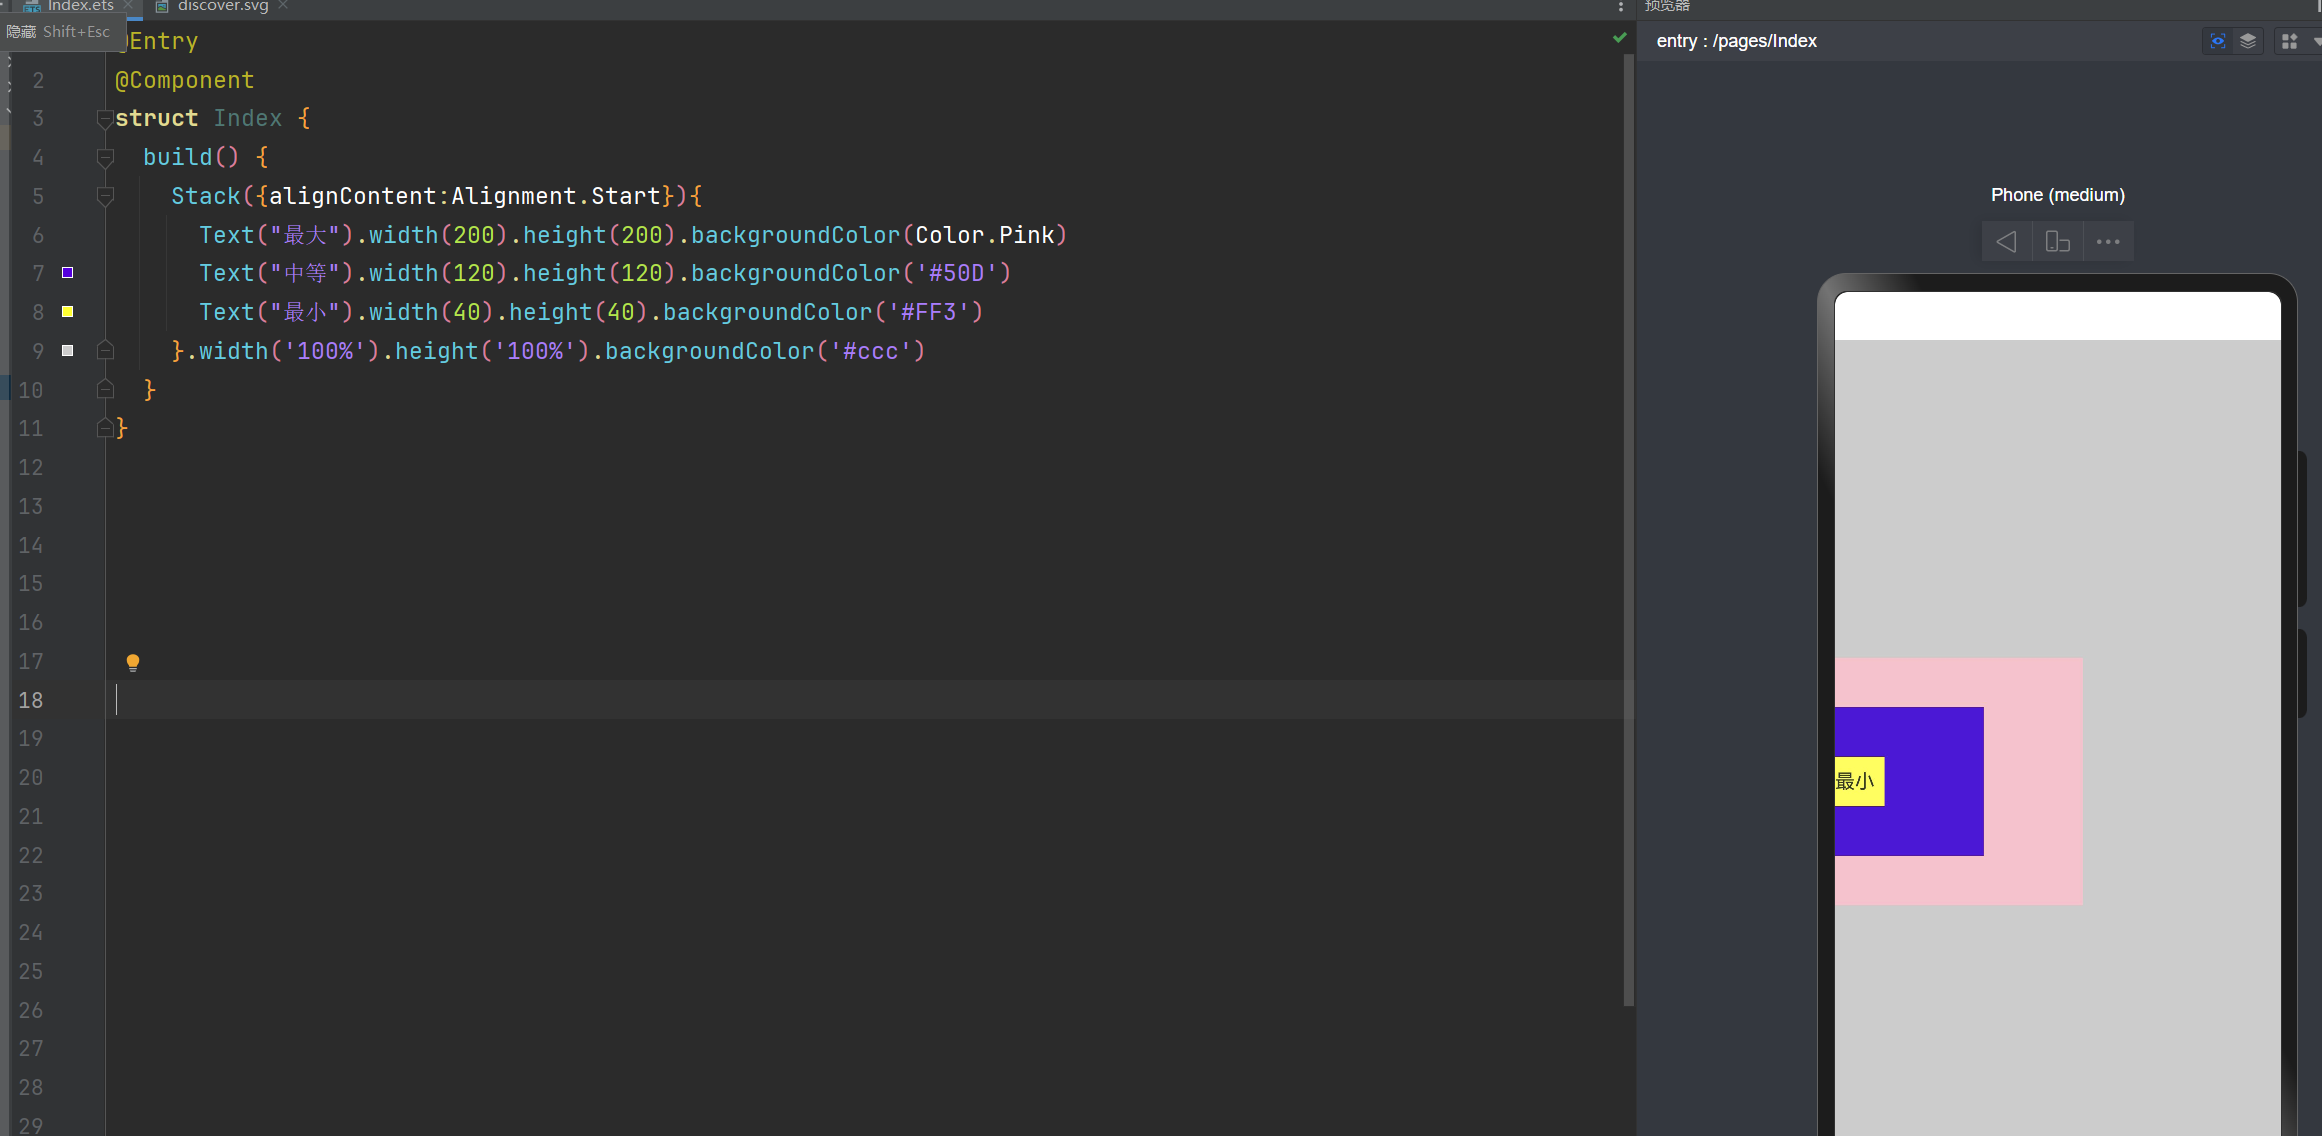
层叠布局: alignContent:Alignment.Start 子组件垂直居中,并紧贴容器的左侧
@Entry

@Component

struct Index {

  build() {

    Stack({alignContent:Alignment.Start}){

      Text("最大").width(200).height(200).backgroundColor(Color.Pink)

      Text("中等").width(120).height(120).backgroundColor('#50D')

      Text("最小").width(40).height(40).backgroundColor('#FF3')

    }.width('100%').height('100%').backgroundColor('#ccc')

  }

}
层叠布局: alignContent:Alignment.TopEnd 右上角
@Entry

@Component

struct Index {

  build() {

    Stack({alignContent:Alignment.TopEnd}){

      Text("最大").width(200).height(200).backgroundColor(Color.Pink)

      Text("中等").width(120).height(120).backgroundColor('#50D')

      Text("最小").width(40).height(40).backgroundColor('#FF3')

    }.width('100%').height('100%').backgroundColor('#ccc')

  }

}

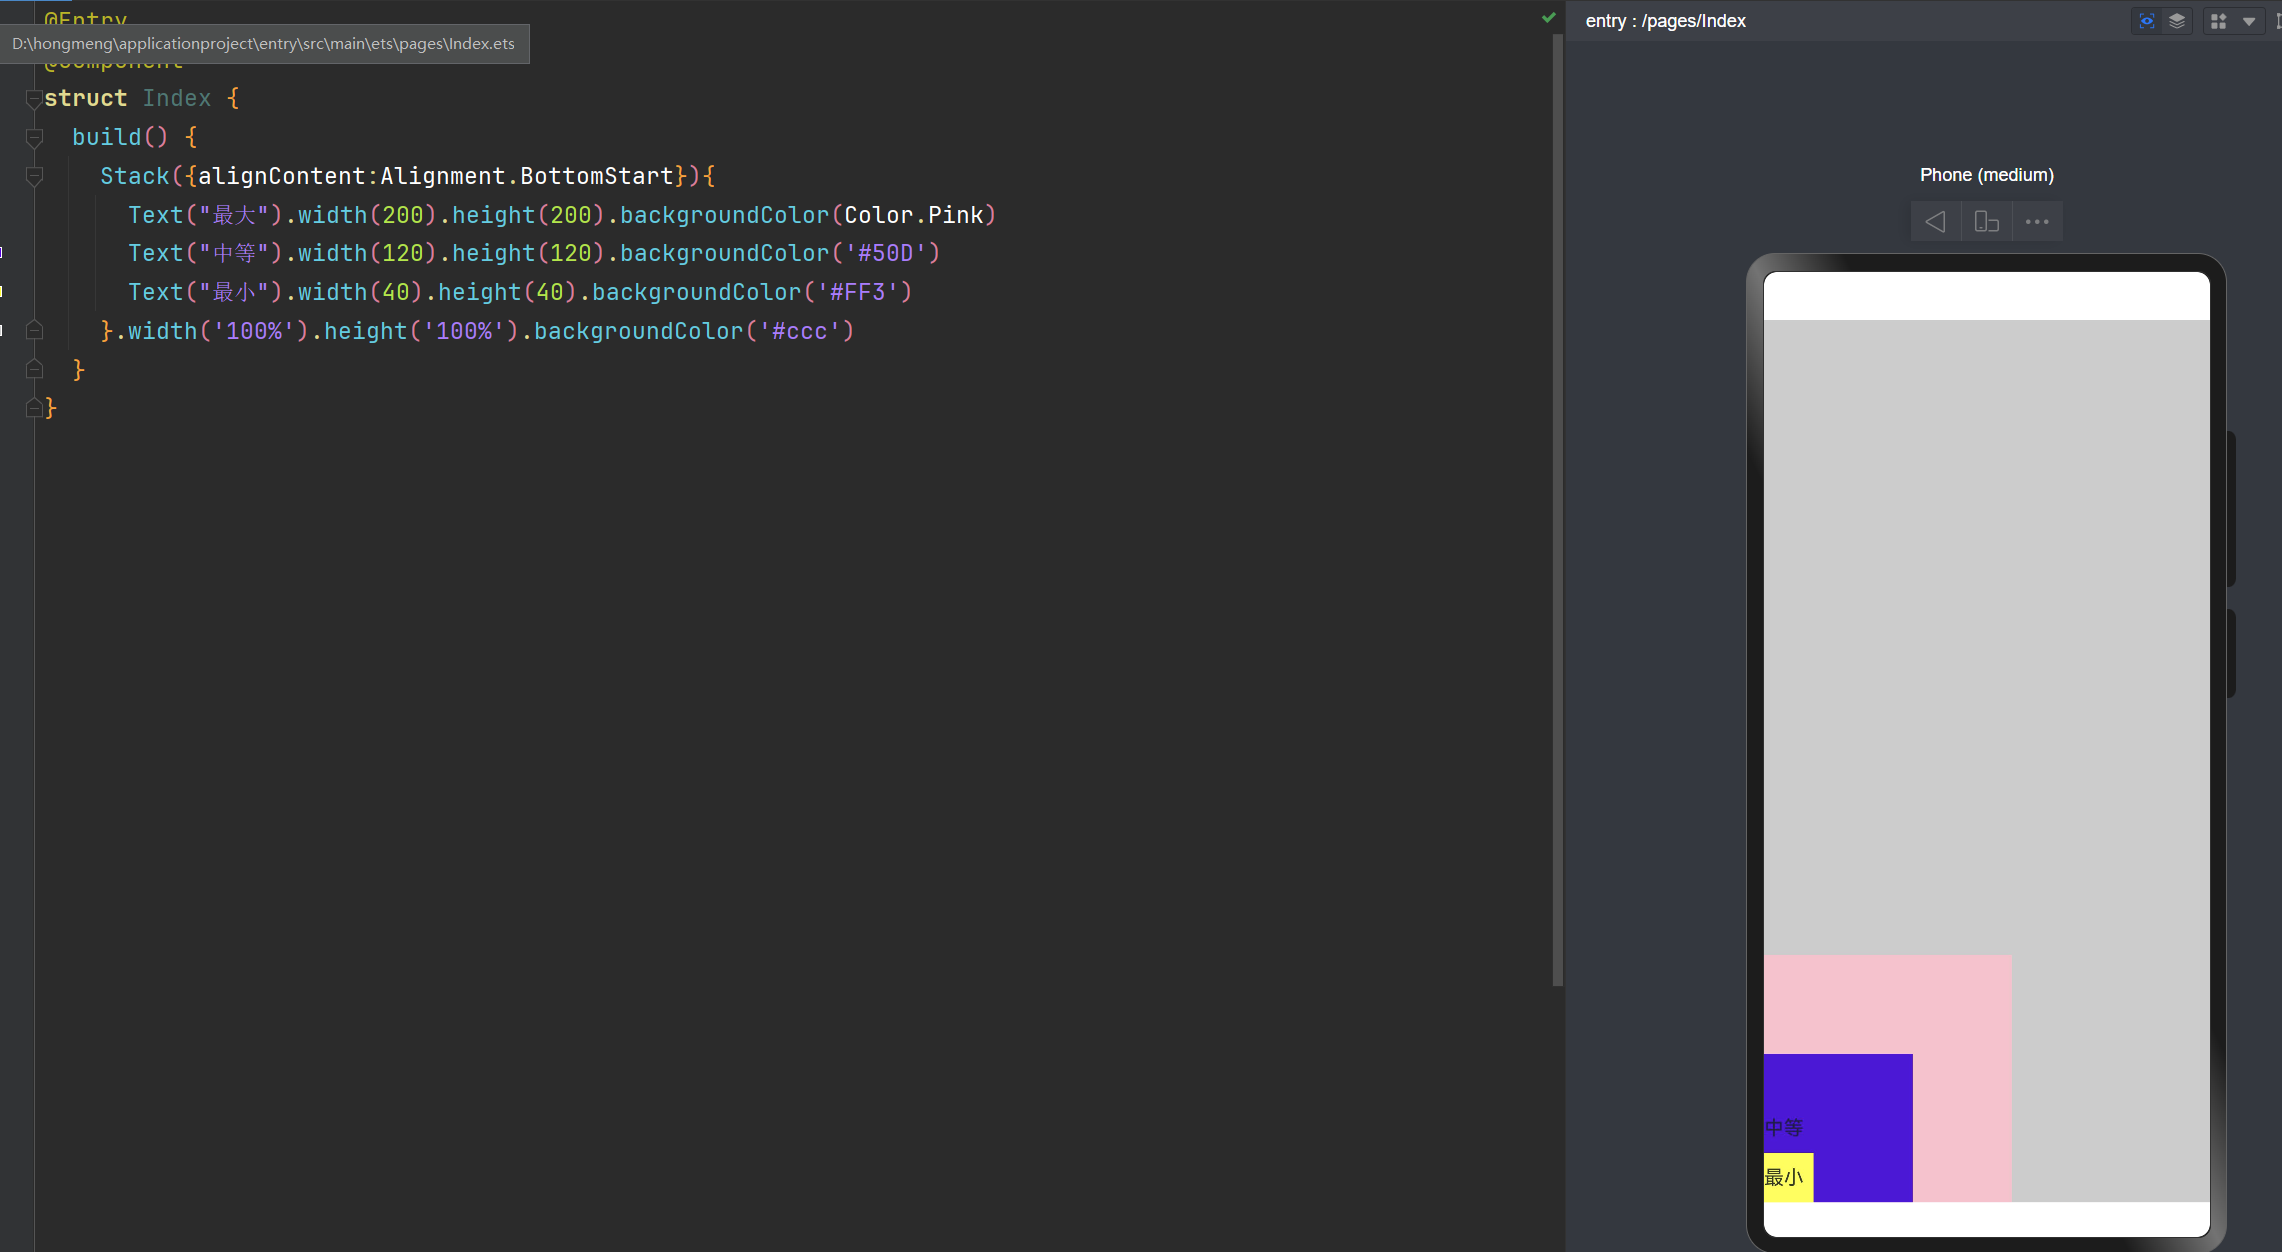
层叠布局: alignContent:Alignment.BottomStart 左边底部
@Entry

@Component

struct Index {

  build() {

    Stack({alignContent:Alignment.BottomStart}){

      Text("最大").width(200).height(200).backgroundColor(Color.Pink)

      Text("中等").width(120).height(120).backgroundColor('#50D')

      Text("最小").width(40).height(40).backgroundColor('#FF3')

    }.width('100%').height('100%').backgroundColor('#ccc')

  }

}
通过ZIndex来控制层级关系
@Entry

@Component

struct Index {

  build() {

    Stack({alignContent:Alignment.Center}){

      Text("最大").width(200).height(200).backgroundColor(Color.Pink).zIndex(40)

      Text("中等").width(120).height(120).backgroundColor('#50D').zIndex(20)

      Text("最小").width(40).height(40).backgroundColor('#FF3').zIndex(50)

    }.width('100%').height('100%').backgroundColor('#ccc')

  }

}
层叠布局和绝对定位的区别
层叠布局(Stack):通过对齐属性快速实现组件堆叠,适合简单叠加场景。
绝对定位:通过精确坐标自由控制位置,适合复杂或动态布局需求。
也就是说:绝对定位更加控制位置更加的自由。
能够使用层叠布局实现的,一定可以使用绝对定位来实现。
在我们实现需求时,优先使用:层叠布局,如果不好实现的话,在考虑绝对定位
Flex布局,绝对定位,层叠布局Stack的详细讲解的更多相关文章
- Flutter 布局类组件:层叠布局(Stack和Positioned)
前言 层叠布局,即子组件可以根据距父容器四个角的位置来确定自身的位置.绝对定位运行子组件堆叠起来,即按照代码中声明的顺序. Flutter中使用Stack和Positioned这两个组件来配合实现绝对 ...
- css-前端实现左中右三栏布局的常用方法:绝对定位,圣杯,双飞翼,flex,table-cell,网格布局等
1.前言 作为一个前端开发人员,工作学习中经常会遇到快速构建网页布局的情况,这篇我整理了一下我知道的一些方法.我也是第一次总结,包括圣杯布局,双飞翼布局,table-cell布局都是第一次听说,可能会 ...
- Flutter 布局(八)- Stack、IndexedStack、GridView详解
本文主要介绍Flutter布局中的Stack.IndexedStack.GridView控件,详细介绍了其布局行为以及使用场景,并对源码进行了分析. 1. Stack A widget that po ...
- CSS3 Flex布局(伸缩布局盒模型)学习
CSS3 Flex布局(伸缩布局盒模型)学习 转自:http://www.xifengxx.com/web-front-end/1408.html CSS2定义了四种布局:块布局.行内布局.表格布局盒 ...
- 技术胖Flutter第三季-16Stack层叠布局
16Stack层叠布局 在上面声明一个变量Stack里面包含两个元素,第一个 是CircleAvater第二个子对象是Container 效果 把文字房子啊中下的位置: 我们需要对齐属性 包含了x轴和 ...
- 技术胖Flutter第三季-17布局PositionedWidget层叠定位组件
博客地址: https://jspang.com/post/flutter3.html#toc-d7a 把我们上节的 Container的部分代码去掉. 使用:Positioned 有点像css里面的 ...
- CSS的flex布局和Grid布局
一.什么是 flex 布局 2009年,W3C 提出了一种新的方案----Flex 布局,可以简便.完整.响应式地实现各种页面布局.目前,它已经得到了所有浏览器的支持,这意味着,现在就能很安全地使用这 ...
- CSS3总结五:弹性盒子(flex)、弹性盒子布局
弹性盒子容器的属性与应用 display:flex/inline-flex flex-direction flex-wrap justify-content align-items align-con ...
- 前端(八)—— 高级布局:文档流、浮动布局、流式布局、定位布局、flex布局、响应布局
高级布局:文档流.浮动布局.流式布局.定位布局.flex布局.响应布局 一.文档流 1.什么是文档流 将窗体自上而下分成一行一行,块级元素从上至下.行内元素在每行中从左至右的顺序依次排放元素 2.本质 ...
- Flex布局【弹性布局】学习
先让我们看看在原来的学习中遇到的问题 之前在软件工程的大作业中,自己从零开始学习如何开发一个网站,从页面,到后台,当然数据库是大二的必修课 在学习如何编写一个静态页面的时候,完全是自学,自己摸索,所以 ...
随机推荐
- IDEA 使用GIt提交代码时,如果不小心提交了不需要提交的内容,在本地仓库中,此时需要回滚版本,如何回滚
选择上次提交的提交记录 选择上次提交的提交记录复制版本号 选中项目的Git重置器 填入刚复制的回滚版本号-点击Reset 这样一来就回滚回去了,本地提交就没了
- 一文速通Python并行计算:02 Python多线程编程-threading模块、线程的创建和查询与守护线程
一文速通 Python 并行计算:02 Python 多线程编程-threading 模块.线程的创建和查询与守护线程 摘要: 本文介绍了 Python threading 模块的核心功能,包括线程创 ...
- NSIS打包脚本模板
; Script generated by the HM NIS Edit Script Wizard. ; HM NIS Edit Wizard helper defines !define PRO ...
- 阅读IDEA生成的equals方法--java进阶day05
1.IDEA生成的equals方法 虽然我们之前写了equals方法,但IDEA中可以快速生成equals方法,因此,我们要能看懂IDEA生成的equals方法 1.if(this==o) 2.if( ...
- 【Python】批量导出word文档中的图片、嵌入式文件
Python 批量导出word文档中的图片.嵌入式文件 需求 学生试卷中的题目有要提交截图的,也有要提交文件的,为了方便学生考试,允许单独交或者嵌入Word中提交,那么事后如何整理学生的答案?单独提交 ...
- Windows Terminal 添加 git-bash
配置文件中 profiles 节点补充配置 { "guid": "{b453ae62-4e3d-5e58-b989-0a998ec441b7}", " ...
- python的typer写cli脚本如此简单
# typer_demo.py import typer from pathlib import Path from typing import Optional from typing_extens ...
- python tkinker答题工具简易实现
分享一个简单的python tkinker实现的答题工具,效果参见https://www.bilibili.com/video/BV13e4y1E71d/ 点击查看代码 import tkinter ...
- 关于class类的知识点记录
下方代码,初始化test的一系列参数和对应的值 class SendMsg(object): def __init__(test): test.name = {'Adele baby','beckha ...
- fiddler的自动响应器
1.点击autoresponder,勾选enable rules和unmatched requests passthrough 2.替换步骤 (1)把要替换的会话拉取到空白处,或者选中要替换的内容点击 ...
