将Mybatis引入Spring Boot项目连接数据库操作
将Mybatis引入Spring Boot项目连接数据库操作
一,首先,在pom.xml引入Mybatis插件
加入Maven依赖代码即可快速引入Mybatis 2.0.0:
<!--Mybatis-->

<dependency>

    <groupId>org.mybatis.spring.boot</groupId>

    <artifactId>mybatis-spring-boot-starter</artifactId>

    <version>2.0.0</version>

</dependency>

<!--MySQL-->

<dependency>

    <groupId>mysql</groupId>

    <artifactId>mysql-connector-java</artifactId>

</dependency>
上面代码将mybatis 2.0.0和mysql连接插件引入项目,保存,等待插件加载完。
二,在配置文件中加入连接配置信息
打开application.properties编辑,加入连接配置信息:
#mybatis链接数据库相关配置

spring.datasource.url=jdbc:mysql://192.168.10.223:3306/db_demo?serverTimezone=UTC&useUnicode=true&characterEncoding=utf-8&useSSL=true

spring.datasource.username=root

spring.datasource.password=Kings0ft_01

spring.datasource.driver-class-name=com.mysql.cj.jdbc.Driver
以上信息用于连接mysql数据库。
三,在项目启动程序中加入mapper注解
打开项目的Xxhdemo1Application,加入注解。
package xxh.springbootmvc.xxhdemo1;

import org.mybatis.spring.annotation.MapperScan;

import org.springframework.boot.SpringApplication;

import org.springframework.boot.autoconfigure.SpringBootApplication;

@SpringBootApplication

/*Spring Boot 会自动加载 spring.datasource.* 相关配置,数据源就会自动注入到 sqlSessionFactory 中,

sqlSessionFactory 会自动注入到 Mapper 中*/

@MapperScan("xxh.springbootmvc.xxhdemo1.MybatisDemo.mapper")

public class Xxhdemo1Application {

    public static void main(String[] args) {

        SpringApplication.run(Xxhdemo1Application.class, args);

    }

}
注意,加入@MapperScan注解后,Spring Boot 会自动加载 spring.datasource.* 相关配置,数据源就会自动注入到 sqlSessionFactory 中,sqlSessionFactory 会自动注入到 Mapper 中。
四,按上面Mapper 路径创建自己建Package,然后在里面创建自己的Mapper 和Model。
创建Model示例 D:\javaWorkspace\IdeaProjects\xxhdemo1\src\main\java\xxh\springbootmvc\xxhdemo1\MybatisDemo\mapper\UserEntity.java:
package xxh.springbootmvc.xxhdemo1.MybatisDemo.mapper;

import java.util.Date;

public class UserEntity {

    public int getId() {

        return id;

    }

    public void setId(int id) {

        this.id = id;

    }

    public String getName() {

        return Name;

    }

    public void setName(String name) {

        Name = name;

    }

    public String getDesc() {

        return Desc;

    }

    public void setDesc(String desc) {

        Desc = desc;

    }

    public Date getCreateTime() {

        return CreateTime;

    }

    public void setCreateTime(Date createTime) {

        CreateTime = createTime;

    }

    public UserEntity(int id, String name, String desc, Date createTime) {

        this.id = id;

        Name = name;

        Desc = desc;

        CreateTime = createTime;

    }

    @Override

    public String toString() {

        return "UserEntity{" +

                "id=" + id +

                ", Name='" + Name + '\'' +

                ", Desc='" + Desc + '\'' +

                ", CreateTime=" + CreateTime +

                '}';

    }

    private int id;

    private String Name;

    private String Desc;

    private Date CreateTime;

}
创建Mapper示例 D:\javaWorkspace\IdeaProjects\xxhdemo1\src\main\java\xxh\springbootmvc\xxhdemo1\MybatisDemo\mapper\UserMapper.java
package xxh.springbootmvc.xxhdemo1.MybatisDemo.mapper;

import org.apache.ibatis.annotations.*;

import java.util.List;

/*注意Mapper的类型是“接口”*/

public interface UserMapper {

    /*查询操作示例*/

    @Select("SELECT * FROM t_user;")

    @Results({

            @Result(property = "id",  column = "Id"),

            @Result(property = "Name", column = "Name"),

            @Result(property = "Desc", column = "Desc"),

            @Result(property = "CreateTime", column = "CreateTime")

    })

    List<UserEntity> getAll();

    /*查询操作示例*/

    @Select("SELECT * FROM t_user WHERE Id = #{id};")

    @Results({

            @Result(property = "id",  column = "Id"),

            @Result(property = "Name", column = "Name"),

            @Result(property = "Desc", column = "Desc"),

            @Result(property = "CreateTime", column = "CreateTime")

    })

    UserEntity getEntity(int id);

    /*插入操作示例*/

    @Insert("INSERT INTO t_user(`Name`,`Desc`,CreateTime) VALUES(#{Name}, #{Desc}, #{CreateTime});")

    @Options(useGeneratedKeys=true, keyProperty="id", keyColumn="Id") /*将自增ID绑定到实体,keyProperty是实体字段,keyColumn是数据库字段*/

    int insert(UserEntity user);

    /*修改操作示例*/

    @Update("UPDATE t_user SET `Name`=#{Name},`Desc`=#{Desc} WHERE Id =#{id};")

    int update(UserEntity user);

    /*删除操作示例*/

    @Delete("DELETE FROM t_user WHERE Id =#{id};")

    int delete(int id);

}
五,创建Controller,写接口或页面调用操作数据库方法
测试demo只需要放回数据即可,不写页面了。所以引入@RestController,@RequestMapping注解。然后必须在控制器域代码里声明Mapper类型,访问类型一般是私有的:
/*在控制器域代码声明Mapper类型*/

private UserMapper UserMapper;
然后再控制器里面写各种调用Mapper操作数据库方法,调用正删查改完整示例:
package xxh.springbootmvc.xxhdemo1.MybatisDemo;

import org.springframework.beans.factory.annotation.Autowired;

import org.springframework.boot.autoconfigure.EnableAutoConfiguration;

import org.springframework.web.bind.annotation.RequestMapping;

import org.springframework.web.bind.annotation.RestController;

import xxh.springbootmvc.xxhdemo1.MybatisDemo.mapper.UserEntity;

import xxh.springbootmvc.xxhdemo1.MybatisDemo.mapper.UserMapper;

import java.util.List;

import java.util.Date;

@RestController

@EnableAutoConfiguration

@RequestMapping("/v1/mybatisdemo")

public class mysqlTestController {

    /*在控制器域代码声明Mapper类型*/

    @Autowired

    private UserMapper UserMapper;

    @RequestMapping("add")

    public int testInsert() throws Exception {

        int id, num = 0;

        UserEntity u = new UserEntity(0, "刘备", "大哥", new Date());

        num = UserMapper.insert(u);

        id = u.getId();

        System.out.println("新增数据完成 id=" + id + ",num=" + num);

        return num;

    }

    @RequestMapping("get")

    public UserEntity testQueryOne(int id) throws Exception {

        UserEntity UserEntity = UserMapper.getEntity(id);

        System.out.println(UserEntity.toString());

        return UserEntity;

    }

    @RequestMapping("getlist")

    public List<UserEntity> testQuery() throws Exception {

        List<UserEntity> UserEntitys = UserMapper.getAll();

        System.out.println(UserEntitys.toString());

        return UserEntitys;

    }

    @RequestMapping("edit")

    public int testUpdate(int id, String name, String desc) throws Exception {

        int num = 0;

        UserEntity UserEntity = UserMapper.getEntity(id);

        if (null != UserEntity && UserEntity.getId() > 0) {

            System.out.println(UserEntity.toString());

            UserEntity.setName(name);

            UserEntity.setDesc(desc);

            num = UserMapper.update(UserEntity);

        }

        return num;

    }

    @RequestMapping("del")

    public int testDelete(int id) throws Exception {

        int num = 0;

        if (id > 0) {

            num = UserMapper.delete(id);

        }

        return num;

    }

}
到这里就可以运行项目代码,测试接口了。
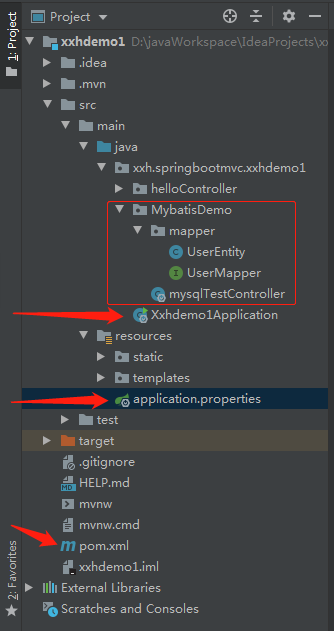
代码结构如图:
六,创建MySQL数据库及表结构
创建MySQL数据库:
CREATE DATABASE IF NOT EXISTS db_demo DEFAULT CHARSET utf8mb4;
创建数据库表结构:
SET FOREIGN_KEY_CHECKS=0;

-- ----------------------------

-- Table structure for t_user

-- ----------------------------

DROP TABLE IF EXISTS `t_user`;

CREATE TABLE `t_user` (

  `Id` int(11) NOT NULL AUTO_INCREMENT,

  `Name` varchar(255) DEFAULT NULL,

  `Desc` varchar(255) DEFAULT NULL,

  `CreateTime` datetime(3) NOT NULL,

  PRIMARY KEY (`Id`)

) ENGINE=InnoDB AUTO_INCREMENT=14 DEFAULT CHARSET=utf8mb4;
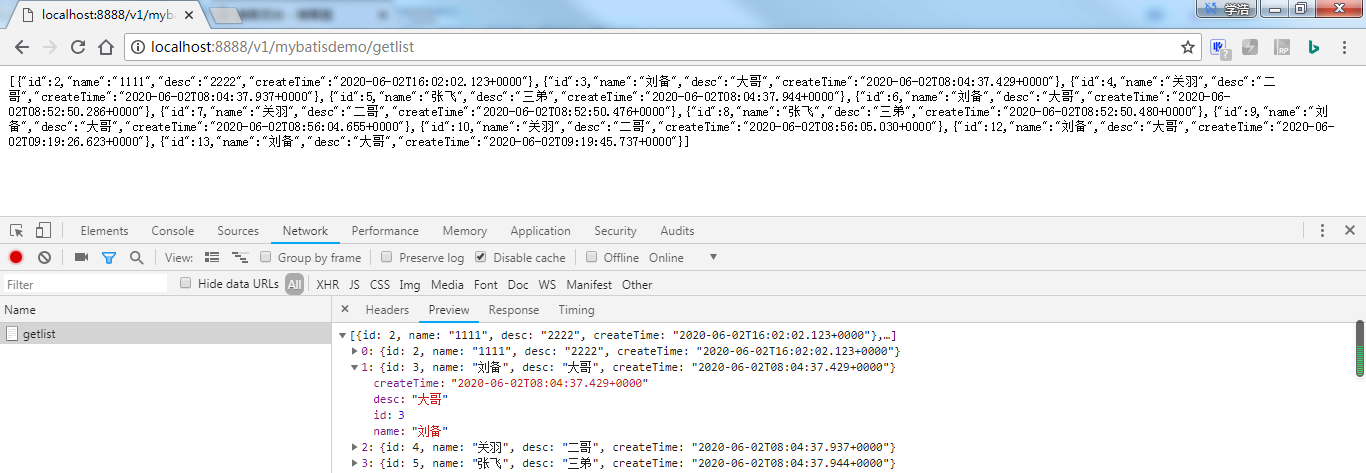
其中,查询数据列表的运行效果,如图:
【完】
上一篇:idea创建一个入门Spring Boot项目(controller层)使用Maven代码管理
下一篇:将Ldap组织结构及用户信息同步到MySQL,用Spring Boot项目操作
将Mybatis引入Spring Boot项目连接数据库操作的更多相关文章
- spring boot 项目连接数据库查询数据过程
spring boot 项目搭建 pom.xml <?xml version="1.0" encoding="UTF-8"?> <projec ...
- 使用IDEA创建Spring boot项目,继承mybaits。并进行简单的数据库查询操作
本文讲的是使用IEDA创建Spring boot项目,对于环境安装需要自行准备,如JDK1.8.Maven 3.3.IDEA编译器.Mysql5.7等需事前准备好. 1.创建Spring boot项目 ...
- Spring Boot 项目学习 (二) MySql + MyBatis 注解 + 分页控件 配置
0 引言 本文主要在Spring Boot 基础项目的基础上,添加 Mysql .MyBatis(注解方式)与 分页控件 的配置,用于协助完成数据库操作. 1 创建数据表 这个过程就暂时省略了. 2 ...
- Spring Boot项目中MyBatis连接DB2和MySQL数据库返回结果中一些字符消失——debug笔记
写这篇记录的原因是因为我之前在Spring Boot项目中通过MyBatis连接DB2返回的结果中存在一些字段, 这些字段的元素中缺少了一些符号,所以我现在通过在自己的电脑上通过MyBatis连接DB ...
- Spring Boot项目指定启动后执行的操作
Spring Boot项目指定启动后执行的操作: (1)实现CommandLineRunner 接口 (2)重写run方法 (3)声明执行顺序@Order(1),数值越小,优先级越高 (4)如果需要注 ...
- spring boot中连接数据库报错500(mybatis)
spring boot中连接数据库报错500(mybatis) pom.xml中的依赖 <!-- 集成mybatis--> <dependency> <groupId&g ...
- spring boot项目启动报DataSource错误
初建一个简单的spring boot 项目,启动后会报错. Exception encountered during context initialization - cancelling refre ...
- step6----->往工程中添加spring boot项目------->修改pom.xml使得我的project是基于spring boot的,而非直接基于spring framework
文章内容概述: spring项目组其实有多个projects,如spring IO platform用于管理external dependencies的版本,通过定义BOM(bill of mater ...
- 用Gradle构建Spring Boot项目
相比起Maven的XML配置方式,Gradle提供了一套简明的DSL用于构建Java项目,使我们就像编写程序一样编写项目构建脚本.本文将从无到有创建一个用Gradle构建的Spring Boot项目, ...
- 使用Docker部署Spring boot项目
Docker是一个使用广泛的Linux容器管理工具包,它允许用户创建镜像,并将其容器实例化.通过本指南,我们可以学习到如何使用Docker部署Spring Boot项目. 先决条件 开发之前,你必须具 ...
随机推荐
- 鸿蒙NEXT开发案例:抛硬币
[1]引言(完整代码在最后面) 本项目旨在实现一个简单的"抛硬币"功能,用户可以通过点击屏幕上的地鼠图标来模拟抛硬币的过程.应用会记录并显示硬币正面(地鼠面)和反面(数字100面) ...
- GetUrlParam:获取Url参数,返回一个对象
function GetUrlParam(){ let url = document.location.toString(); let arrObj = url.split("?" ...
- 李继刚Lisp提示词灵感之源:压缩推动进步
前面在文章< 访谈李继刚:从哲学层面与大模型对话 >中提到,继刚总结去年写提示词的核心理念是"清晰表达",而今年则是"压缩表达",既而才有火爆全网的 ...
- CommonsCollections1(基于ysoserial)
准备环境 JDK1.7(7u80).commons-collections(3.x 4.x均可这里使用3.2版本) JDK:https://repo.huaweicloud.com/java/jdk/ ...
- 连接数据库报错的异常可以用mysqli_report来捕获
有时候数据库密码改了或者数据库删了,就会有一个mysqli的链接报错,是因为直接使用了类似代码 $connection = new mysqli('127.0.0.1', 'test_user', ' ...
- 简单几步,基于云主机快速为Web项目添加AI助手
在华为开发者空间,借助华为云对话机器人服务 CBS您可以零代码创建一个大模型 RAG (Retrieval-Augmented Generation,即检索增强生成)应用,来实现 AI 助手的智能问答 ...
- Netty+Spring Boot 加持,解锁高性能 Web 应用
MiniTomcat(https://github.com/daichangya/MiniTomcat) 这个项目是一个基于Netty的Java Web服务器,它提供了从简单HTTP服务器到集成Spr ...
- antlr的使用
我从以下几个问题入手介绍ANTLR的相关知识. 1 ANTLR是什么? ANTLR, ANother Tool for Language Recognition, 是一个可以接受含有语法描述的语言描述 ...
- 成为Java GC专家系列(3) — 如何优化Java垃圾回收机制
本文是成为Java GC专家系列文章的第三篇.在第一篇<成为JavaGC专家Part I - 深入浅出Java垃圾回收机制>中我们学习了不同GC算法的执行过程,GC是如何工作的,什么是新生 ...
- 2023-05 多校联合训练 ZJNU站 正式赛
Scarlett的三元组 有一个长度为 \(n\) 的序列 \(a_1,a_2,\cdots,a_n\),试问有多少个三元组 \((a_i,a_j,a_k)\) 满足: \(1 \le i \lt j ...