SpringBoot整合Netty+WebSocket
SpringBoot整合Netty+WebSocket
构建环境
pom.xml
<?xml version="1.0" encoding="UTF-8"?>
<project xmlns="http://maven.apache.org/POM/4.0.0" xmlns:xsi="http://www.w3.org/2001/XMLSchema-instance"
xsi:schemaLocation="http://maven.apache.org/POM/4.0.0 https://maven.apache.org/xsd/maven-4.0.0.xsd">
<modelVersion>4.0.0</modelVersion>
<parent>
<groupId>org.springframework.boot</groupId>
<artifactId>spring-boot-starter-parent</artifactId>
<version>2.4.5</version>
<relativePath/> <!-- lookup parent from repository -->
</parent>
<groupId>com.cyz</groupId>
<artifactId>websocket-netty</artifactId>
<version>0.0.1-SNAPSHOT</version>
<name>websocket-netty</name>
<description>Demo project for Spring Boot</description>
<properties>
<java.version>1.8</java.version>
</properties>
<dependencies>
<dependency>
<groupId>org.springframework.boot</groupId>
<artifactId>spring-boot-starter</artifactId>
</dependency>
<dependency>
<groupId>org.springframework.boot</groupId>
<artifactId>spring-boot-starter-web</artifactId>
<version>2.4.2</version>
</dependency>
<!-- 需要依赖-->
<dependency>
<groupId>io.netty</groupId>
<artifactId>netty-all</artifactId>
<version>4.1.63.Final</version>
</dependency>
<dependency>
<groupId>cn.hutool</groupId>
<artifactId>hutool-all</artifactId>
<version>5.6.4</version>
</dependency>
<!-- 需要依赖-->
<dependency>
<groupId>org.springframework.boot</groupId>
<artifactId>spring-boot-starter-thymeleaf</artifactId>
</dependency>
<dependency>
<groupId>org.projectlombok</groupId>
<artifactId>lombok</artifactId>
<optional>true</optional>
</dependency>
<dependency>
<groupId>org.springframework.boot</groupId>
<artifactId>spring-boot-starter-test</artifactId>
<scope>test</scope>
</dependency>
</dependencies>
<build>
<plugins>
<plugin>
<groupId>org.springframework.boot</groupId>
<artifactId>spring-boot-maven-plugin</artifactId>
<configuration>
<excludes>
<exclude>
<groupId>org.projectlombok</groupId>
<artifactId>lombok</artifactId>
</exclude>
</excludes>
</configuration>
</plugin>
</plugins>
</build>
</project>
package com.cyz.websocketnetty.controller;
import org.springframework.web.bind.annotation.GetMapping;
import org.springframework.web.bind.annotation.RequestParam;
import org.springframework.web.bind.annotation.RestController;
@RestController
public class HelloController {
@GetMapping("/hello")
public String sayHello(@RequestParam String name) {
return "hello:" + name;
}
}
实现过程
配置文件
server.port=9090
spring.mvc.view.prefix=/
spring.mvc.view.suffix=.html
NettyConfig
package com.cyz.websocketnetty.config;
import io.netty.channel.Channel;
import io.netty.channel.group.ChannelGroup;
import io.netty.channel.group.DefaultChannelGroup;
import io.netty.util.concurrent.GlobalEventExecutor;
import java.util.concurrent.ConcurrentHashMap;
/**
* @author lian-chen
* 配置类
*/
public class NettyConfig {
/**
* 定义一个channel组,管理所有的channel
* GlobalEventExecutor.INSTANCE 是全局的事件执行器,是一个单例
*/
private static final ChannelGroup CHANNEL_GROUP = new DefaultChannelGroup(GlobalEventExecutor.INSTANCE);
/**
* 存放用户与Chanel的对应信息,用于给指定用户发送消息
*/
private static final ConcurrentHashMap<String, Channel> USER_CHANNEL_MAP = new ConcurrentHashMap<>();
private NettyConfig() {
}
/**
* 获取channel组
*/
public static ChannelGroup getChannelGroup() {
return CHANNEL_GROUP;
}
/**
* 获取用户channel map
*/
public static ConcurrentHashMap<String, Channel> getUserChannelMap() {
return USER_CHANNEL_MAP;
}
}
NettyServer
package com.cyz.websocketnetty.service;
import com.cyz.websocketnetty.handle.WebSocketHandler;
import io.netty.bootstrap.ServerBootstrap;
import io.netty.channel.ChannelFuture;
import io.netty.channel.ChannelInitializer;
import io.netty.channel.EventLoopGroup;
import io.netty.channel.nio.NioEventLoopGroup;
import io.netty.channel.socket.SocketChannel;
import io.netty.channel.socket.nio.NioServerSocketChannel;
import io.netty.handler.codec.http.HttpObjectAggregator;
import io.netty.handler.codec.http.HttpServerCodec;
import io.netty.handler.codec.http.websocketx.WebSocketServerProtocolHandler;
import io.netty.handler.codec.serialization.ObjectEncoder;
import io.netty.handler.stream.ChunkedWriteHandler;
import org.slf4j.Logger;
import org.slf4j.LoggerFactory;
import org.springframework.beans.factory.annotation.Autowired;
import org.springframework.beans.factory.annotation.Value;
import org.springframework.stereotype.Component;
import javax.annotation.PostConstruct;
import javax.annotation.PreDestroy;
import java.net.InetSocketAddress;
/**
* @author lian-chen
*/
@Component
public class NettyServer {
private static final Logger log = LoggerFactory.getLogger(NettyServer.class);
/**
* webSocket协议名
*/
private static final String WEBSOCKET_PROTOCOL = "WebSocket";
/**
* 端口号
*/
@Value("${webSocket.netty.port:58080}")
private int port;
/**
* webSocket路径
*/
@Value("${webSocket.netty.path:/webSocket}")
private String webSocketPath;
@Autowired
private WebSocketHandler webSocketHandler;
private EventLoopGroup bossGroup;
private EventLoopGroup workGroup;
/**
* 启动
*
* @throws InterruptedException
*/
private void start() throws InterruptedException {
bossGroup = new NioEventLoopGroup();
workGroup = new NioEventLoopGroup();
ServerBootstrap bootstrap = new ServerBootstrap();
// bossGroup辅助客户端的tcp连接请求, workGroup负责与客户端之前的读写操作
bootstrap.group(bossGroup, workGroup);
// 设置NIO类型的channel
bootstrap.channel(NioServerSocketChannel.class);
// 设置监听端口
bootstrap.localAddress(new InetSocketAddress(port));
// 连接到达时会创建一个通道
bootstrap.childHandler(new ChannelInitializer<SocketChannel>() {
@Override
protected void initChannel(SocketChannel ch) throws Exception {
// 流水线管理通道中的处理程序(Handler),用来处理业务
// webSocket协议本身是基于http协议的,所以这边也要使用http编解码器
ch.pipeline().addLast(new HttpServerCodec());
ch.pipeline().addLast(new ObjectEncoder());
// 以块的方式来写的处理器
ch.pipeline().addLast(new ChunkedWriteHandler());
/*
说明:
1、http数据在传输过程中是分段的,HttpObjectAggregator可以将多个段聚合
2、这就是为什么,当浏览器发送大量数据时,就会发送多次http请求
*/
ch.pipeline().addLast(new HttpObjectAggregator(8192));
/*
说明:
1、对应webSocket,它的数据是以帧(frame)的形式传递
2、浏览器请求时 ws://localhost:58080/xxx 表示请求的uri
3、核心功能是将http协议升级为ws协议,保持长连接
*/
ch.pipeline().addLast(new WebSocketServerProtocolHandler(webSocketPath, WEBSOCKET_PROTOCOL, true, 65536 * 10));
// 自定义的handler,处理业务逻辑
ch.pipeline().addLast(webSocketHandler);
}
});
// 配置完成,开始绑定server,通过调用sync同步方法阻塞直到绑定成功
ChannelFuture channelFuture = bootstrap.bind().sync();
log.info("Server started and listen on:{}", channelFuture.channel().localAddress());
// 对关闭通道进行监听
channelFuture.channel().closeFuture().sync();
}
/**
* 释放资源
*
* @throws InterruptedException
*/
@PreDestroy
public void destroy() throws InterruptedException {
if (bossGroup != null) {
bossGroup.shutdownGracefully().sync();
}
if (workGroup != null) {
workGroup.shutdownGracefully().sync();
}
}
@PostConstruct()
public void init() {
//需要开启一个新的线程来执行netty server 服务器
new Thread(() -> {
try {
start();
} catch (InterruptedException e) {
e.printStackTrace();
}
}).start();
}
}
WebSocketHandler
package com.cyz.websocketnetty.handle;
import cn.hutool.json.JSONObject;
import cn.hutool.json.JSONUtil;
import com.cyz.websocketnetty.config.NettyConfig;
import com.cyz.websocketnetty.service.NettyServer;
import io.netty.channel.ChannelHandler;
import io.netty.channel.ChannelHandlerContext;
import io.netty.channel.SimpleChannelInboundHandler;
import io.netty.handler.codec.http.websocketx.TextWebSocketFrame;
import io.netty.util.AttributeKey;
import org.slf4j.Logger;
import org.slf4j.LoggerFactory;
import org.springframework.stereotype.Component;
/**
* @author lian-chen
*/
@Component
@ChannelHandler.Sharable
public class WebSocketHandler extends SimpleChannelInboundHandler<TextWebSocketFrame> {
private static final Logger log = LoggerFactory.getLogger(NettyServer.class);
/**
* @param ctx 上下文
*/
@Override
public void handlerAdded(ChannelHandlerContext ctx) throws Exception {
log.info("handlerAdded 被调用"+ctx.channel().id().asLongText());
// 添加到channelGroup 通道组
NettyConfig.getChannelGroup().add(ctx.channel());
}
/**
* 读取数据
*/
@Override
protected void channelRead0(ChannelHandlerContext ctx, TextWebSocketFrame msg) throws Exception {
log.info("服务器收到消息:{}",msg.text());
// 获取用户ID,关联channel
JSONObject jsonObject = JSONUtil.parseObj(msg.text());
String uid = jsonObject.getStr("uid");
NettyConfig.getUserChannelMap().put(uid,ctx.channel());
// 将用户ID作为自定义属性加入到channel中,方便随时channel中获取用户ID
AttributeKey<String> key = AttributeKey.valueOf("userId");
ctx.channel().attr(key).setIfAbsent(uid);
// 回复消息
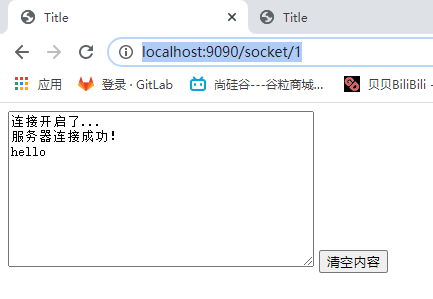
ctx.channel().writeAndFlush(new TextWebSocketFrame("服务器连接成功!"));
}
@Override
public void handlerRemoved(ChannelHandlerContext ctx) throws Exception {
log.info("handlerRemoved 被调用"+ctx.channel().id().asLongText());
// 删除通道
NettyConfig.getChannelGroup().remove(ctx.channel());
removeUserId(ctx);
}
@Override
public void exceptionCaught(ChannelHandlerContext ctx, Throwable cause) throws Exception {
log.info("异常:{}",cause.getMessage());
// 删除通道
NettyConfig.getChannelGroup().remove(ctx.channel());
removeUserId(ctx);
ctx.close();
}
/**
* 删除用户与channel的对应关系
* @param ctx 上下文
*/
private void removeUserId(ChannelHandlerContext ctx){
AttributeKey<String> key = AttributeKey.valueOf("userId");
String userId = ctx.channel().attr(key).get();
NettyConfig.getUserChannelMap().remove(userId);
}
}
PushService
package com.cyz.websocketnetty.service;
/**
* @author lian-chen
*/
public interface PushService {
/**
* 推送给指定用户
*
* @param userId 用户ID
* @param msg 消息
*/
void pushMsgToOne(String userId, String msg);
/**
* 推送给所有用户
*
* @param msg 消息
*/
void pushMsgToAll(String msg);
}
PushServiceImpl
package com.cyz.websocketnetty.service.impl;
import com.cyz.websocketnetty.config.NettyConfig;
import com.cyz.websocketnetty.service.PushService;
import io.netty.handler.codec.http.websocketx.TextWebSocketFrame;
import org.springframework.stereotype.Service;
import io.netty.channel.Channel;
import java.util.concurrent.ConcurrentHashMap;
/**
* @author lian-chen
*/
@Service
public class PushServiceImpl implements PushService {
@Override
public void pushMsgToOne(String userId, String msg){
ConcurrentHashMap<String, Channel> userChannelMap = NettyConfig.getUserChannelMap();
Channel channel = userChannelMap.get(userId);
channel.writeAndFlush(new TextWebSocketFrame(msg));
}
@Override
public void pushMsgToAll(String msg){
NettyConfig.getChannelGroup().writeAndFlush(new TextWebSocketFrame(msg));
}
}
PushController
package com.cyz.websocketnetty.controller;
import com.cyz.websocketnetty.service.PushService;
import org.springframework.beans.factory.annotation.Autowired;
import org.springframework.web.bind.annotation.PostMapping;
import org.springframework.web.bind.annotation.RequestMapping;
import org.springframework.web.bind.annotation.RequestParam;
import org.springframework.web.bind.annotation.RestController;
/**
* @author lian-chen
*/
@RestController
@RequestMapping("/push")
public class PushController {
@Autowired
private PushService pushService;
/**
* 推送给所有用户
*
* @param msg 消息
*/
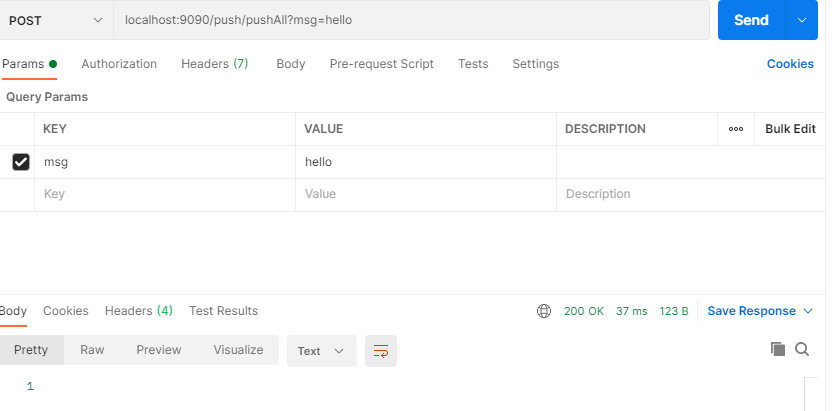
@PostMapping("/pushAll")
public void pushToAll(@RequestParam("msg") String msg) {
pushService.pushMsgToAll(msg);
}
/**
* 推送给指定用户
*
* @param userId 用户ID
* @param msg 消息
*/
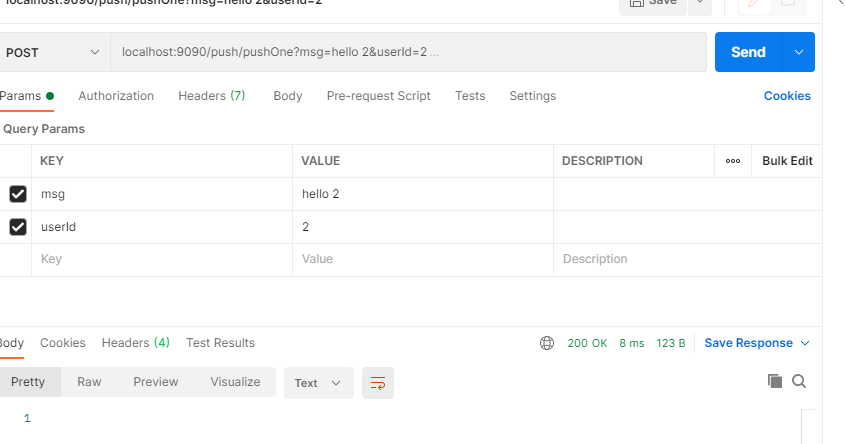
@PostMapping("/pushOne")
public void pushMsgToOne(@RequestParam("userId") String userId, @RequestParam("msg") String msg) {
pushService.pushMsgToOne(userId, msg);
}
}
IndexController
package com.cyz.websocketnetty.controller;
import org.springframework.stereotype.Controller;
import org.springframework.ui.Model;
import org.springframework.web.bind.annotation.GetMapping;
import org.springframework.web.bind.annotation.PathVariable;
/**
* @author lian-chen
*/
@Controller
public class IndexController {
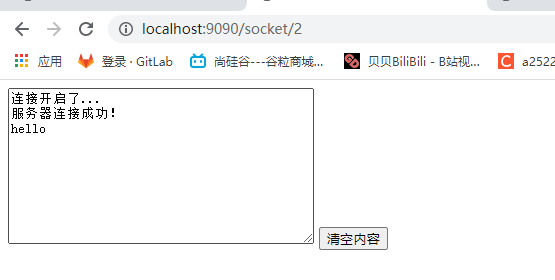
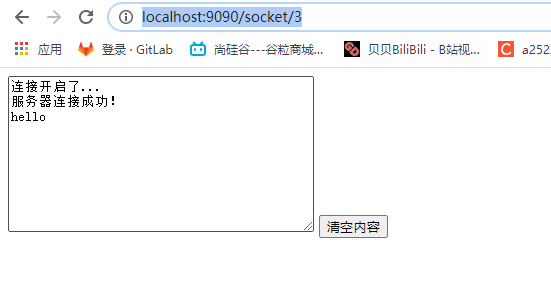
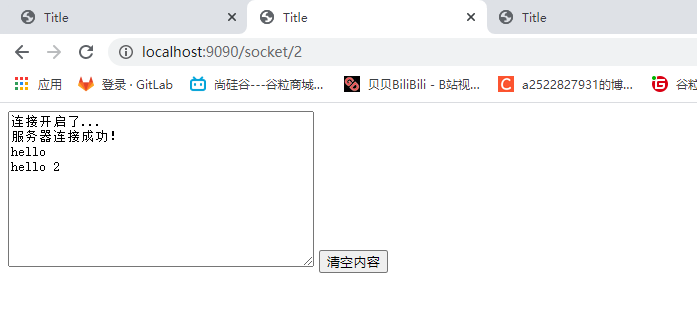
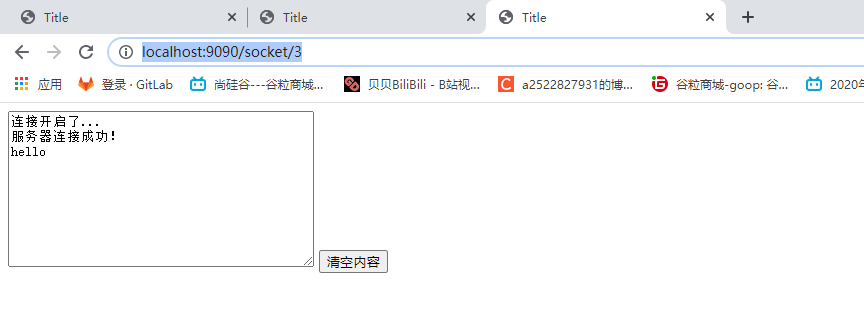
@GetMapping("/socket/{userId}")
public String testHtml(@PathVariable("userId") String userId, Model model) {
model.addAttribute("userId",userId);
return "html/testwebsocket";
}
}
testwebsocket.html
<!DOCTYPE html>
<html lang="en">
<head>
<meta charset="UTF-8">
<title>Title</title>
</head>
<body>
<script>
var socket;
// 判断当前浏览器是否支持webSocket
if (window.WebSocket) {
socket = new WebSocket("ws://192.168.10.47:58080/webSocket")
// 相当于channel的read事件,ev 收到服务器回送的消息
socket.onmessage = function (ev) {
var rt = document.getElementById("responseText");
rt.value = rt.value + "\n" + ev.data;
}
// 相当于连接开启
socket.onopen = function (ev) {
let userId = [[${userId}]];
var rt = document.getElementById("responseText");
rt.value = "连接开启了..."
socket.send(
JSON.stringify({
// 连接成功将,用户ID传给服务端
uid: userId
})
);
}
// 相当于连接关闭
socket.onclose = function (ev) {
var rt = document.getElementById("responseText");
rt.value = rt.value + "\n" + "连接关闭了...";
}
} else {
alert("当前浏览器不支持webSocket")
}
</script>
<form onsubmit="return false">
<textarea id="responseText" style="height: 150px; width: 300px;"></textarea>
<input type="button" value="清空内容" onclick="document.getElementById('responseText').value=''">
</form>
</body>
</html>
访问测试


SpringBoot整合Netty+WebSocket的更多相关文章
- SpringBoot整合Netty并使用Protobuf进行数据传输(附工程)
前言 本篇文章主要介绍的是SpringBoot整合Netty以及使用Protobuf进行数据传输的相关内容.Protobuf会简单的介绍下用法,至于Netty在之前的文章中已经简单的介绍过了,这里就不 ...
- springboot整合netty(二)
目录 前言 正文 代码 1. 新建一个springboot项目,在pom文件中添加netty依赖: 2.新建netty服务 3.netty调用所需的服务类 4 springboot启动类 5.测试 我 ...
- springboot整合netty的多种方式
netty作为一个高性能的io框架,是非好用的一个技术框架, Netty 是一个基于NIO的客户.服务器端编程框架,使用Netty 可以确保你快速和简单的开发出一个网络应用,例如实现了某种协议的客户. ...
- springboot整合netty,多种启动netty的方式,展现bean得多种启动方法
首先讲解下,spring中初始化加载问题: 很多时候,我们自己写的线程池,还有bean对象,还有其他的服务类,都可以通过,相关注解进行交给spring去管理,那么我们如何让nettyserver初始化 ...
- SpringBoot整合Netty
总体来说只需要三个步骤,下面详细介绍 第一步 创建SpringBoot工程snetty 第二步 创建子模块也就是ModuleClient,Server,均为SpringBoot工程 第三步 将服务器端 ...
- 第6章 使用springboot整合netty搭建后台
我们不会去使用自增长的id,在现阶段的互联网开发过程中,自增长的id是已经不适用了.在未来随着系统版本的迭代,用户数量的递增,肯定会做分库分表,去做一些相应的切分.在这个时候我们就需要有一个唯一的id ...
- SpringBoot整合Netty实现socket通讯简单demo
依赖 <dependency> <groupId>io.netty</groupId> <artifactId>netty-all</artifa ...
- SpringBoot整合Guacamole教程
前言 本文主要介绍的是SpringBoot如何整合Guacamole在浏览器是远程桌面的访问. Guacamole 介绍 Apache Guacamole 是一个无客户端远程桌面网关.它支持标准协议, ...
- SpringBoot整合Redis使用Restful风格实现CRUD功能
前言 本篇文章主要介绍的是SpringBoot整合Redis,使用Restful风格实现的CRUD功能. Redis 介绍 Redis 是完全开源免费的,遵守BSD协议,是一个高性能的key-valu ...
- SpringBoot整合Swagger和Actuator
前言 本篇文章主要介绍的是SpringBoot整合Swagger(API文档生成框架)和SpringBoot整合Actuator(项目监控)使用教程. SpringBoot整合Swagger 说明:如 ...
随机推荐
- Windows编译运行webrtc全过程,并实现屏幕共享
文章分为三部分,代码获取/编译/运行. 第一步获取代码,打开cmd执行以下指令即可 set WORKSPACE=E:\webrtc mkdir %WORKSPACE% cd /d %WORKSPACE ...
- RAC:无训练持续扩展,基于检索的目标检测器 | ECCV'24
来源:晓飞的算法工程笔记 公众号,转载请注明出处 论文: Online Learning via Memory: Retrieval-Augmented Detector Adaptation 论文地 ...
- downloadFile:base64数据导出文件,文件下载
function downloadFile(filename, data){ let DownloadLink = document.createElement('a'); if ( Download ...
- 如何手写实现 JSON Parser
JSON.parse 是我们在前端开发中经常会用到API,如果我们要自己实现一个JSON.parse,我们应该怎么实现呢?今天我们就试着手写一个JSON Parser,了解下其内部实现原理. JSON ...
- Air201资产定位模组LuatOS:录音&播放录音功能的操作方法
一直有小伙伴们问,迷你小巧的合宙Air201虽然有很多优点,超低功耗.精准定位,那么它是否支持录音.播放录音功能? 那必须能!高集成化设计的Air201自带了ES8311音频解码芯片(Audio ...
- 一些前端javaScript时间处理函数
史上最全时间处理函数(逐行注释) 获取任意周的周一.周末 获取任意月的前后n月的最后一天和第一天 详细函数如下 获取当前周的周一和周末 || 获取当前周的前后n周的周一和周末 函数注释: 入参: da ...
- .NET9 - 新功能体验(一)
被微软形容为"迄今为止最高效.最现代.最安全.最智能.性能最高的.NET版本"--.NET 9已经发布有一周了,今天想和大家一起体验一下新功能. 此次.NET 9在性能.安全性和功 ...
- rust 终端输出 debug 信息
配置方法 将 env_logger log 添加到 Cargo.toml : 打开 Cargo.toml 文件并在 [dependencies] 部分下添加 env_logger log . [pac ...
- k8s之Helm
官方文档: https://helm.sh/zh/docs/intro/using_helm/ Helm 帮助您管理 Kubernetes 应用-- Helm Chart,Helm 是查找.分享和使用 ...
- dotnet core微服务框架Jimu ~部署和调用演示
首先运行 consul 下载 consul 以开发模式运行 consul agent -dev 2. 调试 用 Visual Studio 2022 IDE 打开项目: 右击解决方案-选择" ...