学习ActiveMQ(四):spring与ActiveMQ整合
在上一篇中已经怎么使用activemq的api来实现消息的发送接收了,但是在实际的开发过程中,我们很少使用activemq直接上去使用,因为我们每次都要创建连接工厂,创建连接,创建session。。。有些繁琐,那么利用spring的话简单多了,强大的spring
提供了对了jms的支持,我们可以使用JmsTemplate来实现,JmsTemplate隔离了像打开、关闭Session和Producer的繁琐操作,因此应用开发人员仅仅需要关注实际的业务逻辑,接下来就一起来看看具体怎么做吧。
首先我们打开idea新建一个maven的webapp项目,对项目项目结构进行一下调整,如下图:

接下来对pom.xml进行修改,需要spring的jar包和jms的jar包,我贴出我的完整代码:
<?xml version="1.0" encoding="UTF-8"?>

<project xmlns="http://maven.apache.org/POM/4.0.0"

         xmlns:xsi="http://www.w3.org/2001/XMLSchema-instance"

         xsi:schemaLocation="http://maven.apache.org/POM/4.0.0 http://maven.apache.org/xsd/maven-4.0.0.xsd">

    <modelVersion>4.0.0</modelVersion>

    <groupId>com.easylab.jms</groupId>

    <artifactId>jms-spring</artifactId>

    <version>1.0-SNAPSHOT</version>

    <properties>

        <spring.version>4.2.5.RELEASE</spring.version>

    </properties>

    <dependencies>

        <dependency>

            <groupId>junit</groupId>

            <artifactId>junit</artifactId>

            <version>4.11</version>

            <scope>test</scope>

        </dependency>

        <dependency>

            <groupId>org.springframework</groupId>

            <artifactId>spring-context</artifactId>

            <version>${spring.version}</version>

        </dependency>

        <dependency>

            <groupId>org.springframework</groupId>

            <artifactId>spring-jms</artifactId>

            <version>${spring.version}</version>

        </dependency>

        <dependency>

            <groupId>org.apache.activemq</groupId>

            <artifactId>activemq-pool</artifactId>

            <version>5.9.0</version>

        </dependency>

        <dependency>

            <groupId>org.apache.activemq</groupId>

            <artifactId>activemq-all</artifactId>

            <version>5.15.4</version>

            <exclusions>

                <exclusion>

                    <artifactId>spring-context</artifactId>

                    <groupId>org.springframework</groupId>

                </exclusion>

            </exclusions>

        </dependency>

    </dependencies>

</project>
在resource文件夹下面建立一个common.xml文件,并进行相关配置,配置作用看代码注释。
<?xml version="1.0" encoding="UTF-8"?>

<beans xmlns="http://www.springframework.org/schema/beans"

       xmlns:xsi="http://www.w3.org/2001/XMLSchema-instance"

       xmlns:context="http://www.springframework.org/schema/context"

       xsi:schemaLocation="http://www.springframework.org/schema/beans http://www.springframework.org/schema/beans/spring-beans.xsd http://www.springframework.org/schema/context http://www.springframework.org/schema/context/spring-context.xsd">

    <!--支持注解-->

    <context:component-scan base-package="com.easylab.jms"/>

    <!--使用PooledConnectionFactory对session和消息producer的缓存机制带来的性能提升-->

    <bean id="connectionFactory" class="org.apache.activemq.pool.PooledConnectionFactory"

          destroy-method="stop">

        <property name="connectionFactory">

            <!--连接mq的连接工厂-->

            <bean class="org.apache.activemq.ActiveMQConnectionFactory">

                <property name="brokerURL">

                    <value>tcp://127.0.0.1:61616</value>

                </property>

            </bean>

        </property>

        <property name="maxConnections" value="100"></property>

    </bean>

    <!--使用缓存可以提升效率-->

    <bean id="cachingConnectionFactory" class="org.springframework.jms.connection.CachingConnectionFactory">

        <property name="targetConnectionFactory" ref="connectionFactory"/>

        <property name="sessionCacheSize" value="1"/>

    </bean>

    <!--配置JmsTemplate,用于发送消息-->

    <bean id="jmsTemplate" class="org.springframework.jms.core.JmsTemplate">

        <property name="connectionFactory" ref="connectionFactory"/>

        <!--给一个默认的是destination-->

        <property name="defaultDestination" ref="queueDestination"/>

    </bean>

    <!--队列模式的destination-->

    <bean id="queueDestination"  class="org.apache.activemq.command.ActiveMQQueue">

        <constructor-arg value="queue"/>

    </bean>

    <!--主题模式的destination配置-->

    <bean id="topicDestination" class="org.apache.activemq.command.ActiveMQTopic">

        <constructor-arg value="topic"/>

    </bean>

    <!--消费者所需-->

    <!--配置 消息监听容器 使用DefaultMessageListenerContainer,它允许异步接收消息并缓存session和消息consumer,而且还可以根据消息数量动态的增加或缩减监听器的数量-->

    <bean id="jmsContainer" class=" org.springframework.jms.listener.DefaultMessageListenerContainer">

        <property name="connectionFactory" ref="connectionFactory"/>

        <property name="destination" ref="queueDestination"/>

        <property name="messageListener" ref="consumerMessageListener"/>

    </bean>

    <!--配置 消息监听容器-->

    <bean id="jmsContainerTopic" class=" org.springframework.jms.listener.DefaultMessageListenerContainer">

        <property name="connectionFactory" ref="connectionFactory"/>

            <property name="destination" ref="topicDestination"/>

        <property name="messageListener" ref="consumerMessageListenerTopic"/>

    </bean>

    <!--自定义消息监听器-->

    <bean id="consumerMessageListener" class="com.easylab.jms.consumer.ConsumerMessageListener"/>

    <bean id="consumerMessageListenerTopic" class="com.easylab.jms.consumer.ConsumerMessageListenerTopic"/>

</beans>
接下来在com.easylab.jms.producer创建一个IProducerService 发送者接口
package com.easylab.jms.producer;

/******************************

 * @author : liuyuan

 * <p>ProjectName:jms-spring  </p>

 * @ClassName :  IProducerService

 * @date : 2018/6/24 0024

 * @time : 8:41

 * @createTime 2018-06-24 8:41

 * @version : 2.0

 * @description :消息发送

 *******************************/

public interface IProducerService {

    public void sendMessage(String message);

}
对这个接口进行实现,在com.easylab.jms.producer创建一个ProducerServiceImpl实现类(使用队列模式发送)
package com.easylab.jms.producer;

import org.springframework.beans.factory.annotation.Autowired;

import org.springframework.context.annotation.Bean;

import org.springframework.jms.core.JmsTemplate;

import org.springframework.jms.core.MessageCreator;

import org.springframework.stereotype.Service;

import javax.annotation.Resource;

import javax.jms.*;

/******************************

 * @author : liuyuan

 * <p>ProjectName:jms-spring  </p>

 * @ClassName :  ProducerServiceImpl

 * @date : 2018/6/24 0024

 * @time : 8:42

 * @createTime 2018-06-24 8:42

 * @version : 2.0

 * @description :

 *******************************/

@Service

public class ProducerServiceImpl implements IProducerService {

    @Autowired

    JmsTemplate jmsTemplate;

  //这里不定义的话,就使用在xml文件里配置的默认的destination

/*    @Resource(name = "queueDestination")

    Destination destination;*/

    public void sendMessage(final String message) {

        // 使用JmsTemplate发送消息

        jmsTemplate.send(new MessageCreator() {

            public Message createMessage(Session session) throws JMSException {

                // 创建一个消息

                TextMessage textMessage = session.createTextMessage(message);

                return textMessage;

            }

        });

        System.out.println("发送消息" + message);

    }

}
再对这个接口写一个实现,在com.easylab.jms.producer创建一个ProducerServiceImplTopic实现类(使用主题模式发送)
package com.easylab.jms.producer;

import org.springframework.beans.factory.annotation.Autowired;

import org.springframework.jms.core.JmsTemplate;

import org.springframework.jms.core.MessageCreator;

import org.springframework.stereotype.Service;

import javax.annotation.Resource;

import javax.jms.*;

/******************************

 * @author : liuyuan

 * <p>ProjectName:jms-spring  </p>

 * @ClassName :  ProducerServiceImpl

 * @date : 2018/6/24 0024

 * @time : 8:42

 * @createTime 2018-06-24 8:42

 * @version : 2.0

 * @description :

 *******************************/

@Service

public class ProducerServiceImplTopic implements IProducerService {

    @Autowired

    JmsTemplate jmsTemplate;

    //指定主题模式

    @Resource(name = "topicDestination")

    Destination destination;

    public void sendMessage( final String message) {

        // 使用JmsTemplate发送消息

        jmsTemplate.send(destination, new MessageCreator() {

            public Message createMessage(Session session) throws JMSException {

                // 创建一个消息

                TextMessage textMessage = session.createTextMessage(message);

                return textMessage;

            }

        });

        System.out.println("发送消息" + message);

    }

}
ok,接下在com.easylab.jms.produce写一个AppProducer运行类就行了
package com.easylab.jms.producer;

import javafx.application.Application;

import org.apache.activemq.ActiveMQConnectionFactory;

import org.apache.xbean.spring.context.ClassPathXmlApplicationContext;

import org.springframework.beans.factory.annotation.Autowired;

import org.springframework.beans.factory.annotation.Qualifier;

import org.springframework.context.ApplicationContext;

import javax.jms.*;

/******************************

 * @author : liuyuan

 * <p>ProjectName:jms-test  </p>

 * @ClassName :  AppProducer

 * @date : 2018/6/20 0020

 * @time : 20:46

 * @createTime 2018-06-20 20:46

 * @version : 2.0

 * @description :

 *******************************/

public class AppProducer {

    public static void main(String[] args) {

        ClassPathXmlApplicationContext context = new ClassPathXmlApplicationContext("common.xml");

        IProducerService service = (IProducerService)context.getBean(ProducerServiceImpl.class);

        for (int i = 0; i < 2; i++) {

            service.sendMessage("test" + i);

        }

        //切换到主题模式下再发送几条

        service = (IProducerService)context.getBean(ProducerServiceImplTopic.class);

        for (int i = 0; i < 10; i++) {

            service.sendMessage("test" + i);

        }

        context.close();

    }

}
可以运行一下看看,可以看到发送信息,但是没有接受消息,因为我们还没有写消费者,我们可以通过监听器来监听队列,如果队列中有消息,就会直接进入到监听器的onMessage方法中进行我们的业务处理,所以我们可以不用写消费者代码了。用监听器即可。
在配置文件中,我们写了两个监听容器和监听器,用他们分别监听队列和主题,查看效果。接下来创建两个监听器.
在com.easylab.jms.produce写一个ConsumerMessageListener监听器:
package com.easylab.jms.consumer;

import javax.jms.Message;

import javax.jms.MessageListener;

import javax.jms.TextMessage;

/******************************

 * @author : liuyuan

 * <p>ProjectName:jms-spring  </p>

 * @ClassName :  ConsumerMessageListener

 * @date : 2018/6/24 0024

 * @time : 9:16

 * @createTime 2018-06-24 9:16

 * @version : 2.0

 * @description :

 *

 *

 *

 *******************************/

public class ConsumerMessageListener implements MessageListener {

    public void onMessage(Message message) {

        TextMessage textMessage = (TextMessage) message;

        try {

            System.out.println("队列监听器接收消息" + textMessage);

        } catch (Exception e) {

            e.printStackTrace();

        }

    }

}
在com.easylab.jms.produce写一个ConsumerMessageListener监听器:
package com.easylab.jms.consumer;

import javax.jms.Message;

import javax.jms.MessageListener;

import javax.jms.TextMessage;

/******************************

 * @author : liuyuan

 * <p>ProjectName:jms-spring  </p>

 * @ClassName :  ConsumerMessageListener

 * @date : 2018/6/24 0024

 * @time : 9:16

 * @createTime 2018-06-24 9:16

 * @version : 2.0

 * @description :

 *******************************/

public class ConsumerMessageListenerTopic implements MessageListener {

    public void onMessage(Message message) {

        TextMessage textMessage = (TextMessage) message;

        try {

            System.out.println("我是topic监听器,接收到消息:" + textMessage);

        } catch (Exception e) {

            e.printStackTrace();

        }

    }

}
到这里代码就全部写完了,运行刚刚创建启动类
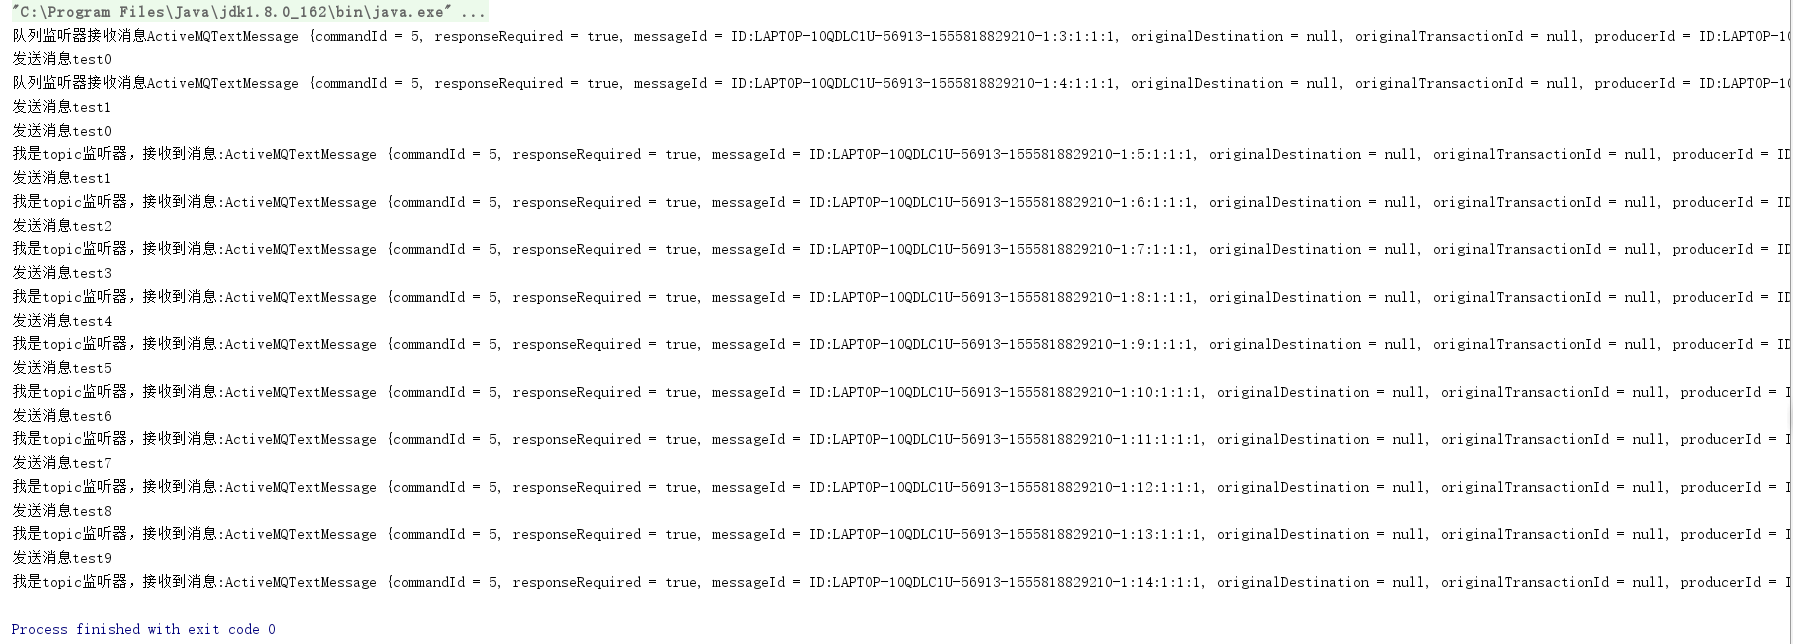
可以清楚的看到消息队列接收到了两条,主题队列接收到了十条,测试成功。
代码地址:https://github.com/MrLiu1227/ActiveMQ
学习ActiveMQ(四):spring与ActiveMQ整合的更多相关文章
- MyBatis学习七:spring和MyBatis整合
<\mybatis\day02\16mybatis和spring整合-sqlSessionFactory配置.avi;> MyBatis学习七:spring和MyBatis整合.逆向工程 ...
- 学习加密(四)spring boot 使用RSA+AES混合加密,前后端传递参数加解密
学习加密(四)spring boot 使用RSA+AES混合加密,前后端传递参数加解密 技术标签: RSA AES RSA AES 混合加密 整合 前言: 为了提高安全性采用了RS ...
- 深入浅出JMS(四)--Spring和ActiveMQ整合的完整实例
第一篇博文深入浅出JMS(一)–JMS基本概念,我们介绍了JMS的两种消息模型:点对点和发布订阅模型,以及消息被消费的两个方式:同步和异步,JMS编程模型的对象,最后说了JMS的优点. 第二篇博文深入 ...
- liunx 安装ActiveMQ 及 spring boot 初步整合 activemq
源码地址: https://gitee.com/kevin9401/microservice.git 一.安装 ActiveMQ: 1. 下载 ActiveMQ wget https://arch ...
- Java开发学习(十四)----Spring整合Mybatis及Junit
一.Spring整合Mybatis思路分析 1.1 环境准备 步骤1:准备数据库表 Mybatis是来操作数据库表,所以先创建一个数据库及表 create database spring_db cha ...
- Spring整合ActiveMQ:spring+JMS+ActiveMQ+Tomcat
一.目录结构 相关jar包 二.关键配置activmq.xml <?xml version="1.0" encoding="UTF-8"?> < ...
- Spring学习(十四)----- Spring Auto Scanning Components —— 自动扫描组件
一. Spring Auto Scanning Components —— 自动扫描组件 1. Declares Components Manually——手动配置componen ...
- Spring 学习十四 Spring security安全
Spring security: 我用过的安全机制: oauth2, filter, secured方法保护 9.2 保护web请求: 9.2.1 代理Servlet过滤器: Delegat ...
- Spring学习十四----------Spring AOP实例
© 版权声明:本文为博主原创文章,转载请注明出处 实例 1.项目结构 2.pom.xml <project xmlns="http://maven.apache.org/POM/4.0 ...
- JMS【四】--Spring和ActiveMQ整合的完整实例
第一篇博文JMS[一]--JMS基本概念,我们介绍了JMS的两种消息模型:点对点和发布订阅模型,以及消息被消费的两个方式:同步和异步,JMS编程模型的对象,最后说了JMS的优点. 第二篇博文JMS[二 ...
随机推荐
- BIO 和 NIO
一.阻塞(Block)和非阻塞(NonBlock) 阻塞和非阻塞是进程在访问数据的时候,数据是否准备就绪的一种处理方式,当数据没有准备的时候阻塞: 阻塞:往往需要等待缞冲区中的数据准备好过后才处理其他 ...
- SQL Server - JOIN
JOIN
- Eclipse 搭建 Strust2开发环境
一.创建一个动态Web项目 ♦ 注意 :一定要勾选Generate Web.xml deployment descriptor 选项,这个将在Eclipse为你创建一个动态web项目. 二.导入相关 ...
- TCP 的那些事儿
TCP是一个巨复杂的协议,因为他要解决很多问题,而这些问题又带出了很多子问题和阴暗面.所以学习TCP本身是个比较痛苦的过程,但对于学习的过程却能让人有很多收获.关于TCP这个协议的细节,我还是推荐你去 ...
- 利用特性和反射给泛型Model赋值
为了解决从数据库读取的表字段和自己建的viewModel字段名称不相符的问题 本人小白,初次将特性及反射应用到实例,写的不好的地方还请大家多多包涵 新建一个控制台应用程序命名为ReflectAndAt ...
- js在数组arr中随机获取count数量的元素
// 在数组arr中随机获取count数量的元素; const getRandomArrayElements = (arr, num) => { // 新建一个数组,将传入的数组复制过来,用于运 ...
- from表单校验插件 validate 实例
$("#nextSubmit").click(function(){ $("#recovePasswordForm").submit(); }); $(&quo ...
- OrCAD Capture CIS 16.6 为原理图中的Off-Page Connector添加页面编号
操作系统:Windows 10 x64 工具1:OrCAD Capture CIS 16.6-S062 (v16-6-112FF) 为原理图中的Off-Page Connector添加页面编号 一般来 ...
- Golang 新手可能会踩的 50 个坑【转】
译文:https://github.com/wuYin/blog/blob/master/50-shades-of-golang-traps-gotchas-mistakes.md 原文:50 Sha ...
- [原创]基于Zynq Linux环境搭建(一)
安装VMWare版本12 Ubuntu版本 12.04.5 64bit 系统安装完成后,登陆系统,在sotfware中心安装konsole.gvim.software source等基本软件 在sof ...