
Ubuntu14.04安装 ROS 安装步骤和问题总结
参考:
1.http://wiki.ros.org/indigo/Installation/Ubuntu
2.安装出现依赖库问题:
https://answers.ros.org/question/310473/ros-indigo-installation-dependency-issue/
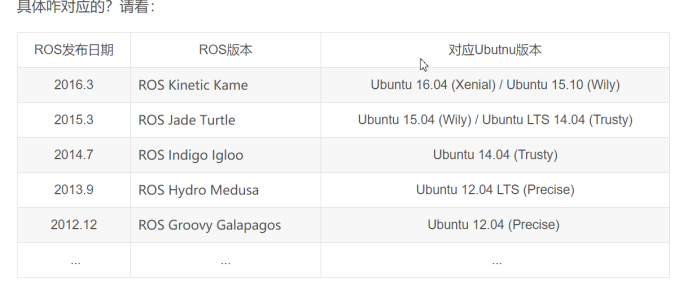
首先看好自己的版本对应:(本人是Ubuntu14.04 对应的就是ROS Indigo)
step1:搜索Software&updates 使用清华的源文件
http://wiki.ros.org/ROS/Installation/UbuntuMirrors#Tsinghua_University

STEP2
sudo apt-get update && sudo apt-get install dpkg
就是一般因为dpkg版本低
需要更新 否则出现依赖库问题:
所以这一步相当重要,曾经被卡过得难受的一、塌糊涂
可能错误点:
(一定要有此步,如果跳过将会出现依赖库错误,依赖库错误如下:
Reading package lists... Done
Building dependency tree
Reading state information... Done
You might want to run 'apt-get -f install' to correct these:
The following packages have unmet dependencies:
python-rosdep : Depends: python-rosdistro (>= 0.4.0) but it is not going to be installed
ros-indigo-desktop-full : Depends: ros-indigo-desktop but it is not going to be installed
Depends: ros-indigo-perception but it is not going to be installed
Depends: ros-indigo-simulators but it is not going to be installed
Depends: ros-indigo-urdf-tutorial but it is not going to be installed
E: Unmet dependencies. Try 'apt-get -f install' with no packages (or specify a solution).
此时如果按照他的提示使用apt-get -f install 会出现:
dpkg-deb: error: archive '/var/cache/apt/archives/python-rosdistro-modules_0.7.0-1_all.deb' has premature member 'control.tar.xz' before 'control.tar.gz', giving up
dpkg: error processing archive /var/cache/apt/archives/python-rosdistro-modules_0.7.0-1_all.deb (--unpack):
subprocess dpkg-deb --control returned error exit status 2
dpkg-deb: error: archive '/var/cache/apt/archives/python-rosdistro_0.7.0-100_all.deb' has premature member 'control.tar.xz' before 'control.tar.gz', giving up
dpkg: error processing archive /var/cache/apt/archives/python-rosdistro_0.7.0-100_all.deb (--unpack):
subprocess dpkg-deb --control returned error exit status 2
Errors were encountered while processing:
/var/cache/apt/archives/python-rosdistro-modules_0.7.0-1_all.deb
/var/cache/apt/archives/python-rosdistro_0.7.0-100_all.deb
E: Sub-process /usr/bin/dpkg returned an error code (1)
)
STEP3
设置url
sudo sh -c '. /etc/lsb-release && echo "deb http://mirrors.tuna.tsinghua.edu.cn/ros/ubuntu/ $DISTRIB_CODENAME main" > /etc/apt/sources.list.d/ros-latest.list'
设置key
sudo apt-key adv --keyserver hkp://ha.pool.sks-keyservers.net:80 --recv-key 421C365BD9FF1F717815A3895523BAEEB01FA116
STEP4设置完之后更新一下
sudo apt-get update
STEP5安装ROS(注意对应的版本)
sudo apt-get install ros-indigo-desktop-full
STEP6
初始化rosdep
sudo rosdep init
rosdep update
可能错误点:
这里的rosdep update 可能会显示错误:
reading in sources list data from /etc/ros/rosdep/sources.list.d
Hit https://raw.githubusercontent.com/ros/rosdistro/master/rosdep/osx-homebrew.yaml
ERROR: error loading sources list:
The read operation timed out
网络问题,多尝试几次就ok了。或者换个网络。
STEP7设置环境变量
echo "source /opt/ros/indigo/setup.bash" >> ~/.bashrc
source ~/.bashrc
STEP8安装插件rosinsatll
sudo apt-get install python-rosinstall
STEP9测试ROS安装是否成功
1.启动ROS环境:
roscore
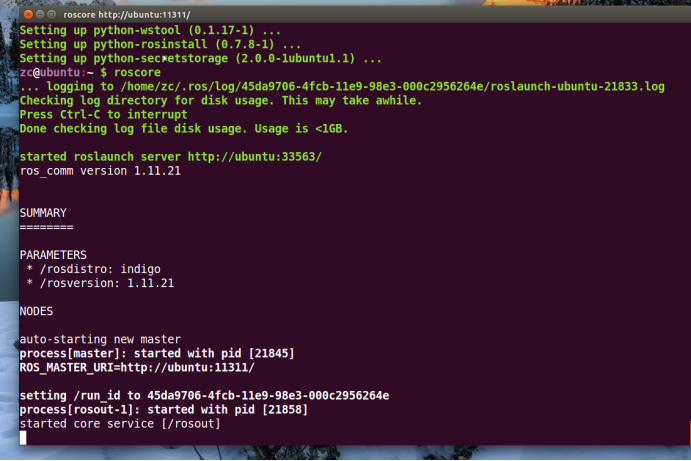
2.测试一下
(1)启动一个终端
roscore
启动服务。
(2)再启动一个终端
rosrun turtlesim turtlesim_node __name:=my_turtle
(3)再再启动一个终端,键盘控制turtlesim
rosrun turtlesim turtle_teleop_key
效果如图:
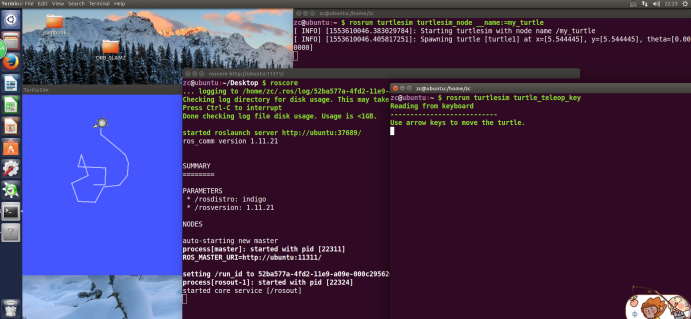
鼠标必须放在第三个控制小乌龟运动的终端上才行
Ubuntu14.04安装 ROS 安装步骤和问题总结的更多相关文章
- Ubuntu14.04 Django Mysql安装部署全过程
Ubuntu14.04 Django Mysql安装部署全过程 一.简要步骤.(阿里云Ubuntu14.04) Python安装 Django Mysql的安装与配置 记录一下我的部署过程,也方便 ...
- Ubuntu14.04(64位)安装ATI_Radeon_R7_M265显卡驱动
电脑型号:Dell inspiron 14-5447 笔记本 显卡配置:集成显卡Intel核心显卡,Cpu是i5-4210U;独立显卡ATI_Radeon_R7_M265 网上关于ATI/Intel双 ...
- ubuntu14.04下编译安装ambari-2.4.2.0
ubuntu14.04下编译安装ambari-2.4.2.0 编译前的准备工作 准备工作有: 系统参数 系统依赖(编译环境) 离线安装包 java环境 maven环境 Nodejs环境 git环境 a ...
- Ubuntu14.04下Ambari安装搭建部署大数据集群(图文分五大步详解)(博主强烈推荐)
不多说,直接上干货! 写在前面的话 (1) 最近一段时间,因担任我团队实验室的大数据环境集群真实物理机器工作,至此,本人秉持负责.认真和细心的态度,先分别在虚拟机上模拟搭建ambari(基于CentO ...
- ubuntu14.04下手动安装eclipse
ubuntu14.04下手动安装eclipse 第一步: 安装jdk 第二步: 下载eclipse,假设下载的文件文件名为eclipse.tar.gz 第三步: 解压 sudo -zxvf ./ecl ...
- ubuntu14.04 下手动安装java jdk
ubuntu14.04 下手动安装java jdk 第一步: 下载jdk.tar.gz (这里假设下载的文件名为jdk.tar.gz) 第二步: 解压 sudo tar -zxvf ./jdk.tar ...
- ubuntu14.04 64位 安装Tomcat
ubuntu14.04 64位 安装Tomcat 1 下载Tomcat 在htt://www.tomcat.apache.org官网上下载apache-tomcat-7.0.57.tar.gz 2 解 ...
- ubuntu14.04 64位 安装eclipse
ubuntu14.04 64位 安装eclipse 1 在官网上下载eclipse http://www.eclipse.org/downloads/下载eclipse-jee-luna-SR1-li ...
- ubuntu14.04 64位 安装JDK1.7
ubuntu14.04 64位 安装JDK1.7 1 新建文件夹 youhaidong@youhaidong:~$ sudo mkdir /usr/lib/jvm 2 解压文件 youhaidong@ ...
- virtualbox谨记:win7上只有4.3.x的版本支持ubuntu14.04.3虚拟机安装Oracle Rac,其他的版本3.x和5.0.2(至2015-08-30)均不可以
virtualbox谨记:win7上只有4.3.x的版本支持ubuntu14.04.3虚拟机安装Oracle Rac,其他的版本3.x和5.0.2(至2015-08-30)均不可以
随机推荐
- CVE-2018-19968
PHPMyAdmin 4.0.0~4.8.3 任意文件包含/远程代码执行漏洞 介绍 本地文件包含(CVE-2018-19968) -至少从4.0.0到4.8.3的phpMyAdmin版本就有一个本地文 ...
- 强大的css3库
http://www.html5tricks.com/demo/css3-animate-css/index.html 关注微信小程序
- 跟技术胖学vue+koa
首页热卖商品组件 技术点:1热卖商品封装成单独的组件 2路由和参数的传递 3详情页面路由参数的接收 //首页 <template> <div> <div class= ...
- wps 邮件 通讯小灵通 长沙杭州
记得在天涯上看过一个热贴,关于贵族与世家的,文中提到号称当今贵族的六大世家,什么“汝南周氏”.“吴兴沈氏”之类,更有甚者,为了比拼,追本溯源,把孔子他老人家也抬了出来,号称孔夫子的多少多少代传人,当时 ...
- 华莱士的 第一个python程序之(用户登录)
Name = "shangzb"password = 43while True: _Name = input("Name:") if _Name == Name ...
- keras图像风格迁移
风格迁移: 在内容上尽量与基准图像保持一致,在风格上尽量与风格图像保持一致. 1. 使用预训练的VGG19网络提取特征 2. 损失函数之一是"内容损失"(content loss) ...
- 在Vuex使用 以及 dispatch和commit来调用mutations的区别
main.js中 import Vuex from 'vuex' Vue.use(vuex); const store = new Vuex.store({ state: { nickName: &q ...
- echart 百度地图实现效果
1 必须引入 echarts.js文件 以及 china.js 点文件才可以执行代码2 ehcart官方文档有点小恶心,看了半天,好多东西都不是很清楚,必须挨个实验才行,希望对一些初学者来说可以少走一 ...
- 《DSP using MATLAB》Problem 7.25
代码: %% ++++++++++++++++++++++++++++++++++++++++++++++++++++++++++++++++++++++++++++++++ %% Output In ...
- 易忽视的Python知识点
1.sort和sorted (1)sort:会直接修改原始列表的序列,只是排序,不去重. >>> a=[2,5,7,8,3,5,1,3,9,6,2] >>> a.s ...