Qt 学习之路 :视图代理
与 Qt model/view 架构类似,在自定义用户界面中,代理扮演着重要的角色。模型中的每一个数据项都要通过一个代理向用户展示,事实上,用户看到的可视部分就是代理。
每一个代理都可以访问一系列属性和附加属性。这些属性及附加属性中,有些来自于数据模型,有些则来自于视图。前者为代理提供了每一个数据项的数据信息;后者则是有关视图的状态信息。
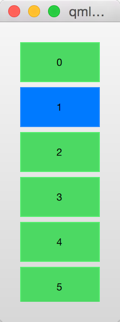
代理中最常用到的是来自于视图的附加属性ListView.isCurrentItem和ListView.view。前者是一个布尔值,用于表示代理所代表的数据项是不是视图所展示的当前数据项;后者则是一个只读属性,表示该代理所属于的视图。通过访问视图的相关数据,我们就可以创建通用的可复用的代理,用于适配视图的大小和展示特性。下面的例子展示了每一个代理的宽度都绑定到视图的宽度,而代理的背景色则根据附加属性ListView.isCurrentItem的不同而有所不同。
|
1
2
3
4
5
6
7
8
9
10
11
12
13
14
15
16
17
18
19
20
21
22
23
24
25
26
27
28
29
30
31
32
33
34
35
36
37
38
39
40
41
42
43
44
45
|
import QtQuick 2.0
Rectangle {
width: 120
height: 300
gradient: Gradient {
GradientStop { position: 0.0; color: "#f6f6f6" }
GradientStop { position: 1.0; color: "#d7d7d7" }
}
ListView {
anchors.fill: parent
anchors.margins: 20
clip: true
model: 100
delegate: numberDelegate
spacing: 5
focus: true
}
Component {
id: numberDelegate
Rectangle {
width: ListView.view.width
height: 40
color: ListView.isCurrentItem?"#157efb":"#53d769"
border.color: Qt.lighter(color, 1.1)
Text {
anchors.centerIn: parent
font.pixelSize: 10
text: index
}
}
}
}
|
代码运行结果如下图所示:
如果该模型的每一个数据项都关联一个动作,例如,响应对该数据项的点击操作,那么,这种功能就应该是每一个代理的一部分。这将事件管理从视图分离出来。视图主要处理的是各个子视图之间的导航、切换,而代理则是对一个特定的数据项的事件进行处理。完成这一功能最常用的方法是,为每一个视图创建一个MouseArea,然后响应其onClicked信号。我们会在后面看到这种实现的示例。
为增加、移除项添加动画
很多情况下,一个视图中的数据项并不是固定不变的,而是需要动态地增加、移除。数据项的增加、移除,其实是底层模型的修改的相关反应。此时,添加动画效果往往是个不错的选择,可以让用户清晰地明白究竟是哪些数据发生了改变。
为了达到这一目的,QML 为每个代理提供了两个信号,onAdd和onRemove,只要将这些信号与动画效果关联起来即可。
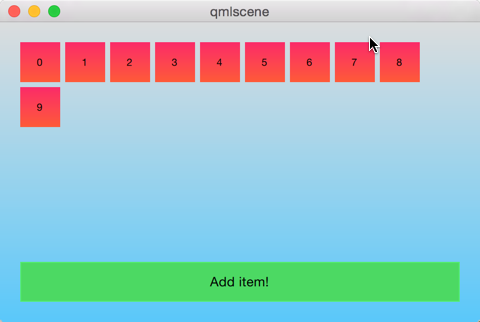
下面的例子演示了为动态修改ListModel增加动画效果。在屏幕下方有一个用于新增数据项的按钮。点击该按钮,会通过调用append函数向模型增加一个数据项。这将触发视图创建一个新的代理,并且发出GridView.onAdd信号。该信号关联了一个SequentialAnimation类型的动画,利用scale属性的变化,将代理缩放到视图。当视图中的一个数据项被点击时,该项会通过调用视图的remove函数被移除。这会发出GridView.onRemove信号,触发另一个SequentialAnimation类型的动画。不过,这一次代理需要在动画结束之后才能被销毁(相比之下,在添加代理时,代理必须在动画开始之前就被创建)。为了达到这一目的,我们使用PropertyAction元素,在动画开始之前将GridView.delayRemove属性设置为true,动画完成之后,再将其设置为false。这保证了在代理被销毁之前,动画能够顺利完成。
|
1
2
3
4
5
6
7
8
9
10
11
12
13
14
15
16
17
18
19
20
21
22
23
24
25
26
27
28
29
30
31
32
33
34
35
36
37
38
39
40
41
42
43
44
45
46
47
48
49
50
51
52
53
54
55
56
57
58
59
60
61
62
63
64
65
66
67
68
69
70
71
72
73
74
75
76
77
78
79
80
81
82
83
84
85
86
87
88
89
90
91
92
93
94
95
96
97
98
99
100
101
102
103
104
105
106
107
108
109
110
111
112
|
import QtQuick 2.0
Rectangle {
width: 480
height: 300
gradient: Gradient {
GradientStop { position: 0.0; color: "#dbddde" }
GradientStop { position: 1.0; color: "#5fc9f8" }
}
ListModel {
id: theModel
ListElement { number: 0 }
ListElement { number: 1 }
ListElement { number: 2 }
ListElement { number: 3 }
ListElement { number: 4 }
ListElement { number: 5 }
ListElement { number: 6 }
ListElement { number: 7 }
ListElement { number: 8 }
ListElement { number: 9 }
}
Rectangle {
anchors.left: parent.left
anchors.right: parent.right
anchors.bottom: parent.bottom
anchors.margins: 20
height: 40
color: "#53d769"
border.color: Qt.lighter(color, 1.1)
Text {
anchors.centerIn: parent
text: "Add item!"
}
MouseArea {
anchors.fill: parent
onClicked: {
theModel.append({"number": ++parent.count});
}
}
property int count: 9
}
GridView {
anchors.fill: parent
anchors.margins: 20
anchors.bottomMargin: 80
clip: true
model: theModel
cellWidth: 45
cellHeight: 45
delegate: numberDelegate
}
Component {
id: numberDelegate
Rectangle {
id: wrapper
width: 40
height: 40
gradient: Gradient {
GradientStop { position: 0.0; color: "#f8306a" }
GradientStop { position: 1.0; color: "#fb5b40" }
}
Text {
anchors.centerIn: parent
font.pixelSize: 10
text: number
}
MouseArea {
anchors.fill: parent
onClicked: {
if (!wrapper.GridView.delayRemove)
theModel.remove(index);
}
}
GridView.onRemove: SequentialAnimation {
PropertyAction { target: wrapper; property: "GridView.delayRemove"; value: true }
NumberAnimation { target: wrapper; property: "scale"; to: 0; duration: 250; easing.type: Easing.InOutQuad }
PropertyAction { target: wrapper; property: "GridView.delayRemove"; value: false }
}
GridView.onAdd: SequentialAnimation {
NumberAnimation { target: wrapper; property: "scale"; from: 0; to: 1; duration: 250; easing.type: Easing.InOutQuad }
}
}
}
}
|
下图是运行初始效果。
改变代理的形状
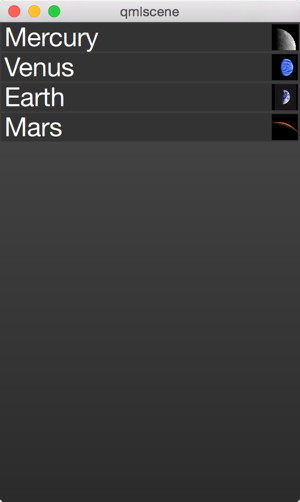
在表现列表时,常常会有这么一种机制:当数据项被选中时,该项会变大以充满屏幕。这种行为可以将被激活的数据项放置在屏幕中央,或者为用户显示更详细的信息。在下面的例子中,ListView的每一个数据项在点击时都会充满整个列表视图,多出来的额外空间用于显示更多信息。我们使用状态实现这种机制。在这个过程中,列表的很多属性都会发生改变。
首先,wrapper的高度会被设置为ListView的高度;缩略图会变大,从先前的位置移动到一个更大的位置。除此以外,两个隐藏的组件,factsView和closeButton会显示在恰当的位置。最后,ListView的contentsY属性会被重新设置为代理的y值。contentsY属性其实就是视图的可见部分的顶部距离。视图的interactive属性会被设置为false,这可以避免用户通过拖动滚动条使视图移动。当数据项第一次被点击时,它会进入expanded状态,是其代理充满整个ListView,并且重新布局内容。当点击关闭按钮时,expanded状态被清除,代理重新回到原始的状态,ListView的交互也重新被允许。
|
1
2
3
4
5
6
7
8
9
10
11
12
13
14
15
16
17
18
19
20
21
22
23
24
25
26
27
28
29
30
31
32
33
34
35
36
37
38
39
40
41
42
43
44
45
46
47
48
49
50
51
52
53
54
55
56
57
58
59
60
61
62
63
64
65
66
67
68
69
70
71
72
73
74
75
76
77
78
79
80
81
82
83
84
85
86
87
88
89
90
91
92
93
94
95
96
97
98
99
100
101
102
103
104
105
106
107
108
109
110
111
112
113
114
115
116
117
118
119
120
121
122
123
124
125
126
127
128
129
130
131
132
133
134
135
136
137
138
139
140
141
142
143
144
145
146
147
148
149
150
151
152
153
154
155
156
157
158
159
160
161
162
163
164
165
166
167
168
169
170
171
|
import QtQuick 2.0
Item {
width: 300
height: 480
Rectangle {
anchors.fill: parent
gradient: Gradient {
GradientStop { position: 0.0; color: "#4a4a4a" }
GradientStop { position: 1.0; color: "#2b2b2b" }
}
}
ListView {
id: listView
anchors.fill: parent
delegate: detailsDelegate
model: planets
}
ListModel {
id: planets
ListElement { name: "Mercury"; imageSource: "images/mercury.jpeg"; facts: "Mercury is the smallest planet in the Solar System. It is the closest planet to the sun. It makes one trip around the Sun once every 87.969 days." }
ListElement { name: "Venus"; imageSource: "images/venus.jpeg"; facts: "Venus is the second planet from the Sun. It is a terrestrial planet because it has a solid, rocky surface. The other terrestrial planets are Mercury, Earth and Mars. Astronomers have known Venus for thousands of years." }
ListElement { name: "Earth"; imageSource: "images/earth.jpeg"; facts: "The Earth is the third planet from the Sun. It is one of the four terrestrial planets in our Solar System. This means most of its mass is solid. The other three are Mercury, Venus and Mars. The Earth is also called the Blue Planet, 'Planet Earth', and 'Terra'." }
ListElement { name: "Mars"; imageSource: "images/mars.jpeg"; facts: "Mars is the fourth planet from the Sun in the Solar System. Mars is dry, rocky and cold. It is home to the largest volcano in the Solar System. Mars is named after the mythological Roman god of war because it is a red planet, which signifies the colour of blood." }
}
Component {
id: detailsDelegate
Item {
id: wrapper
width: listView.width
height: 30
Rectangle {
anchors.left: parent.left
anchors.right: parent.right
anchors.top: parent.top
height: 30
color: "#333"
border.color: Qt.lighter(color, 1.2)
Text {
anchors.left: parent.left
anchors.verticalCenter: parent.verticalCenter
anchors.leftMargin: 4
font.pixelSize: parent.height-4
color: '#fff'
text: name
}
}
Rectangle {
id: image
width: 26
height: 26
anchors.right: parent.right
anchors.top: parent.top
anchors.rightMargin: 2
anchors.topMargin: 2
color: "black"
Image {
anchors.fill: parent
fillMode: Image.PreserveAspectFit
source: imageSource
}
}
MouseArea {
anchors.fill: parent
onClicked: parent.state = "expanded"
}
Item {
id: factsView
anchors.top: image.bottom
anchors.left: parent.left
anchors.right: parent.right
anchors.bottom: parent.bottom
opacity: 0
Rectangle {
anchors.fill: parent
gradient: Gradient {
GradientStop { position: 0.0; color: "#fed958" }
GradientStop { position: 1.0; color: "#fecc2f" }
}
border.color: '#000000'
border.width: 2
Text {
anchors.fill: parent
anchors.margins: 5
clip: true
wrapMode: Text.WordWrap
color: '#1f1f21'
font.pixelSize: 12
text: facts
}
}
}
Rectangle {
id: closeButton
anchors.right: parent.right
anchors.top: parent.top
anchors.rightMargin: 2
anchors.topMargin: 2
width: 26
height: 26
color: "#157efb"
border.color: Qt.lighter(color, 1.1)
opacity: 0
MouseArea {
anchors.fill: parent
onClicked: wrapper.state = ""
}
}
states: [
State {
name: "expanded"
PropertyChanges { target: wrapper; height: listView.height }
PropertyChanges { target: image; width: listView.width; height: listView.width; anchors.rightMargin: 0; anchors.topMargin: 30 }
PropertyChanges { target: factsView; opacity: 1 }
PropertyChanges { target: closeButton; opacity: 1 }
PropertyChanges { target: wrapper.ListView.view; contentY: wrapper.y; interactive: false }
}
]
transitions: [
Transition {
NumberAnimation {
duration: 200;
properties: "height,width,anchors.rightMargin,anchors.topMargin,opacity,contentY"
}
}
]
}
}
}
|
运行结果如下所示:
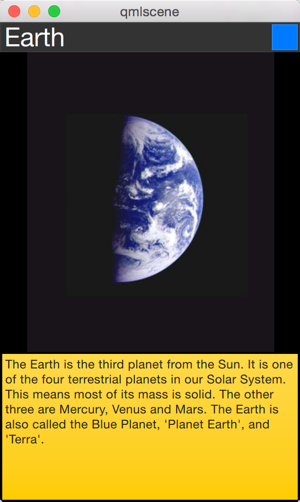
点击每一项可以开始一个动画:
这里展示的技术在某些方面非常实用,比如一些歌曲播放器允许用户在点击某首歌曲后,会将该歌曲的信息放大显示等。
Qt 学习之路 :视图代理的更多相关文章
- Qt 学习之路 2(47):视图选择
Qt 学习之路 2(47):视图选择 豆子 2013年3月28日 Qt 学习之路 2 34条评论 选择是视图中常用的一个操作.在列表.树或者表格中,通过鼠标点击可以选中某一项,被选中项会变成高亮或者反 ...
- Qt 学习之路 2(46):视图和委托
Home / Qt 学习之路 2 / Qt 学习之路 2(46):视图和委托 Qt 学习之路 2(46):视图和委托 豆子 2013年3月11日 Qt 学习之路 2 63条评论 前面我们介绍了 ...
- 《Qt 学习之路 2》目录
<Qt 学习之路 2>目录 <Qt 学习之路 2>目录 豆子 2012年8月23日 Qt 学习之路 2 177条评论 <Qt 学习之路 2>目录 序 Qt ...
- Qt 学习之路 2(65):访问网络(1)
Home / Qt 学习之路 2 / Qt 学习之路 2(65):访问网络(1) Qt 学习之路 2(65):访问网络(1) 豆子 2013年10月11日 Qt 学习之路 2 18条评论 现在 ...
- Qt 学习之路 2(57):可视化显示数据库数据
Qt 学习之路 2(57):可视化显示数据库数据(skip) 豆子 2013年6月26日 Qt 学习之路 2 26条评论 前面我们用了两个章节介绍了 Qt 提供的两种操作数据库的方法.显然,使用QSq ...
- Qt 学习之路 2(51):布尔表达式树模型
Qt 学习之路 2(51):布尔表达式树模型 豆子 2013年5月15日 Qt 学习之路 2 17条评论 本章将会是自定义模型的最后一部分.原本打算结束这部分内容,不过实在不忍心放弃这个示例.来自于 ...
- Qt 学习之路 2(50):自定义可编辑模型
Home / Qt 学习之路 2 / Qt 学习之路 2(50):自定义可编辑模型 Qt 学习之路 2(50):自定义可编辑模型 豆子 2013年5月13日 Qt 学习之路 2 13条评论 上一章我们 ...
- Qt 学习之路 2(49):自定义只读模型
Qt 学习之路 2(49):自定义只读模型 豆子 2013年5月5日 Qt 学习之路 2 18条评论 model/view 模型将数据与视图分割开来,也就是说,我们可以为不同的视图,QListView ...
- Qt 学习之路 2(48):QSortFilterProxyModel
Qt 学习之路 2(48):QSortFilterProxyModel 豆子 2013年4月11日 Qt 学习之路 2 6条评论 从本章开始,我们将逐步了解有关自定义模型的相关内容.尽管前面我们曾经介 ...
- Qt 学习之路 2(45):模型
Home / Qt 学习之路 2 / Qt 学习之路 2(45):模型 Qt 学习之路 2(45):模型 豆子 2013年2月26日 Qt 学习之路 2 23条评论 在前面两章的基础之上,我们 ...
随机推荐
- C# C/S系统软件开发平台架构图(原创)
企业版V4.0 - 架构图 企业版V4.0 - 桥接功能.后台连接策略 桥接功能是指应用策略模式,由用户配置本地INI文件选择ADO直连(ADO-Direct)或者调用WCF服务接口访问远程服务器后台 ...
- 1.1机器学习基础-python深度机器学习
参考彭亮老师的视频教程:转载请注明出处及彭亮老师原创 视频教程: http://pan.baidu.com/s/1kVNe5EJ 1. 课程介绍 2. 机器学习 (Machine Learning, ...
- Quartz1.8.5例子(一)
/* * Copyright 2005 - 2009 Terracotta, Inc. * * Licensed under the Apache License, Version 2.0 (the ...
- iOS代码实现:创建按钮,绑定按钮事件,读取控件值
// // main.m // Hello // // Created by lishujun on 14-8-28. // Copyright (c) 2014年 lishujun. All rig ...
- mysql 服务意外停止1067错误解决办法小结
今天在配置服务器时安装mysql5.5总是无法安装,查看日志错误提示为1067错误,下面来看我的解决办法 事件类型: 错误 事件来源: Service Control Manager 事件种类: 无 ...
- android5.0中RecycleView的用法
最近学习了android5.0中新增的一个组件RecycleView,是用来代替当前的listview开发的,是因为在RecycleView中已经有了viewholder缓存,并且不同的item之间可 ...
- 【HDOJ】3592 World Exhibition
基础差分约束. /* 3592 */ #include <iostream> #include <algorithm> #include <queue> #incl ...
- 【HDOJ】4587 TWO NODES
Tarjan解无向图的割点和桥,参考白书. /* 4587 */ #include <iostream> #include <vector> #include <algo ...
- 关于在C#中数组(byte[])复制方式
{ int[] src = new[] { 1, 2, 3, 4, 5, 6 }; const int destLen = 4;//目标数组大小 ...
- HDOJ/HDU 1297 Children’s Queue(推导~大数)
Problem Description There are many students in PHT School. One day, the headmaster whose name is Pig ...