python使用rabbitMQ介绍四(路由模式)
一、模式介绍
路由模式,与发布-订阅模式一样,消息发送到exchange中,消费者把队列绑定到exchange上。
这种模式在exchange上添加添加了一个路由键(routing-key),生产者发布消息的时候添加路由键(routing-key),消费者绑定队列到交换机时添加键值(routing-key),这样就可以接收到对应的消息。
路由模式的direct exchange。
队列模型:

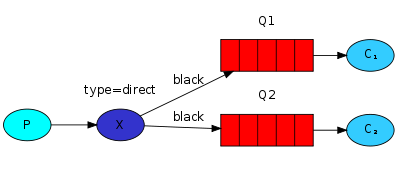
与发布-订阅模式不同的是,每个消费者队列接收的消息不同,根据消息的routing-key把消息发送到不同的队列中。
当所有的消费队列绑定的routing-key一样时,路由模式行为与发布-订阅模式一样。
二、代码示意
发布者:不再创建队列,发送消息到exchange(交换机)中。exchange_type为direct。
 import pika

 import sys

 connection = pika.BlockingConnection(pika.ConnectionParameters(host='localhost'))

 channel = connection.channel()

 channel.exchange_declare(exchange='direct_logs',

                          exchange_type='direct')

 severity = ['info', 'warning', 'error']

 for i in range(20):

     message = '{} Hello World! {}'.format(i, severity[i % 3])

     channel.basic_publish(exchange='direct_logs',

                           routing_key=severity[i % 3],

                           body=message)

     print(" [x] Sent: {}".format(message))

 connection.close()
每个消费者绑定的队列定义不同的routing-key,接收到不同的消息。
以info为示例:
 import pika

 import sys

 connection = pika.BlockingConnection(pika.ConnectionParameters(host='localhost'))

 channel = connection.channel()

 channel.exchange_declare(exchange='direct_logs',

                          exchange_type='direct')

 result = channel.queue_declare(exclusive=True)

 queue_name = result.method.queue

 channel.queue_bind(exchange='direct_logs',

                    queue=queue_name,

                    routing_key='info')

 print(' [*] Waiting for logs. To exit press CTRL+C')

 def callback(ch, method, properties, body):

     print(" [x] %r:%r" % (method.routing_key, body))

 channel.basic_consume(callback,

                       queue=queue_name,

                       no_ack=True)

 channel.start_consuming()
执行结果输出:
发布者:
[x] Sent: 0 Hello World! info

 [x] Sent: 1 Hello World! warning

 [x] Sent: 2 Hello World! error

 [x] Sent: 3 Hello World! info

 [x] Sent: 4 Hello World! warning

 [x] Sent: 5 Hello World! error

 [x] Sent: 6 Hello World! info

 [x] Sent: 7 Hello World! warning

 [x] Sent: 8 Hello World! error

 [x] Sent: 9 Hello World! info

 [x] Sent: 10 Hello World! warning

 [x] Sent: 11 Hello World! error

 [x] Sent: 12 Hello World! info

 [x] Sent: 13 Hello World! warning

 [x] Sent: 14 Hello World! error

 [x] Sent: 15 Hello World! info

 [x] Sent: 16 Hello World! warning

 [x] Sent: 17 Hello World! error

 [x] Sent: 18 Hello World! info

 [x] Sent: 19 Hello World! warning
Info输出:
[*] Waiting for logs. To exit press CTRL+C

 [x] 'info':b'0 Hello World! info'

 [x] 'info':b'3 Hello World! info'

 [x] 'info':b'6 Hello World! info'

 [x] 'info':b'9 Hello World! info'

 [x] 'info':b'12 Hello World! info'

 [x] 'info':b'15 Hello World! info'

 [x] 'info':b'18 Hello World! info'
Warning输出:
[*] Waiting for logs. To exit press CTRL+C

 [x] 'warning':b'1 Hello World! warning'

 [x] 'warning':b'4 Hello World! warning'

 [x] 'warning':b'7 Hello World! warning'

 [x] 'warning':b'10 Hello World! warning'

 [x] 'warning':b'13 Hello World! warning'

 [x] 'warning':b'16 Hello World! warning'

 [x] 'warning':b'19 Hello World! warning'
Error输出:
[*] Waiting for logs. To exit press CTRL+C

 [x] 'error':b'2 Hello World! error'

 [x] 'error':b'5 Hello World! error'

 [x] 'error':b'8 Hello World! error'

 [x] 'error':b'11 Hello World! error'

 [x] 'error':b'14 Hello World! error'

 [x] 'error':b'17 Hello World! error'
可以看到,不同的消费者收到不同级别的日志信息。
三、队列信息
管理页面,exchange页面,点击“direct_logs”上查看队列情况,可以看到三个不同routing_key的队列
routing key列展示了对应的key。

python使用rabbitMQ介绍四(路由模式)的更多相关文章
- python使用rabbitMQ介绍五(话题模式)
一.模式介绍 话题模式(Topic)基本思想和路由模式是一样的,只不过路由键支持模糊匹配,符号“#”匹配一个或多个词,符号“*”匹配不多不少一个词 话题模式相当于消息的模糊匹配,或者按照正则匹配.其中 ...
- python使用rabbitMQ介绍一(生产-消费者模式)
1 模式介绍 生产者-消费者模式是最简单的使用模式. 一个生产者P,给队列发送消息,一个消费者C来取队列的消息. 这里的队列长度不限,生产者和消费者都不用考虑队列的长度. 队列的模型图: 2 示例代码 ...
- python使用rabbitMQ介绍三(发布订阅模式)
一.模式介绍 在前面的例子中,消息直接发送到queue中. 现在介绍的模式,消息发送到exchange中,消费者把队列绑定到exchange上. 发布-订阅模式是把消息广播到每个消费者,每个消费者接收 ...
- python使用rabbitMQ介绍二(工作队列模式)
一模式介绍 第一章节的生产-消费者模式,是非常简单的模式,一发一收.在实际的应用中,消费者有的时候需要工作较长的时间,则需要增加消费者. 队列模型: 这时mq实现了一下几个功能: rabbitmq循环 ...
- Python 操作rabbitmq中的confirm模式的错误
今天使用rabbitmq的confirm模式,书上介绍的是pika版本是0.9.6,但是我用的是别的版本,发现这样的错误 Traceback (most recent call last): Fil ...
- RabbitMQ学习第四记:路由模式(direct)
1.什么是路由模式(direct) 路由模式是在使用交换机的同时,生产者指定路由发送数据,消费者绑定路由接受数据.与发布/订阅模式不同的是,发布/订阅模式只要是绑定了交换机的队列都会收到生产者向交换机 ...
- python - 操作RabbitMQ
python - 操作RabbitMQ 介绍 RabbitMQ是一个在AMQP基础上完整的,可复用的企业消息系统.他遵循Mozilla Public License开源协议.MQ全称为Mess ...
- ASP.NET Core路由中间件[2]: 路由模式
一个Web应用本质上体现为一组终结点的集合.终结点则体现为一个暴露在网络中可供外界采用HTTP协议调用的服务,路由的作用就是建立一个请求URL模式与对应终结点之间的映射关系.借助这个映射关系,客户端可 ...
- RabbitMq四种模式介绍和授权
rabbitmqctl change_password admin admin123 修改admin密码 界面管理和授权操作 1新增用户 rabbitmqctl add_user admin amin ...
随机推荐
- 2019-01-20 JavaScript实现ZLOGO: 界面改进与速度可调
续前文JavaScript实现ZLOGO: 前进方向和速度 在线演示地址: http://codeinchinese.com/%E5%9C%883/%E5%9C%883.html 源码仍在: prog ...
- July 10th, 2018. Tuesday, Week 28th
Winning isn't everything, but wanting it is. 胜利并不能代表一切,但求胜心可以. From Arnold Palmer. Compared to this ...
- Git报错 bad numeric config value '100000' for 'pack.windowmemory': out of range
Git报错 bad numeric config value '10240M' for 'pack.windowmemory': out of range $ git config --edit -- ...
- erlang 删除老版本 安装新版本
[root@izbp1buyhgwtrvlxv3u2gqz ~]# yum remove erlang-erts-R16B-03.18.el7.x86_64Loaded plugins: fastes ...
- shell 编程记录
1 文件比较运算符-e filename 如果 filename存在,则为真 [ -e /var/log/syslog ]-d filename 如果 filename为目录,则为真 [ -d /tm ...
- Caused by: org.springframework.beans.factory.NoSuchBeanDefinitionException: No qualifying bean of type 'com.thinkplatform.dao.UserLogDao' available: expected at least 1 bean which qualifies as autowi
我出错的问题是: 检查:
- AI - TensorFlow - 第一个神经网络(First Neural Network)
Hello world # coding=utf-8 import tensorflow as tf import os os.environ[' try: tf.contrib.eager.enab ...
- Docker & ASP.NET Core (3):发布镜像
第一篇:把代码连接到容器 第二篇:定制Docker镜像 上一篇文章最后有个问题,定制的镜像无法正常运行: 这可能是由于无法找到要运行的dll引起的问题. 之前的Dockerfile的文档我是按照微软的 ...
- C#使用Xamarin开发可移植移动应用(4.进阶篇MVVM双向绑定和命令绑定)附源码
前言 系列目录 C#使用Xamarin开发可移植移动应用目录 源码地址:https://github.com/l2999019/DemoApp 可以Star一下,随意 - - 说点什么.. 嗯..前面 ...
- springboot~Money类型在序列化时遇到的问题与解决
在java扩展包里,有这样一个包,它可以描述货币类型,它说币种和金额组成,可以应用在任何复杂的场合里,这个对象结构如下: { "price": { "amount&quo ...