AutoLayout自动布局
原文转自http://www.cnblogs.com/xjf125/p/4895978.html
目录:
4的不给力,当时并没有得到很大推广。自iOS 7(Xcode
5)开始,Autolayout的开发效率得到很大的提升,Autolayout能很轻松地解决屏幕适配的问题。苹果官方也推荐开发者尽量使用
Autolayout来布局UI界面。
1、Autolayout的2个核心概念
(1)参照:将某个UI控件作为参照标示,进行确定该控件的位置;
在添加时要注意目标view需要遵循以下规则:
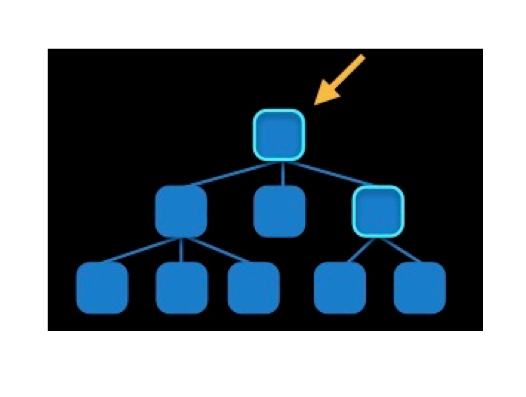
1)对于两个同层级view之间的约束关系,添加到它们的父view上
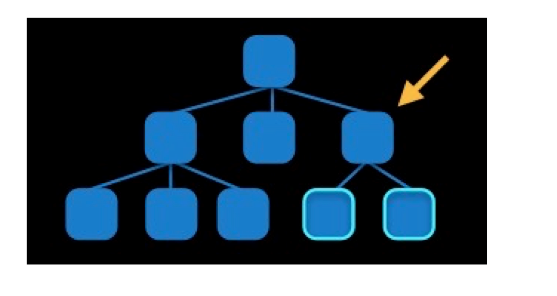
2)对于两个不同层级view之间的约束关系,添加到他们最近的共同父view上
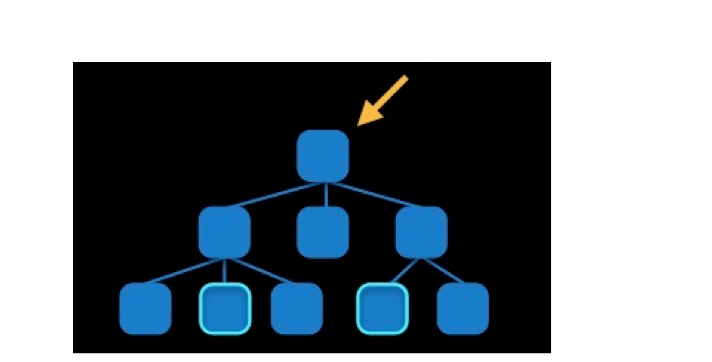
3)对于有层次关系的两个view之间的约束关系,添加到层次较高的父view上
二、创建autoLayout的方法
1、手动布局
2、纯代码方式
(1)利用NSLayoutConstraint类创建具体的约束对象
(2)添加约束对象到相应的view上

#import "ViewController.h"

@interface ViewController ()

@property(strong,nonatomic)UIView *view1;

@property(strong,nonatomic)UIView *view2;

@end

@implementation ViewController

- (void)viewDidLoad {

    [super viewDidLoad];

    //创建view1

    self.view1 = [[UIView alloc]init];

    self.view1.backgroundColor = [UIColor redColor];

    self.view1.translatesAutoresizingMaskIntoConstraints = NO;

    [self.view addSubview:self.view1];

    //创建view2

    self.view2 = [[UIView alloc]init];

    self.view2.backgroundColor = [UIColor yellowColor];

    self.view2.translatesAutoresizingMaskIntoConstraints = NO;

    [self.view addSubview:self.view2];

    //创建约束

    //设置view1的左边距

    NSLayoutConstraint *lcLeft = [NSLayoutConstraint constraintWithItem:self.view1 attribute:NSLayoutAttributeLeading relatedBy:NSLayoutRelationEqual toItem:self.view attribute:NSLayoutAttributeLeading multiplier:1.0 constant:];

    //设置view1的下边距

    NSLayoutConstraint *lcBottom = [NSLayoutConstraint constraintWithItem:self.view1 attribute:NSLayoutAttributeBottom relatedBy:NSLayoutRelationEqual toItem:self.view attribute:NSLayoutAttributeBottom multiplier:1.0 constant:-];

    //设置view1与view2等宽

    NSLayoutConstraint *lcEqualWidth = [NSLayoutConstraint constraintWithItem:self.view1 attribute:NSLayoutAttributeWidth relatedBy:NSLayoutRelationEqual toItem:self.view2 attribute:NSLayoutAttributeWidth multiplier:1.0 constant:];

    //设置view1与view2等高

    NSLayoutConstraint *lcEqualHeight = [NSLayoutConstraint constraintWithItem:self.view2 attribute:NSLayoutAttributeHeight relatedBy:NSLayoutRelationEqual toItem:self.view1 attribute:NSLayoutAttributeHeight multiplier:1.0 constant:];

    //设置view2的右边距

    NSLayoutConstraint *lcRight = [NSLayoutConstraint constraintWithItem:self.view2 attribute:NSLayoutAttributeTrailing relatedBy:NSLayoutRelationEqual toItem:self.view attribute:NSLayoutAttributeTrailing multiplier:1.0 constant:-];

    //设置view2的下边距

    NSLayoutConstraint *lcBottom2 = [NSLayoutConstraint constraintWithItem:self.view2 attribute:NSLayoutAttributeBottom relatedBy:NSLayoutRelationEqual toItem:self.view attribute:NSLayoutAttributeBottom multiplier:1.0 constant:-];

    //设置view1与view2的间隔

    NSLayoutConstraint *lcGap = [NSLayoutConstraint constraintWithItem:self.view2 attribute:NSLayoutAttributeLeading relatedBy:NSLayoutRelationEqual toItem:self.view1 attribute:NSLayoutAttributeTrailing multiplier:1.0 constant:];

    //添加约束到组

    [self.view addConstraints:@[lcLeft,lcBottom,lcRight,lcBottom2,lcEqualHeight,lcEqualWidth,lcGap]];

    //设置view的高度

    NSLayoutConstraint *lcFixedHeight = [NSLayoutConstraint constraintWithItem:self.view1 attribute:NSLayoutAttributeHeight relatedBy:NSLayoutRelationEqual toItem:nil attribute:NSLayoutAttributeHeight multiplier:1.0 constant:];

    [self.view1 addConstraint:lcFixedHeight];

}

@end
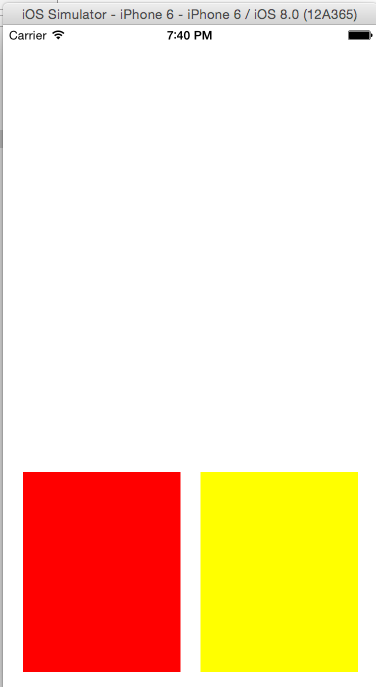
运行效果图,如下所示:
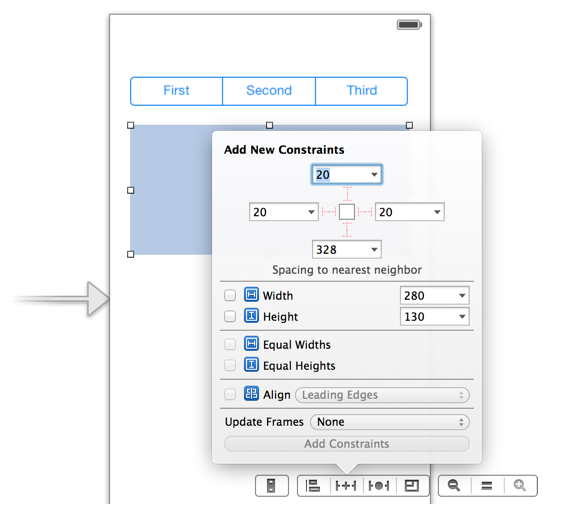
(1)要先禁止autoresizing功能,设置view的下面属性为NO
(2)添加约束之前,一定要保证相关控件都已经在各自的父控件上
(3)不用再给view设置frame
2.3创建约束对象的常用方法
+(id)constraintWithItem:(id)view1
attribute:(NSLayoutAttribute)attr1 relatedBy:(NSLayoutRelation)relation
toItem:(id)view2 attribute:(NSLayoutAttribute)attr2
multiplier:(CGFloat)multiplier constant:(CGFloat)c;
参数解析:
(1)view1 :要约束的控件
(2)attr1 :约束的类型(做怎样的约束)
(3)relation :与参照控件之间的关系
(4)view2 :参照的控件
(5)attr2 :约束的类型(做怎样的约束)
(6)multiplier :乘数
(7)c :常量
三、VFL语言
VFL全称是Visual Format Language,翻译过来是“可视化格式语言”,VFL是苹果公司为了简化Autolayout的编码而推出的抽象语言。
1、简单VFL示例:
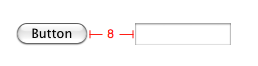
1.[button]-[textField]
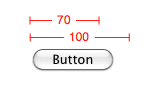
2.[button(>=50)]
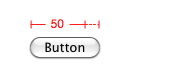
3.|-50-[purpleBox]-50-|
4.V:[topField]-10-[bottomField]

5.[maroonView][blueView]

6.[button(100@20)]

7.[button(==button2)]

8.[flexibleButton(>=70,<=100)]
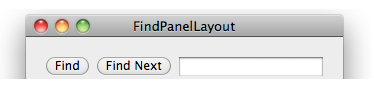
9.|-[find]-[findNext]-[findField(>=20)]-|
2.复杂示例(带说明):
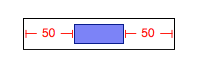
H:[cancelButton(72)]-12-[acceptButton(50)]
说明:canelButton宽72,acceptButton宽50,它们之间间距12
H:[wideView(>=60@700)]
说明:wideView宽度大于等于60point,该约束条件优先级为700(优先级最大值为1000,优先级越高的约束越先被满足)
V:[redBox]-[yellowBox(==redBox)]
说明:竖直方向上,先有一个redBox,其下方紧接一个高度等于redBox高度的yellowBox
H:|-10-[Find]-[FindNext]-[FindField(>=20)]-|
说明:水平方向上,Find距离父view左边缘默认间隔宽度,之后是FindNext距离Find间隔默认宽度;再之后是宽度不小于20的
FindField,它和FindNext以及父view右边缘的间距都是默认宽度。(竖线“|”表示superview的边缘)
3.使用VFL来创建约束数组
+ (NSArray *)constraintsWithVisualFormat:(NSString *)format
options:(NSLayoutFormatOptions)opts metrics:(NSDictionary *)metrics
views:(NSDictionary *)views;
参数说明:
(1)format :VFL语句
(2)opts :约束类型
(3)metrics :VFL语句中用到的具体数值
(4)views :VFL语句中用到的控件
案例分析:通过VFL语句实现上个案例
#import "ViewController.h"

@interface ViewController ()

@property(strong,nonatomic)UIView *view1;

@property(strong,nonatomic)UIView *view2;

@end

@implementation ViewController

- (void)viewDidLoad {

    [super viewDidLoad];

    //创建view1

    self.view1 = [[UIView alloc]init];

    self.view1.backgroundColor = [UIColor redColor];

    self.view1.translatesAutoresizingMaskIntoConstraints = NO;

    [self.view addSubview:self.view1];

    //创建view2

    self.view2 = [[UIView alloc]init];

    self.view2.backgroundColor = [UIColor blueColor];

    self.view2.translatesAutoresizingMaskIntoConstraints = NO;

    [self.view addSubview:self.view2];

    //使用VFL语言添加约束

    NSDictionary *metrics = @{@"gap":@,@"height":@};

    NSDictionary *viewsDic =@{@"view1":self.view1,@"view2":self.view2};

    NSArray *layoutConstraints1 = [NSLayoutConstraint constraintsWithVisualFormat:@"H:|-gap-[view1]-gap-[view2(==view1)]-gap-|" options:NSLayoutFormatDirectionLeftToRight metrics:metrics views:viewsDic];

    NSArray *layoutConstraints2 = [NSLayoutConstraint constraintsWithVisualFormat:@"V:[view1(height)]-gap-|" options:NSLayoutFormatDirectionLeadingToTrailing metrics:metrics views:viewsDic];

     NSArray *layoutConstraints3 = [NSLayoutConstraint constraintsWithVisualFormat:@"V:[view2(==view1)]-gap-|" options:NSLayoutFormatDirectionLeadingToTrailing metrics:metrics views:viewsDic];

    [self.view addConstraints:layoutConstraints1];

    [self.view addConstraints:layoutConstraints2];

    [self.view addConstraints:layoutConstraints3];

}

@end
AutoLayout自动布局的更多相关文章
- AutoLayout(自动布局)
1. iOS两种自适应布局方式:(修正说明:) -AutoLayout(自动布局) + SizeClasses(尺寸类别) -Autoresizing (自动调整尺寸/弹簧式调整尺寸) 前者 Auto ...
- iOS AutoLayout自动布局&Masonry介绍与使用实践
Masonry介绍与使用实践:快速上手Autolayout http://www.cnblogs.com/xiaofeixiang/p/5127825.html http://www.cocoachi ...
- iOS:Autolayout自动布局实例
Autolayout自动布局实例即可以用故事板布局,也可以用纯代码创建,各有各的优点:用故事板布局,比较方便,而且直观,可以很直白的看到视图布局后的变化:采用代码布局,虽然代码比较多,有些麻烦,但是可 ...
- 轻量级应用开发之(06)Autolayout自动布局1
一 什么是Autolayout Autolayout是一种“自动布局”技术,专门用来布局UI界面的. 自IOS7 (Xcode 5)开始,Autolayout的开发效率得到很大的提高. 苹果官方也推荐 ...
- AutoLayout自动布局之VFL语言代码实现(一个神奇的语言)
一.什么是VFL语言?为什么要VFL语言? VFL全称是Visual Format Language,翻译过来是“可视化格式语言” VFL是苹果公司为了简化Autolayout的编码而推出的抽象语言 ...
- AutoLayout自动布局,NSLayoutConstraint 视图约束使用
一.方法 NSLayoutConstraint *constraint = [NSLayoutConstraint constraintWithItem:<#(id)#> attribut ...
- 轻量级应用开发之(06)Autolayout自动布局2
一 Masonry 下载地址:https://github.com/SnapKit/Masonry
- 几种AutoLayout自动布局所经常使用的布局约束类型
width表示约束ui控件的固定宽度 height表示约束ui控件的固定高度 Leading Space to Superview 与父视图的左边界线保持固定距离 Trailing Space to ...
- [OC] autoLayout 博客文档
tip :记录几个博客文档 iOS 8 Auto Layout界面自动布局系列5-自身内容尺寸约束.修改约束.布局动画 iOS AutoLayout自动布局中级开发教程(5)-修改约束的值,延迟加载 ...
随机推荐
- 解析导航栏的url--selnium,beautifulsoup实战
前段时间做ui自动化测试的时候,导航栏菜单始终有点问题,最后只好直接获取到url,然后直接使用driver.get(url)进入页面: 包括做压测的时候,比如我要找出所有报表菜单的url,这样不可能手 ...
- Qt实现小功能之列表无限加载
概念介绍 无限加载与瀑布流的结合在Web前端开发中的效果非常新颖,对于网页内容具备较好的表现形式.无限加载并没有一次性将内容全部加载进来,而是通过监听滚动条事件来刷新内容的.当用户往下拖动滚动条或使用 ...
- SQL2005四个排名函数(row_number、rank、dense_rank和ntile)的比较
排名函数是SQL Server2005新加的功能.在SQL Server2005中有如下四个排名函数: .row_number .rank .dense_rank .ntile 下面分别介绍一下这四个 ...
- 使用archiver在nodejs下打包
archiver是一个在nodejs中能跨平台实现打包功能的模块,可以打zip和tar包,是一个比较好用的三方模块. 使用前先安装archiver模块. npm install archiver 建立 ...
- ListActivity的使用
Android中经常用到列表,ListActivity是实现列表的一种好方法. 使用ListActivity的方法,首先定义布局文件: <?xml version="1.0" ...
- UVALive 4987---Evacuation Plan(区间DP)
题目链接 https://icpcarchive.ecs.baylor.edu/index.php?option=com_onlinejudge&Itemid=8&page=show_ ...
- Scalaz(39)- Free :a real monadic program
一直感觉FP比较虚,可能太多学术性的东西,不知道如何把这些由数学理论在背后支持的一套全新数据类型和数据结构在现实开发中加以使用.直到Free Monad,才真正感觉能用FP方式进行编程了.在前面我们已 ...
- PHP与MySQL的交互(mysqli)
近期在学习PHP,这里总结一下PHP与MySQL的交互. 这里我们使用mysqli进行连接. mysqli扩展允许我们访问MySQL 4.1及以上版本提供的功能. 想深入了解mysqli的信息可以访问 ...
- [javaSE] 反射-动态加载类
Class.forName(“类的全称”) ①不仅表示了类的类类型,还代表了动态加载类 ②请大家区分编译,运行 ③编译时刻加载类是静态加载类,运行时刻加载类是动态加载类 Ⅰ所有的new对象都是静态加载 ...
- Verilog学习笔记简单功能实现(五)...............序列检测设计
这里采用夏宇闻教授第十五章的序列检测为例来学习; 从以上的状态转换图可以写出状态机的程序: module seqdet(x,out,clk,rst); input x,clk,rst; output ...