Qt 学习之路 2(47):视图选择
Qt 学习之路 2(47):视图选择
选择是视图中常用的一个操作。在列表、树或者表格中,通过鼠标点击可以选中某一项,被选中项会变成高亮或者反色。在 Qt 中,选择也是使用了一种模型。在 model/view 架构中,这种选择模型提供了一种更通用的对选择操作的描述。对于一般应用而言,Qt 内置的选择模型已经足够,但是,Qt 还是允许你创建自己的选择模型,来实现一些特殊的操作。
Qt 使用QItemSelectionModel类获取视图中项目的选择情况。这个模型保持有项目的索引,并且独立于任何视图。这意味着,我们可以让不同的视图共享同一个选择模型,从来达到一种同步操作的目的。选择由选择区域组成。模型只将选区的开始和结束的索引位置记录下来,以保证对于很大的选区也有很好的性能。非连续选区则由多个连续选择组成。
选择会直接应用于选择模型所维护的那些被选中的索引上面。最新的选择就是当前选择。这意味着,即便界面上没有显示有任何项目被选择,如果通过某些命令对选区进行操作,同样会有作用。
在视图中,始终存在一个当前项和被选择项(即便从界面上看不到有任何选择)。与通常所想的不同,当前项和选择项是相互独立的两个状态。一个项目可以即是当前项又是选择项。下表是当前项和选择项的区别:
| 当前项 | 选择项 |
|---|---|
| 只能有一个当前项。 | 可以有多个选择项。 |
| 使用键盘或者鼠标点击可以改变当前项。 | 选择项使用两种状态:选择和未选择,这取决于项目之前的状态和其它一些设置,例如,单选或多选。只有在用户进行交互的时候,这种状态才会发生改变。 |
| 当前项可以使用 F2 或者鼠标双击进行编辑(前提是程序允许)。 | 当前项可以结合另外一个锚点指定被选择或者去除选择的一块选区(或二者的结合)。 |
| 当前项通常会有一个焦点框进行标识。 | 选择项使用选区颜色进行标识。 |
在处理选择的时候,我们可以将QItemSelectionModel当成数据模型中所有数据项的选择状态的一个记录。一旦选择模型创建好,这些数据项就可以在不知道哪些项被选择的情况下进行选择、取消选择或者改变选择状态的操作。所有被选择项的索引都在可随时更改,其它组件也可以通过信号槽机制修改这些选择的信息。
标准视图类(QListView、QTreeView以及QTableView)已经提供了默认的选择模型,足以满足大多数应用程序的需求。某一个视图的选择模型可以通过selectionModel()函数获取,然后使用setSelectionModel()提供给其它视图共享,因此,一般没有必要新建选择模型。
如果需要创建一个选区,我们需要指定一个模型以及一对索引,使用这些数据创建一个QItemSelection对象。这两个索引应该指向给定的模型中的数据,并且作为一个块状选区的左上角和右下角的索引。为了将选区应用到模型上,需要将选区提交到选择模型。这种操作有多种实现,对于现有选择模型有着不同的影响。
下面我们来看一些代码片段。首选构建一个总数 32 个数据项的表格模型,然后将其设置为一个表格视图的数据:
QItemSelectionModel *selectionModel = tableWidget.selectionModel();
|
1
2
3
|
QTableWidget tableWidget(8, 4);
QItemSelectionModel *selectionModel = tableWidget.selectionModel();
|
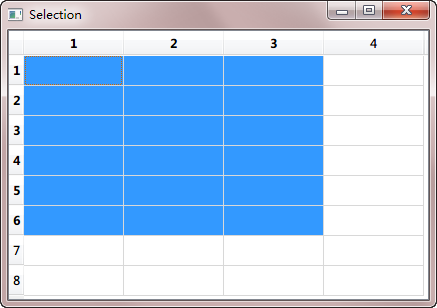
在代码的最后,我们获得QTableView的选择模型,以备以后使用。现在,我们没有修改模型中的数据,而是选择表格左上角的一些单元格。下面我们来看看代码如何实现:
QModelIndex bottomRight = tableWidget.model()->index(5, 2, QModelIndex());
|
1
2
|
QModelIndex topLeft = tableWidget.model()->index(0, 0, QModelIndex());
QModelIndex bottomRight = tableWidget.model()->index(5, 2, QModelIndex());
|
接下来,我们将获得的两个索引定义为选区。为达这一目的,我们首先构造一个QItemSelection对象,然后将其赋值给我们获取的选择模型:
selectionModel->select(selection, QItemSelectionModel::Select);
|
1
2
|
QItemSelection selection(topLeft, bottomRight);
selectionModel->select(selection, QItemSelectionModel::Select);
|
正如前面我们说的,首先利用左上角和右下角的坐标构建一个QItemSelection对象,然后将这个对象设置为选择模型的选择区。select()函数的第一个参数就是需要选择的选区,第二个参数是选区的标志位。Qt 提供了很多不同的操作,可以参考下QItemSelectionModel::SelectionFlags的文档。在本例中,我们使用了QItemSelectionModel::Select,这意味着选区中所包含的所有单元格都会被选择。
下面就是我们的运行结果:
现在我们知道如何设置选区。下面来看看如何获取选区。获取选区需要使用selectedIndexes()函数。该函数返回一个无序列表。我们可以通过遍历这个列表获得哪些被选择:
QModelIndex index;
foreach(index, indexes) {
QString text = QString("(%1,%2)").arg(index.row()).arg(index.column());
model->setData(index, text);
}
|
1
2
3
4
5
6
7
|
QModelIndexList indexes = selectionModel->selectedIndexes();
QModelIndex index;
foreach(index, indexes) {
QString text = QString("(%1,%2)").arg(index.row()).arg(index.column());
model->setData(index, text);
}
|
在选择发生更改时,选择模型会发出信号。我们可以连接selectionChanged()信号,在选区改变时检查哪个项目发生了变化。这个信号有两个参数:第一个是新选择的项目,第二个是刚刚被取消选择的项目。在下面的示例中,我们通过selectionChanged()信号,将所有新选择的项目填充字符串,将所有被取消选择的部分清空:
const QItemSelection &deselected)
{
QModelIndex index;
QModelIndexList items = selected.indexes();
foreach (index, items) {
QString text = QString("(%1,%2)").arg(index.row()).arg(index.column());
model->setData(index, text);
}
items = deselected.indexes();
foreach (index, items) {
model->setData(index, "");
}
}
|
1
2
3
4
5
6
7
8
9
10
11
12
13
14
15
16
17
|
void MainWindow::updateSelection(const QItemSelection &selected,
const QItemSelection &deselected)
{
QModelIndex index;
QModelIndexList items = selected.indexes();
foreach (index, items) {
QString text = QString("(%1,%2)").arg(index.row()).arg(index.column());
model->setData(index, text);
}
items = deselected.indexes();
foreach (index, items) {
model->setData(index, "");
}
}
|
通过currentChanged(),我们可以追踪当前有焦点的项。同selectionChanged()信号类似,这个信号也有两个参数:第一个是新的当前项,第二个是上一个当前项。下面的代码则是该信号的使用:
const QModelIndex &previous)
{
statusBar()->showMessage(
tr("Moved from (%1,%2) to (%3,%4)")
.arg(previous.row()).arg(previous.column())
.arg(current.row()).arg(current.column()));
}
|
1
2
3
4
5
6
7
8
|
void MainWindow::changeCurrent(const QModelIndex ¤t,
const QModelIndex &previous)
{
statusBar()->showMessage(
tr("Moved from (%1,%2) to (%3,%4)")
.arg(previous.row()).arg(previous.column())
.arg(current.row()).arg(current.column()));
}
|
这些信号可以用来监控选区的改变。如果你还要直接更新选区,我们还有另外的方法。
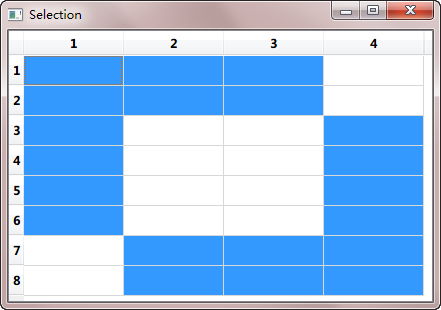
同样是利用前面所说的QItemSelectionModel::SelectionFlag,我们可以对选区进行组合操作。还记得我们在前面的select()函数中使用过的第二个参数吗?当我们替换这个参数,就可以获得不同的组合方式。最常用的就是QItemSelectionModel::Select,它的作用是将所有指定的选区都选择上。QItemSelectionModel::Toggle则是一种取反的操作:如果指定的部分原来已经被选择,则取消选择,否则则选择上。QItemSelectionModel::Deselect则是取消指定的已选择的部分。在下面的例子中,我们使用QItemSelectionModel::Toggle对前面的示例作进一步的操作:
topLeft = tableWidget.model()->index(2, 1, QModelIndex());
bottomRight = tableWidget.model()->index(7, 3, QModelIndex());
toggleSelection.select(topLeft, bottomRight);
selectionModel->select(toggleSelection, QItemSelectionModel::Toggle);
|
1
2
3
4
5
6
7
|
QItemSelection toggleSelection;
topLeft = tableWidget.model()->index(2, 1, QModelIndex());
bottomRight = tableWidget.model()->index(7, 3, QModelIndex());
toggleSelection.select(topLeft, bottomRight);
selectionModel->select(toggleSelection, QItemSelectionModel::Toggle);
|
运行结果将如下所示:
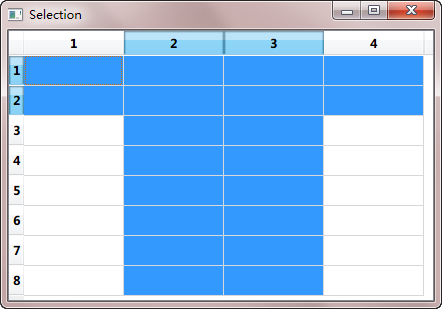
默认情况下,选择操作会只会影响到指定的模型索引。但是,我们也可以改变这一设置。例如,只选择整行或者整列:
topLeft = model->index(0, 1, QModelIndex());
bottomRight = model->index(0, 2, QModelIndex());
columnSelection.select(topLeft, bottomRight);
selectionModel->select(columnSelection,
QItemSelectionModel::Select | QItemSelectionModel::Columns);
QItemSelection rowSelection;
topLeft = model->index(0, 0, QModelIndex());
bottomRight = model->index(1, 0, QModelIndex());
rowSelection.select(topLeft, bottomRight);
selectionModel->select(rowSelection,
QItemSelectionModel::Select | QItemSelectionModel::Rows);
|
1
2
3
4
5
6
7
8
9
10
11
12
13
14
15
16
17
18
19
|
QItemSelection columnSelection;
topLeft = model->index(0, 1, QModelIndex());
bottomRight = model->index(0, 2, QModelIndex());
columnSelection.select(topLeft, bottomRight);
selectionModel->select(columnSelection,
QItemSelectionModel::Select | QItemSelectionModel::Columns);
QItemSelection rowSelection;
topLeft = model->index(0, 0, QModelIndex());
bottomRight = model->index(1, 0, QModelIndex());
rowSelection.select(topLeft, bottomRight);
selectionModel->select(rowSelection,
QItemSelectionModel::Select | QItemSelectionModel::Rows);
|
上面的代码,我们依然使用两个索引设置了一个区域,但是,在选择的使用我们使用了QItemSelectionModel::Rows和QItemSelectionModel::Columns这两个参数,因此只会选择这两个区域中指定的行或者列:
使用QItemSelectionModel::Current参数可以将当前选区替换为新的选区;使用QItemSelectionModel::Clear则会将原来已有的选区全部取消。为了进行全选,我们可以设置选区为左上角和右下角两个索引:
QModelIndex bottomRight = model->index(model->rowCount(parent)-1,
model->columnCount(parent)-1, parent);
QItemSelection selection(topLeft, bottomRight);
selectionModel->select(selection, QItemSelectionModel::Select);
|
1
2
3
4
5
6
|
QModelIndex topLeft = model->index(0, 0, parent);
QModelIndex bottomRight = model->index(model->rowCount(parent)-1,
model->columnCount(parent)-1, parent);
QItemSelection selection(topLeft, bottomRight);
selectionModel->select(selection, QItemSelectionModel::Select);
|
Qt 学习之路 2(47):视图选择的更多相关文章
- Qt 学习之路 :动态视图
Repeater适用于少量的静态数据集.但是在实际应用中,数据模型往往是非常复杂的,并且数量巨大.这种情况下,Repeater并不十分适合.于是,QtQuick 提供了两个专门的视图元素:ListVi ...
- Qt 学习之路:模型-视图高级技术
PathView PathView是 QtQuick 中最强大的视图,同时也是最复杂的.PathView允许创建一种更灵活的视图.在这种视图中,数据项并不是方方正正,而是可以沿着任意路径布局.沿着同一 ...
- Qt 学习之路 2(22):事件总结
Qt 学习之路 2(22):事件总结 豆子 2012年10月16日 Qt 学习之路 2 47条评论 Qt 的事件是整个 Qt 框架的核心机制之一,也比较复杂.说它复杂,更多是因为它涉及到的函数众多,而 ...
- Qt 学习之路 2(46):视图和委托
Home / Qt 学习之路 2 / Qt 学习之路 2(46):视图和委托 Qt 学习之路 2(46):视图和委托 豆子 2013年3月11日 Qt 学习之路 2 63条评论 前面我们介绍了 ...
- Qt 学习之路 2(66):访问网络(2)
Home / Qt 学习之路 2 / Qt 学习之路 2(66):访问网络(2) Qt 学习之路 2(66):访问网络(2) 豆子 2013年10月31日 Qt 学习之路 2 27条评论 上一 ...
- Qt 学习之路 2(57):可视化显示数据库数据
Qt 学习之路 2(57):可视化显示数据库数据(skip) 豆子 2013年6月26日 Qt 学习之路 2 26条评论 前面我们用了两个章节介绍了 Qt 提供的两种操作数据库的方法.显然,使用QSq ...
- Qt 学习之路 2(53):自定义拖放数据
Qt 学习之路 2(53):自定义拖放数据 豆子 2013年5月26日 Qt 学习之路 2 13条评论上一章中,我们的例子使用系统提供的拖放对象QMimeData进行拖放数据的存储.比如使用QM ...
- Qt 学习之路 2(51):布尔表达式树模型
Qt 学习之路 2(51):布尔表达式树模型 豆子 2013年5月15日 Qt 学习之路 2 17条评论 本章将会是自定义模型的最后一部分.原本打算结束这部分内容,不过实在不忍心放弃这个示例.来自于 ...
- Qt 学习之路 2(50):自定义可编辑模型
Home / Qt 学习之路 2 / Qt 学习之路 2(50):自定义可编辑模型 Qt 学习之路 2(50):自定义可编辑模型 豆子 2013年5月13日 Qt 学习之路 2 13条评论 上一章我们 ...
随机推荐
- PHP数据结构之二 线性表中的顺序表的PHP实现
线性表 (一)基本特点:最基本.最简单.最常用的一种数据结构 在这种结构中: 1.存在一个唯一的被称为“第一个”的数据元素: 2.存在一个唯一的被称为“最后一个”的数据元素: 3.除第一个元素外,每个 ...
- HttpRuntime自定义定时更新缓存
缓存更新类如下: /// <summary> /// 缓存更新类 /// </summary> /// <typeparam name="T"> ...
- 求输出和为n的所有连续自然数序列
这是编程之美中的一道题.编程之美中的题目是这样的: 1+2=3 4+5=9 2+3+4=9 等式的左边都是两个或者两个以上的连续自然数相加,那么是不是所有的整数都可以写成这样的形式? 问题1:写个程序 ...
- mfs教程(三)
mfs文件系统(三) 使用 MooseFS 一.挂载文件系统 启动管理服务器(master server)和数据服务器(chunkservers) (chunkservers一个是必需的,但至少两个 ...
- 408. Valid Word Abbreviation有效的单词缩写
[抄题]: Given a non-empty string s and an abbreviation abbr, return whether the string matches with th ...
- ROS naviagtion analysis: costmap_2d--StaticLayer
博客转载自:https://blog.csdn.net/u013158492/article/details/50493246 从UML中能够看到,StaticLayer主要是在实现Layer层要求实 ...
- CMakefile for Cross-Platform Compling - 1
cmake可以自动侦测目标系统,通常编译时候包含的文件和链接的库都不是本地的文件. Demo #toolchain cmake file SET(CMAKE_SYSTEM_NAME Linux) SE ...
- win32多线程 (一) 线程创建与结束等待
#include "stdafx.h"#include <Windows.h>#include <iostream> using namespace std ...
- Luogu 4069 [SDOI2016]游戏
BZOJ 4515 树链剖分 + 李超线段树 要求支持区间插入一条线段,然后查询一个区间内的最小值.可以使用李超线段树解决,因为要维护一个区间内的最小值,所以每一个结点再维护一个$res$表示这个区间 ...
- Logistic Regression 用于预测马是否生病
1.利用Logistic regression 进行分类的主要思想 根据现有数据对分类边界线建立回归公式,即寻找最佳拟合参数集,然后进行分类. 2.利用梯度下降找出最佳拟合参数 3.代码实现 # -* ...