Angular SPA基于Ocelot API网关与IdentityServer4的身份认证与授权(一)
好吧,这个题目我也想了很久,不知道如何用最简单的几个字来概括这篇文章,原本打算取名《Angular单页面应用基于Ocelot API网关与IdentityServer4+ASP.NET Identity实现身份认证与授权》,然而如你所见,这样的名字实在是太长了。所以,我不得不缩写“单页面应用”几个字,然后去掉ASP.NET Identity的描述,最后形成目前的标题。
不过,这也就意味着这篇文章会涵盖很多内容和技术,我会利用这些技术来走通一个完整的流程,这个流程也代表着在微服务架构中单点登录的一种实现模式。在此过程中,我们会使用到如下技术或框架:
- Angular 8
- Ocelot API Gateway
- IdentityServer4
- ASP.NET Identity
- Entity Framework Core
- SQL Server
本文假设读者具有上述技术框架的基础知识。由于内容比较多,我还是将这篇文章分几个部分进行讲解和讨论。
场景描述
在微服务架构下的一种比较流行的设计,就是基于前后端分离,前端只做呈现和用户操作流的管理,后端服务由API网关同一协调,以从业务层面为前端提供各种服务。大致可以用下图表示:
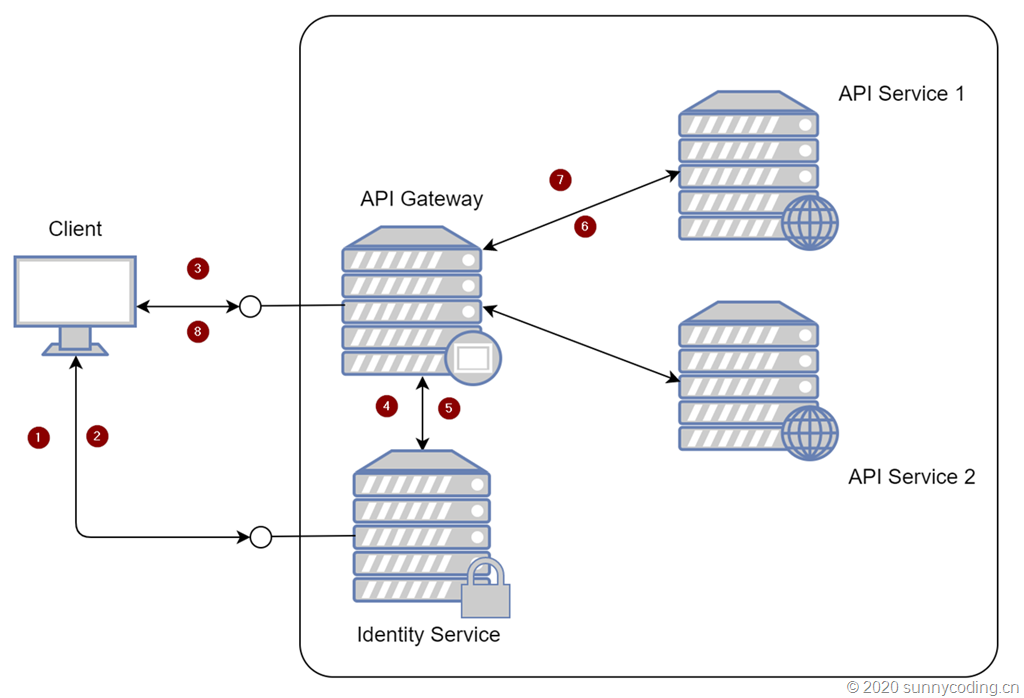
在这个结构中,我没有将Identity Service放在API Gateway后端,因为考虑到Identity Service本身并没有承担任何业务功能。从它所能提供的端点(Endpoint)的角度,它也需要做负载均衡、熔断等保护,但我们暂时不讨论这些内容。
流程上其实也比较简单,在上图的数字标识中:
- Client向Identity Service发送认证请求,通常可以是用户名密码
- 如果验证通过,Identity Service会向Client返回认证的Token
- Client使用Token向API Gateway发送API调用请求
- API Gateway将Client发送过来的Token发送给Identity Service,以验证Token的有效性
- 如果验证成功,Identity Service会告知API Gateway认证成功
- API Gateway转发Client的请求到后端API Service
- API Service将结果返回给API Gateway
- API Gateway将API Service返回的结果转发到Client
只是在这些步骤中,我们有很多技术选择,比如Identity Service的实现方式、认证方式等等。接下来,我就在ASP.NET Core的基础上使用IdentityServer4、Entity Framework Core和Ocelot来完成这一流程。在完成整个流程的演练之前,需要确保机器满足以下条件:
- 安装Visual Studio 2019 Community Edition。使用Visual Studio Code也是可以的,根据自己的需要选择
- 安装Visual Studio Code
- 安装Angular 8
IdentityServer4结合ASP.NET Identity实现Identity Service
创建新项目
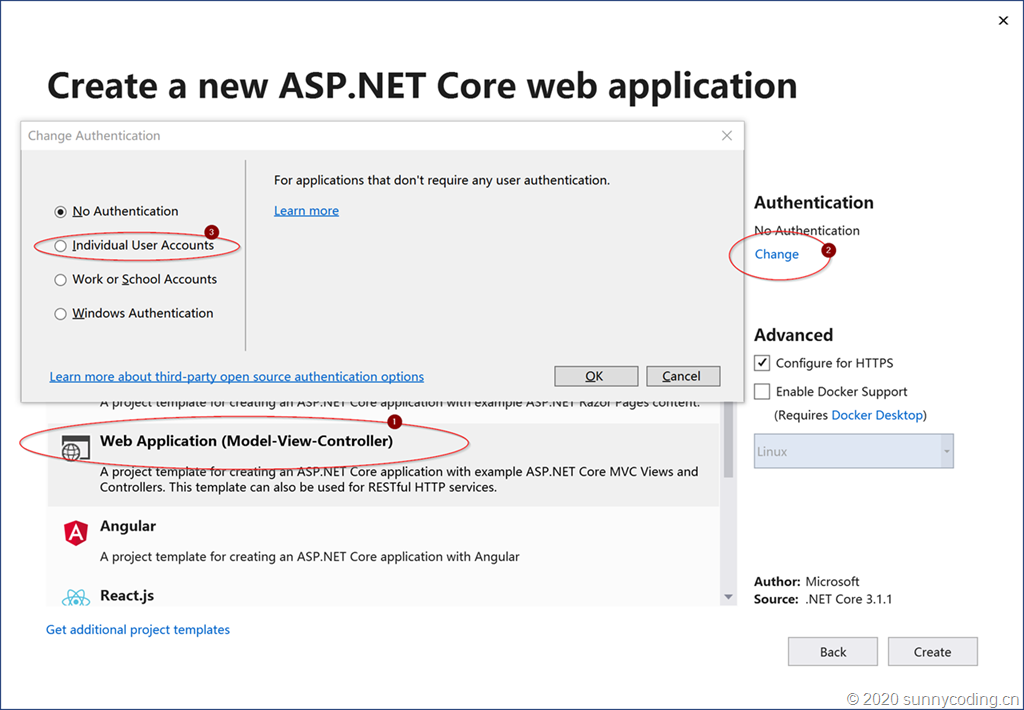
首先第一步就是实现Identity Service。在Visual Studio 2019 Community Edition中,新建一个ASP.NET Core Web Application,模板选择Web Application (Model-View-Controller),然后点击Authentication下的Change按钮,再选择Individual User Accounts选项,以便将ASP.NET Identity的依赖包都加入项目,并且自动完成基础代码的搭建。
然后,通过NuGet添加IdentityServer4.AspNetIdentity以及IdentityServer4.EntityFramework的引用,IdentityServer4也随之会被添加进来。接下来,在该项目的目录下,执行以下命令安装IdentityServer4的模板,并将IdentityServer4的GUI加入到当前项目:
dotnet new -i identityserver4.templates

dotnet new is4ui --force
然后调整一下项目结构,将原本的Controllers目录删除,同时删除Models目录下的ErrorViewModel类,然后将Quickstart目录重命名为Controllers,编译代码,代码应该可以编译通过,接下来就是实现我们自己的Identity。
定制Identity Service
为了能够展现一个标准的应用场景,我自己定义了User和Role对象,它们分别继承于IdentityUser和IdentityRole类:
public class AppUser : IdentityUser

{

    public string DisplayName { get; set; }

}

public class AppRole : IdentityRole

{

    public string Description { get; set; }

}
当然,Data目录下的ApplicationDbContext也要做相应调整,它应该继承于IdentityDbContext<AppUser, AppRole, string>类,这是因为我们使用了自定义的IdentityUser和IdentityRole的实现:
public class ApplicationDbContext : IdentityDbContext<AppUser, AppRole, string>

{

    public ApplicationDbContext(DbContextOptions<ApplicationDbContext> options)

        : base(options)

    {

    }

}
之后修改Startup.cs里的ConfigureServices方法,通过调用AddIdentity、AddIdentityServer以及AddDbContext,将ASP.NET Identity、IdentityServer4以及存储认证数据所使用的Entity Framework Core的依赖全部注册进来。为了测试方便,目前我们还是使用Developer Signing Credential,对于Identity Resource、API Resource以及Clients,我们也是暂时先写死(hard code):
public void ConfigureServices(IServiceCollection services)

{

    services.AddDbContext<ApplicationDbContext>(options =>

        options.UseSqlServer(

            Configuration.GetConnectionString("DefaultConnection")));

    services.AddIdentity<AppUser, AppRole>()

        .AddEntityFrameworkStores<ApplicationDbContext>()

        .AddDefaultTokenProviders();

    services.AddIdentityServer().AddDeveloperSigningCredential()

      .AddOperationalStore(options =>

      {

          options.ConfigureDbContext = builder => builder.UseSqlServer(Configuration.GetConnectionString("DefaultConnection"),

              sqlServerDbContextOptionsBuilder =>

              sqlServerDbContextOptionsBuilder.MigrationsAssembly(typeof(Startup).Assembly.GetName().Name));

          options.EnableTokenCleanup = true;

          options.TokenCleanupInterval = 30; // interval in seconds

      })

      .AddInMemoryIdentityResources(Config.GetIdentityResources())

      .AddInMemoryApiResources(Config.GetApiResources())

      .AddInMemoryClients(Config.GetClients())

      .AddAspNetIdentity<AppUser>();

    services.AddCors(options => options.AddPolicy("AllowAll", p => p.AllowAnyOrigin()

       .AllowAnyMethod()

       .AllowAnyHeader()));

    services.AddControllersWithViews();

    services.AddRazorPages();

    services.AddControllers();

}
然后,调整Configure方法的实现,将IdentityServer加入进来,同时配置CORS使得站点能够被跨域访问:
public void Configure(IApplicationBuilder app, IWebHostEnvironment env)

{

    if (env.IsDevelopment())

    {

        app.UseDeveloperExceptionPage();

        app.UseDatabaseErrorPage();

    }

    else

    {

        app.UseExceptionHandler("/Home/Error");

        app.UseHsts();

    }

    app.UseCors("AllowAll");

    app.UseHttpsRedirection();

    app.UseStaticFiles();

    app.UseRouting();

    app.UseIdentityServer();

    app.UseAuthentication();

    app.UseAuthorization();

    app.UseEndpoints(endpoints =>

    {

        endpoints.MapControllerRoute(

            name: "default",

            pattern: "{controller=Home}/{action=Index}/{id?}");

        endpoints.MapRazorPages();

    });

}
完成这部分代码调整后,编译是通不过的,因为我们还没有定义IdentityServer4的IdentityResource、API Resource和Clients。在项目中新建一个Config类,代码如下:
public static class Config

{

    public static IEnumerable<IdentityResource> GetIdentityResources() =>

        new IdentityResource[]

        {

            new IdentityResources.OpenId(),

            new IdentityResources.Email(),

            new IdentityResources.Profile()

        };

    public static IEnumerable<ApiResource> GetApiResources() =>

        new[]

        {

            new ApiResource("api.weather", "Weather API")

            {

                Scopes =

                {

                    new Scope("api.weather.full_access", "Full access to Weather API")

                },

                UserClaims =

                {

                    ClaimTypes.NameIdentifier,

                    ClaimTypes.Name,

                    ClaimTypes.Email,

                    ClaimTypes.Role

                }

            }

        };

    public static IEnumerable<Client> GetClients() =>

        new[]

        {

            new Client

            {

                RequireConsent = false,

                ClientId = "angular",

                ClientName = "Angular SPA",

                AllowedGrantTypes = GrantTypes.Implicit,

                AllowedScopes = { "openid", "profile", "email", "api.weather.full_access" },

                RedirectUris = {"http://localhost:4200/auth-callback"},

                PostLogoutRedirectUris = {"http://localhost:4200/"},

                AllowedCorsOrigins = {"http://localhost:4200"},

                AllowAccessTokensViaBrowser = true,

                AccessTokenLifetime = 3600

            },

            new Client

            {

                ClientId = "webapi",

                AllowedGrantTypes = GrantTypes.ResourceOwnerPassword,

                ClientSecrets =

                {

                    new Secret("mysecret".Sha256())

                },

                AlwaysSendClientClaims = true,

                AllowedScopes = { "api.weather.full_access" }

            }

        };

}
大致说明一下上面的代码。通俗地讲,IdentityResource是指允许应用程序访问用户的哪些身份认证资源,比如,用户的电子邮件或者其它用户账户信息,在Open ID Connect规范中,这些信息会被转换成Claims,保存在User Identity的对象里;ApiResource用来指定被IdentityServer4所保护的资源,比如这里新建了一个ApiResource,用来保护Weather API,它定义了自己的Scope和UserClaims。Scope其实是一种关联关系,它关联着Client与ApiResource,用来表示什么样的Client对于什么样的ApiResource具有怎样的访问权限,比如在这里,我定义了两个Client:angular和webapi,它们对Weather API都可以访问;UserClaims定义了当认证通过之后,IdentityServer4应该向请求方返回哪些Claim。至于Client,就比较容易理解了,它定义了客户端能够以哪几种方式来向IdentityServer4提交请求。
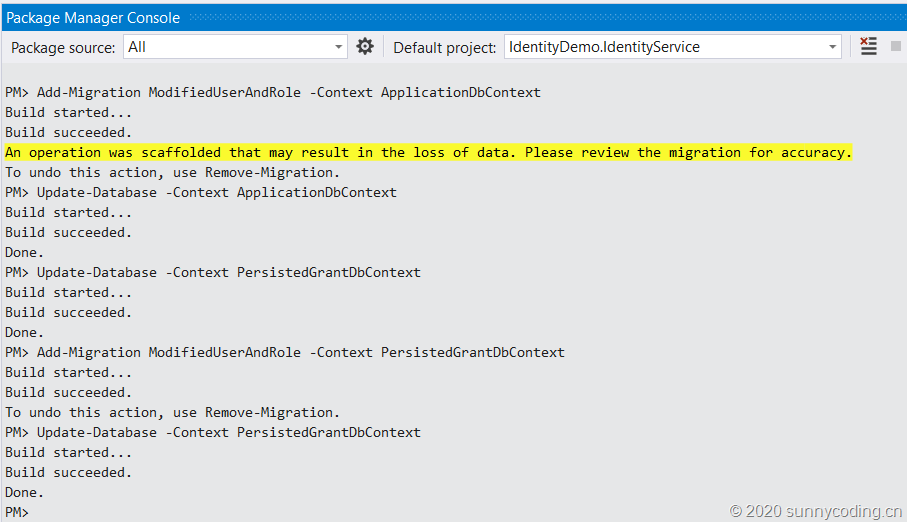
至此,我们的源代码就可以编译通过了,成功编译之后,还需要使用Entity Framework Core所提供的命令行工具或者Powershell Cmdlet来初始化数据库。我这里选择使用Visual Studio 2019 Community中的Package Manager Console,在执行数据库更新之前,确保appsettings.json文件里设置了正确的SQL Server连接字符串。当然,你也可以选择使用其它类型的数据库,只要对ConfigureServices方法做些相应的修改即可。在Package Manager Console中,依次执行下面的命令:
Add-Migration ModifiedUserAndRole -Context ApplicationDbContext

Add-Migration ModifiedUserAndRole –Context PersistedGrantDbContext

Update-Database -Context ApplicationDbContext

Update-Database -Context PersistedGrantDbContext
效果如下:
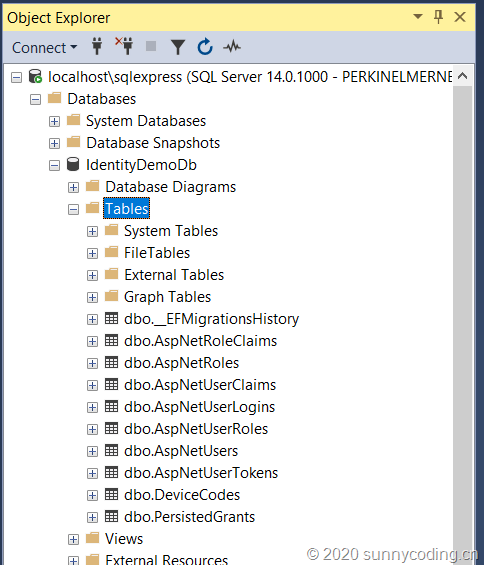
打开SQL Server Management Studio,看到数据表都已成功创建:
由于IdentityServer4的模板所产生的代码使用的是mock user,也就是IdentityServer4里默认的TestUser,因此,相关部分的代码需要被替换掉,最主要的部分就是AccountController的Login方法,将该方法中的相关代码替换为:
if (ModelState.IsValid)

{

    var user = await _userManager.FindByNameAsync(model.Username);

    if (user != null && await _userManager.CheckPasswordAsync(user, model.Password))

    {

        await _events.RaiseAsync(new UserLoginSuccessEvent(user.UserName, user.Id, user.DisplayName));

        // only set explicit expiration here if user chooses "remember me".

        // otherwise we rely upon expiration configured in cookie middleware.

        AuthenticationProperties props = null;

        if (AccountOptions.AllowRememberLogin && model.RememberLogin)

        {

            props = new AuthenticationProperties

            {

                IsPersistent = true,

                ExpiresUtc = DateTimeOffset.UtcNow.Add(AccountOptions.RememberMeLoginDuration)

            };

        };

        // issue authentication cookie with subject ID and username

        await HttpContext.SignInAsync(user.Id, user.UserName, props);

        if (context != null)

        {

            if (await _clientStore.IsPkceClientAsync(context.ClientId))

            {

                // if the client is PKCE then we assume it's native, so this change in how to

                // return the response is for better UX for the end user.

                return View("Redirect", new RedirectViewModel { RedirectUrl = model.ReturnUrl });

            }

            // we can trust model.ReturnUrl since GetAuthorizationContextAsync returned non-null

            return Redirect(model.ReturnUrl);

        }

        // request for a local page

        if (Url.IsLocalUrl(model.ReturnUrl))

        {

            return Redirect(model.ReturnUrl);

        }

        else if (string.IsNullOrEmpty(model.ReturnUrl))

        {

            return Redirect("~/");

        }

        else

        {

            // user might have clicked on a malicious link - should be logged

            throw new Exception("invalid return URL");

        }

    }

    await _events.RaiseAsync(new UserLoginFailureEvent(model.Username, "invalid credentials", clientId: context?.ClientId));

    ModelState.AddModelError(string.Empty, AccountOptions.InvalidCredentialsErrorMessage);

}
这样才能通过注入的userManager和EntityFramework Core来访问SQL Server,以完成登录逻辑。
新用户注册API
由IdentityServer4所提供的默认UI模板中没有包括新用户注册的页面,开发者可以根据自己的需要向Identity Service中增加View来提供注册界面。不过为了快速演示,我打算先增加两个API,然后使用curl来新建一些用于测试的角色(Role)和用户(User)。下面的代码为客户端提供了注册角色和注册用户的API:
public class RegisterRoleRequestViewModel

{

    [Required]

    public string Name { get; set; }

    public string Description { get; set; }

}

public class RegisterRoleResponseViewModel

{

    public RegisterRoleResponseViewModel(AppRole role)

    {

        Id = role.Id;

        Name = role.Name;

        Description = role.Description;

    }

    public string Id { get; }

    public string Name { get; }

    public string Description { get; }

}

public class RegisterUserRequestViewModel

{

    [Required]

    [StringLength(50, ErrorMessage = "The {0} must be at least {2} and at max {1} characters long.", MinimumLength = 2)]

    [Display(Name = "DisplayName")]

    public string DisplayName { get; set; }

    public string Email { get; set; }

    [Required]

    [StringLength(100, ErrorMessage = "The {0} must be at least {2} and at max {1} characters long.", MinimumLength = 6)]

    [DataType(DataType.Password)]

    [Display(Name = "Password")]

    public string Password { get; set; }

    [Required]

    [StringLength(20)]

    [Display(Name = "UserName")]

    public string UserName { get; set; }

    public List<string> RoleNames { get; set; }

}

public class RegisterUserResponseViewModel

{

    public string Id { get; set; }

    public string UserName { get; set; }

    public string DisplayName { get; set; }

    public string Email { get; set; }

    public RegisterUserResponseViewModel(AppUser user)

    {

        Id = user.Id;

        UserName = user.UserName;

        DisplayName = user.DisplayName;

        Email = user.Email;

    }

}

// Controllers\Account\AccountController.cs

[HttpPost]

[Route("api/[controller]/register-account")]

public async Task<IActionResult> RegisterAccount([FromBody] RegisterUserRequestViewModel model)

{

    if (!ModelState.IsValid)

    {

        return BadRequest(ModelState);

    }

    var user = new AppUser { UserName = model.UserName, DisplayName = model.DisplayName, Email = model.Email };

    var result = await _userManager.CreateAsync(user, model.Password);

    if (!result.Succeeded) return BadRequest(result.Errors);

    await _userManager.AddClaimAsync(user, new Claim(ClaimTypes.NameIdentifier, user.UserName));

    await _userManager.AddClaimAsync(user, new Claim(ClaimTypes.Name, user.DisplayName));

    await _userManager.AddClaimAsync(user, new Claim(ClaimTypes.Email, user.Email));

    if (model.RoleNames?.Count > 0)

    {

        var validRoleNames = new List<string>();

        foreach(var roleName in model.RoleNames)

        {

            var trimmedRoleName = roleName.Trim();

            if (await _roleManager.RoleExistsAsync(trimmedRoleName))

            {

                validRoleNames.Add(trimmedRoleName);

                await _userManager.AddToRoleAsync(user, trimmedRoleName);

            }

        }

        await _userManager.AddClaimAsync(user, new Claim(ClaimTypes.Role, string.Join(',', validRoleNames)));

    }

    return Ok(new RegisterUserResponseViewModel(user));

}

// Controllers\Account\AccountController.cs

[HttpPost]

[Route("api/[controller]/register-role")]

public async Task<IActionResult> RegisterRole([FromBody] RegisterRoleRequestViewModel model)

{

    if (!ModelState.IsValid)

    {

        return BadRequest(ModelState);

    }

    var appRole = new AppRole { Name = model.Name, Description = model.Description };

    var result = await _roleManager.CreateAsync(appRole);

    if (!result.Succeeded) return BadRequest(result.Errors);

    return Ok(new RegisterRoleResponseViewModel(appRole));

}
在上面的代码中,值得关注的就是register-account API中的几行AddClaimAsync调用,我们将一些用户信息数据加入到User Identity的Claims中,比如,将用户的角色信息,通过逗号分隔的字符串保存为Claim,在后续进行用户授权的时候,会用到这些数据。
创建一些基础数据
运行我们已经搭建好的Identity Service,然后使用下面的curl命令创建一些基础数据:
curl -X POST https://localhost:7890/api/account/register-role \

  -d '{"name":"admin","description":"Administrator"}' \

  -H 'Content-Type:application/json' --insecure

curl -X POST https://localhost:7890/api/account/register-account \

  -d '{"userName":"daxnet","password":"P@ssw0rd123","displayName":"Sunny Chen","email":"daxnet@163.com","roleNames":["admin"]}' \

  -H 'Content-Type:application/json' --insecure

curl -X POST https://localhost:7890/api/account/register-account \

  -d '{"userName":"acqy","password":"P@ssw0rd123","displayName":"Qingyang Chen","email":"qychen@163.com"}' \

  -H 'Content-Type:application/json' --insecure
完成这些命令后,系统中会创建一个admin的角色,并且会创建daxnet和acqy两个用户,daxnet具有admin角色,而acqy则没有该角色。
使用浏览器访问https://localhost:7890,点击主页的链接进入登录界面,用已创建的用户名和密码登录,可以看到如下的界面,表示Identity Service的开发基本完成:

小结
一篇文章实在是写不完,今天就暂且告一段落吧,下一讲我将介绍Weather API和基于Ocelot的API网关,整合Identity Service进行身份认证。
源代码
访问以下Github地址以获取源代码:
https://github.com/daxnet/identity-demo
Angular SPA基于Ocelot API网关与IdentityServer4的身份认证与授权(一)的更多相关文章
- Angular SPA基于Ocelot API网关与IdentityServer4的身份认证与授权(四)
在上一讲中,我们已经完成了一个完整的案例,在这个案例中,我们可以通过Angular单页面应用(SPA)进行登录,然后通过后端的Ocelot API网关整合IdentityServer4完成身份认证.在 ...
- Angular SPA基于Ocelot API网关与IdentityServer4的身份认证与授权(二)
上文已经介绍了Identity Service的实现过程.今天我们继续,实现一个简单的Weather API和一个基于Ocelot的API网关. 回顾 <Angular SPA基于Ocelot ...
- Angular SPA基于Ocelot API网关与IdentityServer4的身份认证与授权(三)
在前面两篇文章中,我介绍了基于IdentityServer4的一个Identity Service的实现,并且实现了一个Weather API和基于Ocelot的API网关,然后实现了通过Ocelot ...
- .Netcore 2.0 Ocelot Api网关教程(5)- 认证和授权
本文介绍Ocelot中的认证和授权(通过IdentityServer4),本文只使用最简单的IdentityServer,不会对IdentityServer4进行过多讲解. 1.Identity Se ...
- 微服务(入门三):netcore ocelot api网关结合consul服务发现
简介 api网关是提供给外部调用的统一入口,类似于dns,所有的请求统一先到api网关,由api网关进行指定内网链接. ocelot是基于netcore开发的开源API网关项目,功能强大,使用方便,它 ...
- ASP.NET Core on K8S学习之旅(13)Ocelot API网关接入
本篇已加入<.NET Core on K8S学习实践系列文章索引>,可以点击查看更多容器化技术相关系列文章. 上一篇介绍了Ingress的基本概念和Nginx Ingress的基本配置和使 ...
- .Netcore 2.0 Ocelot Api网关教程(7)- 限流
本文介绍Ocelot中的限流,限流允许Api网关控制一段时间内特定api的总访问次数.限流的使用非常简单,只需要添加配置即可. 1.添加限流 修改 configuration.json 配置文件,对 ...
- .Netcore 2.0 Ocelot Api网关教程(6)- 配置管理
本文介绍Ocelot中的配置管理,配置管理允许在Api网关运行时动态通过Http Api查看/修改当前配置.由于该功能权限很高,所以需要授权才能进行相关操作.有两种方式来认证,外部Identity S ...
- .Netcore 2.0 Ocelot Api网关教程(2)- 路由
.Netcore 2.0 Ocelot Api网关教程(1) 路由介绍 上一篇文章搭建了一个简单的Api网关,可以实现简单的Api路由,本文介绍一下路由,即配置文件中ReRoutes,ReRoutes ...
随机推荐
- (转)logback配置详解
找到一篇很详细的关于logback配置的介绍: 贴上原文链接:logback使用配置详解 1.介绍 Logback是由log4j创始人设计的另一个开源日志组件,它当前分为下面下个模块: logback ...
- HDU 1421 搬寝室 解题报告(超详细)
**搬寝室 Time Limit: 2000/1000 MS Memory Limit: 65536/32768 K Problem Description 搬寝室是很累的,xhd深有体会.时间追述2 ...
- python selenium(键盘事件 Keys 类)
1.导入Keys类 from selenium.webdriver.common.keys import Keys Keys.BACK_SPACE 删除输入框内结尾的单个字符 Keys.SPACE ...
- bat 命令
1.强制杀死进程 /F force 强制性/IM image + 进程名 TASKKILL /F /IM python.exe
- zabbix日常问题总结
1.connection to database 'zabbix' failed: [1040] Too many connections 问题:数据库连接池太少解决:增加数据库连接池步骤:(1).进 ...
- c/c++获取硬盘序列号
最近在接触软件注册模块,需要获取硬盘序列号来生成注册码. 硬盘序列号,英文名:Hard Disk Serial Number,该号是硬盘厂家为区别产品而设置的,是唯一的.网上搜索一下,发现获取硬盘序列 ...
- LTE无线网络优化简介
LTE无线网络优化特点 覆盖和质量的估计参数不同 TD-LTE使用RSPP.RSRQ.SINR进行覆盖和质量的评估. 影响覆盖问题的因素不同 工作频段的不同,导致覆盖范围的差异显著:需要考虑天线模式对 ...
- 王颖奇 201771010129《面向对象程序设计(java)》第一周学习总结
<面向对象程序设计(java)>第一周学习总结 第一部分:课程准备部分 填写课程学习 平台注册账号, 平台名称 注册账号 博客园:www.cnblogs.com wangyingqi 程序 ...
- QML文字灰飞烟灭效果
QML文字灰飞烟灭效果 1,目的 实现文字化作一缕青烟随风而逝的效果. 2,设计分析 在前面的章节中讲述了如何化作光斑碎片逐渐消失的效果,我们可以借鉴它将光斑换成烟雾,再加入端流产生微风浮动,加上字幕 ...
- OpenWrt R2020.3.11 去广告 抗污染 加速 PSW 无缝集成 UnPnP NAS
近期更新:OpenWrt R2020.3.11版本2020.03.16编译. 按大家要求,新发布固件携带了编译时用到的全部软件包 加入了国内域名加速解析脚本 解决了原去广告,DNS优化方案与PSW冲突 ...