【转载】Intellij IDEA的Hibernate简单应用


package com.yyq.dao;
import javax.persistence.*;
@Entity
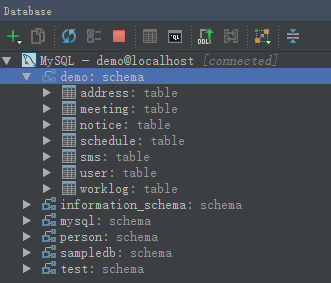
@Table(name = "user", schema = "", catalog = "demo")
public class UserEntity {
private int id;
private String username;
private String password;
private String email;
@Id
@Column(name = "id", nullable = false, insertable = true, updatable = true, length = 10, precision = 0)
public int getId() {
return id;
}
public void setId(int id) {
this.id = id;
}
@Basic
@Column(name = "username", nullable = true, insertable = true, updatable = true, length = 50, precision = 0)
public String getUsername() {
return username;
}
public void setUsername(String username) {
this.username = username;
}
@Basic
@Column(name = "password", nullable = true, insertable = true, updatable = true, length = 50, precision = 0)
public String getPassword() {
return password;
}
public void setPassword(String password) {
this.password = password;
}
@Basic
@Column(name = "email", nullable = true, insertable = true, updatable = true, length = 50, precision = 0)
public String getEmail() {
return email;
}
public void setEmail(String email) {
this.email = email;
}
@Override
public boolean equals(Object o) {
if (this == o) return true;
if (o == null || getClass() != o.getClass()) return false;
UserEntity that = (UserEntity) o;
if (id != that.id) return false;
if (email != null ? !email.equals(that.email) : that.email != null) return false;
if (password != null ? !password.equals(that.password) : that.password != null) return false;
if (username != null ? !username.equals(that.username) : that.username != null) return false;
return true;
}
@Override
public int hashCode() {
int result = id;
result = 31 * result + (username != null ? username.hashCode() : 0);
result = 31 * result + (password != null ? password.hashCode() : 0);
result = 31 * result + (email != null ? email.hashCode() : 0);
return result;
}
}
7)配置hibernate.cfg.xml 如下。
<?xml version='1.0' encoding='utf-8'?>

<!DOCTYPE hibernate-configuration PUBLIC

        "-//Hibernate/Hibernate Configuration DTD//EN"

        "http://www.hibernate.org/dtd/hibernate-configuration-3.0.dtd">

<hibernate-configuration>

    <session-factory>

        <property name="connection.url">jdbc:mysql://localhost:3306/demo</property>

        <property name="connection.driver_class">com.mysql.jdbc.Driver</property>

        <property name="connection.username">root</property>

        <property name="connection.password">123456</property>

        <property name="current_session_context_class">thread</property>

        <property name="show_sql">true</property>

        <property name="hbm2ddl.auto">update</property>

        <!-- DB schema will be updated if needed -->

        <!-- <property name="hbm2ddl.auto">update</property> -->

        <property name="dialect">org.hibernate.dialect.MySQLDialect</property>

        <mapping class="com.yyq.dao.UserEntity"/>

    </session-factory>

</hibernate-configuration>
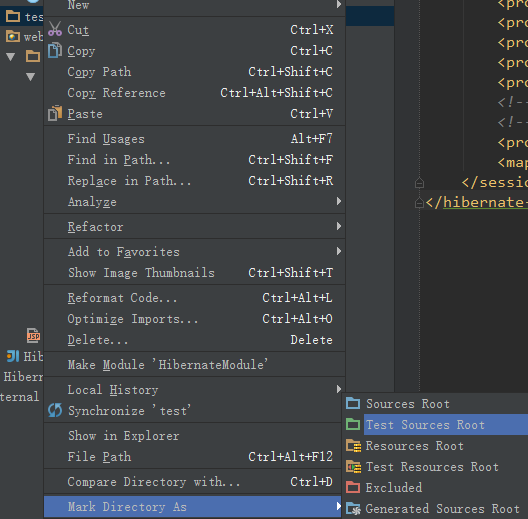
8)生成测试路径。在Module路径下生成一个文件夹,与src同级,名为test,点击文件夹test,右键,选择Mark Directory As - > Test Sources Root。
package com.yyq;

import com.yyq.dao.UserEntity;

import org.hibernate.Session;

import org.hibernate.SessionFactory;

import org.hibernate.Transaction;

import org.hibernate.cfg.Configuration;

import org.junit.Before;

import org.junit.Test;

public class DAOTest {

    Configuration config = null;

    SessionFactory sessionFactory = null;

    Session session = null;

    Transaction tx = null;

    @Before

    public void init() {

        config = new Configuration().configure("/hibernate.cfg.xml");

        sessionFactory = config.buildSessionFactory();

        session = sessionFactory.openSession();

        tx = session.beginTransaction();

    }

    //增加

    @Test

    public void insert() {

        UserEntity ue = new UserEntity();

        ue.setUsername("Anny");

        ue.setPassword("123");

        ue.setEmail("Anny@163.com");

        session.save(ue);

        tx.commit();

    }

    //修改

    @Test

    public void update() {

        UserEntity user = (UserEntity) session.get(UserEntity.class, new Integer(2));

        user.setUsername("Penny");

        session.update(user);

        tx.commit();

        session.close();

    }

    //查找

    @Test

    public void getById() {

        UserEntity user = (UserEntity) session.get(UserEntity.class, new Integer(8));

        tx.commit();

        session.close();

        System.out.println("ID号:" + user.getId() + ";用户名:" + user.getUsername() +

                ";密码:" + user.getPassword() + ";邮件:" + user.getEmail());

    }

    //删除

    @Test

    public void delete() {

        UserEntity user = (UserEntity) session.get(UserEntity.class, new Integer(6));

        session.delete(user);

        tx.commit();

        session.close();

    }

}
10)运行测试类,可以一个一个方法的进行运行,也可以在类名处将所有的测试方法都一起运行。全部运行成功!


<?xml version="1.0" encoding="UTF-8"?>

<web-app xmlns="http://java.sun.com/xml/ns/javaee"

           xmlns:xsi="http://www.w3.org/2001/XMLSchema-instance"

           xsi:schemaLocation="http://java.sun.com/xml/ns/javaee

          http://java.sun.com/xml/ns/javaee/web-app_3_0.xsd"

           version="3.0">

    <display-name>Struts2AndHibernate</display-name>

    <filter>

        <filter-name>struts2</filter-name>

        <filter-class>org.apache.struts2.dispatcher.ng.filter.StrutsPrepareAndExecuteFilter</filter-class>

    </filter>

    <filter-mapping>

        <filter-name>struts2</filter-name>

        <url-pattern>/*</url-pattern>

    </filter-mapping>

    <welcome-file-list>

        <welcome-file>index.jsp</welcome-file>

    </welcome-file-list>

</web-app>
2)将相关的Jar包复制到lib文件夹下。

3)创建一个名为ListAllAction.java文件。
package com.yyq.action;

import com.googlecode.s2hibernate.struts2.plugin.annotations.SessionTarget;

import com.googlecode.s2hibernate.struts2.plugin.annotations.TransactionTarget;

import com.opensymphony.xwork2.ActionSupport;

import com.yyq.dao.UserEntity;

import org.hibernate.Session;

import org.hibernate.Transaction;

import java.util.List;

public class ListAllAction extends ActionSupport {

    //使用@SessionTarget标注得到Hibernate Session

    @SessionTarget

    private Session session = null;

    //使用@TransactionTarget标注得到Hibernate Transaction

    @TransactionTarget

    private Transaction transaction = null;

    private List<UserEntity> users;

    public String list(){

        try{

            //得到user表中的所有记录

            users = session.createCriteria(UserEntity.class).list();

            transaction.commit();

            session.close();

            return SUCCESS;

        }catch (Exception e){

            e.printStackTrace();

            return ERROR;

        }

    }

    public List<UserEntity> getUsers(){

        return users;

    }

    public void setUsers(List<UserEntity> users){

        this.users = users;

    }

}
4)修改index.jsp文件以显示后台数据库的数据获取情况。
<%@ taglib prefix="s" uri="/struts-tags" %>

<%@ page contentType="text/html;charset=UTF-8" language="java" %>

<html>

<head>

    <title>显示数据</title>

</head>

<body>

<table>

    <tr>

        <th>ID</th>

        <th>用户名</th>

        <th>密码</th>

        <th>邮箱</th>

    </tr>

    <s:iterator value="users" var="obj">

        <tr>

            <td><s:property value="id"/></td>

            <td><s:property value="username"/></td>

            <td><s:property value="password"/></td>

            <td><s:property value="email"/></td>

        </tr>

    </s:iterator>

</table>

</body>

</html>
5)配置struts.xml文件。
<?xml version="1.0" encoding="UTF-8"?>

<!DOCTYPE struts PUBLIC

        "-//Apache Software Foundation//DTD Struts Configuration 2.1.7//EN"

        "http://struts.apache.org/dtds/struts-2.1.7.dtd">

<struts>

    <!--s2hibernate插件里面有一个叫hibernate-default的package,

    它里面的拦截器用于实现struts2+hibernate整合-->

    <package name="default" extends="hibernate-default">

        <!--defaultStackHibernate里面的拦截器会识别出@SessionTarget,@TransactionTarget等标注,

        然后将hibernate注入进去-->

        <default-interceptor-ref name="defaultStackHibernate"/>

        <default-class-ref class="com.yyq.action.ListAllAction"/>

        <action name="listAll" method="list">

            <result>index.jsp</result>

        </action>

    </package>

</struts>
6)启动Tomcat,输入:http://localhost:8080/listAll.action

7)项目结构图。

【转载】Intellij IDEA的Hibernate简单应用的更多相关文章
- Intellij IDEA的Hibernate简单应用
1.创建数据库及其表 create database demo; use demo; CREATE TABLE `user` ( `id` int(10) unsigned NOT NULL ...
- 新秀学习Hibernate——简单的增加、删、更改、检查操作
部分博客使用Hibernate单的样例,把数据库的映射显示了出来在上一篇的博客基础上这篇博客讲述怎样利用Hinbernate框架实现简单的数据库操作. 1.增加junit.jar 2.新建一个工具类H ...
- 菜鸟学习Hibernate——简单的增、删、改、查操作
上篇博客利用Hibernate搭建起一个简单的例子,把数据库的映射显示了出来在上一篇的博客基础上这篇博客讲述如何利用Hinbernate框架实现简单的数据库操作. 1.加入junit.jar 2.新建 ...
- *IntelliJ IDEA配置Hibernate
为IntelliJ IDEA安装Hibernate插件
- 【笔记】IntelliJ IDEA配置Hibernate
参考:imooc:http://www.imooc.com/video/7706 1.创建Hibernate的配置文件. 将依赖包导入项目.http://blog.csdn.net/a15337525 ...
- Hibernate二次学习一----------Hibernate简单搭建
因为博客园自带的markdown不太好用,因此所有markdown笔记都使用cmd_markdown发布 Hibernate二次学习一----------Hibernate简单搭建: https:// ...
- 转载 intellij IDEA 使用体验 (本人感觉它的使用是一种趋势)
从去年开始转java以来,一直在寻找一款趁手的兵器,eclipse虽然是很多java程序员的首选,但是我发现一旦安装了一些插件,workspace中的项目达到数10个以后,经常崩溃,实在影响编程的心情 ...
- Spring+SpringMVC+Hibernate简单整合(转)
SpringMVC又一个漂亮的web框架,他与Struts2并驾齐驱,Struts出世早而占据了一定优势,下面同样做一个简单的应用实例,介绍SpringMVC的基本用法,接下来的博客也将梳理一下Str ...
- Intellij IDEA 配置最简单的maven-struts2环境的web项目
在idea里搭建maven项目 看着网上大神发的各种博客,然后自己搭建出来一个最简单的maven-strtus2项目,供初学者学习 新建project
随机推荐
- Android:创建无标题栏的Activity
上图是一个带标题栏的Activity.有些时候我们希望能去除这个标题栏,做法如下: 1. 在res/values目录下面创建styles.xml.如果你已经有这个文件了,那么直接打开这个文件,添加如下 ...
- CSDN处理问题神速,顶你,为你点32个赞!
今天10点左右发表了一篇文章,发表之后.文章状态待审核,博文首页不能显示文章,例如以下图所看到的: 于是果断给官网发了第一封Email.10点19分.CSDN给予回复,内容例如以下: 尊敬的用户您好: ...
- 改动mysqlpassword
1.假设没有password,则 mysql -u root mysql> SET PASSWORD FOR 'root'@'localhost' = PASSWORD('newpass'); ...
- 初触Python,关于pyquery解析html(百度贴吧)
一直听同事说Python是个奇妙的语言,上周在逛知乎的时候深受这个话题的启示. 能利用爬虫技术做到哪些非常酷非常有趣非常实用的事情? 先是说到IDE的选择,作为python新人,尽管知道mac终端自带 ...
- 加州理工学院公开课:机器学习与数据挖掘_Regularization(第十二课)
课程简单介绍: 接上一节课,这一节课的主题是怎样利用 Regularization 避免 Overfitting.通过给如果集设定一些限制条件从而避免 Overfitting,可是如果限制条件设置的 ...
- 上机题目(0基础)- 数据库事务(Java)
/* * 文件名称:JDBCTestCase.java * 版权:Copyright 2006-2011 Huawei Tech. Co. Ltd. All Rights Reserved. * 描写 ...
- Get-Acl 查看文件权限
https://blogs.msmvps.com/erikr/2007/09/26/set-permissions-on-a-specific-service-windows/ Get-Acl .\L ...
- Catalan数(卡特兰数)
Catalan数(卡特兰数) 卡特兰数:规定h(0)=1,而h(1)=1,h(2)=2,h(3)=5,h(4)=14,h(5)=42,h(6)=132,h(7)=429,h(8)=1430,h(9)= ...
- 为什么倒排索引不采用zlib这样的字典压缩算法——因为没法直接使用啊
看了下压缩算法的发展历史,根据倒排索引的数据结构特点,个人认为zstd不适合做倒排索引压缩,举例说明下: 假设有一份文档倒排列表为:[300, 302, 303, 332],对于这组倒排数据,是没法* ...
- XHprof 使用 (转)
原文地址:http://blog.csdn.net/maitiandaozi/article/details/8896293 XHProf是facebook开源出来的一个php轻量级的性能分析工具,跟 ...