
定制controller转场动画
定制controller转场动画
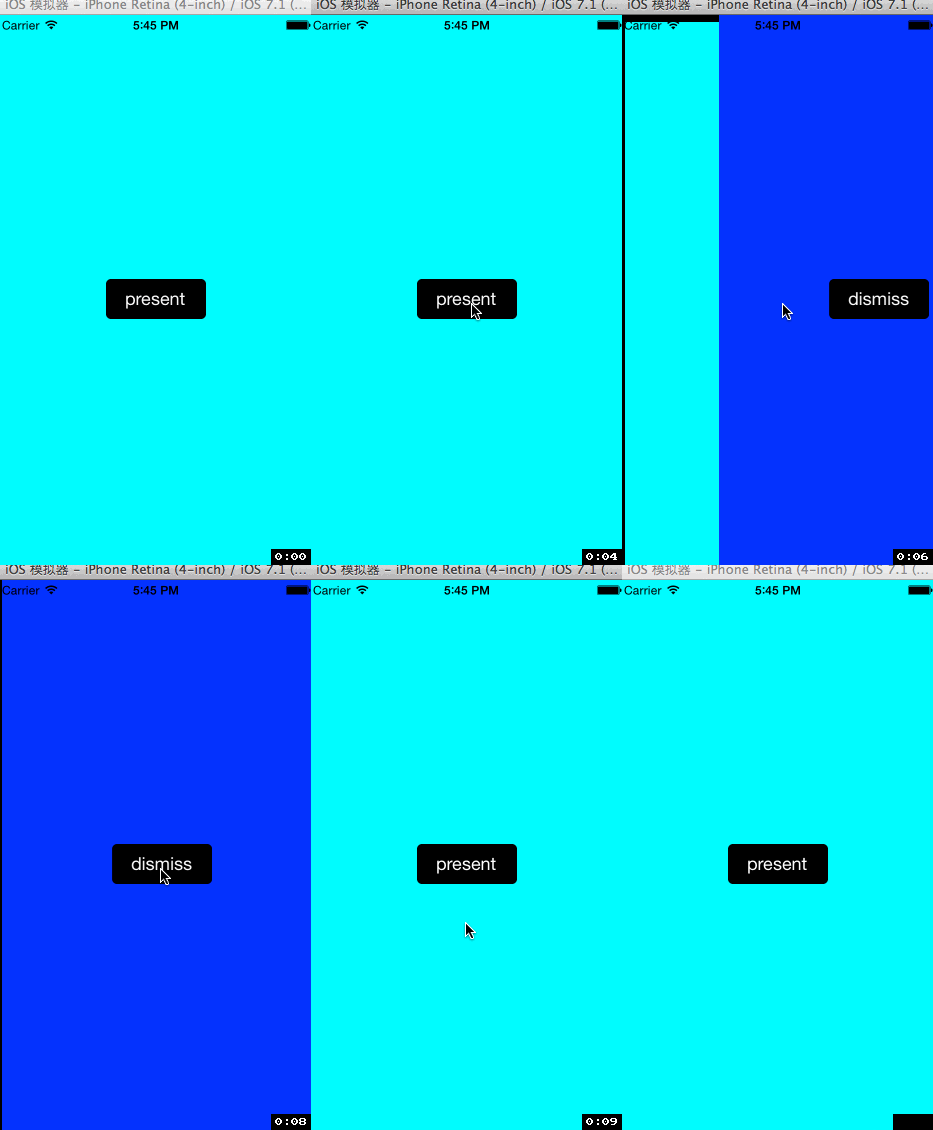
从iOS7开始就可以自由定制控制器间的转场动画了,以下实例描述最简单的定制方式,达到的效果如下所示:
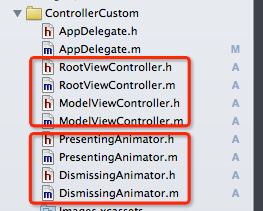
为了实现这个效果需要这么多的文件-_-!!!!
RootViewController
//

//  RootViewController.h

//  ControllerCustom

//

//  Copyright (c) 2014年 Y.X. All rights reserved.

//

#import <UIKit/UIKit.h>

@interface RootViewController : UIViewController

@end
RootViewController.h
//

//  RootViewController.m

//  ControllerCustom

//

//  Copyright (c) 2014年 Y.X. All rights reserved.

//

#import "RootViewController.h"

#import "PresentingAnimator.h"

#import "DismissingAnimator.h"

#import "ModelViewController.h"

@interface RootViewController ()<UIViewControllerTransitioningDelegate>

@property (nonatomic, strong) UIButton *button;

@end

@implementation RootViewController

- (void)viewDidLoad

{

    [super viewDidLoad];

    self.view.backgroundColor = [UIColor cyanColor];

    _button = [[UIButton alloc] initWithFrame:CGRectMake(, , , )];

    _button.backgroundColor = [UIColor blackColor];

    _button.layer.cornerRadius = ;

    [_button setTitle:@"present"

             forState:UIControlStateNormal];

    _button.center = self.view.center;

    [self.view addSubview:_button];

    [_button addTarget:self

                action:@selector(buttonEvent:)

      forControlEvents:UIControlEventTouchUpInside];

}

- (void)buttonEvent:(id)sender

{

    // 推出控制器

    ModelViewController *modalViewController = [ModelViewController new];

    // 设置转场动画代理

    modalViewController.transitioningDelegate = self;

    // 定制转场动画

    modalViewController.modalPresentationStyle = UIModalPresentationCustom;

    [self presentViewController:modalViewController

                       animated:YES

                     completion:NULL];

}

- (id<UIViewControllerAnimatedTransitioning>)animationControllerForPresentedController:(UIViewController *)presented

                                                                  presentingController:(UIViewController *)presenting

                                                                      sourceController:(UIViewController *)source

{

    // 推出控制器的动画

    return [PresentingAnimator new];

}

- (id<UIViewControllerAnimatedTransitioning>)animationControllerForDismissedController:(UIViewController *)dismissed

{

    // 退出控制器动画

    return [DismissingAnimator new];

}

@end
RootViewController.m
ModelViewController
//

//  ModelViewController.h

//  ControllerCustom

//

//  Copyright (c) 2014年 Y.X. All rights reserved.

//

#import <UIKit/UIKit.h>

@interface ModelViewController : UIViewController

@end
ModelViewController.h
//

//  ModelViewController.m

//  ControllerCustom

//

//  Copyright (c) 2014年 Y.X. All rights reserved.

//

#import "ModelViewController.h"

@interface ModelViewController ()

@property (nonatomic, strong) UIButton *button;

@end

@implementation ModelViewController

- (void)viewDidLoad

{

    [super viewDidLoad];

    self.view.backgroundColor = [UIColor blueColor];

    _button = [[UIButton alloc] initWithFrame:CGRectMake(, , , )];

    _button.backgroundColor = [UIColor blackColor];

    _button.layer.cornerRadius = ;

    [_button setTitle:@"dismiss"

             forState:UIControlStateNormal];

    _button.center = self.view.center;

    [self.view addSubview:_button];

    [_button addTarget:self

                action:@selector(buttonEvent:)

      forControlEvents:UIControlEventTouchUpInside];

}

- (void)buttonEvent:(id)sender

{

    [self dismissViewControllerAnimated:YES

                             completion:^{

                             }];

}

@end
ModelViewController.m
PresentingAnimator
//

//  PresentingAnimator.h

//  ControllerCustom

//

//  Copyright (c) 2014年 Y.X. All rights reserved.

//

#import <Foundation/Foundation.h>

@interface PresentingAnimator : NSObject<UIViewControllerAnimatedTransitioning>

@end
PresentingAnimator.h
//

//  PresentingAnimator.m

//  ControllerCustom

//

//  Copyright (c) 2014年 Y.X. All rights reserved.

//

#import "PresentingAnimator.h"

@implementation PresentingAnimator

// 转场动画时间

- (NSTimeInterval)transitionDuration:(id <UIViewControllerContextTransitioning>)transitionContext

{

    return 0.5f;

}

- (void)animateTransition:(id <UIViewControllerContextTransitioning>)transitionContext

{

    // 自己的view

    UIView *fromView = \

        [transitionContext viewControllerForKey:UITransitionContextFromViewControllerKey].view;

    // 另一个view

    UIView *toView   = \

        [transitionContext viewControllerForKey:UITransitionContextToViewControllerKey].view;

    // 管理容器

    UIView *container = [transitionContext containerView];

    container.backgroundColor = [UIColor blackColor];

    // 容器中添加推出的view

    [container addSubview:fromView];

    [container addSubview:toView];

    // 开始动画(移出fromView,移进toView)

    [UIView animateWithDuration:[self transitionDuration:transitionContext]

                     animations:^{

                         fromView.frame = CGRectMake(, , -, -);

                         // 设置toView从右侧偏移进来

                         CGRect toFrame     = toView.frame;

                         toFrame.origin.x   = container.bounds.size.width; // 偏移一个控制器

                         toView.frame = toFrame;

                         toView.center = container.center;

                     } completion:^(BOOL finished) {

                         // 动画结束

                         [transitionContext completeTransition:YES];

                     }];

}

@end
PresentingAnimator.m
DismissingAnimator
//

//  DismissingAnimator.h

//  Popping

//

//  Created by André Schneider on 16.05.14.

//  Copyright (c) 2014 André Schneider. All rights reserved.

//

#import <Foundation/Foundation.h>

@interface DismissingAnimator : NSObject <UIViewControllerAnimatedTransitioning>

@end
DismissingAnimator.h
//

//  DismissingAnimator.m

//  Popping

//

//  Created by André Schneider on 16.05.14.

//  Copyright (c) 2014 André Schneider. All rights reserved.

//

#import "DismissingAnimator.h"

@implementation DismissingAnimator

- (NSTimeInterval)transitionDuration:(id <UIViewControllerContextTransitioning>)transitionContext

{

    return 0.5f;

}

- (void)animateTransition:(id <UIViewControllerContextTransitioning>)transitionContext

{

    // 自己的view

    UIView *fromView = \

    [transitionContext viewControllerForKey:UITransitionContextFromViewControllerKey].view;

    // 另一个view

    UIView *toView   = \

    [transitionContext viewControllerForKey:UITransitionContextToViewControllerKey].view;

    toView.frame = CGRectMake(, , -, -);

    // 管理容器

    UIView *container = [transitionContext containerView];

    // 容器中添加推出的view

    [container addSubview:toView];

    [container addSubview:fromView];

    container.backgroundColor = [UIColor blackColor];

    // 开始动画(移出fromView,移进toView)

    [UIView animateWithDuration:[self transitionDuration:transitionContext]

                     animations:^{

                         CGRect fromFrame = fromView.frame;

                         fromFrame.origin.x = container.bounds.size.width;

                         fromView.frame = fromFrame;

                         toView.frame = container.frame;

                     } completion:^(BOOL finished) {

                         // 动画结束

                         [transitionContext completeTransition:YES];

                     }];

}

@end
DismissingAnimator.m
核心的地方:

为什么设计成代理呢?其实,这是为了让基本的控制器(推出其他控制器的控制器)持有被推出的控制器而已,我是这么理解的.
为了能够实现控制器间的转场动画,我们需要一个实现了UIViewControllerAnimatedTransitioning协议的对象才行.
也就是PresentingAnimator以及DismissingAnimator
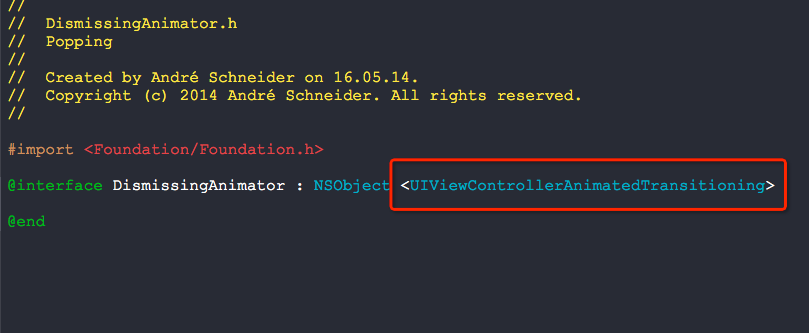
最少实现里面的两个方法:
- (NSTimeInterval)transitionDuration:(id<UIViewControllerContextTransitioning>)transitionContext
- (void)animateTransition:(id<UIViewControllerContextTransitioning>)transitionContext

完了,就是这么简单呢.
附录:

这个方法非常关键哦,动画执行完了之后记得设置好了.

fromView本身就被transitionContext包含拥有了,你无须进行上面的那个addSubview操作哦,可以直接去掉即可

定制controller转场动画的更多相关文章
- iOS 动画学习之视图控制器转场动画
一.概述 1.系统会创建一个转场相关的上下文对象,传递到动画执行器的animateTransition:和transitionDuration:方法,同样,也会传递到交互Controller的star ...
- iOS - 转场动画
苹果在 iOS7 定制了 ViewController 的切换效果 一 在iOS5和iOS6之前,ViewController的切换主要有4种 Push/Pop,NavigationViewCotnr ...
- iOS 开发--转场动画
"用过格瓦拉电影,或者其他app可能都知道,一种点击按钮用放大效果实现转场的动画现在很流行,效果大致如下:" 本文主讲SWIFT版,OC版在后面会留下Demo下载 在iOS中,在同 ...
- 第六十五篇、OC_iOS7 自定义转场动画push pop
自定义转场动画,在iOS7及以上的版本才开始出现的,在一些应用中,我们常常需要定制自定义的的跳转动画 1.遵守协议:<UIViewControllerAnimatedTransitioning& ...
- 转场动画2-Pop动画
上一篇试讲push动画,这篇分解pop动画 里面关于矩阵有不懂得,参考CATransform3D 特效详解 上图(虚拟机下,图是渣渣 ) 代码直接上 // // PopTransition.h // ...
- iOS自定义转场动画的实现
iOS中熟悉的是导航栏中的push和pop这两种动画效果,在这里我们可以自己实现自己想要的一些转场动画 下面是我自己创建转场动画的过程 1.新建一个文件继承自NSObject ,遵循协议UIViewC ...
- Storyboard 自定义转场动画
在storyboard中,segue有几种不同的类型,在iphone和ipad的开发中,segue的类型是不同的.在iphone中,segue 有:push,modal,和custom三种不同的类型, ...
- iOS 转场动画探究(二)
这篇文章是接着第一篇写的,要是有同行刚看到的话建议从前面第一篇看,这是第一篇的地址:iOS 转场动画探究(一) 接着上一篇写的内容: 上一篇iOS 转场动画探究(一)我们说到了转场要素的第四点,把那个 ...
- iOS转场动画封装
写在前面 iOS在modal 或push等操作时有默认的转场动画,但有时候我们又需要特定的转场动画效果,从iOS7开始,苹果就提供了自定义转场的API,模态推送present和dismiss.导航控制 ...
随机推荐
- Go 单元测试、基准测试、并发基准测试
一.单元测试 要开始一个单元测试,需要准备一个 go 源码文件,在命名文件时需要让文件必须以_test结尾. 单元测试源码文件可以由多个测试用例组成,每个测试用例函数需要以Test为前缀,例如: fu ...
- Java 集合框架(二)—— ArrayList
二.数组列表 —— ArrayList 1.构造方法 ArrayList 是 Java 中的动态数组,底层实现就是对象数组,只不过数组的容量会根据情况来改变. 它有个带 int 类型参数的构造方法,根 ...
- BFS和DFS详解以及java实现
前言 图在算法世界中的重要地位是不言而喻的,曾经看到一篇Google的工程师写的一篇<Get that job at Google!>文章中说到面试官问的问题中几乎有一半的问题都可以用图的 ...
- DateUtils 通用类
package com.egaoqi.util; import org.apache.commons.lang3.time.DateFormatUtils; import java.text.Pars ...
- linux之tmpfs
1.概述 tmpfs是ramfs的衍生品,ramfs是基于RAM的文件系统,不能使用swap空间:tmpfs可以动态释放空间.可以使用swap空间.ramfs不能控制使用内存的大小容易使内存爆掉:而t ...
- [硬件知识]OP(Over-provisioning)预留空间
SSD上的OP指的是用户不可操作的容量,大小为实际容量减去用户可用容量,OP区域一般被用于优化操作如:WL,GC和坏块映射等. OP一般分三层(见下图).第一层容量固定为SSD标称容量的7.37%,这 ...
- rabbitmq-channel方法介绍
先介绍rabbmitmq的几个方法: // 声明一个队列 -// queue 队列名称 // durable 为true时server重启队列不会消失 (是否持久化) // exclusive 队列是 ...
- springboot之约定大约配置
前言 Spring Boot 是由 Pivotal 团队提供的全新框架,其设计目的是用来简化新 Spring 应用的初始搭建以及开发过程.该框架使用了特定的方式来进行配置,从而使开发人员不再需要定义样 ...
- Hibernate中一级缓存概念以及flush与clear的区别
Hibernate采用缓存机制提高数据查询效率.缓存分为一级缓存和二级缓存,一级缓存在Session中存在,二级缓存需要手动配置. 在一级缓存中,如果数据保存到数据库中后,而session又没有关闭的 ...
- 基于Vue实现图片在指定区域内移动
当图片比要显示的区域大时,需要将多余的部分隐藏掉,我们可以通过绝对定位来实现,并通过动态修改图片的left值和top值从而实现图片的移动.具体实现效果如下图,如果我们移动的是div 实现思路相仿. 此 ...