C# GDI绘制仪表盘(纯代码实现)
首先来个金属仪表盘图
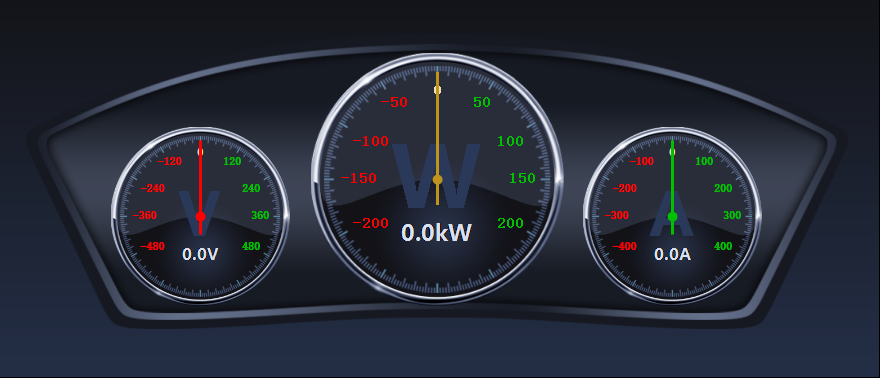
金属仪表盘、车载仪表盘 源代码下载
纯代码实现GDI绘制仪表盘,效果在代码下面。


public partial class HalfDashboardUc : UserControl

    {

        /// <summary>

        /// 仪表盘背景图片

        /// </summary>

        private Image dashboardImage;

        /// <summary>

        /// 定义该仪表盘画布的最大值为371

        /// </summary>

        private int maxSize = ;

        /// <summary>

        /// 仪表盘画布的放大倍数,默认1

        /// </summary>

        private float multiple = ;

        /// <summary>

        /// 定义该仪表盘的直径大小

        /// </summary>

        private float diameter;

        /// <summary>

        /// 每个间隔值

        /// </summary>

        private int intervalValue;

        /// <summary>

        /// 仪表盘显示的最小值,默认为0

        /// </summary>

        private float minValue = ;

        /// <summary>

        /// 仪表盘显示的最小值

        /// </summary>

        [Category("wyl")]

        [Description("仪表盘显示的最小值")]

        public float MinValue

        {

            get

            {

                return minValue;

            }

            set

            {

                if (value >= MaxValue)

                {

                    MessageBox.Show("最小值不能超过最大值!", "警告", MessageBoxButtons.OK, MessageBoxIcon.Warning);

                    minValue = ;

                }

                else

                {

                    minValue = value;

                    //drawBackImage();

                }

            }

        }

        /// <summary>

        /// 仪表盘上显示的最大值,默认123。

        /// </summary>

        private float maxValue = ;

        /// <summary>

        /// 仪表盘上显示的最大值

        /// </summary>

        [Category("wyl")]

        [Description("仪表盘上显示的最大值")]

        public float MaxValue

        {

            get

            {

                return maxValue;

            }

            set

            {

                if (value <= MinValue)

                {

                    MessageBox.Show("最大值不能低于最小值!", "警告", MessageBoxButtons.OK, MessageBoxIcon.Warning);

                    maxValue = ;

                }

                else

                {

                    maxValue = value;

                    //drawBackImage();

                }

            }

        }

        // <summary>

        /// 仪表盘变换的值,默认为0;

        /// </summary>

        private float changeValue = ;

        /// <summary>

        /// 仪表盘变换的值

        /// </summary>

        public float ChangeValue

        {

            get

            {

                return changeValue;

            }

            set

            {

                changeValue = value;

            }

        }

        /// <summary>

        /// 指针颜色

        /// </summary>

        private Color pinColor = Color.FromArgb(, , );

        public Color PinColor

        {

            get

            {

                return pinColor;

            }

            set

            {

                pinColor = value;

            }

        }

        public HalfDashboardUc()

        {

            InitializeComponent();

            //双缓存防止屏幕抖动

            this.SetStyle(ControlStyles.OptimizedDoubleBuffer | ControlStyles.AllPaintingInWmPaint | ControlStyles.DoubleBuffer, true);

            this.SetStyle(ControlStyles.UserPaint, true);

            this.UpdateStyles();

            //设置背景颜色为透明

            this.BackColor = Color.Transparent;

        }

        //private int uintfontsize = 40;

        /// <summary>

        /// 初始化仪表盘画布

        /// </summary>

        private void InitialCanvas()

        {

            //对比控件的长高,以最小值为仪表盘的半径

            if (this.Width >  * this.Height)

            {

                diameter =  * this.Height - ;

            }

            else

            {

                diameter = this.Width - ;

            }

            multiple = (float)diameter / maxSize;//计算仪表盘放大倍数

            //如果半径大于仪表盘的最大值,则设定放大倍数为默认值

            if (multiple > )

            {

                multiple = ;

                diameter = maxSize;

            }

            intervalValue = (int)((MaxValue - minValue) / );//计算每个间隔之间的值

        }

        /// <summary>

        /// 画底图

        /// </summary>

        private void drawBackImage()

        {

            Bitmap bit = new Bitmap(this.Width, this.Height);

            Graphics gp = Graphics.FromImage(bit);

            gp.SmoothingMode = System.Drawing.Drawing2D.SmoothingMode.HighQuality;

            float radius = diameter / ;//半径

            float cerX = this.Width / ;

            float cerY = this.Height /  + radius /  -  * multiple;

            //float cerY = this.Height - 20 ;

            gp.TranslateTransform(cerX, cerY);//以中心点为画布的起始点

            //gp.DrawPie(new Pen(new SolidBrush(Color.FromArgb(19,20,25)),3), -radius, -radius, diameter, diameter, 175, 190);

            gp.DrawArc(new Pen(new SolidBrush(Color.FromArgb(, , )), ), -radius, -radius, diameter, diameter, , );

            float x1 = (float)((radius) * Math.Cos( * Math.PI / ));

            float y1 = (float)((radius) * Math.Sin( * Math.PI / ));

            float x2 = (float)((radius) * Math.Cos( * Math.PI / ));

            float y2 = (float)((radius) * Math.Sin( * Math.PI / ));

            gp.DrawLine(new Pen(new SolidBrush(Color.FromArgb(, , )), ), x1, y1, x2, y2);

            //gp.DrawEllipse(new Pen(Brushes.Red), -5, -5, 10, 10);

            float startRad = ;//起始角度

            float sweepShot = ;//旋转角度

            //gp.DrawLine(new Pen(Brushes.Red), -radius, 0, -(radius - 10), 0);

            for (int i = ; i <= ; i++)

            {

                double rad = (sweepShot + startRad) * Math.PI / ;

                if (i %  == )

                {

                    float px1 = (float)((radius -  ) * Math.Cos(rad));

                    float py1 = (float)((radius -  ) * Math.Sin(rad));

                    float px2 = (float)((radius - ) * Math.Cos(rad));

                    float py2 = (float)((radius - ) * Math.Sin(rad));

                    gp.DrawLine(new Pen(new SolidBrush(Color.FromArgb(, , )), ), px1, py1, px2, py2);

                }

                else

                {

                    float px1 = (float)((radius -  ) * Math.Cos(rad));

                    float py1 = (float)((radius -  ) * Math.Sin(rad));

                    float px2 = (float)((radius -  ) * Math.Cos(rad));

                    float py2 = (float)((radius -  ) * Math.Sin(rad));

                    gp.DrawLine(new Pen(new SolidBrush(Color.FromArgb(, , )), ), px1, py1, px2, py2);

                }

                sweepShot += ;

            }

            //刻度字体

            Font scaleFont = new Font("宋体", , FontStyle.Bold);

            startRad = ;//起始角度

            sweepShot = ;//旋转角度

            Color c1 = Color.FromArgb(, , );

            for (int i = ; i < ; i++)

            {

                int tempValue = i * intervalValue;

                SizeF tempSf = gp.MeasureString(tempValue.ToString(), scaleFont);

                //计算角度值

                double rad = (sweepShot + startRad) * Math.PI / ;

                float px = (float)((radius - ) * Math.Cos(rad));

                float py = (float)((radius - ) * Math.Sin(rad));

                if (sweepShot == )

                {

                    gp.DrawString(tempValue.ToString(), scaleFont, Brushes.Wheat, px - tempSf.Width / , py);

                }

                else if (sweepShot == )

                {

                    gp.DrawString(tempValue.ToString(), scaleFont, new SolidBrush(c1), px - tempSf.Width +  * multiple, py - tempSf.Height /  +  * multiple);

                }

                else if (sweepShot == )

                {

                    gp.DrawString(tempValue.ToString(), scaleFont, new SolidBrush(c1), px - tempSf.Width, py - tempSf.Height /  +  * multiple);

                }

                else if (sweepShot == )

                {

                    gp.DrawString(tempValue.ToString(), scaleFont, new SolidBrush(c1), px - tempSf.Width, py - tempSf.Height / );

                }

                //else if (sweepShot == 120)

                //{

                //    gp.DrawString(tempValue.ToString(), scaleFont, new SolidBrush(c1), px - tempSf.Width, py - tempSf.Height / 2);

                //}

                sweepShot += ;

            }

            startRad = ;//起始角度

            sweepShot = ;//旋转角度

            for (int i = ; i < ; i++)

            {

                int tempValue = -i * intervalValue;

                SizeF tempSf = gp.MeasureString(tempValue.ToString(), scaleFont);

                //计算角度值

                double rad = (sweepShot + startRad) * Math.PI / ;

                float px = (float)((radius -  * multiple) * Math.Cos(rad));

                float py = (float)((radius -  * multiple) * Math.Sin(rad));

                if (sweepShot == -)

                {

                    gp.DrawString(tempValue.ToString(), scaleFont, Brushes.Red, px, py + tempSf.Height / );

                }

                else if (sweepShot == -)

                {

                    gp.DrawString(tempValue.ToString(), scaleFont, Brushes.Red, px + tempSf.Width /  -  * multiple, py + tempSf.Height /  -  * multiple);

                }

                else if (sweepShot == -)

                {

                    gp.DrawString(tempValue.ToString(), scaleFont, Brushes.Red, px + tempSf.Width/  , py - tempSf.Height / );

                }

                sweepShot -= ;

            }

            gp.Dispose();

            this.BackgroundImage = bit;

        }

        /// <summary>

        /// 画图

        /// </summary>

        /// <param name="g"></param>

        private void DrawPin(Graphics g)

        {

            Bitmap bit = new Bitmap(this.Width, this.Height);

            Graphics gp = Graphics.FromImage(bit);

            gp.SmoothingMode = System.Drawing.Drawing2D.SmoothingMode.HighQuality;

            float radius = diameter / ;//半径

            float startRad = ;//起始角度

            float sweepShot = (float)(ChangeValue / MaxValue * );//旋转角度

            float cerX = this.Width / ;

            float cerY = this.Height /  + radius /  -  * multiple;

            gp.TranslateTransform(cerX, cerY);//以中心点为画布的起始点

            //gp.DrawEllipse(new Pen(PinColor, 1), -5, -5, 10, 10);//画中心圆圈

            double rad = (sweepShot + startRad) * Math.PI / ;//计算角度

            float px = (float)((radius - ) * Math.Cos(rad));

            float py = (float)((radius - ) * Math.Sin(rad));

            PointF[] pf = new PointF[] { new PointF(, -radius + ), new PointF(-, ), new PointF(, ) };

            gp.RotateTransform(sweepShot);

            //PointF[] pf = new PointF[] { new PointF(px, py), new PointF(-4, 0), new PointF(4, 0) };

            gp.FillPolygon(new SolidBrush(PinColor), pf);

            //gp.DrawLine(new Pen(new SolidBrush(PinColor), 3f), 0, 0, px, py);

            g.DrawImage(bit, , );

            gp.Dispose();

        }

        private void HalfDashboardUc_Load(object sender, EventArgs e)

        {

            InitialCanvas();

            drawBackImage();

        }

        private void HalfDashboardUc_Paint(object sender, PaintEventArgs e)

        {

            DrawPin(e.Graphics);

        }

        private void HalfDashboardUc_Resize(object sender, EventArgs e)

        {

            InitialCanvas();

            drawBackImage();

        }

    }
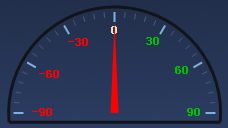
效果实现如下:

金属仪表盘下载地址 https://pan.baidu.com/s/1xANmSkQYnLGzUJ_X8Dbg0w 提取码:fi96
C# GDI绘制仪表盘(纯代码实现)的更多相关文章
- GDI绘制时钟效果,与系统时间保持同步,基于Winform
2018年工作之余,想起来捡起GDI方面的技术,特意在RichCodeBox项目中做了两个示例程序,其中一个就是时钟效果,纯C#开发.这个CSharpQuartz是今天上午抽出一些时间,编写的,算是偷 ...
- 通过GDI+绘制 验证码
只为了记录下自己的学习历程,方便日后查看 现在开始言归正传,以下为其完整代码附上 using System; using System.Collections.Generic; using Syste ...
- C#利用GDI+绘制旋转文字等效果
C#中利用GDI+绘制旋转文本的文字,网上有很多资料,基本都使用矩阵旋转的方式实现.但基本都只提及按点旋转,若要实现在矩形范围内旋转文本,资料较少.经过琢磨,可以将矩形内旋转转化为按点旋转,不过需要经 ...
- C# 使用GDI+绘制漂亮的MenuStrip和ContextMenuStrip皮肤
通过上面的效果截图可以看到,重绘后的MenuStrip和ContextMenuStrip可以添加自己的LOGO信息,实现了类似OFFICE2007的菜单显示效果. .NET对菜单控件的绘制提供了一个抽 ...
- MFC 用gdi绘制填充多边形区域
MFC 用gdi绘制填充多边形区域 这里的代码是实现一个三角形的绘制,并用刷子填充颜色 在OnPaint()函数里面 运用的是给定的三角形的三个点,很多个点可以绘制多边形 CBrush br(RGB( ...
- 『备注』GDI+ 绘制文本有锯齿,透明背景文本绘制
背景: GDI+ 绘制文本 时,如果 背景是透明的 —— 则会出现 锯齿. //其实,我不用这三个 属性 好多年了 //而且,这三个属性 在关键时刻还有可能 帮倒忙 //关键是:这三个属性,鸟用都没有 ...
- C#GDI+ 绘制线段(实线或虚线)、矩形、字符串、圆、椭圆
C#GDI+ 绘制线段(实线或虚线).矩形.字符串.圆.椭圆 绘制基本线条和图形 比较简单,直接看代码. Graphics graphics = e.Graphics; //绘制实线 )) { pen ...
- Qt自定义控件之仪表盘2--QPaint绘制仪表盘
0.前言 前面一篇文章写道了仪表盘的特点,实现了一个贴图的仪表盘,属于低配版本的仪表盘. 主要是有任何改动时候就需要重新设计图片,不能适配不同控件大小,即使让它自由拉伸,但仪表盘放大缩小时候显示 ...
- Qt5绘制仪表盘dashboard
说明 本文演示Qt版本: Qt5.14. 本文将使用QPainter一步一步绘制仪表盘:刻度.指针.刻度值 注意: 绘制顺序,如果先绘制,则后来绘制的将会覆盖住先前绘制的. 如果需要绘制半透明, 请设 ...
随机推荐
- [leetcode]346. Moving Average from Data Stream滑动窗口平均值
Given a stream of integers and a window size, calculate the moving average of all integers in the sl ...
- mysql只保留一条有效数据,删除其他重复的数据
delete from TableName where id in( SELECT ID FROM(SELECT * FROM TableName t0WHERE(t0.Field1,t0.Field ...
- EXPAT(XML解析库)
一.简介 expat是一个由C语言编写的XML解析库.James Clark创建了这个库,现在是制定XML标准的W3组织的技术leader.现在的版本是2.0.2.0开始就由Clark Cooper领 ...
- Laravel 5 如何对部份 URI 禁用 CSRF 验证
打开中间件 VerifyCsrfToken.php 在其 $except 属性中添加要禁用的 uri,如: api/user/add api/user/* api/*
- iOS沙盒机制介绍
一.沙盒机制 沙盒的概念:沙盒是每一个iOS应用程序都会自动创建的一个文件系统目录(文件夹),而且沙盒还具有独立.封闭.安全的特点. 沙盒机制 iOS中的沙盒不仅仅是一个文件目录,TA其实更是一种安全 ...
- 高性能 js -- 无阻塞加载脚本
参考: <<高性能JavaScript>> Nicbolas C. Zakas 著 javascript代码的下载和执行过程会阻塞浏览器的其他进程, 比如页面的绘制, 遇到&l ...
- ThinkPHP5命令行 执行控制器下的某方法
入口文件后加一个空格就行了 1,首先cd到站点目录public下,我的入口文件是默认的index.php,然后执行以下命令,, 2,php要加入环境变量,index.php后面加空格,然后是模块,控制 ...
- vi 基本使用命令
说明:以下的例子中 xxx 表示在命令模式下输入 xxx 并回车以下的例子中 :xxx 表示在扩展模式下输入 xxx 并回车小括号中的命令表示相关命令在编辑模式或可视模式下输入的命令会另外注明 1 查 ...
- Caused by: Unable to load configuration. - action - file:/C:/apache-tomcat-7.0.70/webapps/Structs/WEB-INF/classes/struts.xml:7:72 at com.opensymphony.xwork2.config.ConfigurationManager.getConfigurati
Unable to load configuration. - action - file:/C:/apache-tomcat-7.0.70/webapps/Structs/WEB-INF/class ...
- python将字典中的数据保存到文件中
d = {'a':'aaa','b':'bbb'}s = str(d)f = open('dict.txt','w')f.writelines(s)f.close()