
Keras 时序模型
本文翻译自
时序模型就是层次的线性叠加。
你能够通过向构造函数传递层实例的列表构建序列模型:
from keras.models import Sequential

from keras.layers import Dense, Activation

model = Sequential([

    Dense(32, input_dim=784),

    Activation('relu'),

    Dense(10),

    Activation('softmax'),

])
- 1
- 2
- 3
- 4
- 5
- 6
- 7
- 8
也可以简单的通过.add()添加层:
model = Sequential()

model.add(Dense(32, input_dim=784))

model.add(Activation('relu'))
- 1
- 2
- 3
指定输入形状(Specifying the input shape)
模型需要知道输入的形状。正因为如此,序列模型的第一层(只有第一层,下面的层次能自动进行形状推测)需要接受有关输入形状的信息。这里有几种方式来做这些:
通过第一层的一个参数input_shape进行传递。这是一个形状元组(整数元组或None条目,None指示任何可能的整数都可以)。在Input_shape ,批维度没有被包含;
传进batch_input_shape 参数,它包含了批维度;制定一个固定的批大小是有用的;
一些2D层,例如Dense,支持通过参数input_dim指定输入的形状,一些3D时间层支持参数input_dim或input_length
正因为如此,以下三个代码片段完全相同:
model = Sequential()

model.add(Dense(32, input_shape=(784,)))
- 1
- 2
model = Sequential()

model.add(Dense(32, batch_input_shape=(None, 784)))

# note that batch dimension is "None" here,

# so the model will be able to process batches of any size.
- 1
- 2
- 3
- 4
model = Sequential()

model.add(Dense(32, input_dim=784))
- 1
- 2
下面的三个片段同样相同:
model = Sequential()

model.add(LSTM(32, input_shape=(10, 64)))
- 1
- 2
model = Sequential()

model.add(LSTM(32, batch_input_shape=(None, 10, 64)))
- 1
- 2
model = Sequential()

model.add(LSTM(32, input_length=10, input_dim=64))
- 1
- 2
合并层(The Merge layer)
多个Sequential 实例能够通过Merge层合并为单个的输出;
输出能够在一个新的Sequential模型中像第一层那样进行添加;例如,下面的模型把两个分离的输入分支进行整合;
from keras.layers import Merge

left_branch = Sequential()

left_branch.add(Dense(32, input_dim=784))

right_branch = Sequential()

right_branch.add(Dense(32, input_dim=784))

merged = Merge([left_branch, right_branch], mode='concat')

final_model = Sequential()

final_model.add(merged)

final_model.add(Dense(10, activation='softmax'))
- 1
- 2
- 3
- 4
- 5
- 6
- 7
- 8
- 9
- 10
- 11
- 12
- 13
如此的一个两分支模型能够被训练:
final_model.compile(optimizer='rmsprop', loss='categorical_crossentropy')

final_model.fit([input_data_1, input_data_2], targets)  # we pass one data array per model input
- 1
- 2
合并层支持一些预定义的模式:
sum(default):元素的总和;
concat:向量级联,可以通过concat_axis设置级联轴;
mul:元素相乘
ave:向量平均;
dot:点积;能够通过dot_axes参数指定轴进行减少;
cos:向量间的余弦距离;
还可以通过允许任意变换的函数作为mode参数进行传递;
merged = Merge([left_branch, right_branch], mode=lambda x: x[0] - x[1])
- 1
现在已经能够使用Keras来定义任何的模型。对于不能通过Sequential和Merge进行表示的复杂模型。能够使用the functional API
编译(Compilation)
在训练一个模型之前,需要配置它的学习过程,这是通过compile函数来做的。它接受三个参数:
一个优化器:它可以是现有的优化器的字符串标识符(例如 rmsprop or adagrad),也可以是优化器类的实例;有关优化器
一个损失函数:这是模型想要最小化的目标函数,它可以是一个现存的损失函数的字符串标识符(such as categorical_crossentropy or mse),也可以是一个目标函数;有关损失函数
一个度量值列表:对于任何的聚类问题你将要把它设置为metrics=[‘accuracy’],一个度量值可以是一个已存在的度量的字符串标识符或者是一个自定义度量函数。有关度量值
# for a multi-class classification problem

model.compile(optimizer='rmsprop',

              loss='categorical_crossentropy',

              metrics=['accuracy'])

# for a binary classification problem

model.compile(optimizer='rmsprop',

              loss='binary_crossentropy',

              metrics=['accuracy'])

# for a mean squared error regression problem

model.compile(optimizer='rmsprop',

              loss='mse')

# for custom metrics

import keras.backend as K

def mean_pred(y_true, y_pred):

    return K.mean(y_pred)

def false_rates(y_true, y_pred):

    false_neg = ...

    false_pos = ...

    return {

        'false_neg': false_neg,

        'false_pos': false_pos,

    }

model.compile(optimizer='rmsprop',

              loss='binary_crossentropy',

              metrics=['accuracy', mean_pred, false_rates])
- 1
- 2
- 3
- 4
- 5
- 6
- 7
- 8
- 9
- 10
- 11
- 12
- 13
- 14
- 15
- 16
- 17
- 18
- 19
- 20
- 21
- 22
- 23
- 24
- 25
- 26
- 27
- 28
- 29
- 30
- 31
训练(Training)
Keras模型使用输入数据和标签的Numpy数组进行训练。为了训练一个模型,我们通常使用fit函数,相关文档
# for a single-input model with 2 classes (binary):

model = Sequential()

model.add(Dense(1, input_dim=784, activation='sigmoid'))

model.compile(optimizer='rmsprop',

              loss='binary_crossentropy',

              metrics=['accuracy'])

# generate dummy data

import numpy as np

data = np.random.random((1000, 784))

labels = np.random.randint(2, size=(1000, 1))

# train the model, iterating on the data in batches

# of 32 samples

model.fit(data, labels, nb_epoch=10, batch_size=32)
- 1
- 2
- 3
- 4
- 5
- 6
- 7
- 8
- 9
- 10
- 11
- 12
- 13
- 14
- 15
- 16
# for a multi-input model with 10 classes:

left_branch = Sequential()

left_branch.add(Dense(32, input_dim=784))

right_branch = Sequential()

right_branch.add(Dense(32, input_dim=784))

merged = Merge([left_branch, right_branch], mode='concat')

model = Sequential()

model.add(merged)

model.add(Dense(10, activation='softmax'))

model.compile(optimizer='rmsprop',

              loss='categorical_crossentropy',

              metrics=['accuracy'])

# generate dummy data

import numpy as np

from keras.utils.np_utils import to_categorical

data_1 = np.random.random((1000, 784))

data_2 = np.random.random((1000, 784))

# these are integers between 0 and 9

labels = np.random.randint(10, size=(1000, 1))

# we convert the labels to a binary matrix of size (1000, 10)

# for use with categorical_crossentropy

labels = to_categorical(labels, 10)

# train the model

# note that we are passing a list of Numpy arrays as training data

# since the model has 2 inputs

model.fit([data_1, data_2], l  abels, nb_epoch=10, batch_size=32)
- 1
- 2
- 3
- 4
- 5
- 6
- 7
- 8
- 9
- 10
- 11
- 12
- 13
- 14
- 15
- 16
- 17
- 18
- 19
- 20
- 21
- 22
- 23
- 24
- 25
- 26
- 27
- 28
- 29
- 30
- 31
- 32
- 33
- 34
例子(Examples)
这里有很多的例子:
在示例文件中,你会发现真实数据集的示例:
CIFAR小图像聚类:带有实时数据增加的卷积神经网络;
IMDB电影评论情感聚类:在单词序列上的LSTM;
路透社新闻专线(Reuters newswires)的主题分类:多层感知器(MLP);
MNIST 手写数字聚类:MLP & CNN
使用LSTM进行字母水平的文本生成(Character-level text generation );
多层感知器用于多类soft max聚类:(也就是普通的神经网络)
Multilayer Perceptron (MLP) for multi-class softmax classification:
from keras.models import Sequential

from keras.layers import Dense, Dropout, Activation

from keras.optimizers import SGD

model = Sequential()

# Dense(64) is a fully-connected layer with 64 hidden units.

# in the first layer, you must specify the expected input data shape:

# here, 20-dimensional vectors.

model.add(Dense(64, input_dim=20, init='uniform'))

model.add(Activation('tanh'))

model.add(Dropout(0.5))

model.add(Dense(64, init='uniform'))

model.add(Activation('tanh'))

model.add(Dropout(0.5))

model.add(Dense(10, init='uniform'))

model.add(Activation('softmax'))

sgd = SGD(lr=0.1, decay=1e-6, momentum=0.9, nesterov=True)

model.compile(loss='categorical_crossentropy',

              optimizer=sgd,

              metrics=['accuracy'])

model.fit(X_train, y_train,

          nb_epoch=20,

          batch_size=16)

score = model.evaluate(X_test, y_test, batch_size=16)
- 1
- 2
- 3
- 4
- 5
- 6
- 7
- 8
- 9
- 10
- 11
- 12
- 13
- 14
- 15
- 16
- 17
- 18
- 19
- 20
- 21
- 22
- 23
- 24
- 25
- 26
相似的MLP其他的实现:
model = Sequential()

model.add(Dense(64, input_dim=20, activation='relu'))

model.add(Dropout(0.5))

model.add(Dense(64, activation='relu'))

model.add(Dropout(0.5))

model.add(Dense(10, activation='softmax'))

model.compile(loss='categorical_crossentropy',

              optimizer='adadelta',

              metrics=['accuracy'])
- 1
- 2
- 3
- 4
- 5
- 6
- 7
- 8
- 9
- 10
MLP用于二分类问题
model = Sequential()

model.add(Dense(64, input_dim=20, init='uniform', activation='relu'))

model.add(Dropout(0.5))

model.add(Dense(64, activation='relu'))

model.add(Dropout(0.5))

model.add(Dense(1, activation='sigmoid'))

model.compile(loss='binary_crossentropy',

              optimizer='rmsprop',

              metrics=['accuracy'])
- 1
- 2
- 3
- 4
- 5
- 6
- 7
- 8
- 9
- 10
VGG-like convnet
from keras.models import Sequential

from keras.layers import Dense, Dropout, Activation, Flatten

from keras.layers import Convolution2D, MaxPooling2D

from keras.optimizers import SGD

model = Sequential()

# input: 100x100 images with 3 channels -> (3, 100, 100) tensors.

# this applies 32 convolution filters of size 3x3 each.

model.add(Convolution2D(32, 3, 3, border_mode='valid', input_shape=(3, 100, 100)))

model.add(Activation('relu'))

model.add(Convolution2D(32, 3, 3))

model.add(Activation('relu'))

model.add(MaxPooling2D(pool_size=(2, 2)))

model.add(Dropout(0.25))

model.add(Convolution2D(64, 3, 3, border_mode='valid'))

model.add(Activation('relu'))

model.add(Convolution2D(64, 3, 3))

model.add(Activation('relu'))

model.add(MaxPooling2D(pool_size=(2, 2)))

model.add(Dropout(0.25))

model.add(Flatten())

# Note: Keras does automatic shape inference.

model.add(Dense(256))

model.add(Activation('relu'))

model.add(Dropout(0.5))

model.add(Dense(10))

model.add(Activation('softmax'))

sgd = SGD(lr=0.1, decay=1e-6, momentum=0.9, nesterov=True)

model.compile(loss='categorical_crossentropy', optimizer=sgd)

model.fit(X_train, Y_train, batch_size=32, nb_epoch=1)
- 1
- 2
- 3
- 4
- 5
- 6
- 7
- 8
- 9
- 10
- 11
- 12
- 13
- 14
- 15
- 16
- 17
- 18
- 19
- 20
- 21
- 22
- 23
- 24
- 25
- 26
- 27
- 28
- 29
- 30
- 31
- 32
- 33
- 34
- 35
使用LSTM进行序列分类:
from keras.models import Sequential

from keras.layers import Dense, Dropout, Activation

from keras.layers import Embedding

from keras.layers import LSTM

model = Sequential()

model.add(Embedding(max_features, 256, input_length=maxlen))

model.add(LSTM(output_dim=128, activation='sigmoid', inner_activation='hard_sigmoid'))

model.add(Dropout(0.5))

model.add(Dense(1))

model.add(Activation('sigmoid'))

model.compile(loss='binary_crossentropy',

              optimizer='rmsprop',

              metrics=['accuracy'])

model.fit(X_train, Y_train, batch_size=16, nb_epoch=10)

score = model.evaluate(X_test, Y_test, batch_size=16)
- 1
- 2
- 3
- 4
- 5
- 6
- 7
- 8
- 9
- 10
- 11
- 12
- 13
- 14
- 15
- 16
- 17
- 18
使用一个Convnet和一个Gated Recurrent Unit建立学习图像字幕的框架;
单词级的嵌入,字幕的最大长度为16个单词;
注意要想把这个工作做好,需要更大的Convnet,使用预训练的权重进行初始化;
max_caption_len = 16

vocab_size = 10000

# first, let's define an image model that

# will encode pictures into 128-dimensional vectors.

# it should be initialized with pre-trained weights.

image_model = Sequential()

image_model.add(Convolution2D(32, 3, 3, border_mode='valid', input_shape=(3, 100, 100)))

image_model.add(Activation('relu'))

image_model.add(Convolution2D(32, 3, 3))

image_model.add(Activation('relu'))

image_model.add(MaxPooling2D(pool_size=(2, 2)))

image_model.add(Convolution2D(64, 3, 3, border_mode='valid'))

image_model.add(Activation('relu'))

image_model.add(Convolution2D(64, 3, 3))

image_model.add(Activation('relu'))

image_model.add(MaxPooling2D(pool_size=(2, 2)))

image_model.add(Flatten())

image_model.add(Dense(128))

# let's load the weights from a save file.

image_model.load_weights('weight_file.h5')

# next, let's define a RNN model that encodes sequences of words

# into sequences of 128-dimensional word vectors.

language_model = Sequential()

language_model.add(Embedding(vocab_size, 256, input_length=max_caption_len))

language_model.add(GRU(output_dim=128, return_sequences=True))

language_model.add(TimeDistributed(Dense(128)))

# let's repeat the image vector to turn it into a sequence.

image_model.add(RepeatVector(max_caption_len))

# the output of both models will be tensors of shape (samples, max_caption_len, 128).

# let's concatenate these 2 vector sequences.

model = Sequential()

model.add(Merge([image_model, language_model], mode='concat', concat_axis=-1))

# let's encode this vector sequence into a single vector

model.add(GRU(256, return_sequences=False))

# which will be used to compute a probability

# distribution over what the next word in the caption should be!

model.add(Dense(vocab_size))

model.add(Activation('softmax'))

model.compile(loss='categorical_crossentropy', optimizer='rmsprop')

# "images" is a numpy float array of shape (nb_samples, nb_channels=3, width, height).

# "captions" is a numpy integer array of shape (nb_samples, max_caption_len)

# containing word index sequences representing partial captions.

# "next_words" is a numpy float array of shape (nb_samples, vocab_size)

# containing a categorical encoding (0s and 1s) of the next word in the corresponding

# partial caption.

model.fit([images, partial_captions], next_words, batch_size=16, nb_epoch=100)
- 1
- 2
- 3
- 4
- 5
- 6
- 7
- 8
- 9
- 10
- 11
- 12
- 13
- 14
- 15
- 16
- 17
- 18
- 19
- 20
- 21
- 22
- 23
- 24
- 25
- 26
- 27
- 28
- 29
- 30
- 31
- 32
- 33
- 34
- 35
- 36
- 37
- 38
- 39
- 40
- 41
- 42
- 43
- 44
- 45
- 46
- 47
- 48
- 49
- 50
- 51
- 52
- 53
- 54
- 55
叠加的LSTM用于序列聚类(Stacked LSTM for sequence classification)
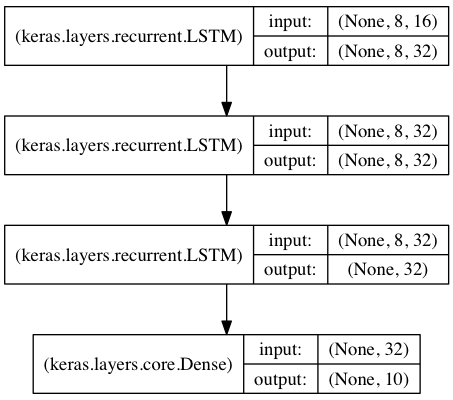
在这个模型中,我们在彼此的顶部叠加了三个LATM层,使这个模型能够学习更高水平的时间表示;
前两个LSTMs返回全输出序列,最后一个仅仅返回输出序列的最后一步,从而降低时间维度;
from keras.models import Sequential

from keras.layers import LSTM, Dense

import numpy as np

data_dim = 16

timesteps = 8

nb_classes = 10

# expected input data shape: (batch_size, timesteps, data_dim)

model = Sequential()

model.add(LSTM(32, return_sequences=True,

               input_shape=(timesteps, data_dim)))  # returns a sequence of vectors of dimension 32

model.add(LSTM(32, return_sequences=True))  # returns a sequence of vectors of dimension 32

model.add(LSTM(32))  # return a single vector of dimension 32

model.add(Dense(10, activation='softmax'))

model.compile(loss='categorical_crossentropy',

              optimizer='rmsprop',

              metrics=['accuracy'])

# generate dummy training data

x_train = np.random.random((1000, timesteps, data_dim))

y_train = np.random.random((1000, nb_classes))

# generate dummy validation data

x_val = np.random.random((100, timesteps, data_dim))

y_val = np.random.random((100, nb_classes))

model.fit(x_train, y_train,

          batch_size=64, nb_epoch=5,

          validation_data=(x_val, y_val))
- 1
- 2
- 3
- 4
- 5
- 6
- 7
- 8
- 9
- 10
- 11
- 12
- 13
- 14
- 15
- 16
- 17
- 18
- 19
- 20
- 21
- 22
- 23
- 24
- 25
- 26
- 27
- 28
- 29
- 30
- 31
一些叠加LSTM模型,提供状态
A stateful recurrent model is one for which the internal states (memories) obtained after processing a batch of samples are reused as initial states for the samples of the next batch. This allows to process longer sequences while keeping computational complexity manageable.
from keras.models import Sequential

from keras.layers import LSTM, Dense

import numpy as np

data_dim = 16

timesteps = 8

nb_classes = 10

batch_size = 32

# expected input batch shape: (batch_size, timesteps, data_dim)

# note that we have to provide the full batch_input_shape since the network is stateful.

# the sample of index i in batch k is the follow-up for the sample i in batch k-1.

model = Sequential()

model.add(LSTM(32, return_sequences=True, stateful=True,

               batch_input_shape=(batch_size, timesteps, data_dim)))

model.add(LSTM(32, return_sequences=True, stateful=True))

model.add(LSTM(32, stateful=True))

model.add(Dense(10, activation='softmax'))

model.compile(loss='categorical_crossentropy',

              optimizer='rmsprop',

              metrics=['accuracy'])

# generate dummy training data

x_train = np.random.random((batch_size * 10, timesteps, data_dim))

y_train = np.random.random((batch_size * 10, nb_classes))

# generate dummy validation data

x_val = np.random.random((batch_size * 3, timesteps, data_dim))

y_val = np.random.random((batch_size * 3, nb_classes))

model.fit(x_train, y_train,

          batch_size=batch_size, nb_epoch=5,

          validation_data=(x_val, y_val))
- 1
- 2
- 3
- 4
- 5
- 6
- 7
- 8
- 9
- 10
- 11
- 12
- 13
- 14
- 15
- 16
- 17
- 18
- 19
- 20
- 21
- 22
- 23
- 24
- 25
- 26
- 27
- 28
- 29
- 30
- 31
- 32
- 33
- 34
两个合并的LSTM编码器用于两个并行序列的分类:
在这个模型中,通过两个分离的LSTM模型 把两个输入序列编码成向量;
这两个向量被级联。在级联上端一个全链接神经网络被训练;

from keras.models import Sequential

from keras.layers import Merge, LSTM, Dense

import numpy as np

data_dim = 16

timesteps = 8

nb_classes = 10

encoder_a = Sequential()

encoder_a.add(LSTM(32, input_shape=(timesteps, data_dim)))

encoder_b = Sequential()

encoder_b.add(LSTM(32, input_shape=(timesteps, data_dim)))

decoder = Sequential()

decoder.add(Merge([encoder_a, encoder_b], mode='concat'))

decoder.add(Dense(32, activation='relu'))

decoder.add(Dense(nb_classes, activation='softmax'))

decoder.compile(loss='categorical_crossentropy',

                optimizer='rmsprop',

                metrics=['accuracy'])

# generate dummy training data

x_train_a = np.random.random((1000, timesteps, data_dim))

x_train_b = np.random.random((1000, timesteps, data_dim))

y_train = np.random.random((1000, nb_classes))

# generate dummy validation data

x_val_a = np.random.random((100, timesteps, data_dim))

x_val_b = np.random.random((100, timesteps, data_dim))

y_val = np.random.random((100, nb_classes))

decoder.fit([x_train_a, x_train_b], y_train,

            batch_size=64, nb_epoch=5,

            validation_data=([x_val_a, x_val_b], y_val))
- 1
- 2
- 3
- 4
- 5
- 6
- 7
- 8
- 9
- 10
- 11
- 12
- 13
- 14
- 15
- 16
- 17
- 18
- 19
- 20
- 21
- 22
- 23
- 24
- 25
- 26
- 27
- 28
- 29
- 30
- 31
- 32
- 33
- 34
- 35
- 36
Keras 时序模型的更多相关文章
- Verilog篇(四)时序模型
时序模型:仿真器的时间推进模型,它反映了推进仿真时间和调度事件的方式. 1)门级时序模型:适用于分析所有的连续赋值语句,过程连续赋值语句,门级原语,用户自定义原语. 特点:任意时刻,任意输入变化都将重 ...
- 开始 Keras 序列模型(Sequential model)
开始 Keras 序列模型(Sequential model) 序列模型是一个线性的层次堆栈. 你可以通过传递一系列 layer 实例给构造器来创建一个序列模型. The Sequential mod ...
- mnist手写数字识别——深度学习入门项目(tensorflow+keras+Sequential模型)
前言 今天记录一下深度学习的另外一个入门项目——<mnist数据集手写数字识别>,这是一个入门必备的学习案例,主要使用了tensorflow下的keras网络结构的Sequential模型 ...
- EGADS介绍(二)--时序模型和异常检测模型算法的核心思想
EDADS系统包含了众多的时序模型和异常检测模型,这些模型的处理会输入很多参数,若仅使用默认的参数,那么时序模型预测的准确率将无法提高,异常检测模型的误报率也无法降低,甚至针对某些时间序列这些模型将无 ...
- Keras序列模型学习
转自:https://keras.io/zh/getting-started/sequential-model-guide/ 1.顺序模型是多个网络层的线性堆叠. 你可以通过将网络层实例的列表传递给 ...
- keras 中模型的保存
参考:https://www.cnblogs.com/weiyinfu/p/9788179.html#0 1.model.summary() 这个函数会打印模型结构,但是仅仅是打印到控制台,不能保存 ...
- windows和linux环境下keras的模型框架可视化
1.简介 keras提供了模型可视化模块,下面讲解下安装教程和简易教程. 2.安装教程 2.1windows环境下的安装 2.1.1安装指定模块 pip install pydot-ng pip in ...
- keras 入门模型训练
# -*- coding: utf-8 -*- from keras.models import Sequential from keras.layers import Dense from kera ...
- keras 保存模型
转自:https://blog.csdn.net/u010159842/article/details/54407745,感谢分享! 我们不推荐使用pickle或cPickle来保存Keras模型 你 ...
随机推荐
- Linux Python import jenkins 报错 oserror: /usr/lib/python2.7/site-packages/lookup3.so
安装了jenkins和Python-jenkins后,在脚本中import jenkins会报错:oserror: /usr/lib/python2.7/site-packages/lookup3.s ...
- Watchbog挖矿病毒程序排查过程
第1章 情况 1)服务器收到cpu报警,cpu被占用达到100%,登录服务器查看,发现cpu被一个watchbog的进程占满了,如下图所示: 2)并且无论如何都杀不掉,用kill杀掉后,其还是会隔一会 ...
- git 换行符替换
https://help.github.com/en/articles/dealing-with-line-endings rm .git/index git reset https://github ...
- SD341X-SD343H管网法兰式伸缩蝶阀厂家,SD341X-SD343H管网法兰式伸缩蝶阀价格 - 专题栏目 - 无极资讯网
无极资讯网 首页 最新资讯 最新图集 最新标签 搜索 SD341X-SD343H管网法兰式伸缩蝶阀 无极资讯网精心为您挑选了(SD341X-SD343H管网法兰式伸缩蝶阀)信息,其中包含了(SD3 ...
- Dubbo---初识
1.概述 1.1 Dubbo是一款高性能.轻量级的java RPC框架: 1.2 Dubbo提供的功能: 面向接口的远程调用: 智能容错.负载均衡: 服务注册.发现: 1.3 Dubbo架构 Prov ...
- springboot实现服务器端消息推送(H5原生支持)
随着互联网的发展,传统的HTTP协议已经很难满足Web应用日益复杂的需求了.近年来,随着HTML5的诞生,WebSocket协议被提出,它实现了浏览器与服务器的全双工通信,扩展了浏览器与服务端的通信功 ...
- 我是怎么一步步用go找出压测性能瓶颈
欢迎大家前往腾讯云+社区,获取更多腾讯海量技术实践干货哦~ 本文由mariolu 发表于云+社区专栏 序言: 笔者要在线上服务器load日志并且重放来测一些机器性能指标.模拟机器资源比较少,相对的 ...
- Scrapy框架学习(四)爬取360摄影美图
我们要爬取的网站为http://image.so.com/z?ch=photography,打开开发者工具,页面往下拉,观察到出现了如图所示Ajax请求, 其中list就是图片的详细信息,接着观察到每 ...
- AtCoder Regular Contest 059 F Unhappy Hacking
Description 题面 Solution 我们发现如果一个位置需要被退掉,那么是 \(0\) 或 \(1\) 都没有关系 于是我们想到把 \(0,1\) 归为一类 问题转化为每一次可以添加和删除 ...
- Full postback triggered by LinkButton inside GridView inside UpdatePanel
GridView inside of a UpdatePanel,get the button to trigger a partial postback <asp:ScriptManager ...