orchestrator-Raft集群部署
本文简要说明下orchestrator的Raft集群部署,其实部署很简单主要是好好研究下配置文件的配置,这里我的样例配置文件暂时只适用于我们这块业务
如果您自己使用请根据情况自行修改。
主要通过配置文件,守护进程、代理配置(官方推荐通过代理把请求都打在Leader上)三部分说明
机器信息:
192.168.1.100
192.168.1.101
192.168.1.102
一共三台机器,三台机器分别部署
1. 配置文件
{

  "Debug": true,

  "EnableSyslog": false,

  "ListenAddress": ":3000",

  "AgentsServerPort": ":3001",

  "MySQLTopologyUser": "orc_client_user",

  "MySQLTopologyPassword": "orc_client_user_password",

  "MySQLTopologyCredentialsConfigFile": "",

  "MySQLTopologySSLPrivateKeyFile": "",

  "MySQLTopologySSLCertFile": "",

  "MySQLTopologySSLCAFile": "",

  "MySQLTopologySSLSkipVerify": true,

  "MySQLTopologyUseMutualTLS": false,

  # 这里我使用的是sqlite数据库,如果使用mysql数据库请自己修改

  "BackendDB": "sqlite3",

  "SQLite3DataFile": "/export/orc-sqlite3.db",

  "MySQLOrchestratorHost": "192.168.1.100",

  "MySQLOrchestratorPort": 3358,

  "MySQLOrchestratorDatabase": "orchestrator",

  "MySQLOrchestratorUser": "orchestrator_rw",

  "MySQLOrchestratorPassword": "orchestrator_pwd",

  "MySQLOrchestratorCredentialsConfigFile": "",

  "MySQLOrchestratorSSLPrivateKeyFile": "",

  "MySQLOrchestratorSSLCertFile": "",

  "MySQLOrchestratorSSLCAFile": "",

  "MySQLOrchestratorSSLSkipVerify": true,

  "MySQLOrchestratorUseMutualTLS": false,

  "MySQLConnectTimeoutSeconds": 5,

  "DefaultInstancePort": 3306,

  "SkipOrchestratorDatabaseUpdate": false,

  "SlaveLagQuery": "",

  "DiscoverByShowSlaveHosts": true,

  "InstancePollSeconds": 30,

  "UnseenInstanceForgetHours": 240,

  "SnapshotTopologiesIntervalHours": 0,

  "InstanceBulkOperationsWaitTimeoutSeconds": 10,

  "HostnameResolveMethod": "none",

  "MySQLHostnameResolveMethod": "none",

  "SkipBinlogServerUnresolveCheck": true,

  "ExpiryHostnameResolvesMinutes": 60,

  "RejectHostnameResolvePattern": "",

  "ReasonableReplicationLagSeconds": 10,

  "ProblemIgnoreHostnameFilters": [],

  "VerifyReplicationFilters": false,

  "ReasonableMaintenanceReplicationLagSeconds": 20,

  "CandidateInstanceExpireMinutes": 60,

  "AuditLogFile": "/tmp/orchestrator-audit.log",

  "AuditToSyslog": false,

  "RemoveTextFromHostnameDisplay": ".mydomain.com:3358",

  "ReadOnly": false,

  "AuthenticationMethod": "",

  "HTTPAuthUser": "",

  "HTTPAuthPassword": "",

  "AuthUserHeader": "",

  "PowerAuthUsers": [

    "*"

  ],

  "ClusterNameToAlias": {

    "127.0.0.1": "test suite"

  },

  "DetectClusterAliasQuery": "SELECT value FROM _vt.local_metadata WHERE name='ClusterAlias'",

  "DetectClusterDomainQuery": "",

  "DetectInstanceAliasQuery": "SELECT value FROM _vt.local_metadata WHERE name='Alias'",

  "DetectPromotionRuleQuery": "SELECT value FROM _vt.local_metadata WHERE name='PromotionRule'",

  "DataCenterPattern": "",

  "PhysicalEnvironmentPattern": "[.]([^.]+[.][^.]+)[.]mydomain[.]com",

  "DetectDataCenterQuery": "SELECT value FROM _vt.local_metadata where name='DataCenter'",

  "PromotionIgnoreHostnameFilters": [],

  "DetectSemiSyncEnforcedQuery": "SELECT @@global.rpl_semi_sync_master_wait_no_slave AND @@global.rpl_semi_sync_master_timeout > 1000000",

  "ServeAgentsHttp": false,

  "AgentsUseSSL": false,

  "AgentsUseMutualTLS": false,

  "AgentSSLSkipVerify": false,

  "AgentSSLPrivateKeyFile": "",

  "AgentSSLCertFile": "",

  "AgentSSLCAFile": "",

  "AgentSSLValidOUs": [],

  "UseSSL": false,

  "UseMutualTLS": false,

  "SSLSkipVerify": false,

  "SSLPrivateKeyFile": "",

  "SSLCertFile": "",

  "SSLCAFile": "",

  "SSLValidOUs": [],

  "StatusEndpoint": "/api/status",

  "StatusSimpleHealth": true,

  "StatusOUVerify": false,

  "AgentPollMinutes": 60,

  "UnseenAgentForgetHours": 6,

  "StaleSeedFailMinutes": 60,

  "SeedAcceptableBytesDiff": 8192,

  "PseudoGTIDPattern": "drop view if exists .*?`_pseudo_gtid_hint__",

  "PseudoGTIDMonotonicHint": "asc:",

  "DetectPseudoGTIDQuery": "",

  "BinlogEventsChunkSize": 10000,

  "SkipBinlogEventsContaining": [],

  "ReduceReplicationAnalysisCount": true,

  "FailureDetectionPeriodBlockMinutes": 60,

  "RecoveryPeriodBlockMinutes": 60,

  "RecoveryPeriodBlockSeconds": 3600,

  "RecoveryIgnoreHostnameFilters": [

    ".*"

  ],

  "RecoverMasterClusterFilters": [

    ".*"

  ],

  "RecoverIntermediateMasterClusterFilters": [

    "_intermediate_master_pattern_"

  ],

  "OnFailureDetectionProcesses": [

    "echo 'Detected {failureType} on {failureCluster}. Affected replicas: {countSlaves}' >> /tmp/recovery.log"

  ],

  "PreFailoverProcesses": [

    "echo 'Will recover from {failureType} on {failureCluster}' >> /tmp/recovery.log"

  ],

  "PostFailoverProcesses": [

    "echo '(for all types) Recovered from {failureType} on {failureCluster}. Failed: {failedHost}:{failedPort}; Successor: {successorHost}:{successorPort}' >> /tmp/recovery.log"

  ],

  "PostUnsuccessfulFailoverProcesses": [

    "echo 'Recovered from {failureType} on {failureCluster}. Failed: {failedHost}:{failedPort}; Promoted: {successorHost}:{successorPort}' >> /tmp/recovery.log",

    "curl -d '{\"isSuccessful\": {isSuccessful}, \"failureType\": \"{failureType}\", \"failureDescription\": \"{failureDescription}\", \"failedHost\": \"{failedHost}\", \"failedPort\": {failedPort}, \"failureCluster\": \"{failureCluster}\", \"failureClusterAlias\": \"{failureClusterAlias}\", \"failureClusterDomain\": \"{failureClusterDomain}\", \"countSlaves\": {countSlaves}, \"countReplicas\": {countReplicas}, \"isDowntimed\": {isDowntimed}, \"autoMasterRecovery\": {autoMasterRecovery}, \"autoIntermediateMasterRecovery\": {autoIntermediateMasterRecovery}, \"orchestratorHost\": \"{orchestratorHost}\", \"recoveryUID\": \"{recoveryUID}\", \"lostSlaves\": \"{lostSlaves}\", \"lostReplicas\": \"{lostReplicas}\", \"slaveHosts\": \"{slaveHosts}\", \"replicaHosts\": \"{replicaHosts}\"}' http://test.domain.com/api/failover"

  ],

  "PostMasterFailoverProcesses": [

    "echo 'Recovered from {failureType} on {failureCluster}. Failed: {failedHost}:{failedPort}; Promoted: {successorHost}:{successorPort}' >> /tmp/recovery.log",

    "curl -d '{\"isSuccessful\": {isSuccessful}, \"failureType\": \"{failureType}\", \"failureDescription\": \"{failureDescription}\", \"failedHost\": \"{failedHost}\", \"failedPort\": {failedPort}, \"failureCluster\": \"{failureCluster}\", \"failureClusterAlias\": \"{failureClusterAlias}\", \"failureClusterDomain\": \"{failureClusterDomain}\", \"countSlaves\": {countSlaves}, \"countReplicas\": {countReplicas}, \"isDowntimed\": {isDowntimed}, \"autoMasterRecovery\": {autoMasterRecovery}, \"autoIntermediateMasterRecovery\": {autoIntermediateMasterRecovery}, \"orchestratorHost\": \"{orchestratorHost}\", \"recoveryUID\": \"{recoveryUID}\", \"successorHost\": \"{successorHost}\", \"successorPort\": {successorPort}, \"lostSlaves\": \"{lostSlaves}\", \"lostReplicas\": \"{lostReplicas}\", \"slaveHosts\": \"{slaveHosts}\", \"successorAlias\": \"{successorAlias}\",\"replicaHosts\": \"{replicaHosts}\"}' http://test.domain.com/api/failover"

  ],

  "PostIntermediateMasterFailoverProcesses": [

    "echo 'Recovered from {failureType} on {failureCluster}. Failed: {failedHost}:{failedPort}; Successor: {successorHost}:{successorPort}' >> /tmp/recovery.log"

  ],

  "CoMasterRecoveryMustPromoteOtherCoMaster": true,

  "DetachLostSlavesAfterMasterFailover": true,

  "ApplyMySQLPromotionAfterMasterFailover": true,

  "MasterFailoverLostInstancesDowntimeMinutes": 0,

  "PostponeSlaveRecoveryOnLagMinutes": 0,

  "OSCIgnoreHostnameFilters": [],

  "GraphiteAddr": "",

  "GraphitePath": "",

  "GraphiteConvertHostnameDotsToUnderscores": true,

  "RaftEnabled": true,

  "RaftDataDir": "/export/Data/orchestrator",

  "RaftBind": "192.168.1.100",

  "RaftAdvertise": "192.168.1.100",

  "DefaultRaftPort": 10008,

  "RaftNodes": [

    "192.168.1.100",

    "192.168.1.101",

    "192.168.1.102",

] }
以上只列出了192.168.1.100的配置,另外两台机器的配置类似的修改就可以,主要注意需要修改RaftBind, RaftAdvertise对应的值即可,其他参数根据个人需要自己修改。
配置准备好后将程序打包防止在/export/App/orchestrator目录下

2. sqlite数据库文件配置
由于配置里面我们使用了sqlite数据库,所以需要将sqlite数据库文件放置在对应的目录下
3. 守护进程
参数配置文件准备好了,我们下面准备守护进程脚本,方便程序故障时重新启动
配置脚本信息如下:
#!/bin/bash

# orchestrator daemon

# chkconfig:

# description: orchestrator daemon

# processname: orchestrator

# Script credit: http://werxltd.com/wp/2012/01/05/simple-init-d-script-template/

# 执行路径,这个和我们防止可执行文件的路劲一致

DAEMON_PATH="/export/App/orchestrator"

DAEMON=orchestrator

DAEMONOPTS="-config /export/App/orchestrator/orchestrator.conf.json --verbose http"

NAME=orchestrator

DESC="orchestrator: MySQL replication management and visualization"

PIDFILE=/var/run/$NAME.pid

SCRIPTNAME=/etc/init.d/$NAME

# Limit the number of file descriptors (and sockets) used by

# orchestrator.  This setting should be fine in most cases but a

# large busy environment may # reach this limit. If exceeded expect

# to see errors of the form:

#   -- :: ERROR dial tcp 10.1.2.3:: connect: cannot assign requested address

# To avoid touching this script you can use /etc/orchestrator_profile

# to increase this limit.

ulimit -n

# initially noop but can adjust according by modifying orchestrator_profile

# - see https://github.com/github/orchestrator/issues/227 for more details.

post_start_daemon_hook () {

    # by default do nothing

    :

}

# Start the orchestrator daemon in the background
# 这里需要注意的是我们启动后会把日志文件直接重定向到/export/Logs/orchestrator目录下面,查看日志直接在该目录查看即可

start_daemon () {

    # start up daemon in the background

    $DAEMON_PATH/$DAEMON $DAEMONOPTS >> /export/Logs/orchestrator/${NAME}.log >& &

    # collect and print PID of started process

    echo $!

    # space for optional processing after starting orchestrator

    # - redirect stdout to stderro to prevent this corrupting the pid info

    post_start_daemon_hook >&

}

# The file /etc/orchestrator_profile can be used to inject pre-service execution

# scripts, such as exporting variables or whatever. It's yours!

#[ -f /etc/orchestrator/orchestrator_profile ] && . /etc/orchestrator/orchestrator_profile

case "$1" in

  start)

    printf "%-50s" "Starting $NAME..."

    cd $DAEMON_PATH

    PID=$(start_daemon)

    #echo "Saving PID" $PID " to " $PIDFILE

    if [ -z $PID ]; then

      printf "%s\n" "Fail"

      exit

    elif [ -z "$(ps axf | awk '{print $1}' | grep ${PID})" ]; then

      printf "%s\n" "Fail"

      exit

    else

      echo $PID > $PIDFILE

      printf "%s\n" "Ok"

    fi

  ;;

  status)

    printf "%-50s" "Checking $NAME..."

    if [ -f $PIDFILE ]; then

      PID=$(cat $PIDFILE)

      if [ -z "$(ps axf | awk '{print $1}' | grep ${PID})" ]; then

        printf "%s\n" "Process dead but pidfile exists"

        exit

      else

        echo "Running"

      fi

    else

      printf "%s\n" "Service not running"

      exit

    fi

  ;;

  stop)

    printf "%-50s" "Stopping $NAME"

    PID=$(cat $PIDFILE)

    cd $DAEMON_PATH

    if [ -f $PIDFILE ]; then

      kill -TERM $PID

      rm -f $PIDFILE

      # Wait for orchestrator to stop otherwise restart may fail.

      # (The newly restarted process may be unable to bind to the

      # currently bound socket.)

      while ps -p $PID >/dev/null >&; do

        printf "."

        sleep

      done

      printf "\n"

      printf "Ok\n"

    else

      printf "%s\n" "pidfile not found"

      exit

    fi

  ;;

  restart)

    $ stop

    $ start

  ;;

  reload)

    PID=$(cat $PIDFILE)

    cd $DAEMON_PATH

    if [ -f $PIDFILE ]; then

      kill -HUP $PID

      printf "%s\n" "Ok"

    else

      printf "%s\n" "pidfile not found"

      exit

    fi

    ;;

  *)

    echo "Usage: $0 {status|start|stop|restart|reload}"

    exit

esac
如果应用程序防止目录不一致,只需要对应的修改路径即可,其他信息不用修改
所有程序防止完成之后即可启动,看看是否能正常选举
4. haproxy代理
安装haproxy
yum install haproxy
配置文件
#---------------------------------------------------------------------

# Example configuration for a possible web application.  See the

# full configuration options online.

#

#   http://haproxy.1wt.eu/download/1.4/doc/configuration.txt

#

#---------------------------------------------------------------------

#---------------------------------------------------------------------

# Global settings

#---------------------------------------------------------------------

global

    # to have these messages end up in /var/log/haproxy.log you will

    # need to:

    #

    # ) configure syslog to accept network log events.  This is done

    #    by adding the '-r' option to the SYSLOGD_OPTIONS in

    #    /etc/sysconfig/syslog

    #

    # ) configure local2 events to go to the /var/log/haproxy.log

    #   file. A line like the following can be added to

    #   /etc/sysconfig/syslog

    #

    #    local2.*                       /var/log/haproxy.log

    #

    log         127.0.0.1 local2

    chroot      /var/lib/haproxy

    pidfile     /var/run/haproxy.pid

    maxconn

    user        haproxy

    group       haproxy

    daemon

    # turn on stats unix socket

    stats socket /var/lib/haproxy/stats

#---------------------------------------------------------------------

# common defaults that all the 'listen' and 'backend' sections will

# use if not designated in their block

#---------------------------------------------------------------------

defaults

    mode                    http

    log                     global

    option                  httplog

    option                  dontlognull

    option http-server-close

    option forwardfor       except 127.0.0.0/

    option                  redispatch

    retries

    timeout http-request    10s

    timeout queue           1m

    timeout connect         10s

    timeout client          1m

    timeout server          1m

    timeout http-keep-alive 10s

    timeout check           10s

    maxconn

#---------------------------------------------------------------------

# main frontend which proxys to the backends

#---------------------------------------------------------------------

#frontend  main *:

#    acl url_static       path_beg       -i /static /images /javascript /stylesheets

#    acl url_static       path_end       -i .jpg .gif .png .css .js

#

#    use_backend static          if url_static

#    default_backend             app

#---------------------------------------------------------------------

# static backend for serving up images, stylesheets and such

#---------------------------------------------------------------------

#backend static

#    balance     roundrobin

#    server      static 127.0.0.1: check

#---------------------------------------------------------------------

# round robin balancing between the various backends

#---------------------------------------------------------------------

#backend app

#    balance     roundrobin

#    server  app1 127.0.0.1: check

#    server  app2 127.0.0.1: check

#    server  app3 127.0.0.1: check

#    server  app4 127.0.0.1: check

listen orchestrator

  stats   enable

  bind    *:

  mode    http

  stats   refresh 30s

  stats   uri /admin

  bind    0.0.0.0: process

  bind    0.0.0.0: process

  bind    0.0.0.0: process

  bind    0.0.0.0: process

  option httpchk GET /api/leader-check

  maxconn

  balance first

  retries

  timeout connect

  timeout check

  timeout server 30s

  timeout client 30s

  default-server port  fall  inter  rise  downinter  on-marked-down shutdown-sessions weight

  server 192.168.1.100 192.168.1.100: check

  server 192.168.1.101 192.168.1.101: check

  server 192.168.1.102 192.168.1.102: check
重启haproxy服务
service haproxy status
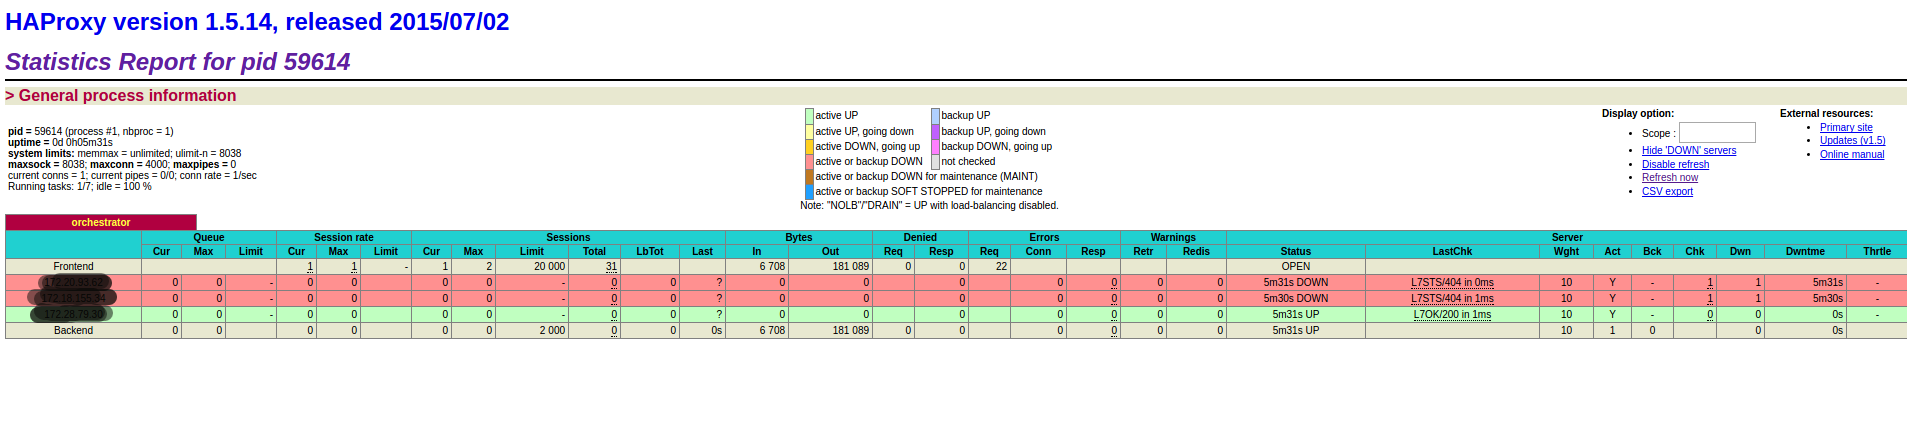
启动后查看监控页面
orchestrator-Raft集群部署的更多相关文章
- 003.etcd集群部署-静态发现
一 etcd集群概述 1.1 概述 静态启动etcd集群要求每个成员都知道集群中的另一个成员.Etcd运行在集群的每个coreos节点上,可以保证coreos集群的稳定,可靠的运行.当集群网络出现动荡 ...
- 集群容器管理之swarm ---集群部署
集群部署及节点管理 使用swarm前提: Docker版本1.12+ 集群节点之间保证TCP 2377.TCP/UDP 7946和UDP 4789端口通信 节点规划: 操作系统:centos7.4.1 ...
- centos6下redis cluster集群部署过程
一般来说,redis主从和mysql主从目的差不多,但redis主从配置很简单,主要在从节点配置文件指定主节点ip和端口,比如:slaveof 192.168.10.10 6379,然后启动主从,主从 ...
- etcd集群部署与遇到的坑(转)
原文 https://www.cnblogs.com/breg/p/5728237.html etcd集群部署与遇到的坑 在k8s集群中使用了etcd作为数据中心,在实际操作中遇到了一些坑.今天记录一 ...
- k8s集群部署之环境介绍与etcd数据库集群部署
角色 IP 组件 配置 master-1 192.168.10.11 kube-apiserver kube-controller-manager kube-scheduler etcd 2c 2g ...
- ElasticSearch 深入理解 三:集群部署设计
ElasticSearch 深入理解 三:集群部署设计 ElasticSearch从名字中也可以知道,它的Elastic跟Search是同等重要的,甚至以Elastic为主要导向. Elastic即可 ...
- consul异地多数据中心以及集群部署方案
consul异地多数据中心以及集群部署方案目的实现consul 异地多数据中心环境部署,使得一个数据中心的服务可以从另一个数据中心的consul获取已注册的服务地址 环境准备两台 linux服务器,外 ...
- influxdb集群部署
环境准备 influxdb enterprise运行条件最低需要三个meta nodes节点以及两个data nodes Meta nodes之间使用TCP和Raft一致性协议通信,默认端口为8089 ...
- (1)Consul在linux环境的集群部署
1.Consul概念 1.1什么是Consul? Consul是一种服务网格解决方案,是HashiCorp公司推出的开源组件,由Go语言开发,部署起来很容易,只需要极少的可执行程序和配置.同时Cons ...
随机推荐
- Python读取键盘输入
Python提供了两个内置函数从标准输入读入一行文本,默认的标准输入是键盘.例如以下: raw_input input raw_input函数 raw_input() 函数从标准输入读取一个行.并返回 ...
- stl之hash_multiset
hash_multiset的元素不会被自己主动排序
- Newton's method Drawback and advantage
Newton Raphson Method: Advantages and Drawbacks: v=QwyjgmqbR9s" target="_blank"& ...
- Objective-C之成魔之路【5-选择结构】
郝萌主倾心贡献.尊重作者的劳动成果,请勿转载. 假设文章对您有所帮助,欢迎给作者捐赠,支持郝萌主.捐赠数额任意,重在心意^_^ 我要捐赠: 点击捐赠 Cocos2d-X源代码下载:点我传送 Objec ...
- jquery远程引用地址大全
jquery官方的引用地址,如图: <script typet="text/javascript" src="http://code.jquery.com/jque ...
- ubuntu12.10更新源
ubuntu12.10更新源 2013-03-10 20:48:17| 分类: Linux |字号 订阅 不同的网络状况连接以下源的速度不同, 建议在添加前手动验证以下源的连接速度(ping下就 ...
- python 的__FILE__,__LINE__功能实现
在C语言里,__FILE__和__LINE__给调试提供了很大的方便,今晚在写PYTHON的时候想到,PYTHON是否有类似的功能实现呢? GOOGLE一番发现两个方法,试验一下下面这句:print ...
- bzoj2005 能量采集 莫比乌斯或者普通容斥
/** 题目:bzoj2005 能量采集 链接:https://vjudge.net/contest/178455#problem/F 题意:栋栋有一块长方形的地,他在地上种了一种能量植物,这种植物可 ...
- C语言 百炼成钢26
/* 题目62: 有一下特征字符串"eerrrrqqAB33333ABa333333ABjsfdsfdsa" 编写一个业务函数, 实现功能1:实现按照子串"AB" ...
- iframe宽高百分百显示
<!DOCTYPE html PUBLIC "-//W3C//DTD XHTML 1.0 Transitional//EN" "http://www.w3.org/ ...