orchestrator-Raft集群部署
本文简要说明下orchestrator的Raft集群部署,其实部署很简单主要是好好研究下配置文件的配置,这里我的样例配置文件暂时只适用于我们这块业务
如果您自己使用请根据情况自行修改。
主要通过配置文件,守护进程、代理配置(官方推荐通过代理把请求都打在Leader上)三部分说明
机器信息:
192.168.1.100
192.168.1.101
192.168.1.102
一共三台机器,三台机器分别部署
1. 配置文件
{

  "Debug": true,

  "EnableSyslog": false,

  "ListenAddress": ":3000",

  "AgentsServerPort": ":3001",

  "MySQLTopologyUser": "orc_client_user",

  "MySQLTopologyPassword": "orc_client_user_password",

  "MySQLTopologyCredentialsConfigFile": "",

  "MySQLTopologySSLPrivateKeyFile": "",

  "MySQLTopologySSLCertFile": "",

  "MySQLTopologySSLCAFile": "",

  "MySQLTopologySSLSkipVerify": true,

  "MySQLTopologyUseMutualTLS": false,

  # 这里我使用的是sqlite数据库,如果使用mysql数据库请自己修改

  "BackendDB": "sqlite3",

  "SQLite3DataFile": "/export/orc-sqlite3.db",

  "MySQLOrchestratorHost": "192.168.1.100",

  "MySQLOrchestratorPort": 3358,

  "MySQLOrchestratorDatabase": "orchestrator",

  "MySQLOrchestratorUser": "orchestrator_rw",

  "MySQLOrchestratorPassword": "orchestrator_pwd",

  "MySQLOrchestratorCredentialsConfigFile": "",

  "MySQLOrchestratorSSLPrivateKeyFile": "",

  "MySQLOrchestratorSSLCertFile": "",

  "MySQLOrchestratorSSLCAFile": "",

  "MySQLOrchestratorSSLSkipVerify": true,

  "MySQLOrchestratorUseMutualTLS": false,

  "MySQLConnectTimeoutSeconds": 5,

  "DefaultInstancePort": 3306,

  "SkipOrchestratorDatabaseUpdate": false,

  "SlaveLagQuery": "",

  "DiscoverByShowSlaveHosts": true,

  "InstancePollSeconds": 30,

  "UnseenInstanceForgetHours": 240,

  "SnapshotTopologiesIntervalHours": 0,

  "InstanceBulkOperationsWaitTimeoutSeconds": 10,

  "HostnameResolveMethod": "none",

  "MySQLHostnameResolveMethod": "none",

  "SkipBinlogServerUnresolveCheck": true,

  "ExpiryHostnameResolvesMinutes": 60,

  "RejectHostnameResolvePattern": "",

  "ReasonableReplicationLagSeconds": 10,

  "ProblemIgnoreHostnameFilters": [],

  "VerifyReplicationFilters": false,

  "ReasonableMaintenanceReplicationLagSeconds": 20,

  "CandidateInstanceExpireMinutes": 60,

  "AuditLogFile": "/tmp/orchestrator-audit.log",

  "AuditToSyslog": false,

  "RemoveTextFromHostnameDisplay": ".mydomain.com:3358",

  "ReadOnly": false,

  "AuthenticationMethod": "",

  "HTTPAuthUser": "",

  "HTTPAuthPassword": "",

  "AuthUserHeader": "",

  "PowerAuthUsers": [

    "*"

  ],

  "ClusterNameToAlias": {

    "127.0.0.1": "test suite"

  },

  "DetectClusterAliasQuery": "SELECT value FROM _vt.local_metadata WHERE name='ClusterAlias'",

  "DetectClusterDomainQuery": "",

  "DetectInstanceAliasQuery": "SELECT value FROM _vt.local_metadata WHERE name='Alias'",

  "DetectPromotionRuleQuery": "SELECT value FROM _vt.local_metadata WHERE name='PromotionRule'",

  "DataCenterPattern": "",

  "PhysicalEnvironmentPattern": "[.]([^.]+[.][^.]+)[.]mydomain[.]com",

  "DetectDataCenterQuery": "SELECT value FROM _vt.local_metadata where name='DataCenter'",

  "PromotionIgnoreHostnameFilters": [],

  "DetectSemiSyncEnforcedQuery": "SELECT @@global.rpl_semi_sync_master_wait_no_slave AND @@global.rpl_semi_sync_master_timeout > 1000000",

  "ServeAgentsHttp": false,

  "AgentsUseSSL": false,

  "AgentsUseMutualTLS": false,

  "AgentSSLSkipVerify": false,

  "AgentSSLPrivateKeyFile": "",

  "AgentSSLCertFile": "",

  "AgentSSLCAFile": "",

  "AgentSSLValidOUs": [],

  "UseSSL": false,

  "UseMutualTLS": false,

  "SSLSkipVerify": false,

  "SSLPrivateKeyFile": "",

  "SSLCertFile": "",

  "SSLCAFile": "",

  "SSLValidOUs": [],

  "StatusEndpoint": "/api/status",

  "StatusSimpleHealth": true,

  "StatusOUVerify": false,

  "AgentPollMinutes": 60,

  "UnseenAgentForgetHours": 6,

  "StaleSeedFailMinutes": 60,

  "SeedAcceptableBytesDiff": 8192,

  "PseudoGTIDPattern": "drop view if exists .*?`_pseudo_gtid_hint__",

  "PseudoGTIDMonotonicHint": "asc:",

  "DetectPseudoGTIDQuery": "",

  "BinlogEventsChunkSize": 10000,

  "SkipBinlogEventsContaining": [],

  "ReduceReplicationAnalysisCount": true,

  "FailureDetectionPeriodBlockMinutes": 60,

  "RecoveryPeriodBlockMinutes": 60,

  "RecoveryPeriodBlockSeconds": 3600,

  "RecoveryIgnoreHostnameFilters": [

    ".*"

  ],

  "RecoverMasterClusterFilters": [

    ".*"

  ],

  "RecoverIntermediateMasterClusterFilters": [

    "_intermediate_master_pattern_"

  ],

  "OnFailureDetectionProcesses": [

    "echo 'Detected {failureType} on {failureCluster}. Affected replicas: {countSlaves}' >> /tmp/recovery.log"

  ],

  "PreFailoverProcesses": [

    "echo 'Will recover from {failureType} on {failureCluster}' >> /tmp/recovery.log"

  ],

  "PostFailoverProcesses": [

    "echo '(for all types) Recovered from {failureType} on {failureCluster}. Failed: {failedHost}:{failedPort}; Successor: {successorHost}:{successorPort}' >> /tmp/recovery.log"

  ],

  "PostUnsuccessfulFailoverProcesses": [

    "echo 'Recovered from {failureType} on {failureCluster}. Failed: {failedHost}:{failedPort}; Promoted: {successorHost}:{successorPort}' >> /tmp/recovery.log",

    "curl -d '{\"isSuccessful\": {isSuccessful}, \"failureType\": \"{failureType}\", \"failureDescription\": \"{failureDescription}\", \"failedHost\": \"{failedHost}\", \"failedPort\": {failedPort}, \"failureCluster\": \"{failureCluster}\", \"failureClusterAlias\": \"{failureClusterAlias}\", \"failureClusterDomain\": \"{failureClusterDomain}\", \"countSlaves\": {countSlaves}, \"countReplicas\": {countReplicas}, \"isDowntimed\": {isDowntimed}, \"autoMasterRecovery\": {autoMasterRecovery}, \"autoIntermediateMasterRecovery\": {autoIntermediateMasterRecovery}, \"orchestratorHost\": \"{orchestratorHost}\", \"recoveryUID\": \"{recoveryUID}\", \"lostSlaves\": \"{lostSlaves}\", \"lostReplicas\": \"{lostReplicas}\", \"slaveHosts\": \"{slaveHosts}\", \"replicaHosts\": \"{replicaHosts}\"}' http://test.domain.com/api/failover"

  ],

  "PostMasterFailoverProcesses": [

    "echo 'Recovered from {failureType} on {failureCluster}. Failed: {failedHost}:{failedPort}; Promoted: {successorHost}:{successorPort}' >> /tmp/recovery.log",

    "curl -d '{\"isSuccessful\": {isSuccessful}, \"failureType\": \"{failureType}\", \"failureDescription\": \"{failureDescription}\", \"failedHost\": \"{failedHost}\", \"failedPort\": {failedPort}, \"failureCluster\": \"{failureCluster}\", \"failureClusterAlias\": \"{failureClusterAlias}\", \"failureClusterDomain\": \"{failureClusterDomain}\", \"countSlaves\": {countSlaves}, \"countReplicas\": {countReplicas}, \"isDowntimed\": {isDowntimed}, \"autoMasterRecovery\": {autoMasterRecovery}, \"autoIntermediateMasterRecovery\": {autoIntermediateMasterRecovery}, \"orchestratorHost\": \"{orchestratorHost}\", \"recoveryUID\": \"{recoveryUID}\", \"successorHost\": \"{successorHost}\", \"successorPort\": {successorPort}, \"lostSlaves\": \"{lostSlaves}\", \"lostReplicas\": \"{lostReplicas}\", \"slaveHosts\": \"{slaveHosts}\", \"successorAlias\": \"{successorAlias}\",\"replicaHosts\": \"{replicaHosts}\"}' http://test.domain.com/api/failover"

  ],

  "PostIntermediateMasterFailoverProcesses": [

    "echo 'Recovered from {failureType} on {failureCluster}. Failed: {failedHost}:{failedPort}; Successor: {successorHost}:{successorPort}' >> /tmp/recovery.log"

  ],

  "CoMasterRecoveryMustPromoteOtherCoMaster": true,

  "DetachLostSlavesAfterMasterFailover": true,

  "ApplyMySQLPromotionAfterMasterFailover": true,

  "MasterFailoverLostInstancesDowntimeMinutes": 0,

  "PostponeSlaveRecoveryOnLagMinutes": 0,

  "OSCIgnoreHostnameFilters": [],

  "GraphiteAddr": "",

  "GraphitePath": "",

  "GraphiteConvertHostnameDotsToUnderscores": true,

  "RaftEnabled": true,

  "RaftDataDir": "/export/Data/orchestrator",

  "RaftBind": "192.168.1.100",

  "RaftAdvertise": "192.168.1.100",

  "DefaultRaftPort": 10008,

  "RaftNodes": [

    "192.168.1.100",

    "192.168.1.101",

    "192.168.1.102",

] }
以上只列出了192.168.1.100的配置,另外两台机器的配置类似的修改就可以,主要注意需要修改RaftBind, RaftAdvertise对应的值即可,其他参数根据个人需要自己修改。
配置准备好后将程序打包防止在/export/App/orchestrator目录下

2. sqlite数据库文件配置
由于配置里面我们使用了sqlite数据库,所以需要将sqlite数据库文件放置在对应的目录下
3. 守护进程
参数配置文件准备好了,我们下面准备守护进程脚本,方便程序故障时重新启动
配置脚本信息如下:
#!/bin/bash

# orchestrator daemon

# chkconfig:

# description: orchestrator daemon

# processname: orchestrator

# Script credit: http://werxltd.com/wp/2012/01/05/simple-init-d-script-template/

# 执行路径,这个和我们防止可执行文件的路劲一致

DAEMON_PATH="/export/App/orchestrator"

DAEMON=orchestrator

DAEMONOPTS="-config /export/App/orchestrator/orchestrator.conf.json --verbose http"

NAME=orchestrator

DESC="orchestrator: MySQL replication management and visualization"

PIDFILE=/var/run/$NAME.pid

SCRIPTNAME=/etc/init.d/$NAME

# Limit the number of file descriptors (and sockets) used by

# orchestrator.  This setting should be fine in most cases but a

# large busy environment may # reach this limit. If exceeded expect

# to see errors of the form:

#   -- :: ERROR dial tcp 10.1.2.3:: connect: cannot assign requested address

# To avoid touching this script you can use /etc/orchestrator_profile

# to increase this limit.

ulimit -n

# initially noop but can adjust according by modifying orchestrator_profile

# - see https://github.com/github/orchestrator/issues/227 for more details.

post_start_daemon_hook () {

    # by default do nothing

    :

}

# Start the orchestrator daemon in the background
# 这里需要注意的是我们启动后会把日志文件直接重定向到/export/Logs/orchestrator目录下面,查看日志直接在该目录查看即可

start_daemon () {

    # start up daemon in the background

    $DAEMON_PATH/$DAEMON $DAEMONOPTS >> /export/Logs/orchestrator/${NAME}.log >& &

    # collect and print PID of started process

    echo $!

    # space for optional processing after starting orchestrator

    # - redirect stdout to stderro to prevent this corrupting the pid info

    post_start_daemon_hook >&

}

# The file /etc/orchestrator_profile can be used to inject pre-service execution

# scripts, such as exporting variables or whatever. It's yours!

#[ -f /etc/orchestrator/orchestrator_profile ] && . /etc/orchestrator/orchestrator_profile

case "$1" in

  start)

    printf "%-50s" "Starting $NAME..."

    cd $DAEMON_PATH

    PID=$(start_daemon)

    #echo "Saving PID" $PID " to " $PIDFILE

    if [ -z $PID ]; then

      printf "%s\n" "Fail"

      exit

    elif [ -z "$(ps axf | awk '{print $1}' | grep ${PID})" ]; then

      printf "%s\n" "Fail"

      exit

    else

      echo $PID > $PIDFILE

      printf "%s\n" "Ok"

    fi

  ;;

  status)

    printf "%-50s" "Checking $NAME..."

    if [ -f $PIDFILE ]; then

      PID=$(cat $PIDFILE)

      if [ -z "$(ps axf | awk '{print $1}' | grep ${PID})" ]; then

        printf "%s\n" "Process dead but pidfile exists"

        exit

      else

        echo "Running"

      fi

    else

      printf "%s\n" "Service not running"

      exit

    fi

  ;;

  stop)

    printf "%-50s" "Stopping $NAME"

    PID=$(cat $PIDFILE)

    cd $DAEMON_PATH

    if [ -f $PIDFILE ]; then

      kill -TERM $PID

      rm -f $PIDFILE

      # Wait for orchestrator to stop otherwise restart may fail.

      # (The newly restarted process may be unable to bind to the

      # currently bound socket.)

      while ps -p $PID >/dev/null >&; do

        printf "."

        sleep

      done

      printf "\n"

      printf "Ok\n"

    else

      printf "%s\n" "pidfile not found"

      exit

    fi

  ;;

  restart)

    $ stop

    $ start

  ;;

  reload)

    PID=$(cat $PIDFILE)

    cd $DAEMON_PATH

    if [ -f $PIDFILE ]; then

      kill -HUP $PID

      printf "%s\n" "Ok"

    else

      printf "%s\n" "pidfile not found"

      exit

    fi

    ;;

  *)

    echo "Usage: $0 {status|start|stop|restart|reload}"

    exit

esac
如果应用程序防止目录不一致,只需要对应的修改路径即可,其他信息不用修改
所有程序防止完成之后即可启动,看看是否能正常选举
4. haproxy代理
安装haproxy
yum install haproxy
配置文件
#---------------------------------------------------------------------

# Example configuration for a possible web application.  See the

# full configuration options online.

#

#   http://haproxy.1wt.eu/download/1.4/doc/configuration.txt

#

#---------------------------------------------------------------------

#---------------------------------------------------------------------

# Global settings

#---------------------------------------------------------------------

global

    # to have these messages end up in /var/log/haproxy.log you will

    # need to:

    #

    # ) configure syslog to accept network log events.  This is done

    #    by adding the '-r' option to the SYSLOGD_OPTIONS in

    #    /etc/sysconfig/syslog

    #

    # ) configure local2 events to go to the /var/log/haproxy.log

    #   file. A line like the following can be added to

    #   /etc/sysconfig/syslog

    #

    #    local2.*                       /var/log/haproxy.log

    #

    log         127.0.0.1 local2

    chroot      /var/lib/haproxy

    pidfile     /var/run/haproxy.pid

    maxconn

    user        haproxy

    group       haproxy

    daemon

    # turn on stats unix socket

    stats socket /var/lib/haproxy/stats

#---------------------------------------------------------------------

# common defaults that all the 'listen' and 'backend' sections will

# use if not designated in their block

#---------------------------------------------------------------------

defaults

    mode                    http

    log                     global

    option                  httplog

    option                  dontlognull

    option http-server-close

    option forwardfor       except 127.0.0.0/

    option                  redispatch

    retries

    timeout http-request    10s

    timeout queue           1m

    timeout connect         10s

    timeout client          1m

    timeout server          1m

    timeout http-keep-alive 10s

    timeout check           10s

    maxconn

#---------------------------------------------------------------------

# main frontend which proxys to the backends

#---------------------------------------------------------------------

#frontend  main *:

#    acl url_static       path_beg       -i /static /images /javascript /stylesheets

#    acl url_static       path_end       -i .jpg .gif .png .css .js

#

#    use_backend static          if url_static

#    default_backend             app

#---------------------------------------------------------------------

# static backend for serving up images, stylesheets and such

#---------------------------------------------------------------------

#backend static

#    balance     roundrobin

#    server      static 127.0.0.1: check

#---------------------------------------------------------------------

# round robin balancing between the various backends

#---------------------------------------------------------------------

#backend app

#    balance     roundrobin

#    server  app1 127.0.0.1: check

#    server  app2 127.0.0.1: check

#    server  app3 127.0.0.1: check

#    server  app4 127.0.0.1: check

listen orchestrator

  stats   enable

  bind    *:

  mode    http

  stats   refresh 30s

  stats   uri /admin

  bind    0.0.0.0: process

  bind    0.0.0.0: process

  bind    0.0.0.0: process

  bind    0.0.0.0: process

  option httpchk GET /api/leader-check

  maxconn

  balance first

  retries

  timeout connect

  timeout check

  timeout server 30s

  timeout client 30s

  default-server port  fall  inter  rise  downinter  on-marked-down shutdown-sessions weight

  server 192.168.1.100 192.168.1.100: check

  server 192.168.1.101 192.168.1.101: check

  server 192.168.1.102 192.168.1.102: check
重启haproxy服务
service haproxy status
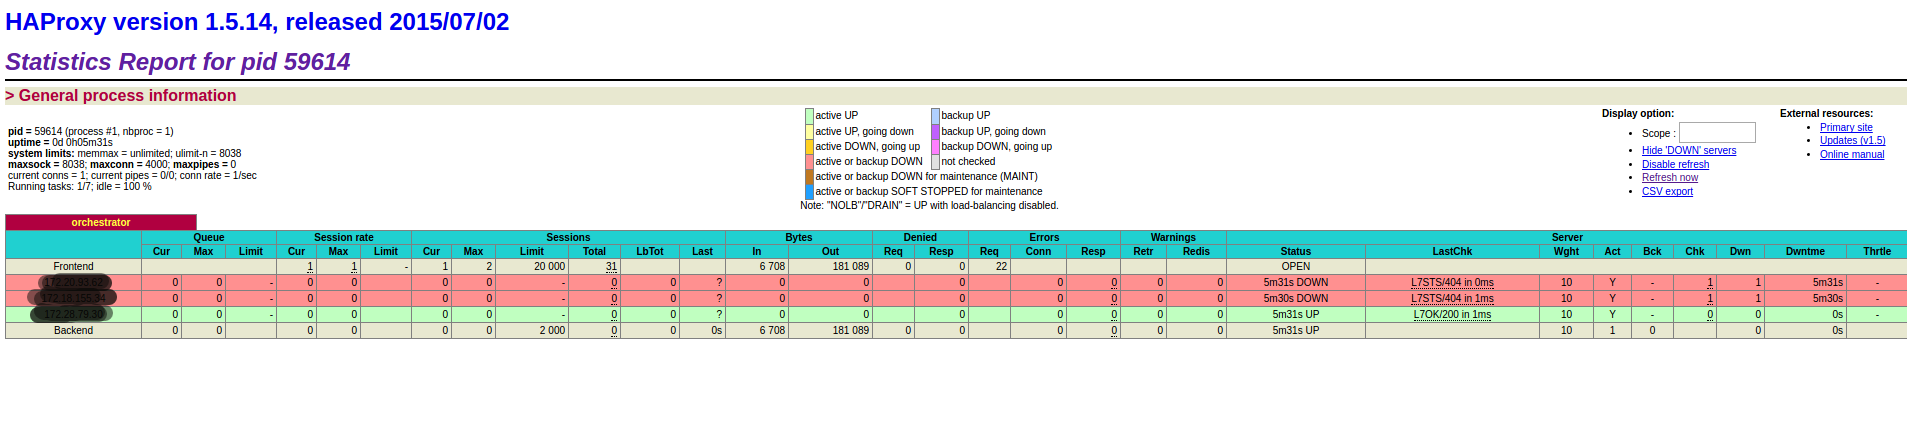
启动后查看监控页面
orchestrator-Raft集群部署的更多相关文章
- 003.etcd集群部署-静态发现
一 etcd集群概述 1.1 概述 静态启动etcd集群要求每个成员都知道集群中的另一个成员.Etcd运行在集群的每个coreos节点上,可以保证coreos集群的稳定,可靠的运行.当集群网络出现动荡 ...
- 集群容器管理之swarm ---集群部署
集群部署及节点管理 使用swarm前提: Docker版本1.12+ 集群节点之间保证TCP 2377.TCP/UDP 7946和UDP 4789端口通信 节点规划: 操作系统:centos7.4.1 ...
- centos6下redis cluster集群部署过程
一般来说,redis主从和mysql主从目的差不多,但redis主从配置很简单,主要在从节点配置文件指定主节点ip和端口,比如:slaveof 192.168.10.10 6379,然后启动主从,主从 ...
- etcd集群部署与遇到的坑(转)
原文 https://www.cnblogs.com/breg/p/5728237.html etcd集群部署与遇到的坑 在k8s集群中使用了etcd作为数据中心,在实际操作中遇到了一些坑.今天记录一 ...
- k8s集群部署之环境介绍与etcd数据库集群部署
角色 IP 组件 配置 master-1 192.168.10.11 kube-apiserver kube-controller-manager kube-scheduler etcd 2c 2g ...
- ElasticSearch 深入理解 三:集群部署设计
ElasticSearch 深入理解 三:集群部署设计 ElasticSearch从名字中也可以知道,它的Elastic跟Search是同等重要的,甚至以Elastic为主要导向. Elastic即可 ...
- consul异地多数据中心以及集群部署方案
consul异地多数据中心以及集群部署方案目的实现consul 异地多数据中心环境部署,使得一个数据中心的服务可以从另一个数据中心的consul获取已注册的服务地址 环境准备两台 linux服务器,外 ...
- influxdb集群部署
环境准备 influxdb enterprise运行条件最低需要三个meta nodes节点以及两个data nodes Meta nodes之间使用TCP和Raft一致性协议通信,默认端口为8089 ...
- (1)Consul在linux环境的集群部署
1.Consul概念 1.1什么是Consul? Consul是一种服务网格解决方案,是HashiCorp公司推出的开源组件,由Go语言开发,部署起来很容易,只需要极少的可执行程序和配置.同时Cons ...
随机推荐
- STL容器分析--queue
queue,顾名思义,是指队列.满足先进先出的原则.
- php安全处理
1.php.ini 修改 open_basedir='d:\wwwroot' //配置只能访问指定的网站目录 2.php.ini 修改 disable_funcitons=system,passthr ...
- [转载]一种高性能Hierarchical RBAC实现方案
背景 框图 上图中,Role和被设置Permission的Resource都是可以有任意层级继承关系的. 举例 举一个网站的例子来说: 如果,User表示网站用户:Role表示角色:Resource表 ...
- Error: Could not find or load main class org.apache.flume.tools.GetJavaProperty
问题: [root@master conf]# flume-ng version Error: Could not find or load main class org.apache.flume.t ...
- CCNA2.0笔记_路由相关
路由器的工作内容 -路由器知道目标地址 -发现到达目标地址的可能的路由 -选择最佳路径(路由表) -维护路由信息 路由的来源 直连路由:直接连到路由器上的网络 -初始化情况下,路由器所知的网络,只有其 ...
- tomcat web 修改logo
第一种: 打开tomcat目录,进入 D:\tomcat\apache-tomcat-7.0.50-1\webapps\ROOT 找到favicon.ico图标 然后替换成自己的 第二种: 由于tom ...
- Ubuntu 启动项、菜单 改动 防止隐藏
因为电脑有多个系统,默认的grub引引导菜单是隐藏的,须要略微改动下方可显示 不要直接改动boot/grub/grub.cfg 要直接改动/etc/default/grub,然后update-gru ...
- JVM Specification 9th Edition (4) Chapter 3. Compiling for the Java Virtual Machine
Chapter 3. Compiling for the Java Virtual Machine 内容列表 3.1. Format of Examples 3.2. Use of Constants ...
- 设置Tomcat编码(UTF-8)
Tomcat的默认编码是ISO-8859-1,如果有是get请求时,会出现乱码,这种情况可以修改Tomcat的编码解决. 在tomcat的conf目录下,编辑server.xml配置文件,在Conne ...
- nginx 为什么要反向代理 影藏后端 高效连接(给nginx,他自己返回) 端口冲突解决 多个服务
nginx 为什么要反向代理 影藏后端 高效连接(给nginx,他自己返回) 端口冲突解决 多个服务 单机使用反向代理可以根据不同url匹配到不同站点 rsync 的工作原理和应用实例 ...