OVN实战---《The OVN Gateway Router》翻译
Overview
在本文中我将在前文的基础上添加一个OVN gateway router。gateway router将使得lab network能访问我们的overlay network
The lab
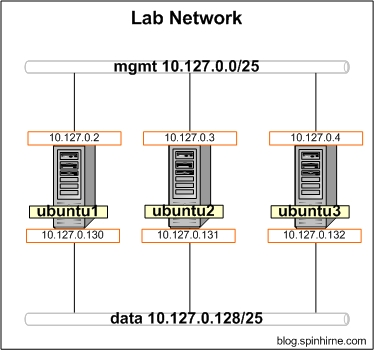
为了能演示gateway router,我们需要给我们的ubuntu hosts再添加一个物理网络。因此,各个节点的eth1都将加入10.127.0.128/25这个网络。最终的拓扑结构如下所示:

Introducing the OVN L3 Gateway
OVN Gateway通常作为overlay network和physical network之间的onramp/offramp存在。它有两种工作方式:在二层将一个OVN logical switch接入一个VLAN,在三层则为OVN router和physical network提供连接。在本文中,我们专注于创建一个三层的gateway,作为physical network和logical network的分界点。
和distributed logical router(DLR)不同,一个OVN gateway router是存在于单个节点中的(chassis),因此它可以提供一些不能分布的服务(例如NAT,负载均衡等等)。在撰写本文的时候,对于gateway router存在一个限制,即它只能通过logical switch和其他路由器相连,而DLRs却能通过peer link之间相连。对于移除这项限制的工作仍在进行中。
需要注意的是,环境中存在多个gateway router也是允许的。这意味着可能存在多条链路(ECMP)能够进入逻辑空间。但是值得注意的是,OVN现在不支持gateway routers之间的egress routers。当然,这也将在以后的开发中得到解决。
Make ubuntu1 an OVN Host
首先,我们将把OVN gateway router存放在ubuntu1中,而不是其他用于存放虚拟机的节点。接着,像OVN Central进行注册
ovs-vsctl set open . external-ids:ovn-remote=tcp:127.0.0.1:6642

ovs-vsctl set open . external-ids:ovn-encap-type=geneve

ovs-vsctl set open . external-ids:ovn-encap-ip=10.127.0.2
确认连通性:
root@ubuntu1:~# netstat -antp | grep 127.0.0.1

tcp        0      0 127.0.0.1:6642          127.0.0.1:55566         ESTABLISHED 4999/ovsdb-server

tcp        0      0 127.0.0.1:55566         127.0.0.1:6642          ESTABLISHED 15212/ovn-controlle
同样,如果OVN没有自动创建integration bridge就创建一个
ovs-vsctl add-br br-int -- set Bridge br-int fail-mode=secure
OVN Logical Design
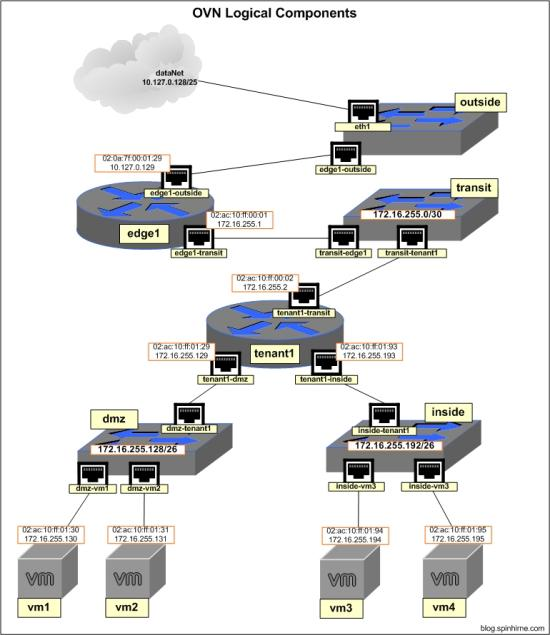
在我们进行具体配置之前,我们先来审查以下我们计划的设计方案。我们要创建的OVN logical network如下所示:

可以看到,我们添加了以下这些新的组件:
- OVN gateway router(edge1)
- 用于连接edge1和tenant1 routers的logical switch(transit)
- 用于连接edge1和lab network的logical switch(outside)
Adding the L3 Gateway
如上文所述,gateway router位于一个特定的chassis(如本例中的ubuntu1)中。为了完成绑定,我们需要确定ubuntu1的chassis id。通过在ubuntu1中使用命令ovn-sbctl,我们可以看到类似如下的输出内容:
ovn-sbctl show

Chassis "833ae1bd-ced3-494a-a95b-f2dc54172b71"

        hostname: "ubuntu1"

        Encap geneve

                ip: "10.127.0.2"

                options: {csum="true"}

Chassis "239f2c28-90ff-468f-a701-655585c630bf"

        hostname: "ubuntu3"

        Encap geneve

                ip: "10.127.0.3"

                options: {csum="true"}

        Port_Binding "dmz-vm2"

        Port_Binding "inside-vm4"

Chassis "517d558e-158a-4cb2-8870-283e9d39685e"

        hostname: "ubuntu2"

        Encap geneve

                ip: "10.127.0.129"

                options: {csum="true"}

        Port_Binding "inside-vm3"

        Port_Binding "dmz-vm1"
拷贝ubuntu1的chassis UUID,下面将会用到。
创建一个新的logical router,用上文中的UUID取代下面操作中的{chassis_id}。在ubuntu1上执行如下操作:
# create router edge1

ovn-nbctl create Logical_Router name=edge1 options:chassis={chassis_uid}

# create a new logical switch for connecting the edge1 and tenant1 routers

ovn-nbctl ls-add transit

# edge1 to the transit switch

ovn-nbctl lrp-add edge1 edge1-transit 02:ac:10:ff:00:01 172.16.255.1/30

ovn-nbctl lsp-add transit transit-edge1

ovn-nbctl lsp-set-type transit-edge1 router

ovn-nbctl lsp-set-addresses transit-edge1 02:ac:10:ff:00:01

ovn-nbctl lsp-set-options transit-edge1 router-port=edge1-transit

# tenant1 to the transit switch

ovn-nbctl lrp-add tenant1 tenant1-transit 02:ac:10:ff:00:02 172.16.255.2/30

ovn-nbctl lsp-add transit transit-tenant1

ovn-nbctl lsp-set-type transit-tenant1 router

ovn-nbctl lsp-set-address transit-tenant1 02:ac:10:ff:00:02

ovn-nbctl lsp-set-options transit-tenant1 router-port=tenant1-transit

# add static routes

ovn-nbctl lr-route-add edge1 "172.16.255.128/25" 172.16.255.2

ovn-nbctl lr-route-add tenant1 "0.0.0.0/0" 172.16.255.1

ovn-sbctl show
注意ubuntu1中的port bindings。现在我们可以通过从ubuntu2中的vm1 ping edge1来测试连通性了
root@ubuntu2:~# ip netns exec vm1 ping 172.16.255.1

PING 172.16.255.1 (172.16.255.1) 56(84) bytes of data.

64 bytes from 172.16.255.1: icmp_seq=1 ttl=253 time=1.07 ms

64 bytes from 172.16.255.1: icmp_seq=2 ttl=253 time=1.13 ms

64 bytes from 172.16.255.1: icmp_seq=3 ttl=253 time=1.00 ms
Connecting to the "data" Network
我们接下去将使用ubuntu1的eth1作为edge1 router和"data" network的连接点。为了完成这个任务,我们需要设置OVN使其通过一个专用的OVS bridge来使用eth1。这种类型的连接在OVN中被称为"localnet"。
# create new port on router 'edge1'

ovn-nbctl lrp-add edge1 edge1-outside 02:0a:7f:00:01:29 10.127.0.129/25

# create new logical switch and connect it to edge1

ovn-nbctl ls-add outside

ovn-nbctl lsp-add outside outside-edge1

ovn-nbctl lsp-set-type outside-edge1 router

ovn-nbctl lsp-set-addresses outside-edge1 02:0a:7f:00:01:29

ovn-nbctl lsp-set-options outside-edge1 router-port=edge1-outside

# create a bridge for eth1

ovs-vsctl add-br br-eth1

# create bridge mapping for eth1, map network name "dataNet" to br-eth1

ovs-vsctl set Open_vSwitch . external-ids:ovn-bridge-mappings=dataNet:br-eth1

# create localnet port on 'outside'. set the network name to "dataNet"

ovn-nbctl lsp-add outside outside-localnet

ovn-nbctl lsp-set-addresses outside-localnet unknown

ovn-nbctl lsp-set-type outside-localnet localnet

ovn-nbctl lsp-set-options outside-localnet network_name=dataNet

# connect eth1 to br-eth1

ovs-vsctl add-port br-eth1 eth1
从vm1测试到edge1-outside的连通性
root@ubuntu2:~# ip netns exec vm1 ping 10.127.0.129

PING 10.127.0.129 (10.127.0.129) 56(84) bytes of data.

64 bytes from 10.127.0.129: icmp_seq=1 ttl=253 time=1.74 ms

64 bytes from 10.127.0.129: icmp_seq=2 ttl=253 time=0.781 ms

64 bytes from 10.127.0.129: icmp_seq=3 ttl=253 time=0.582 ms
Giving the Ubuntu Hosts Access to the "data" Network
现在是时候让各个Ubuntu主机出现在data network里了。对于ubuntu2/ubuntu3,我们只要简单地在它们的物理网卡上设置IP地址即可(在本文中为eth1)。对于ubuntu1,我们需要在br-eth1上设置IP
ubuntu1
ip addr add 10.127.0.130/24 dev br-eth1

ip link set br-eth1 up
ubuntu2
ip addr add 10.127.0.131/24 dev eth1

ip link set eth1 up
ubuntu3
ip addr add 10.127.0.132/24 dev eth1

ip link set eth1 up
从ubuntu1测试到edge1的连通性
root@ubuntu1:~# ping 10.127.0.129

PING 10.127.0.129 (10.127.0.129) 56(84) bytes of data.

64 bytes from 10.127.0.129: icmp_seq=1 ttl=254 time=0.563 ms

64 bytes from 10.127.0.129: icmp_seq=2 ttl=254 time=0.290 ms

64 bytes from 10.127.0.129: icmp_seq=3 ttl=254 time=0.333 ms
Configuring NAT
让我们看看从vm1 ping ubuntu1的结果是怎样的
root@ubuntu2:~# ip netns exec vm1 ping 10.127.0.130

PING 10.127.0.130 (10.127.0.130) 56(84) bytes of data.

^C

--- 10.127.0.130 ping statistics ---

3 packets transmitted, 0 received, 100% packet loss, time 2016ms
未出所料,根本ping不通。这是为什么呢?让我们来看看在ubuntu1执行tcpdump的输出结果:
root@ubuntu1:~# tcpdump -i br-eth1

tcpdump: verbose output suppressed, use -v or -vv for full protocol decode

listening on br-eth1, link-type EN10MB (Ethernet), capture size 262144 bytes

14:41:53.057993 IP 172.16.255.130 > 10.127.0.130: ICMP echo request, id 19359, seq 1, length 64

14:41:54.065696 IP 172.16.255.130 > 10.127.0.130: ICMP echo request, id 19359, seq 2, length 64

14:41:55.073667 IP 172.16.255.130 > 10.127.0.130: ICMP echo request, id 19359, seq 3, length 64
我们可以看到请求进来,但是我们的应答却从另一个网卡返回了,因此并没有出现在tcpdump的输出中。出现这个问题的原因是,ubuntu1中并没有到172.16.255.130的路由,因此应答只能从默认的网关返回。因此为了能够正常工作,我们需要使用以下两个方法中的一种:
- 在ubuntu主机中添加静态路由
- 在OVN gateway router添加NAT
为了减少管理静态路由带来的麻烦,我们将使用第二种方法
在OVN中可以配置以下三种NAT:
- DNAT --- 用于将外部可见的IP转换为内部IP
- SNAT --- 用于将一个或多个内部IP转换为外部可见的IP
- SNAT-DNAT --- 用于创建“静态的NAT”,用于将外部IP和内部IP进行一对一映射
因为我们并不需要外部网络能够访问我们内部的虚拟机,因此我们只要能够让内部虚拟机做outbound NAT就可以了。为了能够创建NAT规则,我们需要直接对OVN northbound database进行操作。操作的语法看起来可能有点奇怪,不过我会在下文具体解释。接下来在ubuntu1执行如下操作:
# create snat rule which will nat to the edge1-outside interface

ovn-nbctl -- --id=@nat create nat type="snat" logical_ip=172.16.255.128/25 \

external_ip=10.127.0.129 -- add logical_router edge1 nat @nat
简单地说,上述命令就是在northbound database中的"nat"表中添加了一条记录,将UUID存储在ovsdb变量"@nat"中,然后再将存储在@nat中的UUID添加到northbound database的"logical_router"表的"edge1"记录的"nat"域中。如果你想了解有关northbound database的细节,那么一定要仔细阅读ovn-nb的man page。同时,ovn-nbctl的man page描述了上述命令的语法
接着我们从vm1进行连通性测试:
root@ubuntu2:~# ip netns exec vm1 ping 10.127.0.130

PING 10.127.0.130 (10.127.0.130) 56(84) bytes of data.

64 bytes from 10.127.0.130: icmp_seq=40 ttl=62 time=2.39 ms

64 bytes from 10.127.0.130: icmp_seq=41 ttl=62 time=1.61 ms

64 bytes from 10.127.0.130: icmp_seq=42 ttl=62 time=1.28 ms
如上所示,我们现在在内部的虚拟机中也能ping通外部网络了
Final Words
Overlay network 如果不能和外部世界相连接的话是没有任何意义的。OVN为这种连接提供了一种方法。
在下一篇文章中,我们将探索OVN另一个重要的特性:the OVN load balancer
OVN实战---《The OVN Gateway Router》翻译的更多相关文章
- OVN实战---《A Primer on OVN》翻译
overview 在本文中,我们将在三个host之间创建一个简单的二层overlay network.首先,我们来简单看一下,整个系统是怎么工作的.OVN基于分布式的control plane,其中各 ...
- OVN实战---《The OVN Load Balancer》翻译
Overview 基于前面几篇文章的基础之上,我们接下来将要探索OVN中的load balancingz这一特性.但是在开始之前,我们先来回顾一下上一个lab中创建好的拓扑结构. The lab ne ...
- OVN实战---《OVN and Containers》翻译
Overview 在本篇文章中,我们要讨论的是OVN和容器的集成.到本次实验中,我们将会创建一个包含有一对容器的“虚拟机”,这些容器会直接和OVN logical switch相连,并且可以供逻辑网络 ...
- OVN实战---《An Introduction to OVN Routing》翻译
Overview 在前面一篇文章的基础上,现在我将通过OVN创建一个基础的三层网络.创建的最终结果将是一对logical switches通过一个logical router相连.另外,该路由器会通过 ...
- 《OVN Logical Flows and ovn-trace》翻译
在本篇文章中,我将解释什么是Logical Flow以及如何使用ovn-trace去更好地理解它们.同时,我也会用一些例子来解释,为什么使用Logical Flow这种抽象模型能让新特性的添加变得出乎 ...
- Spring in action(Spring实战) 第四版中文翻译
第一部分 Spring核心 Spring提供了非常多功能,可是全部这些功能的基础是是依赖注入(DI)和面向方面编程(AOP). 第一章 Springing into action 本章包含: Spri ...
- 如何借助 OVN 来提高 OVS 在云计算环境中的性能
众所周知,OpenvSwitch 以其丰富的功能和不错的性能,已经成为 Openstack 部署中最受欢迎的虚拟交换机.由于 Openstack Neutron 的架构引入了一些性能问题,比如 neu ...
- ovs ovn 学习资料
0.A Primer on OVN http://blog.spinhirne.com/2016/09/a-primer-on-ovn.html 1.Open Virtual Networking W ...
- OVN架构
原文地址 OVN架构 1.简介 OVN,即Open Virtual Network,是一个支持虚拟网络抽象的系统. OVN补充了OVS的现有功能,增加了对虚拟网络抽象的原生(native)支持,比如虚 ...
随机推荐
- PHPEXCEL在thinkphp中封装成类使用
PHPEXCEL在thinkphp中封装成类使用 标签: phpexcel导出导入thinkphp -- : 435人阅读 评论() 收藏 举报 分类: php() 版权声明:本文为博主原创文章,未经 ...
- PHP学习笔记(3)GD库画图
<?php //加header头,不然浏览器乱码 header("content-type: image/png"); //创建画布资源 $img = imagecreate ...
- Ubuntu 启动项、菜单 改动 防止隐藏
因为电脑有多个系统,默认的grub引引导菜单是隐藏的,须要略微改动下方可显示 不要直接改动boot/grub/grub.cfg 要直接改动/etc/default/grub,然后update-gru ...
- mysql—触发器trigger
触发器(trigger):一种特殊的事物, 监视某种事物操作(insert/update/delete), 并触发相关操作(insert/update/delete). 触发器(trigger)创建4 ...
- RTP时间戳
http://xingyunbaijunwei.blog.163.com/blog/static/7653806720126121014111/ ——————————————————————————— ...
- jQuery Colorbox使用教程
jQuery Colorbox是一款弹出层,内容播放插件,效果极佳,最关键的是大小只有10KB,当然我主要是用来弹出图片啦,(之前介绍过jquery Fancybox插件,个人很喜欢).jQuery ...
- 用用匿名函数和闭包加apply强制待定函数调用时使用特定上下文
<button id="test">点我</button> <script> var button={ clicked:false, click ...
- ASP.NET常见内置对象(一)
在web开发中,数据库都是通过HTTP协议来传输的.但HTTP是一个无状态协议,不会保留数据的状态和信息. 为了解决问题.各种开发语言都提供了状态管理功能. 状态管理是在同一页或不同页的多个请求发生时 ...
- JVM难学?那是因为你没认真看完这篇文章(转)
一:虚拟机内存图解 JAVA程序运行与虚拟机之上,运行时需要内存空间.虚拟机执行JAVA程序的过程中会把它管理的内存划分为不同的数据区域方便管理. 虚拟机管理内存数据区域划分如下图: 数据区域分类: ...
- ios在数字键盘左下角添加“完成”按钮的实现原理
本文转载至 http://www.itnose.net/detail/6145865.html 最近要在系统弹出的数字键盘上的左下角额外添加一个自定制的完成按钮,于是研究了一下系统自带键盘添加自定制按 ...
