
CentOS7---Nginx安装并配置虚拟主机
1、源码安装nginx,并提供服务脚本
源码包的获取:官网下载
实验环境:和企业环境类似,关闭防火墙,禁用selinux,使用静态IP地址
安装步骤:
步骤一:安装Nginx所需的pcre库
[root@node01 ~]# yum install pcre-devel -y
步骤二:安装依赖包
[root@node01 ~]# yum -y install gc gcc gcc-c++ zlib-devel openssl-devel
步骤三:创建用户和用户组
[root@node01 ~]# groupadd nginx

[root@node01 ~]# useradd -s /sbin/nologin -g nginx -M nginx
步骤四:上传文件并解压到指定目录
[root@node01 ~]# wget http://tengine.taobao.org/download/tengine-2.2.0.tar.gz

[root@node01 ~]# tar xf tengine-2.2.0.tar.gz -C /usr/local/src/

[root@node01 ~]# cd /usr/local/src/tengine-2.2.0/

[root@node01 tengine-2.2.0]#

[root@node01 tengine-2.2.0]# ls

AUTHORS.te  CHANGES.cn  conf       docs     man       README           tests

auto        CHANGES.ru  configure  html     modules   README.markdown  THANKS.te

CHANGES     CHANGES.te  contrib    LICENSE  packages  src
步骤五:编译安装
./configure --user=nginx --group=nginx \

--prefix=/usr/local/src/nginx \

--with-http_stub_status_module \

--with-http_ssl_module \

--with-http_gzip_static_module
步骤六:make make install
[root@node01 tengine-2.2.0]# make && make install
步骤七:修改目录权限
[root@node01 tengine-2.2.0]# chown -R nginx.nginx /src/tengine-2.2.0/
服务脚本:
[root@node01 ~]# cat /usr/lib/systemd/system/nginx.service

t]

Description=nginx - high performance web server

Documentation=http://nginx.org/en/docs/

After=network.target remote-fs.target nss-lookup.target

[Service]

Type=forking

PIDFile=/usr/local/src/nginx/logs/nginx.pid

ExecStartPre=/usr/local/src/nginx/sbin/nginx -t -c /usr/local/src/nginx/conf/nginx.conf

ExecStart=/usr/local/src/nginx/sbin/nginx -c /usr/local/src/nginx/conf/nginx.conf

ExecReload=/bin/kill -s HUP $MAINPID

ExecStop=/bin/kill -s QUIT $MAINPID

PrivateTmp=true

[Install]

WantedBy=multi-user.target
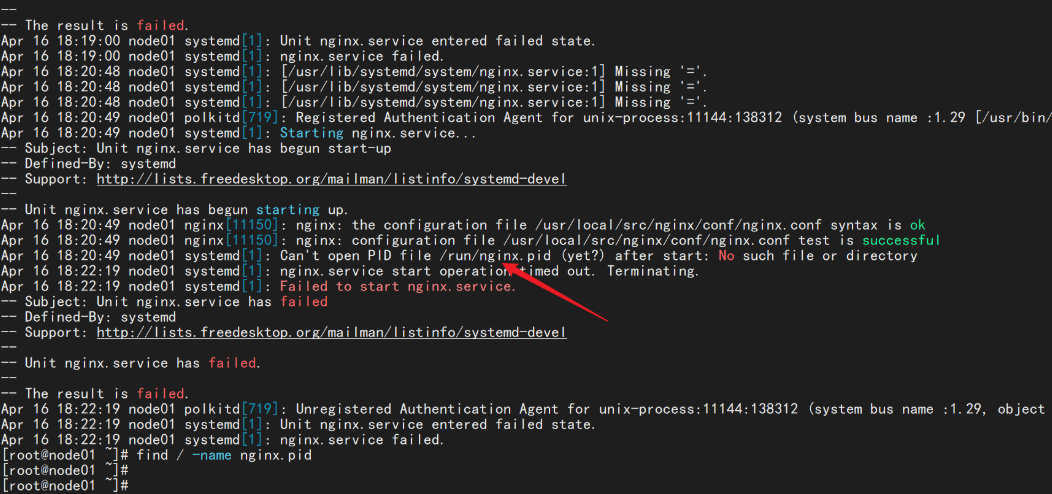
修改了PID文件
# 重新创建了一个PID文件

touch /usr/local/src/nginx/logs/nginx.pid
测试:
[root@node01 ~]# systemctl daemon-reload

[root@node01 ~]# systemctl restart nginx.service

[root@node01 ~]#

[root@node01 ~]#

[root@node01 ~]# ss -lntup | grep 80

tcp    LISTEN     0      128       *:80                    *:*                   users:(("nginx",pid=13454,fd=6),("nginx",pid=13452,fd=6))

tcp    LISTEN     0      80     [::]:3306               [::]:*                   users:(("mysqld",pid=1202,fd=28))

[root@node01 ~]#

[root@node01 ~]#

[root@node01 ~]# systemctl stop  nginx.service

[root@node01 ~]#

[root@node01 ~]#

[root@node01 ~]# ss -lntup | grep 80

tcp    LISTEN     0      80     [::]:3306               [::]:*                   users:(("mysqld",pid=1202,fd=28))
2、配置基于域名的虚拟主机
步骤一:进入默认主页路径
[root@node01 ~]# cd /usr/local/src/nginx/html/

[root@node01 html]# ll

total 8

-rw-r--r-- 1 root root 539 Apr 16 18:07 50x.html

-rw-r--r-- 1 root root 555 Apr 16 18:07 index.html
步骤二:备份原来默认主页并提供方一个测试页
[root@node01 html]# cp index.html{,.bak}

[root@node01 html]# vim index.html

<!DOCTYPE html>

<html>

	<head>

		<meta charset="utf-8">

		<title></title>

		<style>

			@keyframes myAnimation {

				from {

					width: 100px;

					height: 75px;

					background-color: yellow;

					border: 1px solid red;

				}

				to {

					width: 200px;

					height: 150px;

					background-color: green;

					border: 1px solid red;

				}

			}

			div {

				animation-name: myAnimation;

				transition-duration: 1s;

				transition-timing-function: ease;

				animation-iteration-count: infinite;

				animation-play-state: running;

				animation-direction: reverse;

				animation: myAnimation 10s infinite linear;

			}

			div:hover {

				display: none;

			}

		</style>

	</head>

	<body>

		<div>

		</div>

	</body>

</html>
步骤三:配置文件添加虚拟主机部分
[root@node01 conf]# pwd

/usr/local/src/nginx/conf

[root@node01 conf]# vim nginx.conf

server {

                listen 80;

                server_name bbs.openlab.edu;

                location / {

                root html/bbs;

                index index.html index.htm;

        }

}

        server {

                listen 80;

                server_name blog.openlab.edu;

                location / {

                root html/blog;

                index index.html index.htm;

        }

}
步骤四:没有做DNS服务,就配置一个hosts解析
[root@node01 conf]# cat /etc/hosts

127.0.0.1   localhost localhost.localdomain localhost4 localhost4.localdomain4

::1         localhost localhost.localdomain localhost6 localhost6.localdomain6

192.168.11.110 bbs.openlab.edu blog.openlab.ed
步骤五:准备默认主页
[root@node01 html]# for name in blog bbs;do mkdir $name;done

[root@node01 html]# for name in blog bbs ;do echo " $name test" > $name/index.html ;done
步骤六:重启服务测试
[root@node01 conf]# curl http://bbs.openlab.edu

 bbs test

[root@node01 conf]# curl http://blog.openlab.edu

 blog test
3、配置nginx基于用户和地址的访问控制
基于地址访问控制
server {

        listen 192.168.11.110:80;

        server_name bbs.openlab.edu;

        location / {

        autoindex on;

        root html/bbs;

        index index.html index.htm;

        deny 192.168.11.111;

        allow 192.168.11.0/24;

        deny all;

}

location /nginx_status {

        stub_status on;

        access_log off;

 }

 }
测试:
允许通过的地址:
[root@template ~]# ifconfig

ens32: flags=4163<UP,BROADCAST,RUNNING,MULTICAST>  mtu 1500

        inet 192.168.11.10  netmask 255.255.255.0  broadcast 192.168.11.255

        inet6 fe80::23ff:1697:647:7139  prefixlen 64  scopeid 0x20<link>

        ether 00:0c:29:bc:8b:08  txqueuelen 1000  (Ethernet)

        RX packets 589  bytes 49970 (48.7 KiB)

        RX errors 0  dropped 0  overruns 0  frame 0

        TX packets 968  bytes 115511 (112.8 KiB)

        TX errors 0  dropped 0 overruns 0  carrier 0  collisions 0

lo: flags=73<UP,LOOPBACK,RUNNING>  mtu 65536

        inet 127.0.0.1  netmask 255.0.0.0

        inet6 ::1  prefixlen 128  scopeid 0x10<host>

        loop  txqueuelen 1000  (Local Loopback)

        RX packets 0  bytes 0 (0.0 B)

        RX errors 0  dropped 0  overruns 0  frame 0

        TX packets 0  bytes 0 (0.0 B)

        TX errors 0  dropped 0 overruns 0  carrier 0  collisions 0

[root@template ~]# curl http://bbs.openlab.edu

 bbs test
拒绝的地址:
[root@node02 ~]# ifconfig

ens32: flags=4163<UP,BROADCAST,RUNNING,MULTICAST>  mtu 1500

        inet 192.168.11.111  netmask 255.255.255.0  broadcast 192.168.11.255

        inet6 fe80::de65:5eb0:ef21:bfad  prefixlen 64  scopeid 0x20<link>

        inet6 fe80::e8bb:875c:36dc:9aac  prefixlen 64  scopeid 0x20<link>

        ether 00:0c:29:b0:1e:37  txqueuelen 1000  (Ethernet)

        RX packets 705  bytes 60926 (59.4 KiB)

        RX errors 0  dropped 0  overruns 0  frame 0

        TX packets 1180  bytes 141313 (138.0 KiB)

        TX errors 0  dropped 0 overruns 0  carrier 0  collisions 0

lo: flags=73<UP,LOOPBACK,RUNNING>  mtu 65536

        inet 127.0.0.1  netmask 255.0.0.0

        inet6 ::1  prefixlen 128  scopeid 0x10<host>

        loop  txqueuelen 1000  (Local Loopback)

        RX packets 0  bytes 0 (0.0 B)

        RX errors 0  dropped 0  overruns 0  frame 0

        TX packets 0  bytes 0 (0.0 B)

        TX errors 0  dropped 0 overruns 0  carrier 0  collisions 0

[root@node02 ~]# curl -I  http://blog.openlab.edu

HTTP/1.1 403 Forbidden

Server: Tengine/2.2.0

Date: Sun, 16 Apr 2023 11:45:53 GMT

Content-Type: text/html

Content-Length: 589

Connection: keep-alive
基于用户控制
对于实现访问网站或目录密码认证保护,nginx的HTTP基本认证模块(HTTP Auth Basic)可以实现。这个模块提供基于用户名与密码的验证来保护你的站点或站点的一部分
# 在location中添加这俩行

auth_basic  "Restricted";

auth_basic_user_file /usr/local/nginx/webpass;

server {

                listen 80;

                server_name bbs.openlab.edu;

                location / {

                root html/bbs;

                index index.html index.htm;

                auth_basic  "Restricted";

                auth_basic_user_file /usr/local/src/nginx/webpass;

        }

}
创建账号密码, 此账号密码就是用户访问网站时需要输入的
[root@node01 conf]# yum install httpd-tools -y
使用方法:
[root@node01 conf]# htpasswd -cm /usr/local/src/nginx/webpass tom

New password:

Re-type new password:

Adding password for user tom

[root@node01 conf]# more /usr/local/src/nginx/webpass

tom:$apr1$mlWgXfOz$6j4C758K/wsTDDdQtFH990
重新加载 Nginx 使配置修改生效
浏览器测试:
[root@node01 conf]# yum install elinks.x86_64 -y

[root@node1 ~]# elinks http://bbs.openlab.edu/nginx_status
CentOS7---Nginx安装并配置虚拟主机的更多相关文章
- Nginx安装及配置虚拟主机
nginx安装部分 依赖环境 yum -y install gcc zlib openssl-devel zlib-devel 1. 下载好下面两个包:nginx-1.8.1.tar.gz pcre- ...
- Nginx安装、配置虚拟主机、反向代理、负载均衡
1. nginx安装 下载nginx: 官方网站: http://nginx.org/ 使用的版本是1.8.0版本. Nginx提供的源码. 1.1. 要求的安装环境 1.需要安装gcc的环境.y ...
- 快速掌握Nginx(一) —— 安装Nginx和简单配置虚拟主机
Nginx安装和简单配置虚拟主机 1 Nginx简介 Nginx是近几年最火热的http.反向代理服务器,百度阿里等互联网公司也都在使用Nginx,它也可以用作邮件代理服务器.TCP/UDP代理服务器 ...
- Nginx模块及配置虚拟主机
1.Nginx的2组主要的模块 (1)core modules (必需,核心模块) 包括:Main.Events (2)Standard HTTP modules(虽然不是必需,但是缺省都会安装,不建 ...
- Linux centosVMware Nginx安装、 默认虚拟主机、Nginx用户认证、Nginx域名重定向
一. Nginx安装 cd /usr/local/src wget http://nginx.org/download/nginx-1.12.1.tar.gz 版本在http://nginx.org/ ...
- Nginx安装、默认虚拟主机、Nginx用户认证和域名重定向
6月7日任务 12.6 Nginx安装12.7 默认虚拟主机12.8 Nginx用户认证12.9 Nginx域名重定向 扩展nginx.conf 配置详解 http://www.ha97.com/51 ...
- CentOS7 Nginx安装及配置反向代理
背景: Mono (Mono JIT compiler version 5.4.0.201 ) jexus-5.8.2-x64(<CentOS7 安装 jexus-5.8.2-x64>) ...
- nginx配置虚拟主机之不同端口和不同IP地址
配置nginx虚拟主机不同端口和不同ip地址,和上编nginx基于域名配置虚拟主机博文类似,请先参考. zxl.com域名不同端口,配置文件内容如下: 1 2 3 4 5 6 7 8 9 10 11 ...
- centos下Nginx安装和配置多个域名的虚拟主机
nginx安装步骤,源码编译安装(源码编译,可以自定制更多功能) openssl #user nobody; worker_processes ; #error_log logs/error.log; ...
- nginx 配置虚拟主机
文章转载自:http://www.ttlsa.com/html/1571.html 上篇说道我们的nginx是安装在/usr/local/nginx/ cd conf 我们现在把所有的虚拟主机放在一个 ...
随机推荐
- linux 学习之xargs
xargs 可以将筛选结果作为执行条件 如 ls *.go | xargs rm -rf 删除当前目前所有后缀为go的文件 指定单行列数 cat test.txt | xargs -n2
- MacOS使用iTerm2 tab不区分大小写解答
打开控制台 输入 vim ~/.zshrc 按下 i 之后 // i == insert插入字符 粘贴以下代码 复制到该文件中 autoload -Uz compinit && co ...
- swftools工具将pdf文件转换为swf文件 文字丢失
开发客户网站时遇到了一个需求,客户要求后台上传pdf文件,前台能以翻书的形式直接访问. 首先想到的是使用js解决,用户访问前端页面时,php将文件路径发送给js,让js呈现出来翻书的效果.在网上百度了 ...
- Qt之如何创建并显示一个柱状图
创建一个简单的柱状图 第一步:创建一个QBarSet对象:QBarSet类代表条形图中的一组条形. QBarSet *set0 = new QBarSet("Jane"); QBa ...
- Ansys-CHEMKIN-pro表面反应机制输入(Surface Kinetics Input)规则
chemkin表面反应机制文件(Ansys-CHEMKIN-pro表面反应机制输入) 1. 文件包含表面活性位(相).表面组分,固相组分.固相,热力学数据,反应机制: 2. 顺序:物质名称,活性位数据 ...
- 自定义组件中使用half-screen-dailog 无法舒勇外部样式
为了将弹窗更方便的调用,封装了组件,但是发现一个问题, 外部样式类在组件中是无法正常使用的. 也就说在组件的wxss中是无法正常使用.weui-half-screen-dialog 这个外部样式类,然 ...
- DFS专题1
例题一 39.组合总和 给你一个 无重复元素 的整数数组 candidates 和一个目标整数 target ,找出 candidates 中可以使数字和为目标数 target 的 所有 不同组合 , ...
- thread互斥测试
thread互斥测试 实践代码 #include <stdio.h> #include <stdlib.h> #include <pthread.h> //linu ...
- Promise和await、同步和异步
1.同步和异步是什么: ①同步:同步是指如果一个进程在执行某个请求的时候,如果该请求需要等待一段时间,那么该进程会一直等待下去,直到收到返回信息才继续执行下去 ②异步: 指一个请求在执行某个请 ...
- .bat 脚本替换文件内容
rem 定义变量延迟环境,关闭回显 @echo off&setlocal enabledelayedexpansion rem 读取a.txt所有内容 for /f "eol=* t ...