
深入C++04:模板编程
模板编程
函数模板
模板意义:对类型也进行参数化;
函数模板:是不编译的,因为类型不知道
模板的实例化:函数调用点进行实例化,生成模板函数
模板函数:这才是要被编译器所编译的
函数模板、模板的特例化、非模板函数(普通函数):函数模板只是一个模板,模板特例化是明确类型,还有普通函数;三者不是重载关系;
模板代码是不可以在一个文件中定义,在另一个文件中使用的;模板代码调用之前,一定要看到模板定义的地方,这样的化,模板才能够进行正常的实例化,产生能够被编译器编译的代码;所以,模板代码都是放在头文件中,然后源文件当中直接进行#include包含(#include会展开代码)
类模板
利用类模板实现的顺序栈
#include<iostream>

#include<cstring>

template<typename T>

class SeqStack {

public:

    SeqStack(int size = 10) //构造函数

        : _pstack(new T[size])

        , _top(0) //top一开始就指向空的地方,所以后面也是一直要指向空的地方

        , _size(size)

    {}

    ~SeqStack() { //析构函数

        delete []_pstack;

        _pstack = nullptr;

    }

    SeqStack<T>(const SeqStack<T> &stack) { //拷贝构造函数

        _pstack = new T[stack._size];

        _top = stack._top;

        _size = stack._size;

        for (int i = 0; i < _size; i++) {

            _pstack[i] = stack._pstack[i];

        }

    }

    SeqStack<T> operator=(const SeqStack<T> &stack) { //赋值函数重载

        if (stack == *this) return *this;

        delete _pstack;

        T *_newstack = new T[stack._size];

        for (int i = 0; i < stack._size; i++) {

            _newstack[i] = stack._pstack[i];

        }

        _pstack = _newstack;

        _size = stack._size;

        _top = stack._top;

        return *this;

    }

    void push(const T &val) {

        if (full()) resize();

        _pstack[_top++] = val;

    }

    void pop() {

        if (empty()) return;

        --_top;

    }

    T top() const {

        if (empty()) throw "stack is empty!";//抛出异常也属于函数逻辑结束,不需要和返回值一致

        return _pstack[_top - 1];

    }

    bool full() const {

        return _top == _size;

    }

    bool empty() const {

        return _top == 0;

    }

private:

    T *_pstack;

    int _top;

    int _size;

    void resize() {//扩容函数

        T *newstack = new T[_size * 2];

        for (int i = 0; i < _size; i++) {

            newstack[i] = _pstack[i];

        }

        _size = _size * 2;

        delete []_pstack;

        _pstack = newstack;

    }

};

int main() {

    SeqStack<int> test;

    for (int i = 0; i < 20; i++) {

        test.push(i);

    }

    for (int i = 0; i < 20; i++) {

        std::cout << test.top() << std::endl;

        test.pop();

    }

    return 0;

}
实现vector模板
#include<iostream>

template<typename T>

class vector {

public:

    vector<T>(int size = 10)

        : _first(new T[size])

        , _last(_first)

        , _end(_first + size)

    {}

    ~vector<T>() {

        delete []_first;

        _first = _last = _end = nullptr;

    }

    vector<T>(const vector<T> &other) {

        int size = other._end - other._first;

        _first = new T[size];

        int len = other._last - other._first;

        for (int i = 0; i < len; i++) {

            _first[i] = other._first[i];

        }

        _last = _first + len;

        _end = _first + size;

    }

    vector<T>& operator=(const vector<T> &other) {

        if (*this = other) return *this;

        delete []_first;

        int size = other._end - other._first;

        _first = new T[size];

        int len = other._last - other._first;

        for (int i = 0; i < len; i++) {

            _first[i] = other._first[i];

        }

        _last = _first + len;

        _end = _first + size;

        return *this;

    }

    void push_back(const T &val) { //向容器末尾添加元素

        if (full()) resize();

        *_last = val;

        _last++;

    }

    void pop_back() {//从容器末尾删除元素

        if (empty()) return;

        _last--;

    }

    T back() const { //返回容器末尾元素

        if (empty()) throw "no value";

        return *(_last - 1);

    }

    bool full() const { return _last == _end; }

    bool empty() const { return _first == _last; }

    int size() const {return _last - _first;}

private:

    T *_first;//数组起始位置

    T *_last;//数组中有效元素的后继位置

    T *_end;//数组中有效空间的后继位置

    void resize() {//2倍扩容操作

        int len = _end - _first;

        T *newvector = new T[len * 2];

        for (int i = 0; i < len; i++) {

            newvector[i] = _first[i];

        }

        delete []_first;

        _first = newvector;

        _last = _first + len;

        _end = _first + len * 2;

    }

};

int main() {

    vector<int> test;

    for (int i = 0; i < 20; i++) {

        test.push_back(i);

    }

    for (int i = 0; i < 20; i++) {

        std::cout << test.back() << std::endl;

        test.pop_back();

    }

    return 0;

}
空间配置器
上述vector模板的两个问题:
①在创建类test作为vector的对象的时候,系统默认使用了十次所存对象的构造函数(默认构造十个对象),new不仅开辟了空间,同时也生成了对象!(这样很浪费,比如用户要初始化vector一万次,实际只用一个,浪费了创建的9999个对象额外的内存和时间(内存指的是对象指向的堆内存,而存对象所需要的内存在vector里面是必须一开始就要申请的))
②创建了多少个对象就会析构多少次,上述创建那么多个对象,肯定也会析构那么多次,浪费时间;而如果把内存呢开辟和对象构造分开处理,析构的时候直接采用delete的话:只析构_first,那么只析构了这个指针所指的对象;而析构[] _first,析构会死循环,后面有内存但是不是对象;
应该:
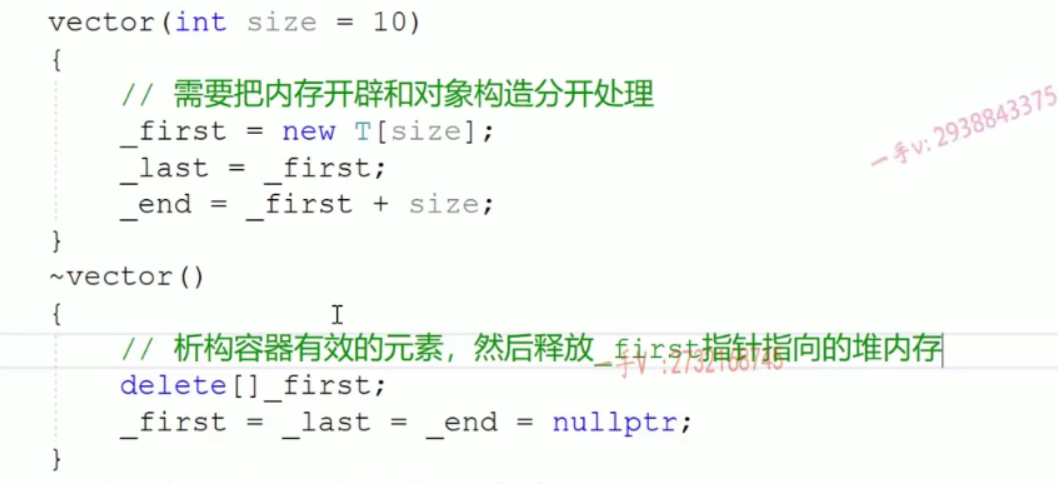
③push_back的时候,里面原本就有对象了的,只是更改了指向,原存在的对象会丢弃,造成内存泄漏
④pop_back的时候只是_last--,没有析构对象,对象中可能还有堆空间,会找不到的;(应该要调用对象的析构函数);但是如果单纯的使用delete,不仅不会调用析构函数析构该位置的对象,还会删除该位置的内存
容器的空间配置器四件事情:内存开辟/内存释放,对象构造/对象析构;
代码:
#include<iostream>

using namespace std;

//实现自己的空间配置器

template<typename T>

class Allocator { //class

public:

    T *allocate(size_t size) {//分配内存

        return (T*)malloc(sizeof(T) * size);

    }

    void deallocate(T *p) {//释放内存

        free(p);

    }

    void construct(T *p, const T &val) {//对象构造,明确是传入指针和引用

        new (p) T(val); //定位new,指定new的区域,同时采用拷贝构造函数生成对象;

    }

    void destroy(T *p) {//对象析构

        p->~T(); //~T()代表了T类型的析构函数;

    }

};

template<typename T, typename Alloc = Allocator<T> >

class vector {

public:

    vector(int size = 10) //构造函数

        : _first(_allocator.allocate(size) )

        , _last(_first)

        , _end(_first + size)

    {}

    ~vector() {

        for (T *p = _first; p != _last; p++) {

            _allocator.destroy(p);//析构有效对象

        }

        _allocator.deallocate(_first);//释放所有空间

        _first = _last = _end = nullptr;

    }

    vector(const vector<T> &other) { //拷贝构造函数

        int size = other._end - other._first;

        // _first = new T[size];

        _allocator.allcoate(size);

        int len = other._last - other._first;

        for (int i = 0; i < len; i++) {

            // _first[i] = other._first[i];

            _allocator.construct(_first + i, other._first[i]); //构造对象

        }

        _last = _first + len;

        _end = _first + size;

    }

    vector& operator=(const vector<T> &other) {

        if (*this = other) return *this;

        // delete []_first;

        //和析构的一样

        for (T *p = _first; p != _last; p++) {

            _allocator.destory(p);//析构有效对象

        }

        _allocator.deallocate(_first);//释放所有空间

        //和拷贝构造的一样

        int size = other._end - other._first;

        int len = other._last - other._first;

        _allocator.allcoate(size);

        for (int i = 0; i < len; i++) {

            _allocator.construct(_first + i, other._first[i]);

        }

        _last = _first + len;

        _end = _first + size;

        return *this;

    }

    void push_back(const T &val) { //向容器末尾添加元素

        if (full()) resize();

        _allocator.construct(_last, val);

        _last++;

    }

    void pop_back() {//从容器末尾删除元素

        if (empty()) return;

        _allocator.destroy(--_last);

    }

    T back() const { //返回容器末尾元素

        if (empty()) throw "no value";

        return *(_last - 1);

    }

    bool full() const { return _last == _end; }

    bool empty() const { return _first == _last; }

    int size() const {return _last - _first;}

private:

    T *_first;//数组起始位置

    T *_last;//数组中有效元素的后继位置

    T *_end;//数组中有效空间的后继位置

    Alloc _allocator;//定义容器空间配置器对象!!!!!

    void resize() {//2倍扩容操作

        int len = _end - _first;

        // T *newvector = new T[len * 2];

        T *newvector = _allocator.allocate(2 * len);

        for (int i = 0; i < len; i++) {

            // newvector[i] = _first[i];

            _allocator.construct(newvector + i, _first[i]);

        }

        // delete []_first;

        for (T *p = _first; p != _last; p++) {

            _allocator.destroy(p);

        }

        _allocator.deallocate(_first);

        _first = newvector;

        _last = _first + len;

        _end = _first + len * 2;

    }

};

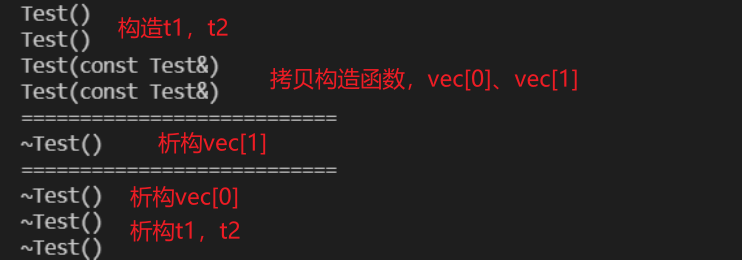
struct Test {

  Test() {

    cout << "Test()" << endl;

  }

  ~Test() {

    cout << "~Test()" << endl;

  }

  Test(const Test &t) {

    cout << "Test(const Test&)" << endl;

  }

  Test& operator=(const Test& t) {

    cout << "operator=(const Test&)" << endl;

  }

};

int main() {

  Test t1;

  Test t2;

  vector<Test> vec;

  vec.push_back(t1);

  vec.push_back(t2);

  cout << "===========================" << endl;

  vec.pop_back();

  cout << "===========================" << endl;

  return 0;

}
深入C++04:模板编程的更多相关文章
- c++模板编程-typename与class关键字的区别
最近一直在研究c++模板编程,虽然有些困难,但希望能够坚持下去.今天,在书上看见一个讨论模板编程typename与class两个关键字的区别,觉得挺有意义的,就把它们给总结一下. 先看一个例子: te ...
- 实训任务04 MapReduce编程入门
实训任务04 MapReduce编程入门 1.实训1:画图mapReduce处理过程 使用有短句“A friend in need is a friend in deed”,画出使用MapReduce ...
- Hyper-v UBUNTU 12.04 模板设置
Ubuntu 12.04 模板设置 参考文档 Hyper-v安装ubuntu http://blogs.msdn.com/b/virtual_pc_guy/archive/2012/05/02/ubu ...
- C++ 11可变参数接口设计在模板编程中应用的一点点总结
概述 本人对模板编程的应用并非很深,若要用一句话总结我个人对模板编程的理解,我想说的是:模板编程是对类定义的弱化. 如何理解“类定义的弱化”? 一个完整的类有如下几部分组成: 类的名称: 类的成员变量 ...
- C++模板编程中只特化模板类的一个成员函数
模板编程中如果要特化或偏特化(局部特化)一个类模板,需要特化该类模板的所有成员函数.类模板中大多数成员函数的功能可能是一模一样的,特化时我们可能只需要重新实现1.2个成员函数即可.在这种情况下,如果全 ...
- C++之模板编程
当我们越来越多的使用C++的特性, 将越来越多的问题和事物抽象成对象时, 我们不难发现:很多对象都具有共性. 比如 数值可以增加.减少:字符串也可以增加减少. 它们的动作是相似的, 只是对象的类型不同 ...
- Django 04 模板标签(if、for、url、with、autoeacape、模板继承于引用、静态文件加载)
Django 04 模板标签(if.for.url.with.autoeacape.模板继承于引用.静态文件加载) 一.if.for.url.with.autoescape urlpatterns = ...
- c++ 基于Policy 的 模板编程
在没真正接触c++ 模板编程之前.真的没有想到c++ 还能够这么用.最大的感触是:太灵活了,太强大了. 最初接触模板威力还是在Delta3d中,感觉里面的模板使用实在是灵活与方便,特别是dtAI中使 ...
- C++模板编程中只特化模板类的一个成员函数(花样特化一个成员函数)
转自:https://www.cnblogs.com/zhoug2020/p/6581477.html 模板编程中如果要特化或偏特化(局部特化)一个类模板,需要特化该类模板的所有成员函数.类模板中大多 ...
随机推荐
- 微信小程序下拉加载和上拉刷新两种实现方法
方法一:onPullDownRefresh和onReachBottom方法实现小程序下拉加载和上拉刷新 首先要在json文件里设置window属性 设置js里onPullDownRefresh和onR ...
- springboot+springsecurity+mybatis plus之用户认证
一.权限管理的概念 另一个安全框架shiro:shiro之权限管理的描述 导入常用坐标 <dependency> <groupId>org.springframework.bo ...
- Spring Boot-@Value获取值和@ConfigurationProperties获取值的比较
@Value和@ConfigurationProperties都是用于属性的注入(相当于spring中<bean id=" " class=" "> ...
- 正则表达式小技巧,sql中in的字符串处理
工作中我经常写sql,当写带in的语句时,需要敲好多单引号,逗号,敲写起来容易易出错.因此,我写了一个小工具,处理这种繁琐工作.原理简单,利用正则表达式匹配.替换. 先看界面,一个html页面,包含三 ...
- Go xmas2020 学习笔记 10、Slices in Detail
10-Slices in Detail. Slice. Empty vs nil slice
- NodeJs学习日报——day3
// 导入模块 const http = require('http') // 创建web服务器实例 const server = http.createServer() // 为服务器实例绑定req ...
- redis 知识点收集 注意理解底层
学redis,首先要明白其特性,其次要理解明白redis与操作系统底层的关系,这点很重要.这是一个优秀的学习方法,作为计算机专业,应当时刻想着技术和操作系统计算机组成数据结构的联系,听起来有些书生气死 ...
- Java语言学习day29--8月04日
今日内容介绍1.Object2.String3.StringBuilder ###01API概念 * A:API(Application Programming Interface) * 应用程序编程 ...
- IDEA小技巧:Debug时如何优雅地制造异常?
抛异常相信大家都会吧?只需要这样就可以了: throw new RuntimeException("didispace.com"); 但是,在开发过程中有一些情况,我们需要测试程序 ...
- ABP应用开发(Step by Step)-下篇
测试 ProductAppService 类 启动模板附带测试基础架构,包括xUnit.Shouldly和NSubstitute库.它使用SQLite 内存数据库来模拟数据库,并为每个测试创建一个单独 ...