Android自定义Dialog及其布局
实际项目开发中默认的Dialog样式无法满足需求,需要自定义Dialog及其布局,并响应布局中控件的事件。
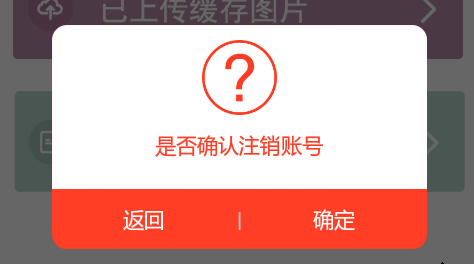
上效果图:
自定义Dialog,LogoutDialog:
要将自定义布局传入构造函数中,才能在Activity中通过 dialog.findviewbyid 获取到控件,否则返回null。
public class LogoutDialog extends Dialog{

  Context context;

  public LogoutDialog(Context context) {

  super(context);

  this.context=context;

  this.setContentView(R.layout.logout_dialog);

  }

  public LogoutDialog(Context context, int theme){

  super(context, theme);

  this.context = context;

  this.setContentView(R.layout.logout_dialog);

  }

  @Override

  protected void onCreate(Bundle savedInstanceState) {

  super.onCreate(savedInstanceState);

  //this.setContentView(R.layout.logout_dialog);

  }

}
自定义布局文件,logout_dialog.xml:
<?xml version="1.0" encoding="utf-8"?>

<LinearLayout xmlns:android="http://schemas.android.com/apk/res/android"

android:layout_width="250dp"

android:layout_height="wrap_content"

android:orientation="vertical"

android:background="@android:color/transparent"

>

  <LinearLayout

  android:layout_width="match_parent"

  android:layout_height="wrap_content"

  android:background="@drawable/dialog_top_bg"

  android:orientation="vertical"

  android:paddingTop="10dp"

  >

    <ImageView

    android:layout_width="50dp"

    android:layout_height="50dp"

    android:src="@drawable/pop_icon1"

    android:layout_gravity="center_horizontal"

    android:layout_marginBottom="10dp"

    />

    <TextView

    android:layout_width="wrap_content"

    android:layout_height="wrap_content"

    android:text="是否确认注销账号"

    android:layout_gravity="center_horizontal"

    android:layout_marginBottom="20dp"

    android:textColor="#FF3C25"

    android:layout_marginLeft="20dp"

    android:layout_marginRight="20dp"

    />

  </LinearLayout>

  <LinearLayout

    android:layout_width="match_parent"

    android:layout_height="40dp"

    android:gravity="center_vertical"

    android:background="@drawable/dialog_buttom_bg"

    >

    <TextView

    android:id="@+id/back_btn_dialog"

    android:layout_width="wrap_content"

    android:layout_height="match_parent"

    android:text="返回"

    android:layout_weight="1"

    android:textColor="#FFFFFF"

    android:gravity="center"

    />

    <TextView

    android:layout_width="wrap_content"

    android:layout_height="match_parent"

    android:text="|"

    android:textColor="#C9CACC"

    android:gravity="center"

    />

    <TextView

    android:id="@+id/submit_btn_dialog"

    android:layout_width="wrap_content"

    android:layout_height="match_parent"

    android:text="确定"

    android:layout_weight="1"

    android:textColor="#FFFFFF"

    android:gravity="center"

    />

  </LinearLayout>

</LinearLayout>
两个Shape的布局,dialog_buttom_bg.xml:
<?xml version="1.0" encoding="utf-8"?>

<shape xmlns:android="http://schemas.android.com/apk/res/android"

>

  <corners

  android:bottomLeftRadius="@dimen/dialog_corners"

  android:bottomRightRadius="@dimen/dialog_corners"

  />

  <gradient

  android:startColor="#FF3E25"

  android:endColor="#FF3E25"

  android:centerColor="#FF3E25"

  android:angle="270"

  />

</shape>
dialog_top_bg.xml:
<?xml version="1.0" encoding="utf-8"?>

<shape xmlns:android="http://schemas.android.com/apk/res/android" >

  <corners

  android:topLeftRadius="@dimen/dialog_corners"

  android:topRightRadius="@dimen/dialog_corners"

  />

  <gradient

  android:startColor="#ffffff"

  android:endColor="#ffffff"

  android:centerColor="#ffffff"

  android:angle="270"

  />

</shape>
自定义样式Style,来改变默认的Dialog样式。在values/styles.xml下新加样式:
<style name="UpdateErrorFinishDialog" parent="@android:style/Theme.Dialog">

  <item name="android:windowFrame">@null</item>

  <item name="android:windowNoTitle">true</item>

  <item name="android:windowBackground">@drawable/dialog_background</item>

  <item name="android:windowIsFloating">true</item>

  <item name="android:windowContentOverlay">@null</item>

</style>
在Activity中调用:
Dialog dialog==new LogoutDialog(TempActivity.this, R.style.UpdateErrorFinishDialog);

dialog.setCanceledOnTouchOutside(false);

dialog.show();

TextView submit_btn_dialog=(TextView) dialog.findViewById(R.id.submit_btn_dialog);

TextView back_btn_dialog=(TextView) dialog.findViewById(R.id.back_btn_dialog);

submit_btn_dialog.setOnClickListener(new View.OnClickListener() {

  @Override

  public void onClick(View v) {

    //Toaster.showLongToast("确定");

    dialog.dismiss();

  }

});

back_btn_dialog.setOnClickListener(new View.OnClickListener() {

  @Override

  public void onClick(View v) {

    //Toaster.showLongToast("返回");

    dialog.dismiss();

  }

});
Android自定义Dialog及其布局的更多相关文章
- Android自定义 Dialog 对话框
Android自定义Dialoghttp://www.cnblogs.com/and_he/archive/2011/09/16/2178716.html Android使用自定义AlertDialo ...
- android自定义dialog布局
dialog使用系统自带的有时候不是很美观,就想要自己来设计一个dialog界面,以下就是可以设计的dialog界面: public class CustomDialog extends Dialog ...
- Android—自定义Dialog
在 Android 日常的开发中,Dialog 使用是比较广泛的.无论是提示一个提示语,还是确认信息,还是有一定交互的(弹出验证码,输入账号密码登录等等)对话框. 而我们去看一下原生的对话框,虽然随着 ...
- Android自定义Dialog(美化界面)
前言:在做项目的时候,发现dialog界面太丑陋,从csdn上下载了一份自定义dialog的源码,在他的基础上对界面进行美化...有需要的朋友可以直接拿走 效果图如下: 主要代码: /** * 自定义 ...
- android 自定义Dialog背景透明及显示位置设置
先贴一下显示效果图,仅作参考: 代码如下: 1.自定义Dialog public class SelectDialog extends AlertDialog{ public SelectDialog ...
- Android自定义Dialog
Android开发过程中,常常会遇到一些需求场景——在界面上弹出一个弹框,对用户进行提醒并让用户进行某些选择性的操作, 如退出登录时的弹窗,让用户选择“退出”还是“取消”等操作. Android系统提 ...
- Android 自定义Dialog类,并在Activity中实现按钮监听。
实际开发中,经常会用到Dialog,比如退出时候会弹出是否退出,或者还有一些编辑框也会用Dialog实现,效果图如下: 开发中遇到的问题无非在于如果在Activity中监听这个Dialog中实现的 ...
- android 自定义Dialog去除黑色边框
在自定义Dialog时显示的界面中老是有黑色的边框,下面就介绍使用style去除黑色边框方法. 首先在values/styles定义自定义样式: <style name="MyDial ...
- Android 自定义Dialog 去除阴影
自定义Dialog中添加下列代码: window.clearFlags( WindowManager.LayoutParams.FLAG_DIM_BEHIND);
随机推荐
- 网页播放器(jsp、js)
jsp对控件显示 <%@ page language="java" import="java.util.*" pageEncoding="UTF ...
- ubuntu使用经验整理
===================================================== 清理/boot分区 =================================== ...
- iptables Data filtering详解
内容简介防火墙的概述iptables简介iptables基础iptables语法iptables实例案例详解(一)防火墙的简介防火墙是指设置在不同网络或网络安全域之间的一系列部件的组合,它能增强机构内 ...
- zabbix3.x web设置手册(2)
在浏览器中输入:http://10.50.32.48/zabbix/setup.php 如下图: 点击Next step: 如上图,右侧全为ok,则点击Next step:若右侧有fail的情况,需要 ...
- Xamarin.Android中使用ResideMenu实现侧滑菜单
上次使用Xamarin.Android实现了一个比较常用的功能PullToRefresh,详情见:Xamarin. Android实现下拉刷新功能 这次将实现另外一个手机App中比较常用的功能:侧滑菜 ...
- [.net 面向对象编程基础] (7) 基础中的基础——流程控制语句
[.net 面向对象编程基础] (7) 基础中的基础——流程控制语句 本来没有这一节的内容,后来考虑到既然是一个系列文章,那么就尽可能写的详细一些,本节参考了网上朋友所写的例子,为的是让更多小伙伴学习 ...
- SSTable 介绍(二)
作者:Jack47 上一篇SSTable 介绍(一)介绍了SSTable的适用场景和leveldb中SSTable的设计.本篇介绍SSTable文件的结构组成. SSTable的特点 首先明确一下上文 ...
- 谈谈对BPM的理解
BPM的产生缘由 近年来,随着计算机技术的发展和互联网时代的到来,我们已经进入了信息时代,也称为数字化时代,在这数字化的时代里,企业的经营管理都受到了极大的挑战.从上世纪90年代起至今,企业的信息化工 ...
- Nunit工具做C#的单元测试
Nunit工具做C#的单元测试 学习心得 编写人:罗旭成 时间:2013年9月2日星期一 1.开发人员如何做单元测试 单元测试是针对最小的可测试软件元素(单元)的,它所测试的内容包括单元的内部结构 ...
- Java-小练习简单银行程序
2练习1:创建一个简单的银行程序包 练习目标-Java 语言中面向对象的封装性及构造器的使用. 任务 在这个练习里,创建一个简单版本的(账户类)Account类.将这个源文件放入banking程序 ...