Spring boot异常统一处理方法:@ControllerAdvice注解的使用、全局异常捕获、自定义异常捕获
一、全局异常
1、首先创建异常处理包和类

2、使用@ControllerAdvice注解,全局捕获异常类,只要作用在@RequestMapping上,所有的异常都会被捕获

package com.example.demo.exception;

import org.springframework.web.bind.annotation.ControllerAdvice;

import org.springframework.web.bind.annotation.ExceptionHandler;

import org.springframework.web.bind.annotation.ResponseBody;

import java.util.HashMap;

import java.util.Map;

/**

 * 全局捕获异常类,只要作用在@RequestMapping上,所有的异常都会被捕获

 */

@ResponseBody

@ControllerAdvice

public class MyControllerAdvice {

    @ExceptionHandler(value = Exception.class)

    public Map<String,Object> errorHandle(Exception e){

        Map<String,Object> map = new HashMap<String,Object>();

        map.put("code",-1);

        map.put("msg",e.getMessage());

        return map;

    }

}
这上面有个需要注意的是要加上@ResponseBody注解,如果不加会怎么样呢,我们试下,报错:
javax.servlet.ServletException: Circular view path [hello]: would dispatch back to the current handler URL [/hello] again.
Check your ViewResolver setup! (Hint: This may be the result of an unspecified view, due to default view name generation.)

    at org.springframework.web.servlet.view.InternalResourceView.prepareForRendering(InternalResourceView.java:209) ~[spring-webmvc-5.0.6.RELEASE.jar:5.0.6.RELEASE]

    at org.springframework.web.servlet.view.InternalResourceView.renderMergedOutputModel(InternalResourceView.java:147) ~[spring-webmvc-5.0.6.RELEASE.jar:5.0.6.RELEASE]

    at org.springframework.web.servlet.view.AbstractView.render(AbstractView.java:314) ~[spring-webmvc-5.0.6.RELEASE.jar:5.0.6.RELEASE]

    at org.springframework.web.servlet.DispatcherServlet.render(DispatcherServlet.java:1325) ~[spring-webmvc-5.0.6.RELEASE.jar:5.0.6.RELEASE]

    at org.springframework.web.servlet.DispatcherServlet.processDispatchResult(DispatcherServlet.java:1069) ~[spring-webmvc-5.0.6.RELEASE.jar:5.0.6.RELEASE]

    at org.springframework.web.servlet.DispatcherServlet.doDispatch(DispatcherServlet.java:1008) ~[spring-webmvc-5.0.6.RELEASE.jar:5.0.6.RELEASE]

    at org.springframework.web.servlet.DispatcherServlet.doService(DispatcherServlet.java:925) ~[spring-webmvc-5.0.6.RELEASE.jar:5.0.6.RELEASE]

    at org.springframework.web.servlet.FrameworkServlet.processRequest(FrameworkServlet.java:974) ~[spring-webmvc-5.0.6.RELEASE.jar:5.0.6.RELEASE]

    at org.springframework.web.servlet.FrameworkServlet.doGet(FrameworkServlet.java:866) ~[spring-webmvc-5.0.6.RELEASE.jar:5.0.6.RELEASE]

    at javax.servlet.http.HttpServlet.service(HttpServlet.java:635) ~[tomcat-embed-core-8.5.31.jar:8.5.31]

    at org.springframework.web.servlet.FrameworkServlet.service(FrameworkServlet.java:851) ~[spring-webmvc-5.0.6.RELEASE.jar:5.0.6.RELEASE]

    at javax.servlet.http.HttpServlet.service(HttpServlet.java:742) ~[tomcat-embed-core-8.5.31.jar:8.5.31]

    at org.apache.catalina.core.ApplicationFilterChain.internalDoFilter(ApplicationFilterChain.java:231) ~[tomcat-embed-core-8.5.31.jar:8.5.31]
因为是个json的格式,所以必须要有@ResponseBody
3、测试:在hello里面造个异常
package com.example.demo;

import org.springframework.beans.factory.annotation.Value;

import org.springframework.web.bind.annotation.RequestMapping;

import org.springframework.web.bind.annotation.RestController;

@RestController

public class HelloController {

    @Value("${gwf.name}")

    private String msg;

    @RequestMapping("/hello")

    public String hello() {

        int num = 1/0;

        return this.msg;

    }

}
结果: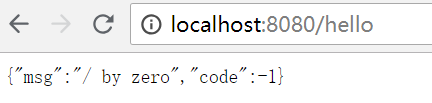
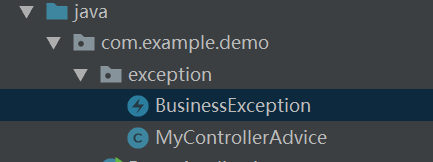
二、自定义异常
1、首先创建自定义异常类:注意需要继承extends RuntimeException
package com.example.demo.exception;

public class BusinessException extends RuntimeException{

    private String code;

    private String msg;

    public BusinessException(String code, String msg) {

        super();

        this.code = code;

        this.msg = msg;

    }

    public String getCode() {

        return code;

    }

    public void setCode(String code) {

        this.code = code;

    }

    public String getMsg() {

        return msg;

    }

    public void setMsg(String msg) {

        this.msg = msg;

    }

}
这里介绍下idea自动生成get/set和构造函数的快捷键:alt + insert,然后选择getter和setter,constructor,自动生成get、set方法和构造函数
2、然后就是自定义异常捕获
package com.example.demo.exception;

import org.springframework.web.bind.annotation.ControllerAdvice;

import org.springframework.web.bind.annotation.ExceptionHandler;

import org.springframework.web.bind.annotation.ResponseBody;

import java.util.HashMap;

import java.util.Map;

/**

 * 全局捕获异常类,只要作用在@RequestMapping上,所有的异常都会被捕获

 */

@ResponseBody

@ControllerAdvice

public class MyControllerAdvice {

    @ExceptionHandler(value = Exception.class)

    public Map<String,Object> errorHandle(Exception e){

        Map<String,Object> map = new HashMap<String,Object>();

        map.put("code",-1);

        map.put("msg",e.getMessage());

        return map;

    }

    @ExceptionHandler(value = BusinessException.class)

    public Map<String,Object> errorHandle(BusinessException e){

        Map<String,Object> map = new HashMap<String,Object>();

        map.put("code",e.getCode());

        map.put("msg",e.getMsg());

        return map;

    }

}
3、最后我们测试下:抛出自定义异常
package com.example.demo;

import com.example.demo.exception.BusinessException;

import org.springframework.beans.factory.annotation.Value;

import org.springframework.web.bind.annotation.RequestMapping;

import org.springframework.web.bind.annotation.RestController;

@RestController

public class HelloController {

    @Value("${gwf.name}")

    private String msg;

    @RequestMapping("/hello")

    public String hello() {

        //int num = 1/0;

        throw new BusinessException("100","密码错误");

        //return this.msg;

    }

}
结果: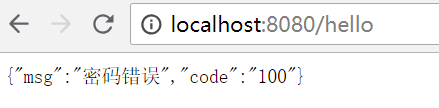
Spring boot异常统一处理方法:@ControllerAdvice注解的使用、全局异常捕获、自定义异常捕获的更多相关文章
- spring mvc异常统一处理(ControllerAdvice注解)
首先我的项目是一个为移动端提供的json数据的,当后台报错时如果为移动端返回一个错误页面显得非常不友好,于是通过ControllerAdvice注解返回json数据. 首先创建一个异常处理类: pac ...
- Spring Boot 系列(八)@ControllerAdvice 拦截异常并统一处理
在spring 3.2中,新增了@ControllerAdvice 注解,可以用于定义@ExceptionHandler.@InitBinder.@ModelAttribute,并应用到所有@Requ ...
- Spring Boot API 统一返回格式封装
今天给大家带来的是Spring Boot API 统一返回格式封装,我们在做项目的时候API 接口返回是需要统一格式的,只有这样前端的同学才可对接口返回的数据做统一处理,也可以使前后端分离 模式的开发 ...
- 精尽Spring Boot源码分析 - 剖析 @SpringBootApplication 注解
该系列文章是笔者在学习 Spring Boot 过程中总结下来的,里面涉及到相关源码,可能对读者不太友好,请结合我的源码注释 Spring Boot 源码分析 GitHub 地址 进行阅读 Sprin ...
- Spring Boot入门(三):使用Scheduled注解实现定时任务
在程序开发的过程中,经常会使用定时任务来实现一些功能,比如: 系统依赖于外部系统的非核心数据,可以定时同步 系统内部一些非核心数据的统计计算,可以定时计算 系统内部的一些接口,需要间隔几分钟或者几秒执 ...
- Spring Boot 最核心的 25 个注解,都是干货!
学习和应用 Spring Boot 有一些时间了,你们对 Spring Boot 注解了解有多少呢?今天栈长我给大家整理了 Spring Boot 最核心的 25 个注解,都是干货! 你所需具备的基础 ...
- Spring Boot 项目学习 (二) MySql + MyBatis 注解 + 分页控件 配置
0 引言 本文主要在Spring Boot 基础项目的基础上,添加 Mysql .MyBatis(注解方式)与 分页控件 的配置,用于协助完成数据库操作. 1 创建数据表 这个过程就暂时省略了. 2 ...
- 基于Spring Boot的统一异常处理设计
基于Spring Boot的统一异常处理设计 作者: Grey 原文地址:https://www.cnblogs.com/greyzeng/p/11733327.html Spring Boot中,支 ...
- 自定义的Spring Boot starter如何设置自动配置注解
本文首发于个人网站: 在Spring Boot实战之定制自己的starter一文最后提到,触发Spring Boot的配置过程有两种方法: spring.factories:由Spring Boot触 ...
- 使用Spring Boot和AspectJ实现方法跟踪基础结构
了解如何使用Spring Boot和AspectJ实现方法跟踪基础结构!最近在优锐课学习收获颇多,记录下来大家一起进步! 在我们的应用程序中,获取方法的堆栈跟踪信息可能会节省很多时间.具有输入输出参数 ...
随机推荐
- CentOS6.5下搭建ftp服务器(三种认证模式:匿名用户、本地用户、虚拟用户)
CentOS 6.5下搭建ftp服务器 vsftpd(very secure ftp daemon,非常安全的FTP守护进程)是一款运行在Linux操作系统上的FTP服务程序,不仅完全开源而且免费,此 ...
- laydate控制之前的日期不可选择
laydate.render({ elem: '#start_time', min:0, //,type: 'date' //默认,可不填 }); 只要加一个min参数,就可以控制了.0表示之前的日期 ...
- javaSE习题 第三章 运算符、表达式和语句
问答: 1.下列System.out.printf的结果是什么? int a=100,x,y; x=++a; y=a--; System.out.printf("%d,%d,%d" ...
- 串口.Qt532测试(同步)
环境:Win7x64.Qt5.3.2 MSVC OpenGL(x86).vs2010(x86) ZC:这里的例子是 同步的函数操作,貌似 如果子线程在等待 WaitCommEvent(...)或Rea ...
- ios手机域名https协议注意事项
加载网页版链接框架不能用http 1.下载到本地 2.转换为cdn https
- Python数据分析-Day1-Numpy模块
1.numpy.genfromtxt读取txt文件 import numpyworld_alcohol = numpy.genfromtxt("world_alcohol.txt" ...
- Python全栈开发-Day4-Python基础4
本节内容 匿名函数 装饰器 列表生成式.迭代器&生成器 内置函数 Json & pickle 数据序列化 1. 匿名函数 匿名函数就是不需要显式的指定函数 1 2 3 4 5 6 7 ...
- python中函数与函数式编程(二)
首先要明白为什么要用到返回值,返回值的作用就是为了分情况来处理下面的程序(个人见解总结) 1.函数返回值 def test1(): pass def test2(): return 0 def tes ...
- 通过wifi 连接 adb 到 手机
网上很多文章都需要先用 usb 线连接先做一下设置,然后才能通过下面的方法连接 julian@julian-ThinkPad-T450:~/tools/android_sdk/platform-too ...
- Zabbix安装(debian,centos)
lnmp和lamp架构搭建一键安装脚本下载地址:https://lnmp.org/download.html https://github.com/teddysun/lamp/tree/master ...