tensorflow 笔记8:RNN、Lstm源码,训练代码输入输出,维度分析
tensorflow 官网信息:https://www.tensorflow.org/api_docs/python/tf/contrib/rnn/BasicLSTMCell
tensorflow 版本:1.10
如有错误还望指正,一起探讨;
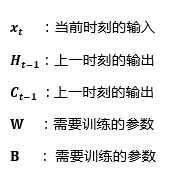
当前层各个参数含义:
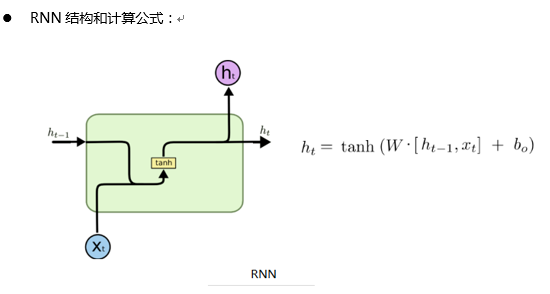
Tensorflow 中RNN单个时刻计算流程:
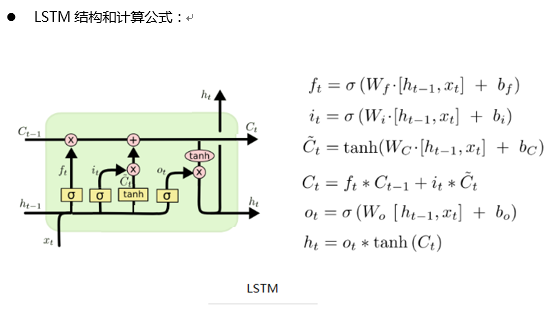
Tensorflow 中 lstm 单个时刻计算流程:

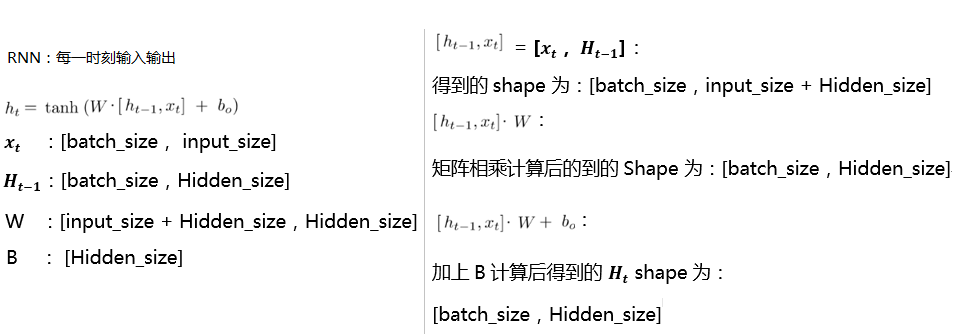
注:上面计算[H,X] * W后和B维度不同, 如何相加,解释如下;
- tensorflow代码中,用的这个 nn_ops.bias_add(gate_inputs, self._bias),这个函数的计算方法是,让每个 batch 的输出值,都加上这个 B;
- 所以维度不同可以相加:【batch_size,Hidden_size】,【Hidden_size】,见函数演示:nn_ops.bias_add
tensorflow 代码分析:见如下
tensorflow version:1.9
注:以下是一个batch,一个时刻的计算,若计算所有时刻,则循环执行以下代码,num_step(句长)次; tensorflow 已经封装好了,不需要我们写;
 RNN 关键代码:

 @tf_export("nn.rnn_cell.BasicRNNCell")

 class BasicRNNCell(LayerRNNCell):

   """The most basic RNN cell.

   Args:

     num_units: int, The number of units in the RNN cell.

     activation: Nonlinearity to use.  Default: `tanh`.

     reuse: (optional) Python boolean describing whether to reuse variables

      in an existing scope.  If not `True`, and the existing scope already has

      the given variables, an error is raised.

     name: String, the name of the layer. Layers with the same name will

       share weights, but to avoid mistakes we require reuse=True in such

       cases.

     dtype: Default dtype of the layer (default of `None` means use the type

       of the first input). Required when `build` is called before `call`.

   """

   def __init__(self,

                num_units,

                activation=None,

                reuse=None,

                name=None,

                dtype=None):

     super(BasicRNNCell, self).__init__(_reuse=reuse, name=name, dtype=dtype)

     # Inputs must be 2-dimensional.

     self.input_spec = base_layer.InputSpec(ndim=2)

     self._num_units = num_units

     self._activation = activation or math_ops.tanh

   @property

   def state_size(self):

     return self._num_units

   @property

   def output_size(self):

     return self._num_units

   def build(self, inputs_shape):

     if inputs_shape[1].value is None:

       raise ValueError("Expected inputs.shape[-1] to be known, saw shape: %s"

                        % inputs_shape)

     input_depth = inputs_shape[1].value

     # 初始化生成 W 和 B,shape 大小为

     # W: [input_size + Hidden_size, Hidden_size)

     # B: [Hidden_size]

     self._kernel = self.add_variable(

         _WEIGHTS_VARIABLE_NAME,

         shape=[input_depth + self._num_units, self._num_units])

     self._bias = self.add_variable(

         _BIAS_VARIABLE_NAME,

         shape=[self._num_units],

         initializer=init_ops.zeros_initializer(dtype=self.dtype))

     self.built = True

   # 循环该函数 num_step(句子长度) 次,则该层计算完;

   def call(self, inputs, state):

     """Most basic RNN: output = new_state = act(W * input + U * state + B)."""

     # output = Ht = tanh([x,Ht-1]*W + B)

     # 如果是第 0 时刻,那么当前的 state(即上一时刻的输出H0)的值全部为0;

     # input 的 shape为: [batch_size,emb_size]

     # state 的 shape为:[batch_zize,Hidden_size]

     # matmul : 矩阵相乘

     # array_ops.concat: 两个矩阵连接,连接后的 shape 为 [batch_size,input_size + Hidden_size],实际就是[Xt,Ht-1]

     # 此时计算: [input,state] * [W,U] == [Xt,Ht-1] * W,得到的shape为:[batch_size,Hidden_size]

     gate_inputs = math_ops.matmul(

         array_ops.concat([inputs, state], 1), self._kernel)

     # B 的shape 为:【Hidden_size】,[Xt,Ht-1] * W 计算后的shape为:[batch_size,Hidden_size]

     # nn_ops.bias_add,这个函数的计算方法是,让每个 batch 得到的值,都加上这个 B;

     # 这一步,加上B后:Ht = tanh([Xt,Ht-1] * W + B),得到的 shape 还是: [batch_size,Hidden_size]

     # 那么这个 Ht 将作为下一时刻的输入和下一层的输入;

     gate_inputs = nn_ops.bias_add(gate_inputs, self._bias)

     output = self._activation(gate_inputs)

     #此时return的维度为:[batch_size,Hidden_size]

     # 一个output作为下一时刻的输入Ht,另一个作为下一层的输入 Ht

     return output, output

 LSTM 关键代码:

 @tf_export("nn.rnn_cell.BasicLSTMCell")

 class BasicLSTMCell(LayerRNNCell):

   """Basic LSTM recurrent network cell.

   The implementation is based on: http://arxiv.org/abs/1409.2329.

   We add forget_bias (default: 1) to the biases of the forget gate in order to

   reduce the scale of forgetting in the beginning of the training.

   It does not allow cell clipping, a projection layer, and does not

   use peep-hole connections: it is the basic baseline.

   For advanced models, please use the full @{tf.nn.rnn_cell.LSTMCell}

   that follows.

   """

   def __init__(self,

                num_units,

                forget_bias=1.0,

                state_is_tuple=True,

                activation=None,

                reuse=None,

                name=None,

                dtype=None):

     """Initialize the basic LSTM cell.

     Args:

       num_units: int, The number of units in the LSTM cell.

       forget_bias: float, The bias added to forget gates (see above).

         Must set to `0.0` manually when restoring from CudnnLSTM-trained

         checkpoints.

       state_is_tuple: If True, accepted and returned states are 2-tuples of

         the `c_state` and `m_state`.  If False, they are concatenated

         along the column axis.  The latter behavior will soon be deprecated.

       activation: Activation function of the inner states.  Default: `tanh`.

       reuse: (optional) Python boolean describing whether to reuse variables

         in an existing scope.  If not `True`, and the existing scope already has

         the given variables, an error is raised.

       name: String, the name of the layer. Layers with the same name will

         share weights, but to avoid mistakes we require reuse=True in such

         cases.

       dtype: Default dtype of the layer (default of `None` means use the type

         of the first input). Required when `build` is called before `call`.

       When restoring from CudnnLSTM-trained checkpoints, must use

       `CudnnCompatibleLSTMCell` instead.

     """

     super(BasicLSTMCell, self).__init__(_reuse=reuse, name=name, dtype=dtype)

     if not state_is_tuple:

       logging.warn("%s: Using a concatenated state is slower and will soon be "

                    "deprecated.  Use state_is_tuple=True.", self)

     # Inputs must be 2-dimensional.

     self.input_spec = base_layer.InputSpec(ndim=2)

     self._num_units = num_units

     self._forget_bias = forget_bias

     self._state_is_tuple = state_is_tuple

     self._activation = activation or math_ops.tanh

   @property

   def state_size(self):

     # 隐藏层的 size:

     return (LSTMStateTuple(self._num_units, self._num_units)

             if self._state_is_tuple else 2 * self._num_units)

   @property

   def output_size(self):

     # 输出层的size:Hidden_size

     return self._num_units

   def build(self, inputs_shape):

     if inputs_shape[1].value is None:

       raise ValueError("Expected inputs.shape[-1] to be known, saw shape: %s"

                        % inputs_shape)

     #inputs的维度为:[batch_size,input_size]

     #如果是第一层每个时刻词语的输入,则这个input_size 就是 embedding_size,就等于词向量的维度;

     # 所以 此时 input_depth,就是input_size

     input_depth = inputs_shape[1].value

     # h_depth 就是 Hidden_size,隐藏层的维度

     h_depth = self._num_units

     # self._kernel == W;则此时 W的维度 为【input_size + Hidden_size,4* Hidden_size】

     # 此处定义四个 W 和 B,是为了,一次就把 i,j,f,o 计算出来;相当于图中的 ft,it,ct‘,ot

     self._kernel = self.add_variable(

         _WEIGHTS_VARIABLE_NAME,

         shape=[input_depth + h_depth, 4 * self._num_units])

     # 此时的B的维度为【4 * Hidden_size】

     self._bias = self.add_variable(

         _BIAS_VARIABLE_NAME,

         shape=[4 * self._num_units],

         initializer=init_ops.zeros_initializer(dtype=self.dtype))

     self.built = True

   def call(self, inputs, state):

     """Long short-term memory cell (LSTM).

     Args:

       inputs: `2-D` tensor with shape `[batch_size, input_size]`.

       state: An `LSTMStateTuple` of state tensors, each shaped

         `[batch_size, num_units]`, if `state_is_tuple` has been set to

         `True`.  Otherwise, a `Tensor` shaped

         `[batch_size, 2 * num_units]`.

     Returns:

       A pair containing the new hidden state, and the new state (either a

         `LSTMStateTuple` or a concatenated state, depending on

         `state_is_tuple`).

     """

     sigmoid = math_ops.sigmoid

     one = constant_op.constant(1, dtype=dtypes.int32)

     # Parameters of gates are concatenated into one multiply for efficiency.

     # 每一层的第0时刻的 c 和 h,元素全部初始化为0;

     if self._state_is_tuple:

       c, h = state

     else:

       c, h = array_ops.split(value=state, num_or_size_splits=2, axis=one)

     # 此时刻的 input:Xt 和 上一时刻的输出:Ht-1,进行结合;

     # inputs shape : [batch_size,input_size],第一层的时候,input_size,就相当于 embedding_size

     # 结合后的维度为【batch_size,input_size + Hidden_size】,W的维度为【input_size + Hidden_size,4*hidden_size】

     # 两者进行矩阵相乘后的维度为:【batch_size,4*hidden_size】

     gate_inputs = math_ops.matmul(

         array_ops.concat([inputs, h], 1), self._kernel)

     # B 的shape 为:【4 * Hidden_size】,[Xt,Ht-1] * W 计算后的shape为:[batch_size, 4 * Hidden_size]

     # nn_ops.bias_add,这个函数的计算方法是,让每个 batch 得到的值,都加上这个 B;

     # 这一步,加上B后,得到的是,i,j,f,o 的结合, [Xt,Ht-1] * W + B,得到的 shape 还是: [batch_size, 4 * Hidden_size]

     #  加上偏置B后的维度为:【batch_size,4 * Hidden_size】

     gate_inputs = nn_ops.bias_add(gate_inputs, self._bias)

     # i = input_gate, j = new_input, f = forget_gate, o = output_gate

     # 从以上的矩阵相乘后,分割出来四部分,就是 i,j,f,o的值;

     # 每个的维度为【batch_size,Hidden_size】

     i, j, f, o = array_ops.split(

         value=gate_inputs, num_or_size_splits=4, axis=one)

     forget_bias_tensor = constant_op.constant(self._forget_bias, dtype=f.dtype)

     # Note that using `add` and `multiply` instead of `+` and `*` gives a

     # performance improvement. So using those at the cost of readability.

     add = math_ops.add

     # 此处加上遗忘的 bias,选择遗忘元素;

     # 以下计算是:对应元素相乘:因为四个参数的维度都是【batch_size,hidden_size】,计算后维度不变;

     # new_c = c*sigmoid(f+bias) + sigmoid(i)*tanh(o)

     # 计算后的维度为【batch_size,hidden_size】

     multiply = math_ops.multiply

     new_c = add(multiply(c, sigmoid(add(f, forget_bias_tensor))),

                 multiply(sigmoid(i), self._activation(j)))

     # 以下计算是:对应元素相乘:因为2个参数的维度都是【batch_size,hidden_size】,计算后维度不变;

     #new_h = sigmoid(o) * tanh(new_c)

     new_h = multiply(self._activation(new_c), sigmoid(o))

     # 计算后的维度是(值不相等):new_c == new_h == 【batch_size,hidden_size】

     if self._state_is_tuple:

       new_state = LSTMStateTuple(new_c, new_h)

     else:

       new_state = array_ops.concat([new_c, new_h], 1)

     # new_h:最后一个时刻的H,new_state:最后一个时刻的 H和C;循环执行该函数,执行 num_step次(即 最大的步长),则该层计算完全;

     # 此时的 new_c 和 new_h,作为下一时刻的输入,new_h 和下一时刻的,Xt+1 进行连接,连接后的维度为,【batch_size,input_size + Hidden_size】

     # 如果还有下一层的话,那么此刻的 new_h,变身为下一时刻的 Xt

     return new_h, new_state
tensorflow 笔记8:RNN、Lstm源码,训练代码输入输出,维度分析的更多相关文章
- tensorflow笔记:多层LSTM代码分析
tensorflow笔记:多层LSTM代码分析 标签(空格分隔): tensorflow笔记 tensorflow笔记系列: (一) tensorflow笔记:流程,概念和简单代码注释 (二) ten ...
- tensorflow笔记:模型的保存与训练过程可视化
tensorflow笔记系列: (一) tensorflow笔记:流程,概念和简单代码注释 (二) tensorflow笔记:多层CNN代码分析 (三) tensorflow笔记:多层LSTM代码分析 ...
- [笔记] Ubuntu 18.04源码安装caffe流程
虽然Ubuntu 18.04可以通过apt安装caffe,但是为了使用最新的代码,还是值得从源码安装一遍的. 安装环境 OS: Ubuntu 18.04 64 bit 显卡: NVidia GTX 1 ...
- tensorflow笔记:流程,概念和简单代码注释
tensorflow是google在2015年开源的深度学习框架,可以很方便的检验算法效果.这两天看了看官方的tutorial,极客学院的文档,以及综合tensorflow的源码,把自己的心得整理了一 ...
- 老李推荐:第6章8节《MonkeyRunner源码剖析》Monkey原理分析-事件源-事件源概览-小结
老李推荐:第6章8节<MonkeyRunner源码剖析>Monkey原理分析-事件源-事件源概览-小结 本章我们重点围绕处理网络过来的命令的MonkeySourceNetwork这个事 ...
- 老李推荐:第6章7节《MonkeyRunner源码剖析》Monkey原理分析-事件源-事件源概览-注入按键事件实例
老李推荐:第6章7节<MonkeyRunner源码剖析>Monkey原理分析-事件源-事件源概览-注入按键事件实例 poptest是国内唯一一家培养测试开发工程师的培训机构,以学员能胜 ...
- 老李推荐:第6章6节《MonkeyRunner源码剖析》Monkey原理分析-事件源-事件源概览-命令队列
老李推荐:第6章6节<MonkeyRunner源码剖析>Monkey原理分析-事件源-事件源概览-命令队列 事件源在获得字串命令并把它翻译成对应的MonkeyEvent事件后,会把这些 ...
- 老李推荐:第6章4节《MonkeyRunner源码剖析》Monkey原理分析-事件源-事件源概览-翻译命令字串
老李推荐:第6章4节<MonkeyRunner源码剖析>Monkey原理分析-事件源-事件源概览-翻译命令字串 poptest是国内唯一一家培养测试开发工程师的培训机构,以学员能胜任自 ...
- 老李推荐:第6章5节《MonkeyRunner源码剖析》Monkey原理分析-事件源-事件源概览-事件
老李推荐:第6章5节<MonkeyRunner源码剖析>Monkey原理分析-事件源-事件源概览-事件 从网络过来的命令字串需要解析翻译出来,有些命令会在翻译好后直接执行然后返回,但有 ...
- 老李推荐:第6章3节《MonkeyRunner源码剖析》Monkey原理分析-事件源-事件源概览-命令翻译类
老李推荐:第6章3节<MonkeyRunner源码剖析>Monkey原理分析-事件源-事件源概览-命令翻译类 每个来自网络的字串命令都需要进行解析执行,只是有些是在解析的过程中直接执行 ...
随机推荐
- 001.HAProxy简介
一 HAProxy简介 HAProxy是可提供高可用性.负载均衡以及基于TCP(从而可以反向代理mysql等应用)和HTTP应用的代理,支持虚拟主机,它是免费.快速并且可靠的一种解决方案.HAProx ...
- spring AbstractBeanDefinition创建bean类型是动态代理类的方式
1.接口 Class<?> resourceClass 2.获取builder BeanDefinitionBuilder builder = BeanDefinitionBuilder. ...
- C#如何打开一个窗体,同时关闭该窗体
- for循环的灵活性
for循环把初始化.测试和更新组合在一起,其基本形式如下所示: for(初始化:测试条件:更新表达式) { //循环体 } 关键字for后面的圆括号中3个表达式,分别用两个分号隔开: 第一 ...
- wtforms源码流程
未实例化前 1.继承的Form类 # Form(FormMeta("NewBase", (BaseForm,), {}))# Form(NewBase(BaseForm)) cla ...
- Android弹出Toast工具类总结
Android弹出Toast工具类总结,包括系统自带的,也包括自定义的. public class ToastUtil { public ToastUtil() { } public static T ...
- 2016年3月1日Android实习笔记
1:经查资料,Android中gif动画加载共有两种 1)利用WebView,WebView 主要调用三个方法:LoadUrl.LoadData.LoadDataWithBaseURL 2)主要用的是 ...
- mongodb group操作 以及管道 aggregate 分组排序分页
分组获取数据: db.express_info.group({ "key":{"express_code":true}, "initial" ...
- 在 Python 中使用 in_memory 工作空间
在 Python 中使用 in_memory 工作空间 在 Python 脚本中,in_memory 工作空间仅对地理处理工具有效:它不是可以写入任何数据的通用虚拟目录. 您可以按以下代码示例所示使用 ...
- 谈一下Docker与Kubernetes集群的日志和日志管理
本文的测试环境为CentOS 7.3,Kubernetes集群为1.11.2,安装步骤参见kubeadm安装kubernetes V1.11.1 集群 日志对于我们管理Kubernetes集群及其上的 ...