
Chrome RenderText分析(1)
先从一些基础的类开始
1.Range
// A Range contains two integer values that represent a numeric range, like the
// range of characters in a text selection. A range is made of a start and end
// position; when they are the same, the Range is akin to a caret. Note that
// |start_| can be greater than |end_| to respect the directionality of the
// range.
文字绘制前后有索引,比如
“hello你好”便是hello |0,4|5,6|
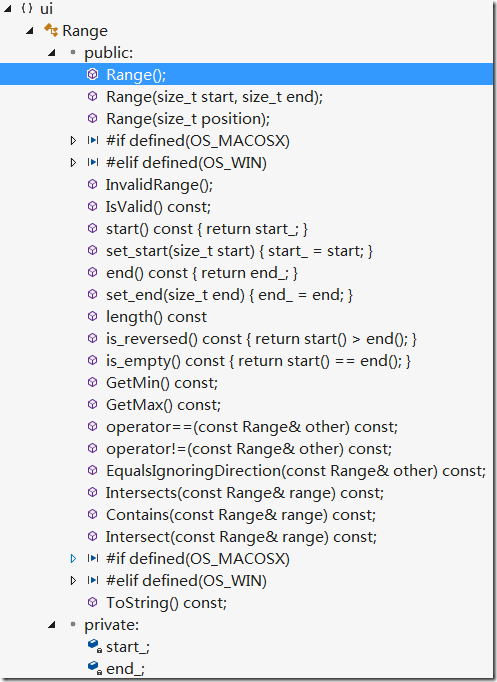
一段简单的测试代码
TEST(RangeTest, StartEndInit) {

  ui::Range r(10, 15);

  EXPECT_EQ(10U, r.start());

  EXPECT_EQ(15U, r.end());

  EXPECT_EQ(5U, r.length());

  EXPECT_FALSE(r.is_reversed());

  EXPECT_FALSE(r.is_empty());

  EXPECT_TRUE(r.IsValid());

  EXPECT_EQ(10U, r.GetMin());

  EXPECT_EQ(15U, r.GetMax());

}
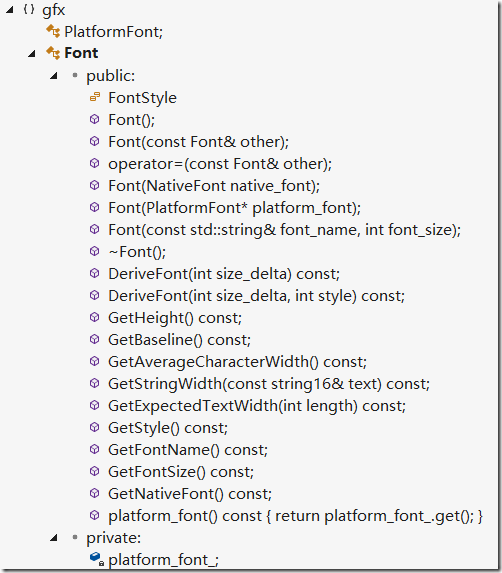
2.Font
// Font provides a wrapper around an underlying font. Copy and assignment
// operators are explicitly allowed, and cheap.
由于是跨平台的,所以其GetNativeFont返回则HFONT
3.RenderTextWin
// RenderTextWin is the Windows implementation of RenderText using Uniscribe.
Lay Out Text Using Uniscribe
Your application can use the following steps to lay out out a text paragraph with Uniscribe. This procedure assumes that the application has already divided the paragraph into runs.
- Call ScriptRecordDigitSubstitution only when starting or when receiving a WM_SETTINGCHANGE message.
- (Optional) Call ScriptIsComplex to determine if the paragraph requires complex processing.
- (Optional) If using Uniscribe to handle bidirectional text and/or digit substitution, call ScriptApplyDigitSubstitution to prepare the SCRIPT_CONTROL and SCRIPT_STATE structures as inputs to ScriptItemize. If skipping this step, but still requiring digit substitution, substitute national digits for Unicode U+0030 through U+0039 (European digits). For information about digit substitution, see Digit Shapes.
- Call ScriptItemize to divide the paragraph into items. If not using Uniscribe for digit substitution and the bidirectional order is known, for example, because of the keyboard layout used to enter the character, call ScriptItemize. In the call, provide null pointers for the SCRIPT_CONTROL and SCRIPT_STATE structures. This technique generates items by use of the shaping engine only, and the items can be reordered using the engine information.
Note Typically, applications that work only with left-to-right scripts and without any digit substitution should pass null pointers for the SCRIPT_CONTROL and SCRIPT_STATE structures.
- Merge the item information with the run information to produce ranges.
- Call ScriptShape to identify clusters and generate glyphs.
- If ScriptShape returns the code USP_E_SCRIPT_NOT_IN_FONT or S_OK with the output containing missing glyphs, select characters from a different font. Either substitute another font or disable shaping by setting the eScript member of the SCRIPT_ANALYSIS structure passed to ScriptShape to SCRIPT_UNDEFINED. For more information, see Using Font Fallback.
- Call ScriptPlace to generate advance widths and x and y positions for the glyphs in each successive range. This is the first step for which text size becomes a consideration.
- Sum the range sizes until the line overflows.
- Break the range on a word boundary by using the fSoftBreak and fWhiteSpace members in the logical attributes. To break a single character cluster off the run, use the information returned by calling ScriptBreak.
Note Decide if the first code point of a range should be a word break point because the last character of the previous range requires it. For example, if one range ends in a comma, consider the first character of the next range to be a word break point.
- Repeat steps 6 through 10 for each line in the paragraph. However, if breaking the last run on the line, call ScriptShape to reshape the remaining part of the run as the first run on the next line.
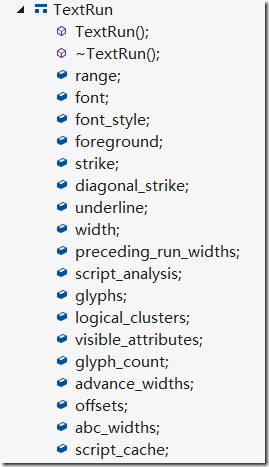
4.TextRun
用来描述每小段文字
重点来看RenderTextWin的流程
GetStringSize用于获取文字的尺寸
Size RenderTextWin::GetStringSize() {

  EnsureLayout();

  return string_size_;

}
首先要通过ScriptItemize方法来把文字分段,封装成TextRun数组
void RenderTextWin::ItemizeLogicalText() {

  runs_.clear();

  string_size_ = Size(0, GetFont().GetHeight());

  common_baseline_ = 0;

  // Set Uniscribe's base text direction.

  script_state_.uBidiLevel =

      (GetTextDirection() == base::i18n::RIGHT_TO_LEFT) ? 1 : 0;

  if (text().empty())

    return;

  HRESULT hr = E_OUTOFMEMORY;

  int script_items_count = 0;

  std::vector<SCRIPT_ITEM> script_items;

  const size_t text_length = GetLayoutText().length();

  for (size_t n = kGuessItems; hr == E_OUTOFMEMORY && n < kMaxItems; n *= 2) {

    // Derive the array of Uniscribe script items from the logical text.

    // ScriptItemize always adds a terminal array item so that the length of the

    // last item can be derived from the terminal SCRIPT_ITEM::iCharPos.

    script_items.resize(n);

    hr = ScriptItemize(GetLayoutText().c_str(),

                       text_length,

                       n - 1,

                       &script_control_,

                       &script_state_,

                       &script_items[0],

                       &script_items_count);

  }

  DCHECK(SUCCEEDED(hr));

  if (script_items_count <= 0)

    return;

  // Temporarily apply composition underlines and selection colors.

  ApplyCompositionAndSelectionStyles();

  // Build the list of runs from the script items and ranged colors/styles.

  // TODO(msw): Only break for bold/italic, not color etc. See TextRun comment.

  internal::StyleIterator style(colors(), styles());

  SCRIPT_ITEM* script_item = &script_items[0];

  const size_t layout_text_length = GetLayoutText().length();

  for (size_t run_break = 0; run_break < layout_text_length;) {

    internal::TextRun* run = new internal::TextRun();

    run->range.set_start(run_break);

    run->font = GetFont();

    run->font_style = (style.style(BOLD) ? Font::BOLD : 0) |

                      (style.style(ITALIC) ? Font::ITALIC : 0);

    DeriveFontIfNecessary(run->font.GetFontSize(), run->font.GetHeight(),

                          run->font_style, &run->font);

    run->foreground = style.color();

    run->strike = style.style(STRIKE);

    run->diagonal_strike = style.style(DIAGONAL_STRIKE);

    run->underline = style.style(UNDERLINE);

    run->script_analysis = script_item->a;

    // Find the next break and advance the iterators as needed.

    const size_t script_item_break = (script_item + 1)->iCharPos;

    run_break = std::min(script_item_break,

                         TextIndexToLayoutIndex(style.GetRange().end()));

    style.UpdatePosition(LayoutIndexToTextIndex(run_break));

    if (script_item_break == run_break)

      script_item++;

    run->range.set_end(run_break);

    runs_.push_back(run);

  }

  // Undo the temporarily applied composition underlines and selection colors.

  UndoCompositionAndSelectionStyles();

}
注意点:
The function returns E_OUTOFMEMORY if the value of cMaxItems is insufficient. As in all error cases, no items are fully processed and no part of the output array contains defined values. If the function returns E_OUTOFMEMORY, the application can call it again with a larger pItems buffer.
1.先看斜体部分,通过ScriptItemize,得到一个SCRIPT_ITEM数组
2.再通过SCRIPT_ITEM数组封装成TextRun数组
5.TextRun的文字样式(BreakList)
看如下文字样式

文字的样式有颜色,格式(斜体,下划线)
想要呈现”[set]”上面的文字需要把文字拆成几个分段
1.颜色分成5段[0,1,2,3,4]
2.字体分段: 每个文字可能有多个格式,比如斜体和粗体是同时出现的
为了储存以上样式信息,就出现一个BreakList的数据结构
// BreakLists manage ordered, non-overlapping, and non-repeating ranged values.
// These may be used to apply ranged colors and styles to text, for an example.
//
// Each break stores the start position and value of its associated range.
// A solitary break at position 0 applies to the entire space [0, max_).
// |max_| is initially 0 and should be set to match the available ranged space.
// The first break always has position 0, to ensure all positions have a value.
// The value of the terminal break applies to the range [break.first, max_).
// The value of other breaks apply to the range [break.first, (break+1).first).
  typedef std::pair<size_t, T> Break;

  std::vector<Break> breaks_;

  size_t max_;
上面颜色的存储就是[0,green],[1,blue],[2,red],[3,blue],[4,green]
字体分段则是一个列表的BreakList:[[0,true],[1,true]],[[0,true],[1,true]]
看一下类成员
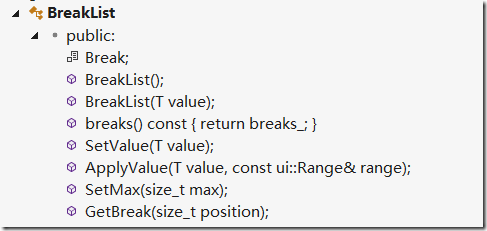
- SetValue方法设置一个默认值
- ApplyValue则设置区间的start和end值,同时清除区间的值
BreakList的设置逻辑是区间相邻不会出现重复的值.
即不会出现[0,true][1,true],[2,true]这种情况
看几个单元测试用例
1.SetValue测试
TEST_F(BreakListTest, SetValue) {

  // Check the default values applied to new instances.

  BreakList<bool> style_breaks(false);

  EXPECT_TRUE(style_breaks.EqualsValueForTesting(false));

  style_breaks.SetValue(true);

  EXPECT_TRUE(style_breaks.EqualsValueForTesting(true));

  // Ensure that setting values works correctly.

  BreakList<SkColor> color_breaks(SK_ColorRED);

  EXPECT_TRUE(color_breaks.EqualsValueForTesting(SK_ColorRED));

  color_breaks.SetValue(SK_ColorBLACK);

  EXPECT_TRUE(color_breaks.EqualsValueForTesting(SK_ColorBLACK));

}
重新设置SetValue回清空所有段落
2.ApplyValue
  BreakList<bool> breaks(false);

  const size_t max = 99;

  breaks.SetMax(max);

  // Apply a value to a valid range, check breaks; repeating should be no-op.

  std::vector<std::pair<size_t, bool> > expected;

  expected.push_back(std::pair<size_t, bool>(0, false));

  expected.push_back(std::pair<size_t, bool>(2, true));

  expected.push_back(std::pair<size_t, bool>(3, false));

  for (size_t i = 0; i < 2; ++i) {

    breaks.ApplyValue(true, ui::Range(2, 3));

    EXPECT_TRUE(breaks.EqualsForTesting(expected));

  }
ApplyValue区间的end如果不是max值则是SetValue的默认值
  // Ensure applying a value over [0, |max|) is the same as setting a value.

  breaks.ApplyValue(false, ui::Range(0, max));

  EXPECT_TRUE(breaks.EqualsValueForTesting(false));
ApplyValue区间的end如果是max值则段区域只有1段
  // Ensure applying a value that is already applied has no effect.

  breaks.ApplyValue(false, ui::Range(0, 2));

  breaks.ApplyValue(false, ui::Range(3, 6));

  breaks.ApplyValue(false, ui::Range(7, max));

  EXPECT_TRUE(breaks.EqualsValueForTesting(false));
同理,设置区域的Value都一样的话,那还是在同一个区域,也还只有1段
看完BreakList的用法之后,我们回头来看RenderTextWin中关于color和style的应用
变量
  // Color and style breaks, used to color and stylize ranges of text.

  // BreakList positions are stored with text indices, not layout indices.

  // TODO(msw): Expand to support cursor, selection, background, etc. colors.

  BreakList<SkColor> colors_;

  std::vector<BreakList<bool> > styles_;
方法
void RenderText::SetColor(SkColor value) {

  colors_.SetValue(value);

}

void RenderText::ApplyColor(SkColor value, const ui::Range& range) {

  colors_.ApplyValue(value, range);

}

void RenderText::SetStyle(TextStyle style, bool value) {

  styles_[style].SetValue(value);

 }

void RenderText::ApplyStyle(TextStyle style,

                            bool value,

                            const ui::Range& range) {

  styles_[style].ApplyValue(value, range);

}
回到ItemizeLogicalText方法中看StyleIterator类,其均是取BreakList的首个值
StyleIterator::StyleIterator(const BreakList<SkColor>& colors,

                             const std::vector<BreakList<bool> >& styles)

    : colors_(colors),

      styles_(styles) {

  color_ = colors_.breaks().begin();

  for (size_t i = 0; i < styles_.size(); ++i)

    style_.push_back(styles_[i].breaks().begin());

}
Chrome RenderText分析(1)的更多相关文章
- Chrome RenderText分析(2)
接Chrome RenderText分析(1) 继续分析以下步骤 一.TextRun结构 struct TextRun { TextRun(); ~TextRun(); ui::Range r ...
- JS内存泄漏 和Chrome 内存分析工具简介(摘)
原文地址:http://web.jobbole.com/88463/ JavaScript 中 4 种常见的内存泄露陷阱 原文:Sebastián Peyrott 译文:伯乐在线专栏作者 - AR ...
- Chrome渲染分析之Timeline工具的使用
原文http://www.th7.cn/web/html-css/201406/42043.shtml Timeline工具栏提供了对于在装载你的Web应用的过程中,时间花费情况的概览,这些应用包括处 ...
- chrome性能分析
Chrome开发者工具之JavaScript内存分析 前端性能优化 —— 前端性能分析 Chrome DevTools - 性能监控
- 通过chrome浏览器分析网页加载时间
今天趁着下班的时间看了下chrome浏览器的网页加载时间分析工具和相关文档,简单写点儿东西记录一下. 以百度首页加载为例,分析下一张图片1.jgp(就是背景图)的加载时间 看右侧的Timing标签,从 ...
- Chrome性能分析工具lightHouse用法指南
本文主要讲如何使用Chrome开发者工具linghtHouse进行页面性能分析. 1.安装插件 非常简单,点击右上角的“添加至Chrome”即可. 2.使用方式 1)打开要测试的页面,点击浏览器右上角 ...
- Wappalyzer(chrome网站分析插件)
Wappalyzer是一款功能强大的.且非常实用的chrome网站技术分析插件,通过该插件能够分析目标网站所采用的平台构架. 网站环境.服务器配置环境.JavaScript框架.编程语言等参数,使用时 ...
- Chrome性能分析工具Coverage使用方法
操作路径如下: 打开控制台-->点击‘Sources’-->ctrl+shift+p-->在命令窗口输入coverage-->在下边新出现的窗口中点击左上角刷新按钮. 界面如下 ...
- 使用Chrome逆向分析JS实战---分析google网站翻译器原文存放位置
剧透:就是使用了一下Chrome DevTools的Memory功能,通过已知的JS变量的值查找JS内存中变量的引用 一:不分析一下现有的网页翻译方法么? 总所周知,(As is well known ...
随机推荐
- 缓存之EHCache(一)
源文: http://blog.csdn.net/l271640625/article/details/20528573 一.简介 非常简单,而且易用. ehcache 是一个非常轻量级的缓存 ...
- 线程池 多线程运行结束后 如何关闭? ExecutorService的正确关闭方法
前言 最近在使用ExecutorService的时候,对于与ExecutorService相关的概念有些迷糊, 加上本身ExecutorService内部的有些方法名在取名上也容易让使用者误解,导致 ...
- SQL中Union与Union All的区别
在写SQL查询语句时,经常会碰到类似于这种的需求:查询年龄大于60岁的男职工以及所有出生于1950年的职工.在处理这种需求时,无法使用一条简单的SQL语句查询出所有满足条件的结果,此时就需要将这种需求 ...
- python的selenium
from selenium import webdriverChromeDriver="C:\Program Files (x86)\Google\Chrome\Application\ch ...
- thinkphp验证码的使用
thinkphp不仅封装了验证规则 还封装了验证码 文件的位置是ThinkPHP\Library\Think\Verify.class.php 下面简单的说一下如何使用 我们现在控制器里新建一个方法 ...
- maven的三种工程pom、jar、war
阅读数:739 maven中的三种工程: 1.pom工程:用在父级工程或聚合工程中.用来做jar包的版本控制. 2.war工程:将会打包成war,发布在服务器上的工程.如网站或服务. 3.jar工程: ...
- win10下安装scala
win10安装scala详细步骤 1.下载安装JDK 2.配置Java环境变量 JAVA_HOME:jdk的安装目录 Path:%JAVA_HOME%\bin; Classpath:%JAVA_HOM ...
- 【Java】 剑指offer(35) 复杂链表的复制
本文参考自<剑指offer>一书,代码采用Java语言. 更多:<剑指Offer>Java实现合集 题目 请实现函数ComplexListNode* Clone(Compl ...
- pyinstaller打包pyqt文件(转)
pyinstaller打包pyqt文件 https://www.cnblogs.com/dcb3688/p/4211390.html 打包pyqt文件 如何将pyqt生成exe的二进制文件呢,p ...
- springboot springcloud 父项目pom工程创建pom文件
<project xmlns="http://maven.apache.org/POM/4.0.0" xmlns:xsi="http://www.w3.org/20 ...