路由器配置——基于链路的OSPF简单口令认证
一、实验目的:掌握基于链路的OSPF简单口令认证
二、拓扑图:

三、具体步骤配置:
(1)R1路由器配置
Router>enable
Router#configure terminal
Enter configuration commands, one per line. End with CNTL/Z.
Router(config)#hostname R1
R1(config)#interface s0/0/0
R1(config-if)#ip address 192.168.1.1 255.255.255.0
R1(config-if)#clock rate 64000
R1(config-if)#no shutdown
%LINK-5-CHANGED: Interface Serial0/0/0, changed state to down
R1(config-if)#exit
R1(config)#interface l0
R1(config-if)#ip address 1.1.1.1 255.255.255.0
R1(config-if)#no shutdown
R1(config-if)#exit
R1(config)#router ospf 1
R1(config-router)#router-id 1.1.1.1
R1(config-router)#network 192.168.1.0 0.0.0.255 area 0
R1(config-router)#network 1.1.1.0 0.0.0.255 area 0
R1(config-router)#interface s0/0/0
R1(config-if)#ip ospf authentication
R1(config-if)#ip ospf authentication-key 123
R1(config-if)#end
(2)R2路由器配置
Router>enable
Router#configure terminal
Enter configuration commands, one per line. End with CNTL/Z.
Router(config)#hostname R2
R2(config)#interface s0/0/0
R2(config-if)#ip address 192.168.1.2 255.255.255.0
R2(config-if)#clock rate 64000
This command applies only to DCE interfaces
R2(config-if)#no shutdown
R2(config-if)#exit
R2(config)#interface l0
R2(config-if)#ip address 2.2.2.2 255.255.255.0
R2(config-if)#no shutdown
R2(config-if)#exit
R2(config)#router ospf 1
R2(config-router)#router-id 2.2.2.2
R2(config-router)#network 192.168.1.0 0.0.0.255 area 0
R2(config-router)#network 2.2.2.0 0.0.0.255 area 0
R2(config-router)#interface s0/0/0
R2(config-if)#ip ospf authentication
R2(config-if)#ip ospf authentication-key 123
R2(config-if)#end
四、验证测试:
(1)检查端口是否启用了简单口令认证。
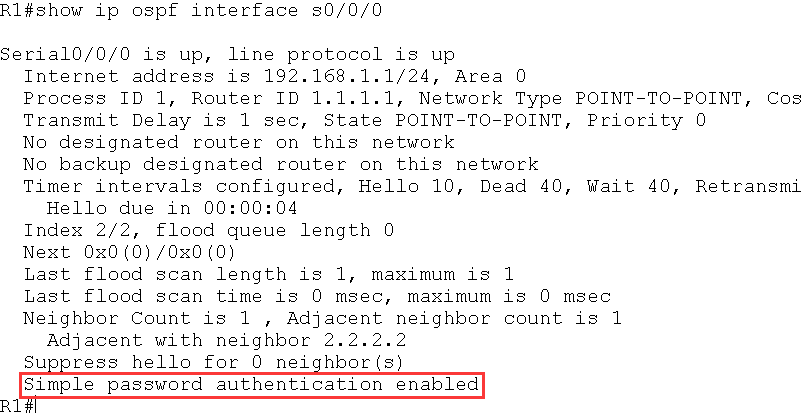
红色标记处表明该端口启用了简单口令认证。
(2)如果R1 的s0/0/0 接口启动简单口令认证,R2 的s0/0/0 接口没有启动认证,则
R2 上出现下面的信息:
*Feb 10 11:19:33.074: OSPF: Rcv pkt from 192.168.12.1, Serial0/0/0 : Mismatch
Authentication type. Input packet specified type 1, we use type 0
(3)如果R1 和R2 的s0/0/0 都启动简单口令认证,但是R2 的接口下没有配置认证密
码或密码错误,则R2 上出现下面的信息:
*Feb 10 11:22:33.074: OSPF: Rcv pkt from 192.168.12.1, Serial0/0/0 : Mismatch
Authentication Key - Clear Text
路由器配置——基于链路的OSPF简单口令认证的更多相关文章
- 基于链路的OSPF简单口令认证
实验要求:掌握基于链路的OSPF简单口令认证 拓扑如下: 配置如下: R1enable configure terminal interface s0/0/0ip address 192.168.1. ...
- 路由器配置——基于链路的OSPF的MD5口令认证
一.实验目的:掌握基于链路的OSPFMD5口令认证 二.拓扑图: 三.具体步骤配置: (1)R1路由器的配置 Router>enable Router#configure terminal En ...
- 路由器配置——基于区域的OSPF简单认证
一.实验目的:掌握区域的OSPF简单认证 二.拓扑图: 三.具体步骤配置: (1)R1路由器配置 Router>enable Router#configure terminal Enter co ...
- 路由器配置——基于区域的OSPF,MD5认证
一.实验目的:掌握OSPF基于区域的MD5认证 二.拓扑图: 三.具体步骤配置 (1)R1路由器配置 Router>enable Router#configure terminal Enter ...
- 基于区域的OSPF简单认证
实验要求:掌握OSPF区域简单认证配置 拓扑如下: 配置如下: R1enable configure terminal interface s0/0/0ip address 192.168.1.1 2 ...
- 基于区域的OSPF的MD5认证
实验要求:掌握OSPF基于区域的MD5认证 拓扑如下: 配置如下: R1enable configure terminal interface s0/0/0ip address 192.168.1.1 ...
- 基于链路的OSPFMD5口令认证
实验要求:掌握基于链路的OSPFMD5口令认证 拓扑如下: 配置如下: R1enable configure terminal interface s0/0/0ip address 192.168.1 ...
- 路由器配置——广播多路访问链路上的OSPF
一.实验目的:作广播形式的OSPF,了解DR与BDR之间的链路关系 二.拓扑图: 三.具体步骤配置 (1)R1路由器配置 enableconfigure terminalhostname R1inte ...
- 路由器配置——OSPF协议(2)
一.实验目的:使用OSPF协议达到全网互通的效果 二.拓扑图 三.具体步骤配置 (1)R1路由器配置 Router>enableRouter#configure terminalEnter co ...
随机推荐
- redis字符串类型的基本命令
1.redis字符串类型键的设置 命令名称:SET 语法:set key value [EX seconds] [PX milliseconds] [NX|XX] 功能:给一个key添加字符串类型的值 ...
- iframe滚动条充当浏览器滚动条
在做博客项目的时候,使用了iframe,方便根据选择的文章类别切换显示的内容,但是文章一般都有很多,通过bootstrap的媒体列表的方式显示的话,iframe是一定会出现滚动条的,特别是我添加了一个 ...
- 【转】[STL]vector和deque的内存释放(clear)
vector的clear成员函数可以清除vector中的元素,使其大小减至0.但它却不能减小vector占用的内存. [cpp] view plain copy int main() { vector ...
- laravel 的安装与配置
1.工作环境 php 7.0+ .MySQL5.1+ 这里可以用开发环境包一键安装: 自己用的是wamp(windows)http://www.wampserver.com/en/ linux系统和m ...
- KVM之virsh管理虚拟机CPU
查看虚拟机CPU数量配置 [root@ubuntu ~]# virsh vcpucount centos_server01 maximum config 2 maximum live 2 curren ...
- zabbix-通过自动发现添加主机
当生产环境中需要监控海量的机器的时候,特别是像58.赶集这类同城性质的大网站,或者京东.阿里云这样的造节电商,每次活动.大促都需要添加很多机器来应对海量用户流量,每天都有可能上架新的机器.或者添加新的 ...
- 查看flask中所有的路由信息(同时查看/设置允许的请求方式get、post)
查看flask中所有的路由信息(同时查看/设置允许的请求方式get.post) # -*- coding: utf-8 -*- from flask import Flask app = Flask( ...
- MVC方式显示数据(手动添加数据)
Model添加类 Customers using System; using System.Collections.Generic; using System.Linq; using System.W ...
- 第四章、drf框架 - 三大认证组件 | 认证组件 | 权限组件 | 频率组件
目录 RBAC 基于用户权限访问控制的认证 - Role-Based Access Control 三大认证组件 源码分析 一.认证组件 自定义认证类 使用: 二.权限组件 自定义权限类 三.频率组件 ...
- EditPlus使用技巧
1.p{$$}*10 按ctrl+E 自动 填写10行 P标签. $表示数字,$$表示2位数... p{b$}*10 2.cltr +j 复制当前行. 3.自动填充开启. --------锚 ...