Java浅拷贝与深拷贝(思维导图)

图1 拷贝思维导图(点击查看图片)
1,拷贝
有两个相同属性的对象A和B,A拥有初始化值,将其值拷贝到B中,使得B拥有与A“相同”数据的属性!注意这里的相同我有加双引号!
相同可能表示这么几个意思:①数值相同【指向不同的内存空间】;②地址相同【指向相同的内存空间】;
下面是直接使用"="进行复制的操作
 package com.cnblogs.mufasa.Demo1;

 import java.util.Date;

 class Person{//

     private int age=0;

     private Birth birth=new Birth();

     private String name="";

     public Person(int age, Birth birth, String name) {

         this.age = age;

         this.birth = birth;

         this.name = name;

     }

     public int getAge() {

         return age;

     }

     public void setAge(int age) {

         this.age = age;

     }

     public Birth getBirth() {

         return birth;

     }

     public void setBirth(Birth birth) {

         this.birth = birth;

     }

     public String getName() {

         return name;

     }

     public void setName(String name) {

         this.name = name;

     }

     public String toString(){

         return "姓名:"+name+",年龄:"+age+",出生日期:"+birth.toString();

     }

 }

 class Birth{//生日

     private String date="";

     public Birth(){}

     public Birth(String date){

         this.date=date;

     }

     public String getDate() {

         return date;

     }

     public void setDate(String date) {

         this.date = date;

     }

     @Override

     public String toString() {

         return this.date;

     }

 }

 public class Demo1 {//浅拷贝

     public static void main(String[] args) {

         Person p1=new Person(18,new Birth("19950729"),"万雨");

         Person p2=p1;

         System.out.println(p1.toString());

         System.out.println(p2.toString());

         p1.setAge(17);

         p1.setBirth(new Birth("2018"));

         p1.setName("Mufasa");

         System.out.println(p1.toString());

         System.out.println(p2.toString());

     }

 }
姓名:万雨,年龄:18,出生日期:19950729

姓名:万雨,年龄:18,出生日期:19950729

姓名:Mufasa,年龄:17,出生日期:2018

姓名:Mufasa,年龄:17,出生日期:2018
其实就相当于对原始对象进行操作
2,浅拷贝
Perosn类型对象有两个属性Age、name,将p1浅复制给p2
基本类型直接进行数值复制,引用类型进行地址拷贝(String类型比较特殊,属于引用类型,但是它存在一个常量池需要进行特殊对待)

图2 浅拷贝
使用构造方法进行浅拷贝:
 package com.cnblogs.mufasa.Demo;

 import java.util.Date;

 class Person{//

     private Age age;

     private String name;

     private int birth;

     public Person(Age age, String name,int birth) {

         this.age = age;

         this.name = name;

         this.birth = birth;

     }

     public Person(Person p1){

         this.age=p1.age;

         this.name=p1.name;

         this.birth=p1.birth;

     }

     public int getAge() {

         return this.age.getAge();

     }

     public void setAge(int age) {

         this.age.setAge(age); ;

     }

     public void setAge(Age age) {

         this.age = age;

     }

     public int getBirth() {

         return birth;

     }

     public void setBirth(int birth) {

         this.birth = birth;

     }

     public String getName() {

         return this.name;

     }

     public void setName(String name) {

         this.name = name;

     }

     public String toString(){

         return "姓名:"+this.name+",年龄:"+this.age+",出生日期:"+this.birth;

     }

 }

 class Age{

     private int age;

     public Age(){}

     public Age(int age){

         this.age=age;

     }

     public int getAge() {

         return age;

     }

     public void setAge(int age) {

         this.age = age;

     }

     public String toString(){

         return this.age+"";

     }

 }

 public class Demo {//浅拷贝-构造方法实现

     public static void main(String[] args) {

         Person p1=new Person(new Age(18),"万雨",1995);

         Person p2=new Person(p1);

         System.out.println(p1.toString());

         System.out.println(p2.toString());

         p1.setAge(17);

         p1.setBirth(2019);

         p1.setName("Mufasa");

         System.out.println(p1.toString());

         System.out.println(p2.toString());

     }

 }
使用继承Cloneable接口调用clone方法进行浅拷贝
 package com.cnblogs.mufasa.Demo2;

 import java.util.Date;

 class Person implements Cloneable{//

     private Age age;

     private String name;

     private int birth;

     public Person(Age age, String name,int birth) {

         this.age = age;

         this.name = name;

         this.birth = birth;

     }

     public Person clone(){

         Person obj=null;

         try {

             obj=(Person) super.clone();

         }catch (CloneNotSupportedException e){

             e.printStackTrace();

         }

 //        obj.age=(Age) this.getAge().clone();

         return obj;

     }

     public Age getAge() {

         return this.age;

     }

     public void setAge(int age) {

         this.age.setAge(age); ;

     }

     public void setAge(Age age) {

         this.age = age;

     }

     public int getBirth() {

         return birth;

     }

     public void setBirth(int birth) {

         this.birth = birth;

     }

     public String getName() {

         return this.name;

     }

     public void setName(String name) {

         this.name = name;

     }

     public String toString(){

         return "姓名:"+this.name+",年龄:"+this.age+",出生日期:"+this.birth;

     }

 }

 class Age implements Cloneable{

     private int age;

     public Age(){}

     public Age(int age){

         this.age=age;

     }

 //    public Age clone(){

 //        Age obj=null;

 //        try {

 //            obj=(Age) super.clone();

 //        }catch (CloneNotSupportedException e){

 //            e.printStackTrace();

 //        }

 //        return obj;

 //    }

     public int getAge() {

         return age;

     }

     public void setAge(int age) {

         this.age = age;

     }

     public String toString(){

         return this.age+"";

     }

 }

 public class Demo2 {//浅拷贝-继承Cloneable接口实现

     public static void main(String[] args) {

         Person p1=new Person(new Age(18),"万雨",1995);

         Person p2=(Person)p1.clone();

         System.out.println(p1.toString());

         System.out.println(p2.toString());

         p1.setAge(17);

         p1.setBirth(2019);

         p1.setName("Mufasa");

         System.out.println(p1.toString());

         System.out.println(p2.toString());

     }

 }
姓名:万雨,年龄:18,出生日期:1995

姓名:万雨,年龄:18,出生日期:1995

姓名:Mufasa,年龄:17,出生日期:2019

姓名:万雨,年龄:17,出生日期:1995
3,深拷贝
引用类型数据也进行新内存开辟与幅值,
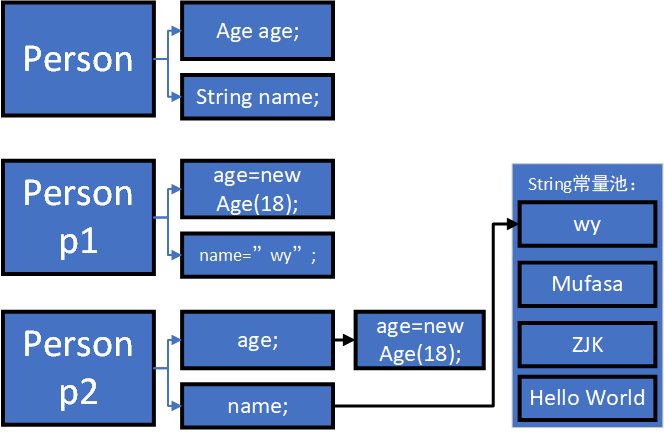
图3 深拷贝
使用继承Cloneable接口调用clone方法进行深拷贝【每个引用对象都需要使用clone方法进行拷贝】
 package com.cnblogs.mufasa.Demo2;

 import java.util.Date;

 class Person implements Cloneable{//

     private Age age;

     private String name;

     private int birth;

     public Person(Age age, String name,int birth) {

         this.age = age;

         this.name = name;

         this.birth = birth;

     }

     public Person clone(){

         Person obj=null;

         try {

             obj=(Person) super.clone();

         }catch (CloneNotSupportedException e){

             e.printStackTrace();

         }

         obj.age=(Age) this.getAge().clone();

         return obj;

     }

     public Age getAge() {

         return this.age;

     }

     public void setAge(int age) {

         this.age.setAge(age); ;

     }

     public void setAge(Age age) {

         this.age = age;

     }

     public int getBirth() {

         return birth;

     }

     public void setBirth(int birth) {

         this.birth = birth;

     }

     public String getName() {

         return this.name;

     }

     public void setName(String name) {

         this.name = name;

     }

     public String toString(){

         return "姓名:"+this.name+",年龄:"+this.age+",出生日期:"+this.birth;

     }

 }

 class Age implements Cloneable{

     private int age;

     public Age(){}

     public Age(int age){

         this.age=age;

     }

     public Age clone(){

         Age obj=null;

         try {

             obj=(Age) super.clone();

         }catch (CloneNotSupportedException e){

             e.printStackTrace();

         }

         return obj;

     }

     public int getAge() {

         return age;

     }

     public void setAge(int age) {

         this.age = age;

     }

     public String toString(){

         return this.age+"";

     }

 }

 public class Demo2 {//浅拷贝-继承Cloneable接口实现

     public static void main(String[] args) {

         Person p1=new Person(new Age(18),"万雨",1995);

         Person p2=(Person)p1.clone();

         System.out.println(p1.toString());

         System.out.println(p2.toString());

         p1.setAge(17);

         p1.setBirth(2019);

         p1.setName("Mufasa");

         System.out.println(p1.toString());

         System.out.println(p2.toString());

     }

 }
使用继承Serializable接口进行序列化与反序列化进行深拷贝【注意对象不能使用transient进行修饰,原因:transient修饰的对象无法进行序列化!】
 package com.cnblogs.mufasa.Demo3;

 import java.io.*;

 class Person implements Serializable{

     private Age age;

     private String name;

     private int birth;

     public Person(Age age, String name,int birth) {

         this.age = age;

         this.name = name;

         this.birth = birth;

     }

     public Age getAge() {

         return this.age;

     }

     public void setAge(int age) {

         this.age.setAge(age); ;

     }

     public void setAge(Age age) {

         this.age = age;

     }

     public int getBirth() {

         return birth;

     }

     public void setBirth(int birth) {

         this.birth = birth;

     }

     public String getName() {

         return this.name;

     }

     public void setName(String name) {

         this.name = name;

     }

     public String toString(){

         return "姓名:"+this.name+",年龄:"+this.age+",出生日期:"+this.birth;

     }

 }

 class Age implements Serializable {

     private int age;

     public Age(){}

     public Age(int age){

         this.age=age;

     }

     public int getAge() {

         return age;

     }

     public void setAge(int age) {

         this.age = age;

     }

     public String toString(){

         return this.age+"";

     }

 }

 public class Demo3 {//浅拷贝-继承Cloneable接口实现

     public static void main(String[] args) throws IOException, ClassNotFoundException {

         Person p1=new Person(new Age(18),"万雨",1995);

         ByteArrayOutputStream bos=new ByteArrayOutputStream();

         ObjectOutputStream oos=new ObjectOutputStream(bos);

         oos.writeObject(p1);//1,先进行序列化

         oos.flush();

         ObjectInputStream ois=new ObjectInputStream(new ByteArrayInputStream(bos.toByteArray()));

         Person p2=(Person)ois.readObject();//2,进行反序列化

         System.out.println(p1.toString());

         System.out.println(p2.toString());

         p1.setAge(17);

         p1.setBirth(2019);

         p1.setName("Mufasa");

         System.out.println(p1.toString());

         System.out.println(p2.toString());

     }

 }
姓名:万雨,年龄:18,出生日期:1995

姓名:万雨,年龄:18,出生日期:1995

姓名:Mufasa,年龄:17,出生日期:2019

姓名:万雨,年龄:18,出生日期:1995
Java浅拷贝与深拷贝(思维导图)的更多相关文章
- [Java 并发] Java并发编程实践 思维导图 - 第一章 简单介绍
阅读<Java并发编程实践>一书后整理的思维导图.
- [Java 并发] Java并发编程实践 思维导图 - 第二章 线程安全性
依据<Java并发编程实践>一书整理的思维导图.
- [Java 并发] Java并发编程实践 思维导图 - 第四章 对象的组合
依据<Java并发编程实践>一书整理的思维导图. 第一部分: 第二部分:
- 学习Java的9张思维导图
转自:https://blog.csdn.net/aitaozi11/article/details/79652943 网上搜集了java的学习思维导图,分享给大家. 01.Java程序设计(基础) ...
- Java建造者模式(思维导图)
图1 建造者模式[点击查看大图] 基本的知识点已在思维导图中,下面是demo 1,Builder 为创建一个产品对象的各个部件指定抽象接口 public interface PersonBuilder ...
- Java组合模式(思维导图)
图1 组合模式[点击查看图片] 1,以公司职员为例的结构 package com.cnblogs.mufasa.demo3; import java.util.ArrayList; import ja ...
- Java门面模式(思维导图)
图1 门面模式[点击查看图片] 1,实体对象类 package com.cnblogs.mufasa.demo1; //3个子系统,解决问题的实体 public class StoreA { //示意 ...
- Java Web学习过程的思维导图
今天找文件,无意中翻到老师前段时间总结的知识点.觉得应该有点用处,所以分享给大家. 第一次在博客园发表,如有错误,还请指正.
- java编程思想-泛型思维导图
- java编程思想-并发思维导图
随机推荐
- 添加sql距离现在多久以前时间条件
UNIX_TIMESTAMP(NOW())-UNIX_TIMESTAMP(add_time)<=25200 其中now()是现在时间 add_time是其他时间点 25200:是秒,现在和ad ...
- Git 命令行使用
一.git简介: Linux创建了Linux,但是Linux的发展壮大是由世界各地的热心志愿者参与编写的?那么那么多份的代码是怎么合并的呢?之前是在2002年以前,世界各地的志愿者把源代码文件通过di ...
- PHP中部分宏应用
1.字符串复制 ZVAL_STRINGL(pzv, str, len, dup):str 和 len 分别为内存中保存的字符串地址和他的长度,dup之名该字符串是否需要被复制,值为1则将先申请一块新内 ...
- startuml 3 windows 破解教程
1.startuml 的下载地址:http://staruml.io/download 2.下载安装之后,安装node 服务.
- ajax调用c#后端,发现参数没数值
之前是int的数据,名字是id 后面被改成字符串的数据,名字是encrptedId 因为名字不匹配,导致找不到数值.只需要把js里调用传递的参数名字改一下,或者C#后端,继续保持原来的名字
- 指定版本下载yum离线安装包
#!/bin/bash releasever=7 for i in salt-minion salt-api salt-master docker-ce docker-ce-cli docker-co ...
- CloudFlare 新手入门中文教程
loudFlare成立于2009年,是国外著名的免费CDN网站加速服务公司,CloudFlare 还提供实时安全保护服务和网络优化等,采用的是免费+增值模式,可以免费使用,也有收费服务.国内也有很多免 ...
- Invoke-customs are only supported starting with Android O (--min-api 26) Message{kind=ERROR,……
https://www.jianshu.com/p/434928537a90 在我使用构建版本gradle 26但是在将buildtoolsversion更改为27之后,就像这个图像 错误:e ...
- OSG Qt Widget加载三维模型
graphicswindowqt.h #ifndef GRAPHICSWINDOWQT_H #define GRAPHICSWINDOWQT_H #include <QGLWidget> ...
- RocketMQ采坑记
先来一篇解释比较多的实例 https://www.cnblogs.com/super-d2/p/4154541.html No route info of this topic, PushTopic ...