babylon.js 学习笔记(5)
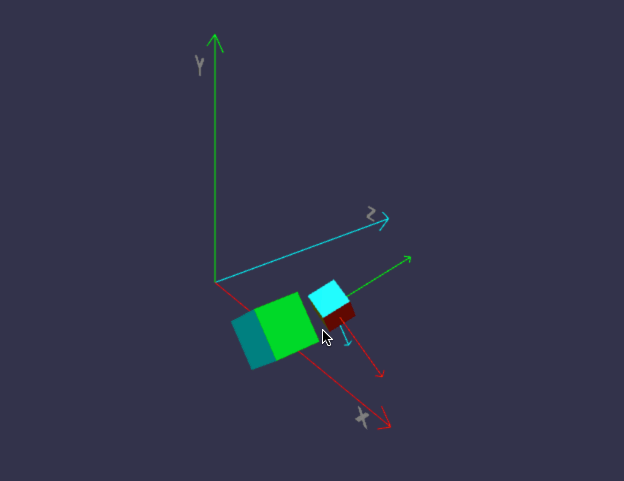
前面我们画的小房子,基本上都是用内置的标准形状组合而成,但并非所有对象都这么简单,今天我们来画一个小汽车,汽车由多个零件组成,控制这些零件的缩放、位置、旋转,如果每个都单独用代码来修改position/roration/scaling,未免太复杂,幸好babylon.js中,对象有所谓的child/parent 关系。简单来说,如果A是B的parent,则对A的任何位置/缩放/旋转,其child也会同步受影响,但child可以在parent的基础上,再独立叠加新变化。有没有发现,这很符合遗传学,孩子必然长得象父母,但是又有些自己的特征。
一、理解 parent / child 关系
const createScene = () => {

    const scene = new BABYLON.Scene(engine);

    const camera = new BABYLON.ArcRotateCamera("camera", -Math.PI / 2.2, Math.PI / 2.5, 15, new BABYLON.Vector3(0, 0, 0));

    camera.attachControl(canvas, true);

    const light = new BABYLON.HemisphericLight("light", new BABYLON.Vector3(0, 1, 0));

    //方块6个面的颜色

    const faceColors = [];

    faceColors[0] = BABYLON.Color3.Blue();

    faceColors[1] = BABYLON.Color3.Teal()

    faceColors[2] = BABYLON.Color3.Red();

    faceColors[3] = BABYLON.Color3.Purple();

    faceColors[4] = BABYLON.Color3.Green();

    faceColors[5] = BABYLON.Color3.Yellow();

    const boxParent = BABYLON.MeshBuilder.CreateBox("Box", { faceColors: faceColors });

    const boxChild = BABYLON.MeshBuilder.CreateBox("Box", { size: 0.5, faceColors: faceColors });

    //小方块是大方块的child

    boxChild.setParent(boxParent);

    //child的独立特征

    boxChild.position.x = 0;

    boxChild.position.y = 2;

    boxChild.position.z = 0;

    boxChild.rotation.x = Math.PI / 4;

    boxChild.rotation.y = Math.PI / 4;

    boxChild.rotation.z = Math.PI / 4;

    //parent的位置变化,将影响child

    boxParent.position.x = 2;

    boxParent.position.y = 0;

    boxParent.position.z = 0;

    boxParent.rotation.x = 0;

    boxParent.rotation.y = 0;

    boxParent.rotation.z = -Math.PI / 4;

    //辅助坐标轴,方便理解

    const boxChildAxes = localAxes(1.5, scene);

    boxChildAxes.parent = boxChild;

    showAxis(5, scene);

    return scene;

}

//坐标轴

const showAxis = (size, scene) => {

    const makeTextPlane = (text, color, size) => {

        const dynamicTexture = new BABYLON.DynamicTexture("DynamicTexture", 50, scene, true);

        dynamicTexture.hasAlpha = true;

        dynamicTexture.drawText(text, 5, 40, "bold 36px Arial", color, "transparent", true);

        const plane = new BABYLON.Mesh.CreatePlane("TextPlane", size, scene, true);

        plane.material = new BABYLON.StandardMaterial("TextPlaneMaterial", scene);

        plane.material.backFaceCulling = false;

        plane.material.specularColor = new BABYLON.Color3(0, 0, 0);

        plane.material.diffuseTexture = dynamicTexture;

        return plane;

    };

    const axisX = BABYLON.Mesh.CreateLines("axisX", [

        new BABYLON.Vector3.Zero(), new BABYLON.Vector3(size, 0, 0), new BABYLON.Vector3(size * 0.95, 0.05 * size, 0),

        new BABYLON.Vector3(size, 0, 0), new BABYLON.Vector3(size * 0.95, -0.05 * size, 0)

    ]);

    axisX.color = new BABYLON.Color3(1, 0, 0);

    const xChar = makeTextPlane("X", "white", size / 8);

    xChar.position = new BABYLON.Vector3(0.9 * size, -0.05 * size, 0);

    const axisY = BABYLON.Mesh.CreateLines("axisY", [

        new BABYLON.Vector3.Zero(), new BABYLON.Vector3(0, size, 0), new BABYLON.Vector3(-0.05 * size, size * 0.95, 0),

        new BABYLON.Vector3(0, size, 0), new BABYLON.Vector3(0.05 * size, size * 0.95, 0)

    ]);

    axisY.color = new BABYLON.Color3(0, 1, 0);

    const yChar = makeTextPlane("Y", "white", size / 8);

    yChar.position = new BABYLON.Vector3(0, 0.9 * size, -0.05 * size);

    const axisZ = BABYLON.Mesh.CreateLines("axisZ", [

        new BABYLON.Vector3.Zero(), new BABYLON.Vector3(0, 0, size), new BABYLON.Vector3(0, -0.05 * size, size * 0.95),

        new BABYLON.Vector3(0, 0, size), new BABYLON.Vector3(0, 0.05 * size, size * 0.95)

    ]);

    axisZ.color = new BABYLON.Color3(0, 1, 1);

    const zChar = makeTextPlane("Z", "white", size / 8);

    zChar.position = new BABYLON.Vector3(0, 0.05 * size, 0.9 * size);

};

//小方块的坐标轴

localAxes = (size, scene) => {

    const local_axisX = BABYLON.Mesh.CreateLines("local_axisX", [

        new BABYLON.Vector3.Zero(), new BABYLON.Vector3(size, 0, 0), new BABYLON.Vector3(size * 0.95, 0.05 * size, 0),

        new BABYLON.Vector3(size, 0, 0), new BABYLON.Vector3(size * 0.95, -0.05 * size, 0)

    ], scene);

    local_axisX.color = new BABYLON.Color3(1, 0, 0);

    local_axisY = BABYLON.Mesh.CreateLines("local_axisY", [

        new BABYLON.Vector3.Zero(), new BABYLON.Vector3(0, size, 0), new BABYLON.Vector3(-0.05 * size, size * 0.95, 0),

        new BABYLON.Vector3(0, size, 0), new BABYLON.Vector3(0.05 * size, size * 0.95, 0)

    ], scene);

    local_axisY.color = new BABYLON.Color3(0, 1, 0);

    const local_axisZ = BABYLON.Mesh.CreateLines("local_axisZ", [

        new BABYLON.Vector3.Zero(), new BABYLON.Vector3(0, 0, size), new BABYLON.Vector3(0, -0.05 * size, size * 0.95),

        new BABYLON.Vector3(0, 0, size), new BABYLON.Vector3(0, 0.05 * size, size * 0.95)

    ], scene);

    local_axisZ.color = new BABYLON.Color3(0, 1, 1);

    const local_origin = new BABYLON.TransformNode("local_origin");

    local_axisX.parent = local_origin;

    local_axisY.parent = local_origin;

    local_axisZ.parent = local_origin;

    return local_origin;

}
代码有点长,坐标轴的部分可以先不管,只看createScene即可。
在线地址:https://yjmyzz.github.io/babylon_js_study/day05/01.html
二、理解 ExtrudePolygon
ExtrudePolygon方法可以画出一些不规则形状,比如下面:
const buildCar = () => {

    //base

    const outline = [

        new BABYLON.Vector3(-0.3, 0, -0.1),

        new BABYLON.Vector3(0.2, 0, -0.1),

    ]

    //top

    outline.push(new BABYLON.Vector3(0, 0, 0.1));

    outline.push(new BABYLON.Vector3(-0.3, 0, 0.1));

    //back formed automatically

    const car = BABYLON.MeshBuilder.ExtrudePolygon("car", { shape: outline, depth: 0.2 });

    return car;

}

在线地址:https://yjmyzz.github.io/babylon_js_study/day05/02.html
具体画的过程,可以结合下面的图理解:简单来说,A->B->C->D 先画出1个梯形,然后向下拉长,就得到了这个模型。

再完善一下,把车头及轮子加上
const createScene = () => {
const scene = new BABYLON.Scene(engine);
const camera = new BABYLON.ArcRotateCamera("camera", -Math.PI / 2, Math.PI / 2.5, 3, new BABYLON.Vector3(0, 0, 0));
camera.attachControl(canvas, true);
const light = new BABYLON.HemisphericLight("light", new BABYLON.Vector3(0, 1, 0));
//造车身
const car = buildCar();
//安装轮子
buildWheel(car);
showAxis(0.8, scene);
return scene;
}
//车身
const buildCar = () => {
//base
const outline = [
new BABYLON.Vector3(-0.3, 0, -0.1),
new BABYLON.Vector3(0.2, 0, -0.1),
]
//curved front
for (let i = 0; i < 20; i++) {
outline.push(new BABYLON.Vector3(0.2 * Math.cos(i * Math.PI / 40), 0, 0.2 * Math.sin(i * Math.PI / 40) - 0.1));
}
//top
outline.push(new BABYLON.Vector3(0, 0, 0.1));
outline.push(new BABYLON.Vector3(-0.3, 0, 0.1));
//back formed automatically
const car = BABYLON.MeshBuilder.ExtrudePolygon("car", { shape: outline, depth: 0.2 });
return car;
}
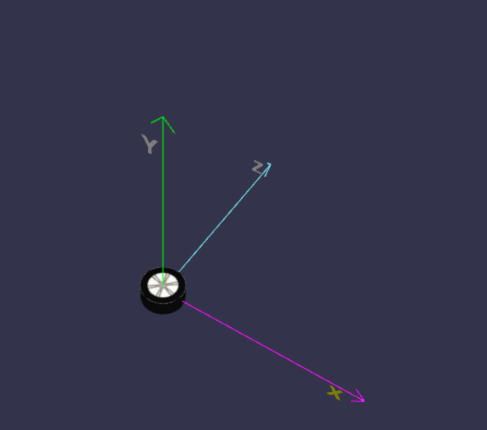
//轮子
const buildWheel = (car) => {
const wheelRB = BABYLON.MeshBuilder.CreateCylinder("wheelRB", { diameter: 0.125, height: 0.05 })
wheelRB.parent = car;
wheelRB.position.z = -0.1;
wheelRB.position.x = -0.2;
wheelRB.position.y = 0.035;
const wheelRF = wheelRB.clone("wheelRF");
wheelRF.position.x = 0.1;
const wheelLB = wheelRB.clone("wheelLB");
wheelLB.position.y = -0.2 - 0.035;
const wheelLF = wheelRF.clone("wheelLF");
wheelLF.position.y = -0.2 - 0.035;
}

在线地址:https://yjmyzz.github.io/babylon_js_study/day05/03.html
最后再加上贴图:


const createScene = () => {

    const scene = new BABYLON.Scene(engine);

    const camera = new BABYLON.ArcRotateCamera("camera", -Math.PI / 2, Math.PI / 2.5, 3, new BABYLON.Vector3(0.2, -0.20, 1.5));

    camera.attachControl(canvas, true);

    const light = new BABYLON.HemisphericLight("light", new BABYLON.Vector3(0, 1, 0));

    const car = buildCar();

    car.rotation.x = -Math.PI / 2;

    showAxis(0.6, scene);

    return scene;

}

const buildCar = () => {

    //base

    const outline = [

        new BABYLON.Vector3(-0.3, 0, -0.1),

        new BABYLON.Vector3(0.2, 0, -0.1),

    ]

    //curved front

    for (let i = 0; i < 20; i++) {

        outline.push(new BABYLON.Vector3(0.2 * Math.cos(i * Math.PI / 40), 0, 0.2 * Math.sin(i * Math.PI / 40) - 0.1));

    }

    //top

    outline.push(new BABYLON.Vector3(0, 0, 0.1));

    outline.push(new BABYLON.Vector3(-0.3, 0, 0.1));

    //car face UVs

    const faceUV = [];

    faceUV[0] = new BABYLON.Vector4(0, 0.5, 0.38, 1);

    faceUV[1] = new BABYLON.Vector4(0, 0, 1, 0.5);

    faceUV[2] = new BABYLON.Vector4(0.38, 1, 0, 0.5);

    //car material

    const carMat = new BABYLON.StandardMaterial("carMat");

    carMat.diffuseTexture = new BABYLON.Texture("../assets/img/car.png");

    //back formed automatically

    const car = BABYLON.MeshBuilder.ExtrudePolygon("car", { shape: outline, depth: 0.2, faceUV: faceUV, wrap: true });

    car.material = carMat;

    //wheel face UVs

    const wheelUV = [];

    wheelUV[0] = new BABYLON.Vector4(0, 0, 1, 1);

    wheelUV[1] = new BABYLON.Vector4(0, 0.5, 0, 0.5);

    wheelUV[2] = new BABYLON.Vector4(0, 0, 1, 1);

    //car material

    const wheelMat = new BABYLON.StandardMaterial("wheelMat");

    wheelMat.diffuseTexture = new BABYLON.Texture("../assets/img/wheel.png");

    const wheelRB = BABYLON.MeshBuilder.CreateCylinder("wheelRB", { diameter: 0.125, height: 0.05, faceUV: wheelUV })

    wheelRB.material = wheelMat;

    wheelRB.parent = car;

    wheelRB.position.z = -0.1;

    wheelRB.position.x = -0.2;

    wheelRB.position.y = 0.035;

    const wheelRF = wheelRB.clone("wheelRF");

    wheelRF.position.x = 0.1;

    const wheelLB = wheelRB.clone("wheelLB");

    wheelLB.position.y = -0.2 - 0.035;

    const wheelLF = wheelRF.clone("wheelLF");

    wheelLF.position.y = -0.2 - 0.035;

    return car;

}
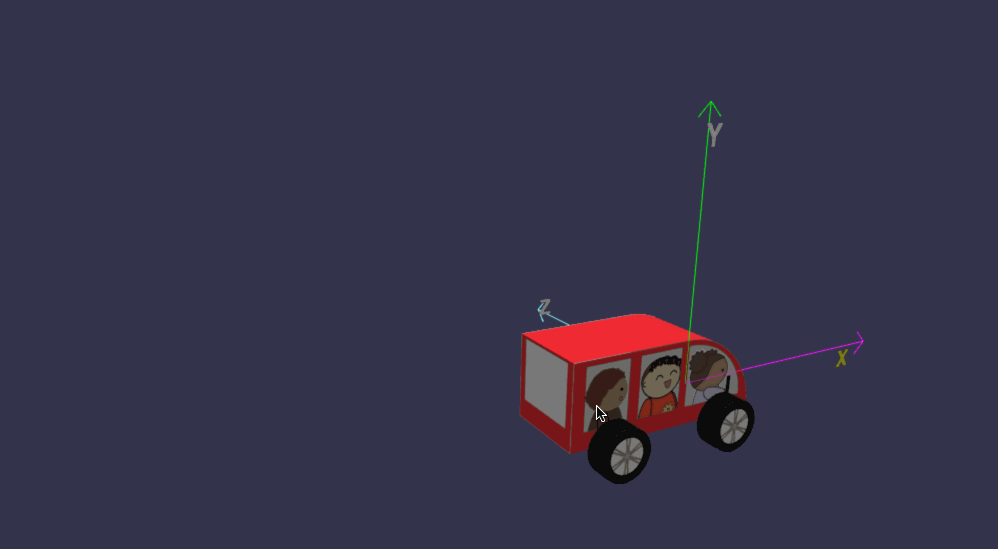
在线地址:https://yjmyzz.github.io/babylon_js_study/day05/04.html
三、轮子动画
既然是汽车,轮子肯定得转起来,可以借助Animation对象来实现
const createScene = () => {

    const scene = new BABYLON.Scene(engine);

    const camera = new BABYLON.ArcRotateCamera("camera", -Math.PI / 2, Math.PI / 2.5, 3, new BABYLON.Vector3(0, 0, 0));

    camera.attachControl(canvas, true);

    const light = new BABYLON.HemisphericLight("light", new BABYLON.Vector3(0, 1, 0));

    const wheel = buildWheel();

    wheelAnimation(scene, wheel);

    showAxis(0.6, scene);

    return scene;

}

//造轮子

const buildWheel = () => {

    const wheelUV = [];

    wheelUV[0] = new BABYLON.Vector4(0, 0, 1, 1);

    wheelUV[1] = new BABYLON.Vector4(0, 0.5, 0, 0.5);

    wheelUV[2] = new BABYLON.Vector4(0, 0, 1, 1);

    const wheelMat = new BABYLON.StandardMaterial("wheelMat");

    wheelMat.diffuseTexture = new BABYLON.Texture("../assets/img/wheel.png");

    const wheelRB = BABYLON.MeshBuilder.CreateCylinder("wheelRB", { diameter: 0.125, height: 0.05, faceUV: wheelUV })

    wheelRB.material = wheelMat;

    return wheelRB;

}

//轮子转动

const wheelAnimation = (scene, wheel) => {

    //定义一个动画,每秒30帧,绕y轴转动

    const animWheel = new BABYLON.Animation("wheelAnimation", "rotation.y",

        30, BABYLON.Animation.ANIMATIONTYPE_FLOAT, BABYLON.Animation.ANIMATIONLOOPMODE_CYCLE);

    //动画关键帧

    const wheelKeys = [];

    //起始帧

    wheelKeys.push({

        frame: 0,

        value: 0

    });

    //截止帧(即:第30帧,转到360度)

    wheelKeys.push({

        frame: 30,

        value: 2 * Math.PI

    });

    //设置关键帧

    animWheel.setKeys(wheelKeys);

    //将wheel与动画关联

    wheel.animations = [];

    wheel.animations.push(animWheel);

    //开始动画,最后的true表示循环播放

    scene.beginAnimation(wheel, 0, 30, true);

}
在线地址:https://yjmyzz.github.io/babylon_js_study/day05/05.html
把4个轮子都加上动画:
const createScene = () => {

    const scene = new BABYLON.Scene(engine);

    const camera = new BABYLON.ArcRotateCamera("camera", -Math.PI / 2, Math.PI / 2.5, 2, new BABYLON.Vector3(0, 0, 0));

    camera.attachControl(canvas, true);

    const light = new BABYLON.HemisphericLight("light", new BABYLON.Vector3(1, 1, 0));

    const car = buildCar();

    const wheels = buildWheels(car);

    car.rotation.x = -Math.PI / 2;

    wheelAnimation(scene, wheels);

    showAxis(0.6, scene);

    return scene;

}

const buildCar = () => {

    //base

    const outline = [

        new BABYLON.Vector3(-0.3, 0, -0.1),

        new BABYLON.Vector3(0.2, 0, -0.1),

    ]

    //curved front

    for (let i = 0; i < 20; i++) {

        outline.push(new BABYLON.Vector3(0.2 * Math.cos(i * Math.PI / 40), 0, 0.2 * Math.sin(i * Math.PI / 40) - 0.1));

    }

    //top

    outline.push(new BABYLON.Vector3(0, 0, 0.1));

    outline.push(new BABYLON.Vector3(-0.3, 0, 0.1));

    //car face UVs

    const faceUV = [];

    faceUV[0] = new BABYLON.Vector4(0, 0.5, 0.38, 1);

    faceUV[1] = new BABYLON.Vector4(0, 0, 1, 0.5);

    faceUV[2] = new BABYLON.Vector4(0.38, 1, 0, 0.5);

    //car material

    const carMat = new BABYLON.StandardMaterial("carMat");

    carMat.diffuseTexture = new BABYLON.Texture("../assets/img/car.png");

    //back formed automatically

    const car = BABYLON.MeshBuilder.ExtrudePolygon("car", { shape: outline, depth: 0.2, faceUV: faceUV, wrap: true });

    car.material = carMat;

    return car;

}

const buildWheels = (car) => {

    //wheel face UVs

    const wheelUV = [];

    wheelUV[0] = new BABYLON.Vector4(0, 0, 1, 1);

    wheelUV[1] = new BABYLON.Vector4(0, 0.5, 0, 0.5);

    wheelUV[2] = new BABYLON.Vector4(0, 0, 1, 1);

    //car material

    const wheelMat = new BABYLON.StandardMaterial("wheelMat");

    wheelMat.diffuseTexture = new BABYLON.Texture("../assets/img/wheel.png");

    const wheelRB = BABYLON.MeshBuilder.CreateCylinder("wheelRB", { diameter: 0.125, height: 0.05, faceUV: wheelUV })

    wheelRB.material = wheelMat;

    wheelRB.parent = car;

    wheelRB.position.z = -0.1;

    wheelRB.position.x = -0.2;

    wheelRB.position.y = 0.035;

    const wheelRF = wheelRB.clone("wheelRF");

    wheelRF.position.x = 0.1;

    const wheelLB = wheelRB.clone("wheelLB");

    wheelLB.position.y = -0.2 - 0.035;

    const wheelLF = wheelRF.clone("wheelLF");

    wheelLF.position.y = -0.2 - 0.035;

    const wheels = [];

    wheels.push(wheelRB);

    wheels.push(wheelRF);

    wheels.push(wheelLB);

    wheels.push(wheelLF);

    return wheels;

}

//轮子转动

const wheelAnimation = (scene, wheels) => {

    //定义一个动画,每秒30帧,绕y轴转动

    const animWheel = new BABYLON.Animation("wheelAnimation", "rotation.y",

        30, BABYLON.Animation.ANIMATIONTYPE_FLOAT, BABYLON.Animation.ANIMATIONLOOPMODE_CYCLE);

    //动画关键帧

    const wheelKeys = [];

    //起始帧

    wheelKeys.push({

        frame: 0,

        value: 0

    });

    //截止帧(即:第30帧,转到360度)

    wheelKeys.push({

        frame: 30,

        value: 2 * Math.PI

    });

    //设置关键帧

    animWheel.setKeys(wheelKeys);

    for (let i = 0; i < wheels.length; i++) {

        //将wheel与动画关联

        wheels[i].animations = [];

        wheels[i].animations.push(animWheel);

        //开始动画,最后的true表示循环播放

        scene.beginAnimation(wheels[i], 0, 30, true);

    }

}
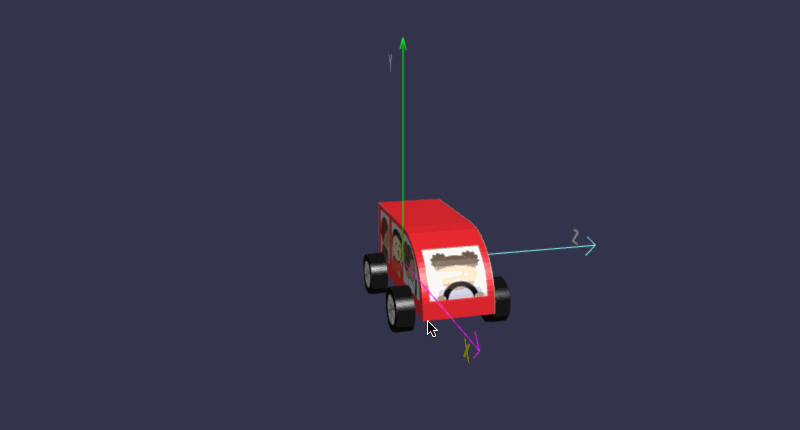
在线地址:https://yjmyzz.github.io/babylon_js_study/day05/06.html
参考文档:https://doc.babylonjs.com/features/introductionToFeatures/chap3/carmat
babylon.js 学习笔记(5)的更多相关文章
- js学习笔记:webpack基础入门(一)
之前听说过webpack,今天想正式的接触一下,先跟着webpack的官方用户指南走: 在这里有: 如何安装webpack 如何使用webpack 如何使用loader 如何使用webpack的开发者 ...
- Vue.js学习笔记(2)vue-router
vue中vue-router的使用:
- JS 学习笔记--9---变量-作用域-内存相关
JS 中变量和其它语言中变量最大的区别就是,JS 是松散型语言,决定了它只是在某一个特定时间保存某一特定的值的一个名字而已.由于在定义变量的时候不需要显示规定必须保存某种类型的值,故变量的值以及保存的 ...
- WebGL three.js学习笔记 使用粒子系统模拟时空隧道(虫洞)
WebGL three.js学习笔记 使用粒子系统模拟时空隧道 本例的运行结果如图: 时空隧道demo演示 Demo地址:https://nsytsqdtn.github.io/demo/sprite ...
- WebGL three.js学习笔记 法向量网格材质MeshNormalMaterial的介绍和创建360度全景天空盒的方法
WebGL学习----Three.js学习笔记(5) 点击查看demo演示 Demo地址:https://nsytsqdtn.github.io/demo/360/360 简单网格材质 MeshNor ...
- WebGL three.js学习笔记 创建three.js代码的基本框架
WebGL学习----Three.js学习笔记(1) webgl介绍 WebGL是一种3D绘图协议,它把JavaScript和OpenGL ES 2.0结合在一起,通过增加OpenGL ES 2.0的 ...
- vue.js 学习笔记3——TypeScript
目录 vue.js 学习笔记3--TypeScript 工具 基础类型 数组 元组 枚举 字面量 接口 类类型 类类型要素 函数 函数参数 this对象和类型 重载 迭代器 Symbol.iterat ...
- 2019-4-29 js学习笔记
js学习笔记一:js数据类型 1:基本数据类型 number类型(整数,小数) String类型 boolean类型 NaN类型其实是一个nu ...
- 一点感悟:《Node.js学习笔记》star数突破1000+
写作背景 笔者前年开始撰写的<Node.js学习笔记> github star 数突破了1000,算是个里程碑吧. 从第一次提交(2016.11.03)到现在,1年半过去了.突然有些感慨, ...
- JS学习笔记5_DOM
1.DOM节点的常用属性(所有节点都支持) nodeType:元素1,属性2,文本3 nodeName:元素标签名的大写形式 nodeValue:元素节点为null,文本节点为文本内容,属性节点为属性 ...
随机推荐
- 36.3K star!开发者专属PPT神器,Markdown秒变炫酷幻灯片!
嗨,大家好,我是小华同学,关注我们获得"最新.最全.最优质"开源项目和高效工作学习方法 Slidev 是专为开发者打造的现代化幻灯片制作工具,基于 Markdown + Vue 技 ...
- 区块链共识算法--PoW
PoW算法为一种概率算法,其共识结果是临时的,随着时间推移或某种强化,共识结果被推翻的概率越来越小,最终称为事实上结果 1 研究 工作量证明(Proof Of Work,简称POW),简单理解就是一份 ...
- 【晴神宝典刷题路】codeup+pat 题解索引(更新ing
记录一下每天的成果,看多久能刷完伐 c2 c/c++快速入门 <算法笔记>2.3小节--C/C++快速入门->选择结构 习题4-10-1 奖金计算 <算法笔记>2.4小节 ...
- 阅读类元服务开发笔记---week1
.markdown-body { line-height: 1.75; font-weight: 400; font-size: 16px; overflow-x: hidden; color: rg ...
- Python 设置国内镜像
从Python官网下载.安装python之后(不建议使用brew安装python3) MacOS :打开/User/xxx/.config/pip/pip.conf Windows:打开%APPDAT ...
- java list<对象>根据某个字段分组
前言 仅供学习参考,不保证性能问题 其中的实体类改成你自己的实体类 代码 /** * 根据某个字段进行分组,分组后遍历方法 * <p> * Map<String, List<M ...
- 「Log」2023.8.24 小记
序幕 \(\texttt{7:20}\):才到校,昨天调题整半夜去了,没想到这么晚来的人也少. 按惯例整理博客. 补题,补串串. \(\color{blueviolet}{P2444\ [POI200 ...
- 6款超好用的AI换脸软件,一键视频直播换脸(附下载链接)
随着AIGC的火爆,AI换脸技术也被广泛应用于娱乐.广告.电影制作等领域,本期文章系统介绍了市面上超火的6款AI软件 换脸整合包收录了全部6款AI工具,请按照需要选择下载: 百度网盘:https:// ...
- harbor自建https证书生成
1.生成CA证书 # 生成 RSA 私有秘钥 openssl genrsa -out ca-key.pem 4096 # 生成CSR(Certificate Signing Request),CSR和 ...
- jemelloc论文(中英翻译)
AScalable Concurrent malloc(3) Implementation for FreeBSD (基于FreeBSD的可伸缩的并发malloc(3)实现) 作者:Jason Eva ...