trae开发的win10端口占用检测工具
前言
首先,强烈安利字节开发的工具:https://www.trae.com.cn/ 以下代码均由此工具生成。
linux 中可以使用 lsof -i:端口号 查看端口占用进程,并使用kill指令杀死进程,但是对于不熟悉windows命令行的同学,
如果运行代码时,一直提示某个端口被占用,使用netstat -ano|findstr LISTEN 虽然也可以查到端口占用进程,但是taskkill 指令还是挺麻烦的。
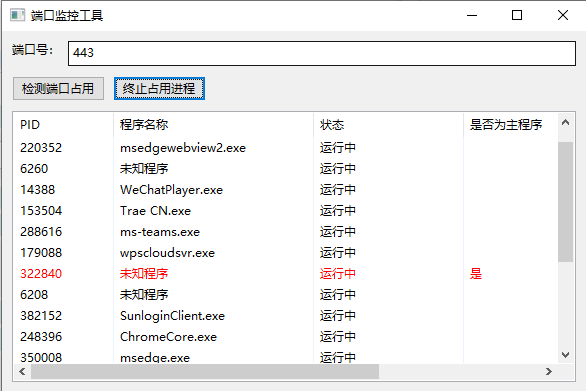
下面是用trae开发的基于python wxpython库的端口占用检测界面工具。
正文
- 主程序 port_monitor.py
import wx

import subprocess

import re

class PortMonitorFrame(wx.Frame):

    def __init__(self, parent, title):

        super(PortMonitorFrame, self).__init__(parent, title=title, size=(600, 400))

        self.InitUI()

        self.Centre()

        self.is_scanning = False

    def InitUI(self):

        panel = wx.Panel(self)

        vbox = wx.BoxSizer(wx.VERTICAL)

        hbox1 = wx.BoxSizer(wx.HORIZONTAL)

        self.port_input = wx.TextCtrl(panel)

        hbox1.Add(wx.StaticText(panel, label='端口号:'), flag=wx.RIGHT, border=8)

        hbox1.Add(self.port_input, proportion=1)

        hbox2 = wx.BoxSizer(wx.HORIZONTAL)

        self.check_btn = wx.Button(panel, label='检测端口占用')

        self.kill_btn = wx.Button(panel, label='终止占用进程')

        self.check_btn.Bind(wx.EVT_BUTTON, self.on_check_port)

        self.kill_btn.Bind(wx.EVT_BUTTON, self.on_kill_process)

        hbox2.Add(self.check_btn, flag=wx.RIGHT, border=8)

        hbox2.Add(self.kill_btn)

        self.result_list = wx.ListCtrl(panel, style=wx.LC_REPORT)

        self.result_list.InsertColumn(0, 'PID', width=100)

        self.result_list.InsertColumn(1, '程序名称', width=200)

        self.result_list.InsertColumn(2, '状态', width=150)

        self.result_list.InsertColumn(3, '是否为主程序', width=100)

        self.result_list.InsertColumn(4, '程序路径', width=250)

        vbox.Add(hbox1, flag=wx.EXPAND|wx.LEFT|wx.RIGHT|wx.TOP, border=10)

        vbox.Add(hbox2, flag=wx.EXPAND|wx.ALL, border=10)

        vbox.Add(self.result_list, proportion=1, flag=wx.EXPAND|wx.LEFT|wx.RIGHT|wx.BOTTOM, border=10)

        panel.SetSizer(vbox)

    def on_check_port(self, event):

        port = self.port_input.GetValue().strip()

        if not port.isdigit():

            wx.MessageBox('请输入有效的端口号', '错误', wx.ICON_ERROR)

            return

        if self.is_scanning:

            wx.MessageBox('扫描正在进行中', '提示', wx.ICON_INFORMATION)

            return

        self.result_list.DeleteAllItems()

        self.is_scanning = True

        wx.CallAfter(self.check_btn.Enable, False)

        def scan_task():

            try:

                startupinfo = subprocess.STARTUPINFO()

                startupinfo.dwFlags |= subprocess.STARTF_USESHOWWINDOW

                output = subprocess.check_output(['netstat', '-ano'], text=True, stderr=subprocess.STDOUT, startupinfo=startupinfo)

                pattern = re.compile(r'TCP\s+.*?:{}\s+.*?\s+(\d+)'.format(port))

                pids = pattern.findall(output)

                if not pids:

                    wx.CallAfter(wx.MessageBox, '端口未被占用', '提示', wx.ICON_INFORMATION)

                else:

                    for pid in set(pids):

                        if not self.is_scanning:  # 扫描被中断时退出循环

                            break

                        startupinfo = subprocess.STARTUPINFO()

                        startupinfo.dwFlags |= subprocess.STARTF_USESHOWWINDOW

                        task_info = subprocess.check_output(['tasklist', '/fi', f'pid eq {pid}'], text=True, stderr=subprocess.STDOUT, startupinfo=startupinfo)

                        proc_name = re.search(r'(.+?)\s+\d+\s+Console', task_info)

                        proc_name = proc_name.group(1).strip() if proc_name else '未知程序'

                        # 解析netstat输出获取PID对应的连接状态

                        pattern_detail = re.compile(r'TCP\s+.*?:{}\s+.*?\s+(\S+)\s+({})'.format(port, pid))

                        status_match = pattern_detail.search(output)

                        is_listening = status_match.group(1) == 'LISTENING' if status_match else False

                        def update_ui(pid, proc_name, is_listening, proc_path):

                            index = self.result_list.InsertItem(self.result_list.GetItemCount(), pid)

                            self.result_list.SetItem(index, 1, proc_name)

                            self.result_list.SetItem(index, 2, '运行中')

                            self.result_list.SetItem(index, 3, '是' if is_listening else '')

                            self.result_list.SetItem(index, 4, proc_path)

                            if is_listening:

                                self.result_list.SetItemTextColour(index, wx.RED)

                        # 获取程序路径(使用wmic命令)

                        try:

                            proc_path_output = subprocess.check_output(['wmic', 'process', 'where', f'processid={pid}', 'get', 'executablepath'], text=True, stderr=subprocess.STDOUT, startupinfo=startupinfo)

                            proc_path_match = re.search(r'ExecutablePath\s+(.+?)\s*$', proc_path_output, re.MULTILINE)

                            proc_path = proc_path_match.group(1).strip() if proc_path_match else '未知路径'

                        except:

                            proc_path = '未知路径'

                        wx.CallAfter(update_ui, pid, proc_name, is_listening, proc_path)

            except subprocess.CalledProcessError as e:

                wx.CallAfter(wx.MessageBox, f'执行命令失败:{e.output}', '错误', wx.ICON_ERROR)

            finally:

                self.is_scanning = False

                wx.CallAfter(self.check_btn.Enable, True)

        import threading

        threading.Thread(target=scan_task, daemon=True).start()

    def on_kill_process(self, event):

        if self.is_scanning:

            wx.MessageBox('扫描未完成,请稍后', '提示', wx.ICON_INFORMATION)

            return

        selected = self.result_list.GetFirstSelected()

        if selected == -1:

            wx.MessageBox('请选择要终止的进程', '提示', wx.ICON_INFORMATION)

            return

        pid = self.result_list.GetItemText(selected)

        try:

            startupinfo = subprocess.STARTUPINFO()

            startupinfo.dwFlags |= subprocess.STARTF_USESHOWWINDOW

            output = subprocess.check_output(['taskkill', '/F', '/PID', pid], text=True, stderr=subprocess.STDOUT, startupinfo=startupinfo)

            self.result_list.DeleteItem(selected)

            wx.MessageBox('进程终止成功', '提示', wx.ICON_INFORMATION)

        except subprocess.CalledProcessError as e:

            wx.MessageBox(f'终止进程失败:{e.output}', '错误', wx.ICON_ERROR)

if __name__ == '__main__':

    app = wx.App()

    frame = PortMonitorFrame(None, '端口监控工具')

    frame.Show()

    app.MainLoop()
- 编译成二进制脚本
这里使用了 nuitka 工具,将py脚本编译成c++的可执行程序。也可以使用 pyinstaller (pyinstaller 编译成的程序会在用户目录留下缓存文件)
pip install nuitka
批处理文件
build.bat
@echo off

nuitka --standalone --onefile --windows-console-mode=disable port_monitor.py

echo 打包完成,可执行文件在dist目录下

pause
运行后,生成 port_monitor.exe
- 运行
直接python脚本运行
python port_monitor.py
exe运行
port_monitor.exe
运行效果展示:
trae开发的win10端口占用检测工具的更多相关文章
- windows端口占用处理工具
一.描述 笔者在最近使用tomcat时,老是会遇到这种端口占用的问题,便写了这个小的exe,用于解决windows下的端口占用问题. 好吧,其实是我实在记不住CMD下的那几行命令.这玩意的实现比较简单 ...
- windows下端口占用处理工具
一.通用方法 经常,我们在启动应用的时候发现系统需要的端口被别的程序占用,笔者在最近使用tomcat时,老是会遇到这种端口占用的问题,如何知道谁占有了我们需要的端口,很多人都比较头疼,以下是通用方法: ...
- 【windows7】解决IIS 80端口占用问题(亲测)
1.默认你win机器已经安装并启用了80端口 2.现在你要安装并启用apache服务器 3.首先进行80端口占用检测:netstat -aon|findstr 80 4.找到进程号为404的服务名称, ...
- Cocos开发中性能优化工具介绍之Visual Studio内存泄漏检测工具——Visual Leak Detector
那么在Windows下有什么好的内存泄漏检测工具呢?微软提供Visual Studio开发工具本身没有什么太好的内存泄漏检测功能,我们可以使用第三方工具Visual Leak Detector(以下简 ...
- Xenu-web开发死链接检测工具应用
Xenu 是一款深受业界好评,并被广泛使用的死链接检测工具. 时常检测网站并排除死链接,对网站的SEO 非常重要,因为大量死链接存在会降低用户和搜索引擎对网站的信任,web程序开发人员还可通过其找到死 ...
- C#实时检测端口占用情况
在TCP/IP协议中,服务端需要去监听客户端的端口,开始监听,我们需要检测使用的端口是否被占用,获取系统当前使用的所有端口号,用此端口进行匹配即可. 代码如下 internal static Bool ...
- 基于端口的弱口令检测工具--iscan
亲手打造了一款弱口令检测工具,用Python编写,主要可以用于内网渗透.弱口令检测等方面,目前集成了常见端口服务,包含 系统弱口令:ftp.ssh.telnet.ipc$ 数据库弱口令:mssql.m ...
- Metasploit是一款开源的安全漏洞检测工具,
Metasploit是一款开源的安全漏洞检测工具,可以帮助安全和IT专业人士识别安全性问题,验证漏洞的缓解措施,并管理专家驱动的安全性进行评估,适合于需要核实漏洞的安全专家,同时也适合于强大进攻能力的 ...
- Android内存泄露---检测工具篇
内存使用是程序开发无法回避的一个问题.如果我们毫不在意肆意使用,总有一天会为此还账,且痛不欲生...所以应当防患于未然,把内存使用细化到平时的每一行代码中. 内存使用概念较大,本篇先讲对已有app如何 ...
- Linux中系统检测工具top命令
Linux中系统检测工具top命令 本文转自:https://www.cnblogs.com/zhoug2020/p/6336453.html 首先介绍top中一些字段的含义: VIRT:virtua ...
随机推荐
- QT5笔记:9. QT的容器类
QList 中存放对象指针,QVector直接存放对象,所以访问性能更高 QMap中key不可以重复,QMultiMap中key可以重复 QMap在内存中顺序存储,QHash不是顺序存储的(hash算 ...
- Typecho复制文章自带版权说明
自带版权说明代码 <script> document.body.addEventListener('copy', function (e) { if (window.getSelectio ...
- MySQL Q&A - [01] root密码忘记了怎么办
题记部分 Windows 场景下 1.先使用管理员身份打开两个命令提示符窗口(winA和winB) 2.在命令提示符窗口winA中将MySQL服务停掉net stop mysql Microsoft ...
- DeepSeek满血版测试
技术背景 很多厂商以次充好,用蒸馏版DeepSeek冒充满血版.本文提供一些收集的问题集,可以用于测试是否满血DeepSeek.经过实际测试,国内厂商中只有满血版DeepSeek可以全对.但是各厂商后 ...
- RCE_STUDY
概念 RCE(Remote code execution)远程代码执行漏洞,RCE又分命令执行和代码执行. RCE-远程代码执行:远程执行PHP代码 RCE-远程命令执行:远程执行Linux或者Win ...
- github520cli解决无法github访问问题
github并没有被GFW直接墙掉,而是因为DNS污染导致经常无法访问 访问的时候经常出现push或者pull代码的时间很长,出现无法访问仓库,请检查是否有权限的报错,这可能就是被DNS污染了 如何解 ...
- mysql基础中的基础 函数
前段时间b站看sql基础语法,在此做一总结 1.基本函数 mysql中的函数基本可以分为单行函数和分组函数,单行函数用于处理单个的数据,分组函数则是传输一组值过去进行处理.单行函数有可分为字符函数,数 ...
- goframe API 自定义接口返回值处理
前言 goframe 默认使用了中间键 ghttp.MiddlewareHandlerResponse, HTTP Server 的数据返回通过 ghttp.Response 对象实现,ghttp.R ...
- VLAN聚合技术:Super-vlan
Super-VLAN,也称为VLAN聚合(VLAN Aggregation),是一种网络配置技术,主要用于优化IP地址资源的利用和隔离广播域. 一.定义与功能 Super-VLAN是通过将多个VLAN ...
- PLSQL中查询数据的时候查询结果显示中文乱码
要需要很努力才能看起来毫不费力.....1.在PLSQL中查询数据的时候查询结果显示中文乱码这里写图片描述2.需要在环境变量中新建两个环境变量:第一个:设置 NLS_LANG=SIMPLIFIED C ...