Material04 MdListModule模块
1 在共享模块中导入MdListModule模块
import { NgModule } from '@angular/core';

import { CommonModule } from '@angular/common';

import {

  MdSidenavModule,

  MdToolbarModule,

  MdIconModule,

  MdButtonModule,

  MdIconRegistry,

  MdCardModule,

  MdInputModule,

  MdListModule

 } from '@angular/material';

 import { HttpModule } from '@angular/http';

@NgModule({

  imports: [

    CommonModule,

    HttpModule,

    MdSidenavModule,

    MdToolbarModule,

    MdIconModule,

    MdButtonModule,

    MdCardModule,

    MdInputModule,

    MdListModule

  ],

  declarations: [],

  exports: [

    CommonModule,

    MdSidenavModule,

    MdToolbarModule,

    MdIconModule,

    MdButtonModule,

    HttpModule,

    MdCardModule,

    MdInputModule,

    MdListModule

  ]

})

export class SharedModule { }
技巧01:MdListModule提供了两个列表组件 -> md-list 和 md-nav-list,它们的用法差不多,只是前者没有动画效果,后者有动画效果而已就(后者通常用于导航栏)
2 在需要用到 MdListModule 的模块引入共享模块
3 利用 MdListModule 提供的组件编写list主要结构
<md-nav-list>

  <h3 md-subheader>客户微服务</h3>

  <md-list-item>客户管理</md-list-item>

  <h3 md-subheader>员工微服务</h3>

  <md-list-item>员工管理</md-list-item>

</md-nav-list>
代码解释01:md-list-item里面包含了一个div,这个div是一个横向排列的flex容器
代码解释02:md-subheader 命令只是将相应元素作为一个段落分割而已
4 md-list-item高级用法
4.1 md-list-item支持多行
<md-nav-list>

  <h3 md-subheader>客户微服务</h3>

  <md-list-item>

    <!-- <md-icon md-list-icon svgIcon="day"></md-icon> -->

    <span md-line>客户管理</span>

    <span md-line md-subheader>客户基本信息管理</span>

  </md-list-item>

  <h3 md-subheader>员工微服务</h3>

  <md-list-item>员工管理</md-list-item>

</md-nav-list>
代码解释01:md-list-item中的一般元素都会被看成是一个flex项目放到一个flex容器中
代码解释02:md-line命令表示md-list-item中的内容会被多行显示
4.2 md-list-item支持图标
<md-nav-list>

  <h3 md-subheader>客户微服务</h3>

  <md-list-item>

    <md-icon md-list-icon svgIcon="day"></md-icon>

    <span md-line>客户管理</span>

    <span md-line md-subheader>客户基本信息管理</span>

  </md-list-item>

  <h3 md-subheader>员工微服务</h3>

  <md-list-item>员工管理</md-list-item>

</md-nav-list>
代码解释01:两个标有md-line的元素会被看成一个flex项目,但是它们是分行显示的;md-subheader命令只是将字体变小而已
代码解释02:md-icon组件会被看成是一个单独的flex项目,md-list-icon命令的作用是让图标在felx容器的第一个位置进行显示
技巧01:md-list-item中那个div是一个flex容器,它默认时横向排列的、项目时居中排列;如果想要图标在纵轴的对齐方式是顶端对齐就必须自己写样式来确保felx项目在纵轴方向顶端对齐
md-icon {

    align-self: flex-start;

}
技巧02:svg图标的显示请参见MdIconModule模块相关知识点
技巧03:当静态svg资源在不同文件夹时的重构技巧
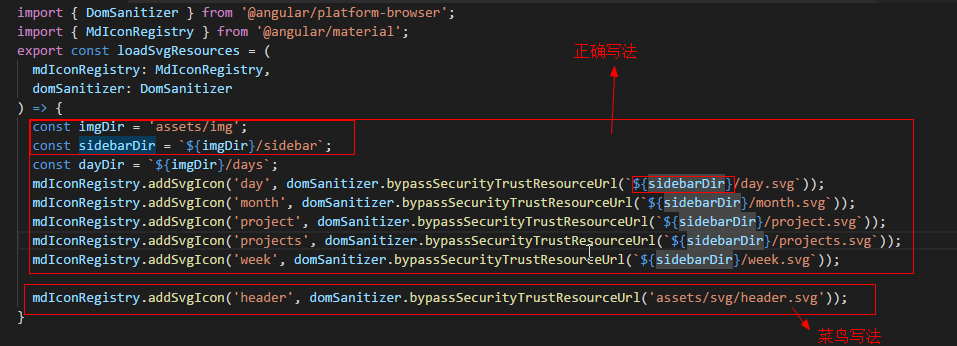
import { DomSanitizer } from '@angular/platform-browser';

import { MdIconRegistry } from '@angular/material';

export const loadSvgResources = (

  mdIconRegistry: MdIconRegistry,

  domSanitizer: DomSanitizer

) => {

  const imgDir = 'assets/img';

  const sidebarDir = `${imgDir}/sidebar`;

  const dayDir = `${imgDir}/days`;

  mdIconRegistry.addSvgIcon('day', domSanitizer.bypassSecurityTrustResourceUrl(`${sidebarDir}/day.svg`));

  mdIconRegistry.addSvgIcon('month', domSanitizer.bypassSecurityTrustResourceUrl(`${sidebarDir}/month.svg`));

  mdIconRegistry.addSvgIcon('project', domSanitizer.bypassSecurityTrustResourceUrl(`${sidebarDir}/project.svg`));

  mdIconRegistry.addSvgIcon('projects', domSanitizer.bypassSecurityTrustResourceUrl(`${sidebarDir}/projects.svg`));

  mdIconRegistry.addSvgIcon('week', domSanitizer.bypassSecurityTrustResourceUrl(`${sidebarDir}/week.svg`));

  mdIconRegistry.addSvgIcon('header', domSanitizer.bypassSecurityTrustResourceUrl('assets/svg/header.svg'));

}
4.3 md-list-item的图标动态显示
需求:根据当前日期显示对应的日期图标
4.3.1 将每天的svg图片进行注册
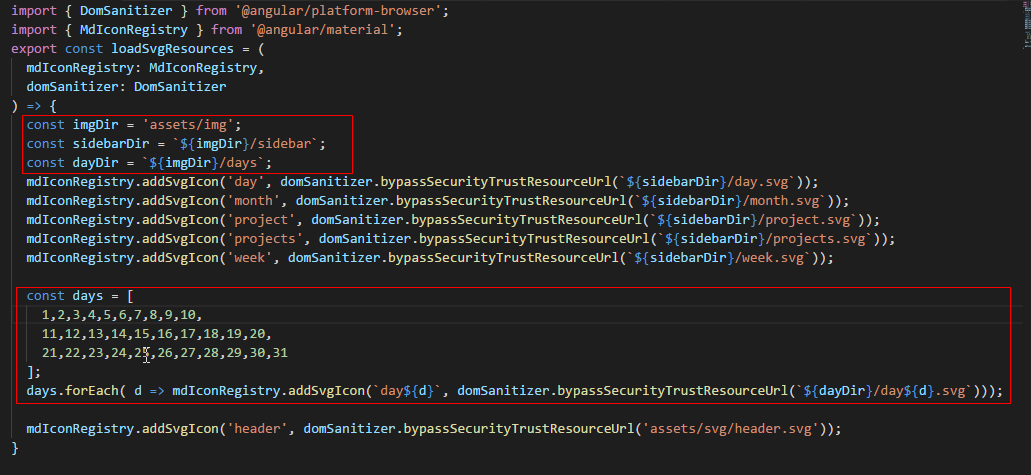
import { DomSanitizer } from '@angular/platform-browser';

import { MdIconRegistry } from '@angular/material';

export const loadSvgResources = (

  mdIconRegistry: MdIconRegistry,

  domSanitizer: DomSanitizer

) => {

  const imgDir = 'assets/img';

  const sidebarDir = `${imgDir}/sidebar`;

  const dayDir = `${imgDir}/days`;

  mdIconRegistry.addSvgIcon('day', domSanitizer.bypassSecurityTrustResourceUrl(`${sidebarDir}/day.svg`));

  mdIconRegistry.addSvgIcon('month', domSanitizer.bypassSecurityTrustResourceUrl(`${sidebarDir}/month.svg`));

  mdIconRegistry.addSvgIcon('project', domSanitizer.bypassSecurityTrustResourceUrl(`${sidebarDir}/project.svg`));

  mdIconRegistry.addSvgIcon('projects', domSanitizer.bypassSecurityTrustResourceUrl(`${sidebarDir}/projects.svg`));

  mdIconRegistry.addSvgIcon('week', domSanitizer.bypassSecurityTrustResourceUrl(`${sidebarDir}/week.svg`));

  const days = [

    1,2,3,4,5,6,7,8,9,10,

    11,12,13,14,15,16,17,18,19,20,

    21,22,23,24,25,26,27,28,29,30,31

  ];

  days.forEach( d => mdIconRegistry.addSvgIcon(`day${d}`, domSanitizer.bypassSecurityTrustResourceUrl(`${dayDir}/day${d}.svg`)));

  mdIconRegistry.addSvgIcon('header', domSanitizer.bypassSecurityTrustResourceUrl('assets/svg/header.svg'));

}
4.3.2 下载date相关的依赖包
cnpm install --save date-fns -> 运行环境用
cnpm install --save-dev @types/date-fns -> 开发环境用
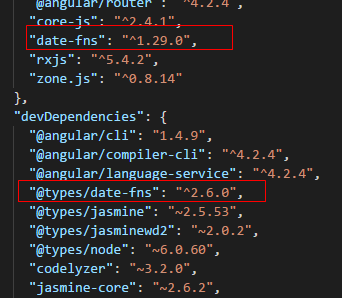
{

  "name": "material",

  "version": "0.0.0",

  "license": "MIT",

  "scripts": {

    "ng": "ng",

    "start": "ng serve",

    "build": "ng build",

    "test": "ng test",

    "lint": "ng lint",

    "e2e": "ng e2e"

  },

  "private": true,

  "dependencies": {

    "@angular/animation": "^4.0.0-beta.8",

    "@angular/animations": "^4.2.4",

    "@angular/common": "^4.2.4",

    "@angular/compiler": "^4.2.4",

    "@angular/core": "^4.2.4",

    "@angular/forms": "^4.2.4",

    "@angular/http": "^4.2.4",

    "@angular/material": "^2.0.0-beta.7",

    "@angular/platform-browser": "^4.2.4",

    "@angular/platform-browser-dynamic": "^4.2.4",

    "@angular/router": "^4.2.4",

    "core-js": "^2.4.1",

    "date-fns": "^1.29.0",

    "rxjs": "^5.4.2",

    "zone.js": "^0.8.14"

  },

  "devDependencies": {

    "@angular/cli": "1.4.9",

    "@angular/compiler-cli": "^4.2.4",

    "@angular/language-service": "^4.2.4",

    "@types/date-fns": "^2.6.0",

    "@types/jasmine": "~2.5.53",

    "@types/jasminewd2": "~2.0.2",

    "@types/node": "~6.0.60",

    "codelyzer": "~3.2.0",

    "jasmine-core": "~2.6.2",

    "jasmine-spec-reporter": "~4.1.0",

    "karma": "~1.7.0",

    "karma-chrome-launcher": "~2.1.1",

    "karma-cli": "~1.0.1",

    "karma-coverage-istanbul-reporter": "^1.2.1",

    "karma-jasmine": "~1.1.0",

    "karma-jasmine-html-reporter": "^0.2.2",

    "protractor": "~5.1.2",

    "ts-node": "~3.2.0",

    "tslint": "~5.7.0",

    "typescript": "~2.3.3"

  }

}
4.3.3 在需要用到date-fns模块中的相关方法的组件进行引入
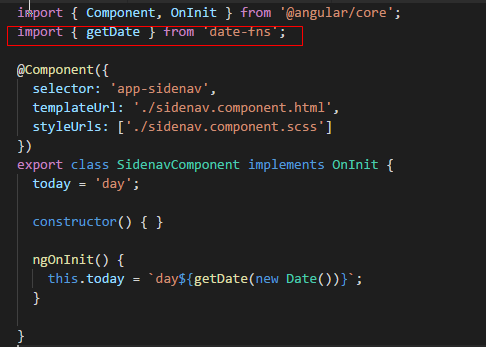
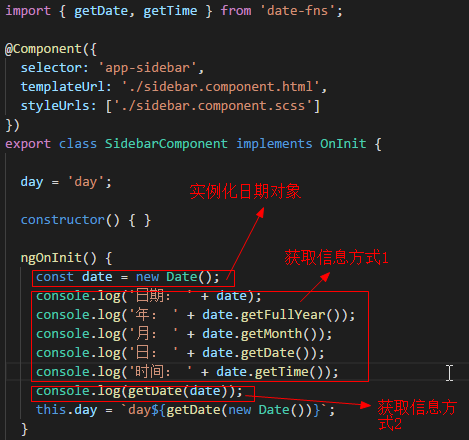
import { Component, OnInit } from '@angular/core';

import { getDate } from 'date-fns';

@Component({

  selector: 'app-sidenav',

  templateUrl: './sidenav.component.html',

  styleUrls: ['./sidenav.component.scss']

})

export class SidenavComponent implements OnInit {

  today = 'day';

  constructor() { }

  ngOnInit() {

    this.today = `day${getDate(new Date())}`; // 获取当前日期的日

  }

}
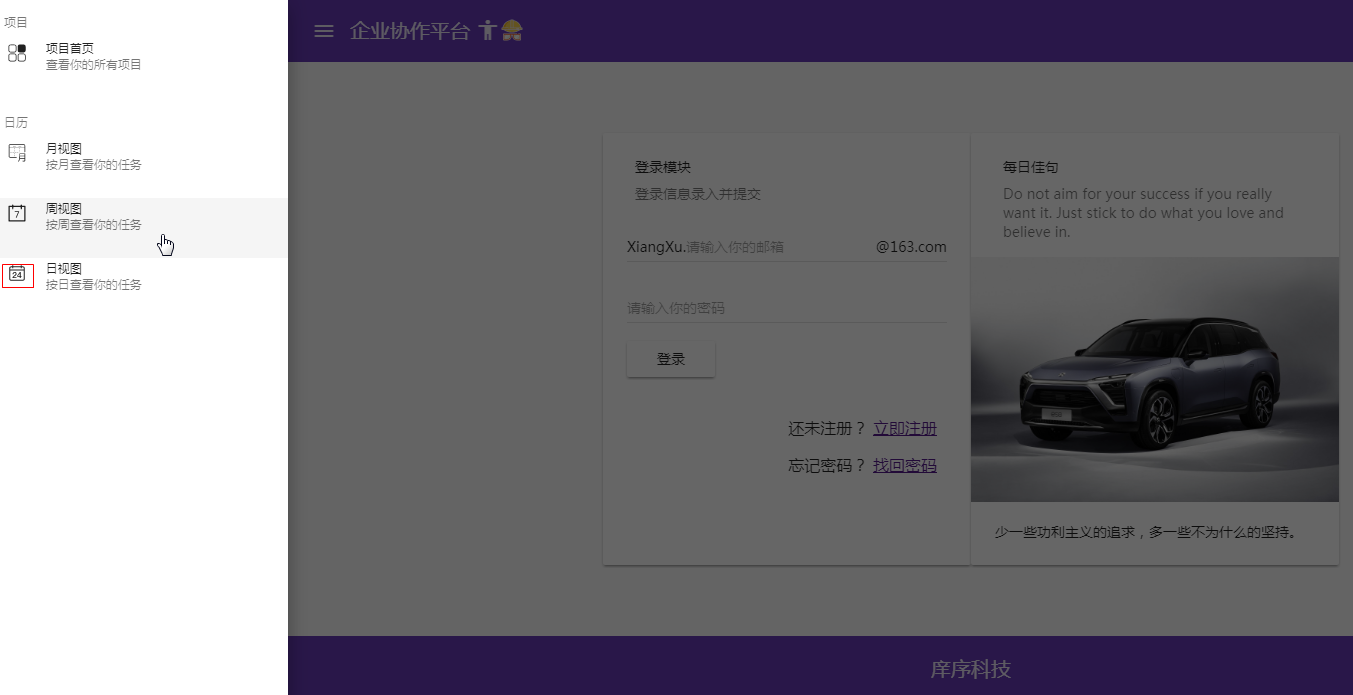
<md-nav-list dense>
<h3 md-subheader>项目</h3>
<md-list-item>
<md-icon md-list-icon svgIcon="projects"></md-icon>
<span md-line>项目首页</span>
<span md-line md-subheader>查看你的所有项目</span>
</md-list-item>
<h3 md-subheader>日历</h3>
<md-list-item>
<md-icon md-list-icon svgIcon="project"></md-icon>
<span md-line>日历首页</span>
<span md-line md-subheader>根据日期查看</span>
</md-list-item>
<md-list-item>
<md-icon md-list-icon svgIcon="month"></md-icon>
<span md-line>月视图</span>
<span md-line md-subheader>按月查看</span>
</md-list-item>
<md-list-item>
<md-icon md-list-icon svgIcon="week"></md-icon>
<span md-line>周视图</span>
<span md-line md-subheader>按周查看</span>
</md-list-item>
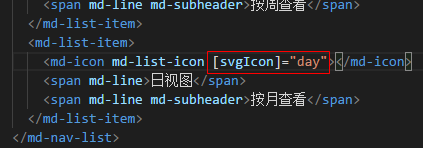
<md-list-item>
<md-icon md-list-icon [svgIcon]="day"></md-icon>
<span md-line>日视图</span>
<span md-line md-subheader>按月查看</span>
</md-list-item>
</md-nav-list>
技巧01:实例化日期对象,从日期对象中获取时间信息
4.4.4 效果图如下
5 MdButtonToggleModule
5.1 概述
MdButtonToggleModule中有两个组件选择器一个是md-button-toggle-group 一个是 md-button-toggle;其中md-button-toggle相当于是一个单选框,而md-button-toggle-group相当于是多个md-button-toggle组成的单选框组合,但是每次只能有一个md-button-toggle会被选中,md-button-toggle-group的值就是当前被选中的md-button-toggle的值
5.2 编程步骤
5.2.1 导入MdButtonToggleModule
在共享模块中导入MdButtonToggleModule
技巧01:还需要进行导出操作,因为其它模块如果需要用到MdButtonToggleModule就只需要导入共享模块就可以啦
import { NgModule } from '@angular/core';
import { CommonModule } from '@angular/common';
import {
MdToolbarModule,
MdIconModule,
MdButtonModule,
MdCardModule,
MdInputModule,
MdListModule,
MdSlideToggleModule,
MdGridListModule,
MdDialogModule,
MdAutocompleteModule,
MdMenuModule,
MdCheckboxModule,
MdTooltipModule,
MdRadioModule,
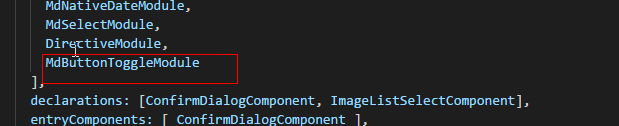
MdDatepickerModule,
MdNativeDateModule,
MdSelectModule,
MdButtonToggleModule
} from '@angular/material';
import { ConfirmDialogComponent } from './confirm-dialog/confirm-dialog.component';
import { DirectiveModule } from '../directive/directive.module';
import { FormsModule, ReactiveFormsModule } from '@angular/forms';
import { ImageListSelectComponent } from './image-list-select/image-list-select.component';
@NgModule({
imports: [
CommonModule,
FormsModule,
ReactiveFormsModule,
MdToolbarModule,
MdIconModule,
MdButtonModule,
MdCardModule,
MdInputModule,
MdListModule,
MdSlideToggleModule,
MdGridListModule,
MdDialogModule,
MdAutocompleteModule,
MdMenuModule,
MdCheckboxModule,
MdTooltipModule,
MdRadioModule,
MdDatepickerModule,
MdNativeDateModule,
MdSelectModule,
DirectiveModule,
MdButtonToggleModule
],
declarations: [ConfirmDialogComponent, ImageListSelectComponent],
entryComponents: [ ConfirmDialogComponent ],
exports: [
CommonModule,
FormsModule,
ReactiveFormsModule,
MdToolbarModule,
MdIconModule,
MdButtonModule,
MdCardModule,
MdInputModule,
MdListModule,
MdSlideToggleModule,
MdGridListModule,
MdDialogModule,
MdAutocompleteModule,
MdMenuModule,
MdCheckboxModule,
MdTooltipModule,
MdRadioModule,
MdDatepickerModule,
MdNativeDateModule,
MdSelectModule,
DirectiveModule,
ImageListSelectComponent,
MdButtonToggleModule
]
})
export class SharedModule { }
TS
5.2.2 在组件中MdButtonToggleModule提供的组件
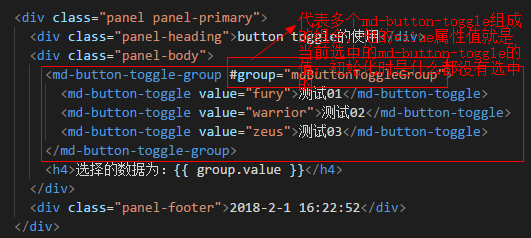
<div class="panel panel-primary">

  <div class="panel-heading">button toggle的使用</div>

  <div class="panel-body">

    <md-button-toggle-group #group="mdButtonToggleGroup">

      <md-button-toggle value="fury">测试01</md-button-toggle>

      <md-button-toggle value="warrior">测试02</md-button-toggle>

      <md-button-toggle value="zeus">测试03</md-button-toggle>

    </md-button-toggle-group>

    <h4>选择的数据为:{{ group.value }}</h4>

  </div>

  <div class="panel-footer">2018-2-1 16:22:52</div>

</div>
HTML
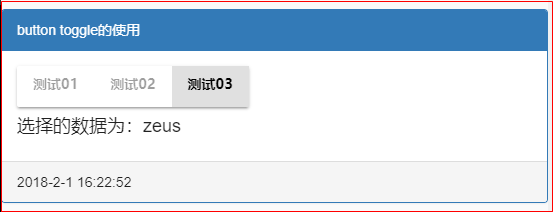
5.2.3 效果展示
Material04 MdListModule模块的更多相关文章
- Material使用05 MdListModule模块 MdButtonToggleModule模块
1 在共享模块中导入MdListModule模块 import { NgModule } from '@angular/core'; import { CommonModule } from '@an ...
- npm 私有模块的管理使用
你可以使用 NPM 命令行工具来管理你在 NPM 仓库的私有模块代码,这使得在项目中使用公共模块变的更加方便. 开始前的工作 你需要一个 2.7.0 以上版本的 npm ,并且需要有一个可以登陆 np ...
- node.js学习(三)简单的node程序&&模块简单使用&&commonJS规范&&深入理解模块原理
一.一个简单的node程序 1.新建一个txt文件 2.修改后缀 修改之后会弹出这个,点击"是" 3.运行test.js 源文件 使用node.js运行之后的. 如果该路径下没有该 ...
- ES6模块import细节
写在前面,目前浏览器对ES6的import支持还不是很好,需要用bable转译. ES6引入外部模块分两种情况: 1.导入外部的变量或函数等: import {firstName, lastName, ...
- Python标准模块--ContextManager
1 模块简介 在数年前,Python 2.5 加入了一个非常特殊的关键字,就是with.with语句允许开发者创建上下文管理器.什么是上下文管理器?上下文管理器就是允许你可以自动地开始和结束一些事情. ...
- Python标准模块--Unicode
1 模块简介 Python 3中最大的变化之一就是删除了Unicode类型.在Python 2中,有str类型和unicode类型,例如, Python 2.7.6 (default, Oct 26 ...
- Python标准模块--Iterators和Generators
1 模块简介 当你开始使用Python编程时,你或许已经使用了iterators(迭代器)和generators(生成器),你当时可能并没有意识到.在本篇博文中,我们将会学习迭代器和生成器是什么.当然 ...
- 自己实现一个javascript事件模块
nodejs中的事件模块 nodejs中有一个events模块,用来给别的函数对象提供绑定事件.触发事件的能力.这个别的函数的对象,我把它叫做事件宿主对象(非权威叫法),其原理是把宿主函数的原型链指向 ...
- 理解nodejs模块的scope
描述 原文档地址:https://docs.npmjs.com/misc/scope 所有npm模块都有name,有的模块的name还有scope.scope的命名规则和name差不多,同样不能有ur ...
随机推荐
- input光标高度问题
input输入框光标高度问题IE:不管该行有没有文字,光标高度与font-size大小一致 FF:该行没有文字时,光标大小与input的 height 大小一致:该行有文字时,光标大小与font-si ...
- javascript中toString和valueOf方法的区别
toString():将对象转为字符串 valueOf():获取对象的原始值, 1.针对基本类型的变量:如在string,number,boolean类型的变量上调用这两个方法时,直接返回原始值,即变 ...
- redhat7 邮件服务搭建
一.先搭建DNS服务,在正向和反向区域文件分别添加以下配置 cd /var/named 目录下 ① vi abc.com.zone 正向区域文件,添加以下内容 @ MX 5 mail.test.cn ...
- RobotFramework自动化测试环境配置
现在工作是做自动化测试平台维护的,平台用的C#做的,主要是用来测试CMBRun项目,它是c/s结构的项目,而b/s结构的项目主要使用RF+Python来做.做这块之前听过自动化测试,身边的朋友也有做这 ...
- meta 是什么??
META http-equiv 大全HTTP-EQUIV类似于HTTP的头部协议,它回应给浏览器一些有用的信息,以帮助正确和精确地显示网页内容.常用的HTTP-EQUIV类型有: 1.Content- ...
- RestSharp使用总结
RestSharp是一个轻量的,不依赖任何第三方的组件或者类库的Http的组件.RestSharp具有以下的优点: 1.支持.NET 3.5+,Silverlight 4, Windows Pho ...
- Win10命令大全通用(Win8,Win7)
Windows 10/Win10命令大全通用(Win8,Win7 Windows 10/Win10命令大全通用(Win8,Win7) 1.calc:启动计算器 2.appwiz.cpl:程 ...
- IpHelper根据客户端IP进行网站分流
public class IpHelper { // 核心方法:IP搜索 /// <summary> /// 查找IP所属地区,确保web.c ...
- PHP通过Zabbix API获取服务器监控信息
开源监控系统Zabbix提供了丰富的API,供第三方系统调用. 基本步骤如下: 1.获取合法认证:连接对应Zabbix URL,并提供用户名和密码,HTTP方法为"POST",HT ...
- 海思板卡SATA最佳读写块大小测试
1 引言 应需求,在海思板子上测试SATA读写速度,用dd指令,每次分别读/写不同大小的块 (bs),同时检测运行dd命令CPU占比,记录读/写速度和CPU占比. 2 实验过程 2. ...