如何用webgl(three.js)搭建一个3D库房,3D密集架,3D档案室(升级版)
很长一段时间没有写3D库房,3D密集架相关的效果文章了,刚好最近有相关项目落地,索性总结一下
与之前我写的3D库房密集架文章《如何用webgl(three.js)搭建一个3D库房,3D密集架,3D档案室,-第二课》相比,本次做了一些效果上的升级,以及更加贴合用户应用实际。
密集架库房再档案管理,土壤监测,标本存储等各个行业应用的比较多,从早期的货架到后来的手摇式密集架再到现在的全自动密集架,硬件上都做了升级改进。
在环境、安防监控这一块,密集架方案提供商也配套的加上了八方感知,视频监控,温湿度一体机,自动书架,智能门禁等各种设备。
这篇文章我们主要记录讲解使用webgl(three.js)实现3D可视化密集架方案以及实现代码。
闲话少叙,我们进入正题:
一、主库房功能效果,以及其特效实现代码
首先我们先看看库房效果以及当前实现的3d密集架的一些功能
1.1、主界面效果,这个库房分了6个区域,多个房间拐角,后面我们还会展示一些拐角房间的内部效果,那是一个虚拟展厅。效果如下:

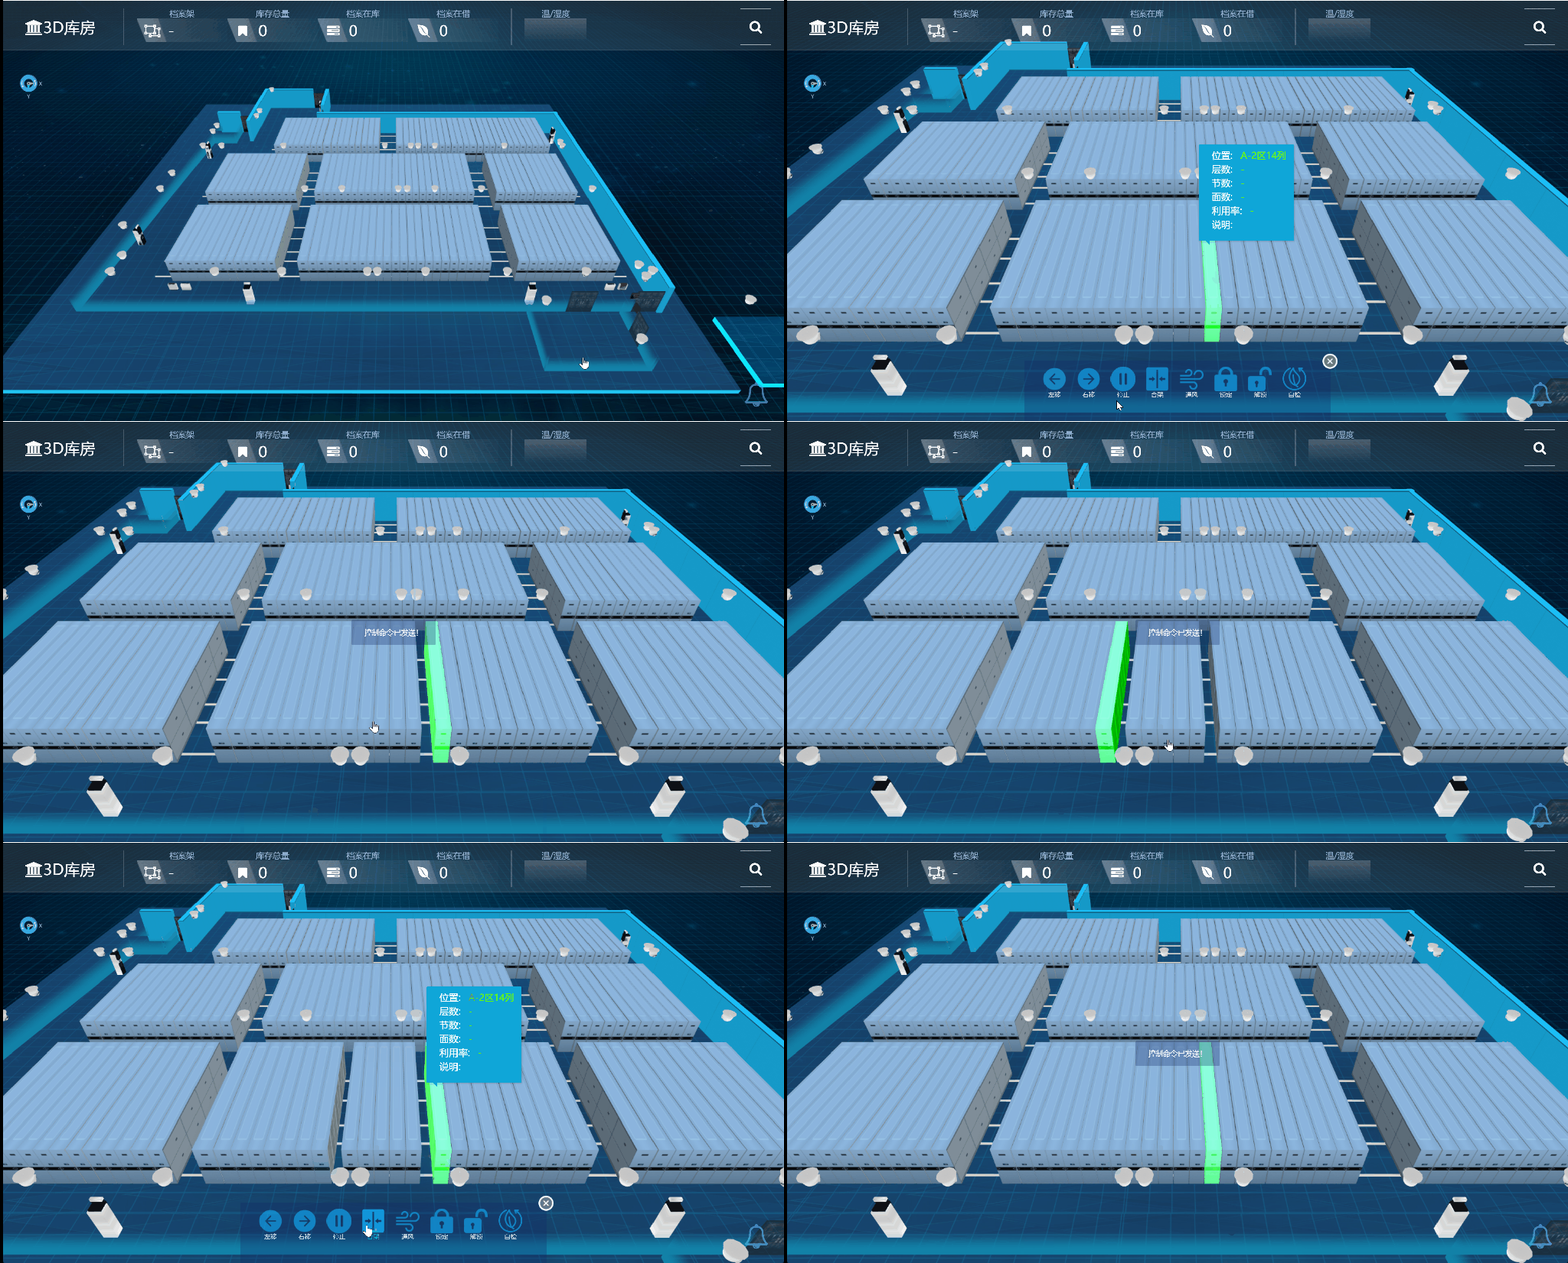
1.2、选择点击密集架,可以看到当前密集架的一些统计信息,例如面数,层数,节数(列),还有利用率等。
对于全自动密集架,我们还可以通过协议对接,对密集架进行控制,开架,打开通道,合架等。效果如下:
实现方式:
移动密集架,合并密集架,重点,难点在于计算密集架移动距离,每次移动密集架的个数,以及记录当前密集架的位置
我才用的时分区计算,各个突破,通过配置文件的方式记录固定架,以及每个架子的有效移动方向
具体实现如下:
首先通过配置的方式,记录每个架子的初始态,对于一个库房来说,不用写逻辑代码,直接配置还是比较方便的
var shelfAreas = [[11, 23, 13, 11, 23, 13, 25, 17]];

//固定列编号

var areasFixedCol = [

[[ 1], [12], [13], [1], [12], [13], [13], [9]]

];

//左移方向

var leftMoveDirect = [

[["x", -1], ["x", -1], ["x", -1],

["x", -1], ["x", -1], ["x", -1],

["x", -1], ["x", -1]]];
然后再通过写通用方法,实现每个架子的移动与合并方案
//互斥移动 一次只能移动一个区域单边的架子

ModelBusiness.prototype.moveMjj = function (obj, dir, moveLength) {

    var _this = this;

    if (_this.moveState == 1) {

        layer.msg("有架子移动中,请稍后");

        return;

    }

    _this.moveState = 1;

    var movemjjsParam = this.getNeedMoveMjjs(obj, dir);

    /*

        needMoveNubs: needMoveNubs,

        needMoveMjjNames:needMoveMjjNames,

        directStr: driStr,

        directValue: directValue,

        onlyCanMoveValue: onlyCanMoveValue

    */

    if(movemjjsParam.directStr=="x"){

        movemjjsParam.directStrLager="X";

    }

    if(movemjjsParam.directStr=="z"){

        movemjjsParam.directStrLager="Z";

    }

    console.log(movemjjsParam);

    var moveMjjObjs = WT3DObj.commonFunc.findObjectsByNames(movemjjsParam.needMoveMjjNames);

    var canMoveRealObjs = [];//真正能移动的架子

    $.each(moveMjjObjs, function (_index, _obj) {

        if (!_obj.oldPositionX) { _obj.oldPositionX = _obj.position.x; }

        if (!_obj.oldPositionZ) { _obj.oldPositionZ = _obj.position.z; }

        var movevalue=0;//该架子移动前 已经移动了多少

        if( Math.abs(_obj.position[movemjjsParam.directStr]-_obj["oldPosition"+movemjjsParam.directStrLager])>10){

            movevalue=_obj.position[movemjjsParam.directStr]-_obj["oldPosition"+movemjjsParam.directStrLager];

        }

        if (movevalue == 0) {//如果未移动过

            if (movemjjsParam.directValue == movemjjsParam.onlyCanMoveValue) {

                canMoveRealObjs.push(_obj);

            }

        } else {

            if (movemjjsParam.directValue != movemjjsParam.onlyCanMoveValue) {

                canMoveRealObjs.push(_obj);

            }

        }

    });

    console.log(canMoveRealObjs);

    var moveL = { length: 0 };

    $.each(canMoveRealObjs, function (_index, _obj) {

        _obj["currentValue" + movemjjsParam.directStr] = _obj.position[movemjjsParam.directStr];

    });

    new TWEEN.Tween(moveL).to({

        length: moveLength

    }, 200).onUpdate(function (a) {

        var _this = this;

        $.each(canMoveRealObjs, function (_index, _obj) {

            _obj.position[movemjjsParam.directStr] = _obj["currentValue" + movemjjsParam.directStr] + _this.length * movemjjsParam.directValue;

        });

    }).onComplete(function () {

        _this.moveState = 0;

    }).start();

}

//非互斥移动

ModelBusiness.prototype.moveMjjAll = function (obj, dir, moveLength) {

    var _this = this;

    var movemjjsParam = this.getNeedMoveMjjs(obj, dir);

    /*

        needMoveNubs: needMoveNubs,

        needMoveMjjNames:needMoveMjjNames,

        directStr: driStr,

        directValue: directValue,

        onlyCanMoveValue: onlyCanMoveValue

    */

    if (movemjjsParam.directStr == "x") {

        movemjjsParam.directStrLager = "X";

    }

    if (movemjjsParam.directStr == "z") {

        movemjjsParam.directStrLager = "Z";

    }

    console.log(movemjjsParam);

    var moveMjjObjs = WT3DObj.commonFunc.findObjectsByNames(movemjjsParam.needMoveMjjNames);

    var canMoveRealObjs = [];//真正能移动的架子

    $.each(moveMjjObjs, function (_index, _obj) {

        if (!_obj.oldPositionX) { _obj.oldPositionX = _obj.position.x; }

        if (!_obj.oldPositionZ) { _obj.oldPositionZ = _obj.position.z; }

        var movevalue = 0;//该架子移动前 已经移动了多少

        if (Math.abs(_obj.position[movemjjsParam.directStr] - _obj["oldPosition" + movemjjsParam.directStrLager]) > 10) {

            movevalue = _obj.position[movemjjsParam.directStr] - _obj["oldPosition" + movemjjsParam.directStrLager];

        }

        if (movevalue == 0) {//如果未移动过

            if (movemjjsParam.directValue == movemjjsParam.onlyCanMoveValue) {

                canMoveRealObjs.push(_obj);

            }

        } else {

            if (movemjjsParam.directValue != movemjjsParam.onlyCanMoveValue) {

                canMoveRealObjs.push(_obj);

            }

        }

    });

    console.log(canMoveRealObjs);

    $.each(canMoveRealObjs, function (_index, _obj) {

        _obj.position[movemjjsParam.directStr] = _obj.position[movemjjsParam.directStr] + moveLength * movemjjsParam.directValue;

    });

    //new TWEEN.Tween(moveL).to({

    //    length: moveLength

    //}, 200).onUpdate(function (a) {

    //    var _this = this;

    //    $.each(canMoveRealObjs, function (_index, _obj) {

    //        _obj.position[movemjjsParam.directStr] = _obj["currentValue" + movemjjsParam.directStr] + _this.length * movemjjsParam.directValue;

    //    });

    //}).onComplete(function () {

    //}).start();

}

ModelBusiness.prototype.closeMJJ = function (obj,timelong,callBack) {

    var info = modelBusiness.getMJJBindRelationByModelId(obj.name);

    var maxColNub = info.maxColNub;

    var prefixName = obj.name.split("_")[0] + "_" + obj.name.split("_")[1] + "_";//前缀

    var mjjNames = [];

    for (var i = 1; i <= maxColNub; i++) {

        mjjNames.push(prefixName+i);

    }

    var moveMjjObjs = WT3DObj.commonFunc.findObjectsByNames(mjjNames);

    $.each(moveMjjObjs, function (_index,_obj) {

        new TWEEN.Tween(_obj.position).to({

            x: _obj.oldPositionX,

            z:_obj.oldPositionZ

        }, timelong ? timelong : 200).onComplete(function () {

            if (callBack) {

                callBack();

            }

        }).start();

    });

}
1.3、密集架支持通风,锁定、解锁、自检等操作,并配有相关动画。效果如下:

这里我们通过导入通风模型的方式来实现,当通风打开时,我们载入通风动画模型,然后定时销毁即可
实现如下:
//打开 1 关闭 0 通风

ModelBusiness.prototype.windFunc = function (type,position) {

    var models = [{ "show": true, "uuid": "", "name": "flowtube_7", "objType": "flowTube", "points": [{ "x": -600, "y": 0, "z": 0 }, { "x": -300, "y": -350, "z": 0 }, { "x": 300, "y": -350, "z": null }, { "x": 600, "y": 0, "z": null }], "position": position, "scale": { "x": 1, "y": 1, "z": 1 }, "rotation": [{ "direction": "x", "degree": 0 }, { "direction": "y", "degree": Math.PI }, { "direction": "z", "degree": 0 }], "style": { "skinColor": 16772846, "imgurl": "../img/3dImg/right1.png", "opacity": 1, "canvasSkin": { "cwidth": 1024, "cheight": 128, "cwNub": 8, "chNub": 12, "cMarginW": 0.2, "cMarginH": 0.2, "speed": 8, "fps": 20, "direction": "w", "forward": "f", "side": 2, "run": true, "bgcolor": "rgba(0, 255, 34, 0.02)" } }, "segments": 3, "radialSegments": 2, "closed": false, "radius": 200, "showSortNub": 7000, "customType1": "", "customType2": "", "animation": null, "dbclickEvents": null, "BindDevId": null, "BindDevName": null, "devInfo": null, "BindMeteId": null, "BindMeteName": null }];

    WT3DObj.commonFunc.loadModelsByJsons(models, { x: 0, y: 0, z: 0 }, { x: 0, y: 0, z: 0 }, true);

    setTimeout(function () {

        var flowtube_7 = WT3DObj.commonFunc.findObject("flowtube_7");

        if (type == 1) {

            layer.msg("正在执行打开通风!");

            setTimeout(function () {

                WT3DObj.commonFunc.changeObjsOpacity([flowtube_7], 1, 0.1, 800);

                setTimeout(function () {

                    flowtube_7.visible = false;

                    WT3DObj.destoryObj(flowtube_7);

                    WT3DObj.destoryObj("flowtube_7");

                }, 500);

            }, 5000);

        } else {

            setTimeout(function () {

                layer.msg("正在执行关闭通风!");

                new TWEEN.Tween(flowtube_7.scale).to({

                    x: 20,

                    y: 20,

                    z: 20,

                }, 1000).onUpdate(function (a) {

                }).onComplete(function () {

                    flowtube_7.visible = false;

                    flowtube_7.scale.x = 0.001;

                    flowtube_7.scale.y = 0.001;

                    flowtube_7.scale.z = 0.001;

                    setTimeout(function () {

                        WT3DObj.destoryObj(flowtube_7);

                        WT3DObj.destoryObj("flowtube_7");

                    }, 200);

                }).start();

            }, 1000);

        }

    }, 200);

}
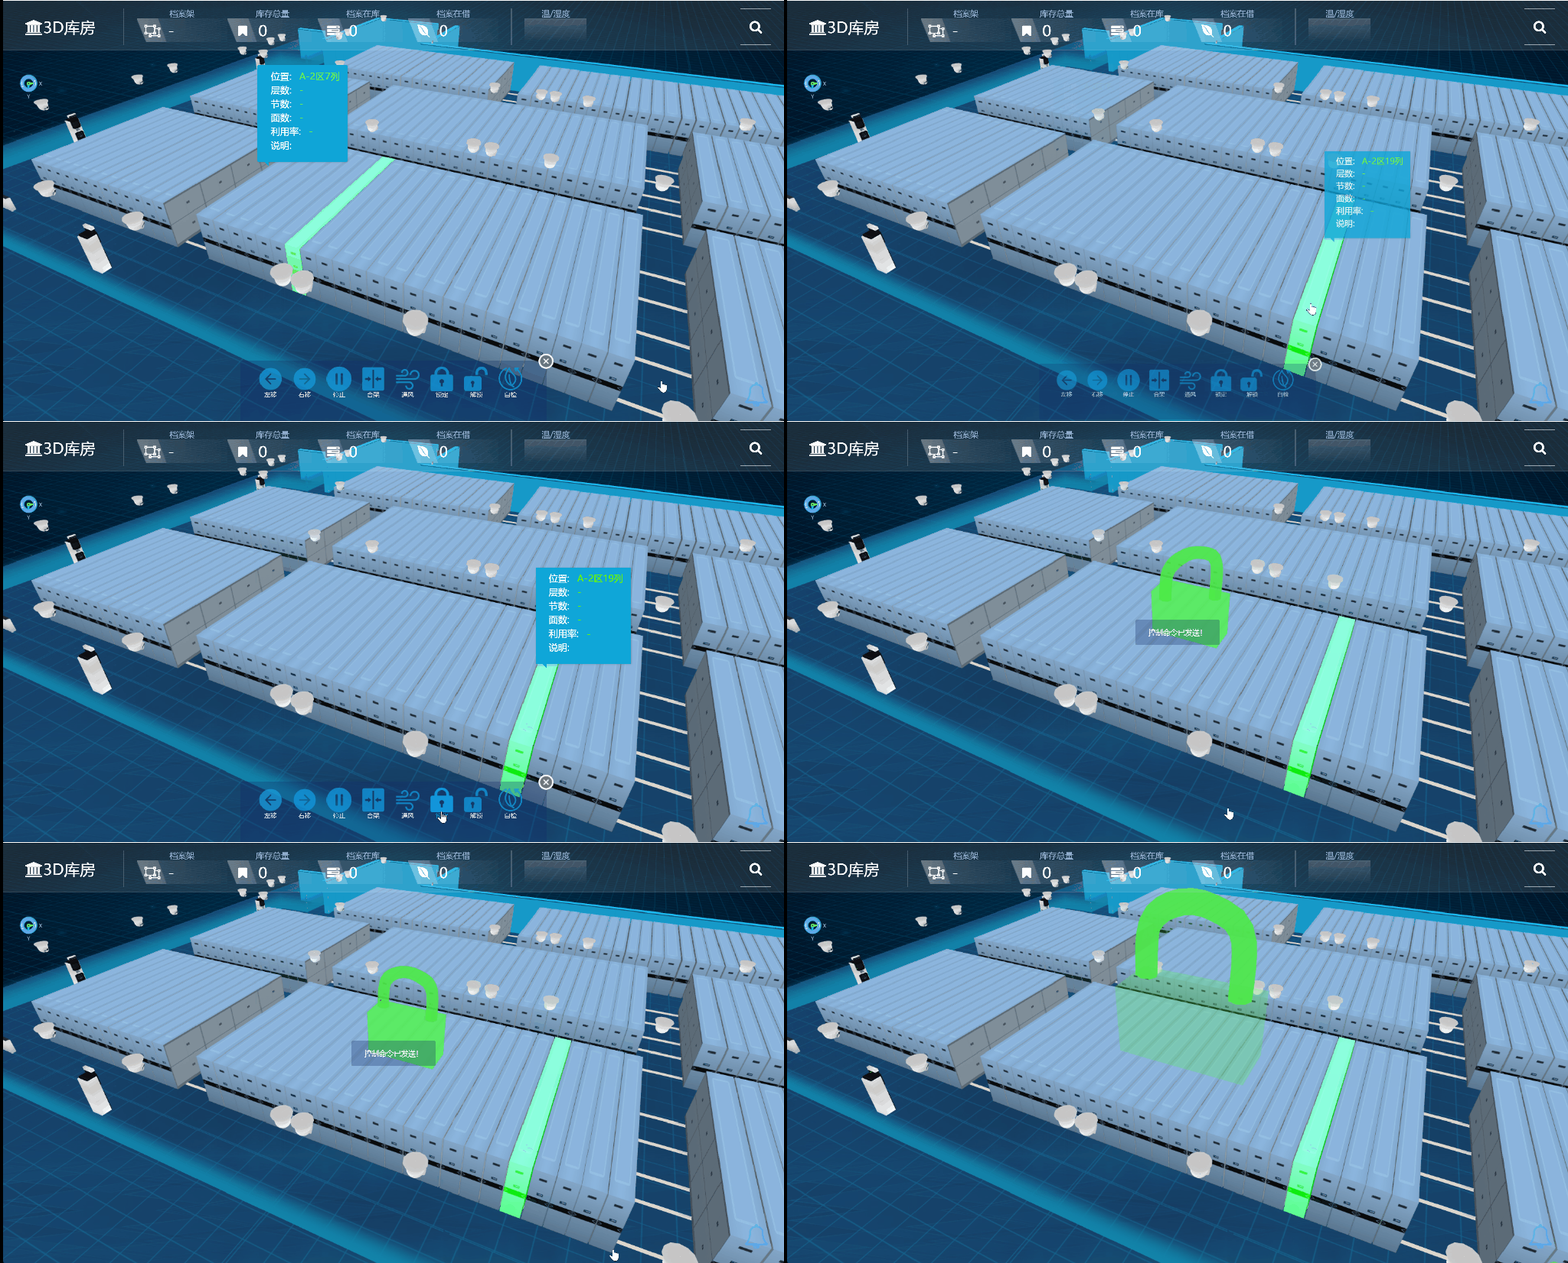
与通风动画类似,我们通过载入锁动画模型,实现如下:
//开锁 1 关锁 0特效

ModelBusiness.prototype.lockFunc = function (position,type) {

    var models = null;

    if (type == 1) {

        models = [{ "show": true, "uuid": "", "name": "lock_7", "objType": "GroupObj", "scale": { "x": 4, "y": 4, "z": 4 }, "position": { "x": 0, "y": 0, "z": 0 }, "rotation": [{ "direction": "x", "degree": 0 }, { "direction": "y", "degree": 0 }, { "direction": "z", "degree": 0 }], "childrens": [{ "show": true, "uuid": "", "name": "lock_7OBJCREN0", "objType": "ExtrudeGeometry", "position": { "x": 0, "y": 0, "z": 0 }, "style": { "skinColor": 5306186, "opacity": 0.8 }, "scale": { "x": 1, "y": 1, "z": 1 }, "shapeParm": { "points": [{ "x": 100, "y": -120, "type": "nomal" }, { "x": 100, "y": 120, "type": "nomal" }, { "x": -100, "y": 120, "type": "nomal" }, { "x": -100, "y": -120, "type": "nomal" }], "holes": [] }, "extrudeSettings": { "amount": 0, "curveSegments": 1, "steps": 1, "bevelEnabled": true, "bevelThickness": 1, "bevelSize": 1, "bevelSegments": 1, "extrudePathPoints": [{ "x": 0, "y": 0, "z": -50 }, { "x": 0, "y": 0, "z": 50 }] }, "showSortNub": 6000, "customType1": "", "customType2": "", "animation": null, "dbclickEvents": null, "rotation": [{ "direction": "x", "degree": 0 }, { "direction": "y", "degree": 0 }, { "direction": "z", "degree": 0 }], "BindDevId": null, "BindDevName": null, "devInfo": null, "BindMeteId": null, "BindMeteName": null }, { "show": true, "uuid": "", "name": "lock_7OBJCREN1", "objType": "tube", "points": [{ "x": 0, "y": 0, "z": 0 }, { "x": 0, "y": 150, "z": 0 }, { "x": -50, "y": 190, "z": 0 }, { "x": -110, "y": 190, "z": 0 }, { "x": -160, "y": 150, "z": 0 }, { "x": -170, "y": 60, "z": 0 }], "position": { "x": 84.692, "y": 33.246, "z": 0 }, "scale": { "x": 1, "y": 1, "z": 1 }, "rotation": [{ "direction": "x", "degree": 0 }, { "direction": "y", "degree": 0 }, { "direction": "z", "degree": 0 }], "style": { "skinColor": 5040966, "opacity": 0.9 }, "segments": 24, "radialSegments": 8, "closed": false, "radius": 20, "showSortNub": 7000, "customType1": "", "customType2": "", "animation": null, "dbclickEvents": null, "BindDevId": null, "BindDevName": null, "devInfo": null, "BindMeteId": null, "BindMeteName": null }], "showSortNub": 7000, "customType1": "", "customType2": "", "animation": null, "dbclickEvents": null, "BindDevId": null, "BindDevName": null, "devInfo": null, "BindMeteId": null, "BindMeteName": null }];

    } else {

        models = [{ "show": true, "uuid": "", "name": "lock_7", "objType": "GroupObj", "scale": { "x": 4, "y": 4, "z": 4 }, "position": { "x": 0, "y": 0, "z": 0 }, "rotation": [{ "direction": "x", "degree": 0 }], "childrens": [{ "show": true, "uuid": "", "name": "lock_7OBJCREN0", "objType": "ExtrudeGeometry", "position": { "x": 0, "y": 0, "z": 0 }, "style": { "skinColor": 5306186, "opacity": 0.8 }, "scale": { "x": 1, "y": 1, "z": 1 }, "shapeParm": { "points": [{ "x": 100, "y": -120, "type": "nomal" }, { "x": 100, "y": 120, "type": "nomal" }, { "x": -100, "y": 120, "type": "nomal" }, { "x": -100, "y": -120, "type": "nomal" }], "holes": [] }, "extrudeSettings": { "amount": 0, "curveSegments": 1, "steps": 1, "bevelEnabled": true, "bevelThickness": 1, "bevelSize": 1, "bevelSegments": 1, "extrudePathPoints": [{ "x": 0, "y": 0, "z": -50 }, { "x": 0, "y": 0, "z": 50 }] }, "showSortNub": 6000, "customType1": "", "customType2": "", "animation": null, "dbclickEvents": null, "rotation": [{ "direction": "x", "degree": 0 }, { "direction": "y", "degree": 0 }, { "direction": "z", "degree": 0 }], "BindDevId": null, "BindDevName": null, "devInfo": null, "BindMeteId": null, "BindMeteName": null }, { "show": true, "uuid": "", "name": "lock_7OBJCREN1", "objType": "tube", "points": [{ "x": 0, "y": 0, "z": 0 }, { "x": 0, "y": 150, "z": 0 }, { "x": -50, "y": 190, "z": 0 }, { "x": -110, "y": 190, "z": 0 }, { "x": -160, "y": 150, "z": 0 }, { "x": -170, "y": 60, "z": 0 }], "position": { "x": 84.692, "y": 75.037, "z": 0 }, "scale": { "x": 1, "y": 1, "z": 1 }, "rotation": [{ "direction": "x", "degree": -3.141592653589793 }, { "direction": "y", "degree": 1.2246468525851679e-16 }, { "direction": "z", "degree": -3.141592653589793 }], "style": { "skinColor": 5040966, "opacity": 0.9 }, "segments": 24, "radialSegments": 8, "closed": false, "radius": 20, "showSortNub": 7000, "customType1": "", "customType2": "", "animation": null, "dbclickEvents": null, "BindDevId": null, "BindDevName": null, "devInfo": null, "BindMeteId": null, "BindMeteName": null }], "showSortNub": 7000 }];

    }

    WT3DObj.commonFunc.loadModelsByJsons(models, position, { x: 0, y: 0, z: 0 }, true);

    setTimeout(function () {

        var lock7 = WT3DObj.commonFunc.findObject("lock_7");

        if (type == 1) {

            var top1 = lock7.children[1];

            top1.oldpositiony = top1.position.y;

            var moveobj = { x: 0 };

            new TWEEN.Tween(moveobj).to({

                x: 25

            }, 500).onUpdate(function (a) {

                var _this = this;

                top1.position.y = top1.oldpositiony + _this.x;

                top1.matrixAutoUpdate = true;

            }).onComplete(function () {

                new TWEEN.Tween(top1.rotation).to({

                    y: Math.PI,

                }, 1000).onUpdate(function (a) {

                    top1.matrixAutoUpdate = true;

                }).onComplete(function () {

                    setTimeout(function () {

                        WT3DObj.commonFunc.changeObjsOpacity([lock7], 1, 0.1, 800);

                        new TWEEN.Tween(lock7.scale).to({

                            x: 10,

                            y: 10,

                            z: 10,

                        }, 1000).onUpdate(function (a) {

                        }).onComplete(function () {

                            lock7.visible = false;

                            lock7.scale.x = 0.001;

                            lock7.scale.y = 0.001;

                            lock7.scale.z = 0.001;

                            setTimeout(function () {

                                WT3DObj.destoryObj(lock7);

                                WT3DObj.destoryObj("lock_7");

                            }, 200);

                        }).start();

                    }, 1000);

                }).start();

            }).start();

        } else {

            var top1 = lock7.children[1];

            top1.oldpositiony = top1.position.y;

            new TWEEN.Tween(top1.rotation).to({

                y: Math.PI,

            }, 1000).onUpdate(function (a) {

                top1.matrixAutoUpdate = true;

            }).onComplete(function () {

                var moveobj = { x: 0 };

                new TWEEN.Tween(moveobj).to({

                    x: -25

                }, 500).onUpdate(function (a) {

                    var _this = this;

                    top1.position.y = top1.oldpositiony + _this.x;

                    top1.matrixAutoUpdate = true;

                }).onComplete(function () {

                    setTimeout(function () {

                        WT3DObj.commonFunc.changeObjsOpacity([lock7], 1, 0.1, 800);

                        new TWEEN.Tween(lock7.scale).to({

                            x: 10,

                            y: 10,

                            z: 10,

                        }, 1000).onUpdate(function (a) { }).onComplete(function () {

                            lock7.visible = false;

                            lock7.scale.x = 0.001;

                            lock7.scale.y = 0.001;

                            lock7.scale.z = 0.001;

                            setTimeout(function () {

                                WT3DObj.destoryObj(lock7);

                                WT3DObj.destoryObj("lock_7");

                            }, 200);

                        }).start();

                    }, 1000);

                }).start();

            }).start();

        }

    }, 200);

}

1.4、库房内安装有区域控制器,八防感知系统等设备。点击设备可以看到其实时监控数据,效果如下:

这就比较简单了,我们只需要获取到模型的位置,再转换成屏幕的二维位置,然后再对应的位置上加上tips即可,这里我用的时layer.tips
实现如下:
ModelBusiness.prototype.showMsg = function (_obj, position, html, closeFunc) {

    //获取位置

    var screenPostion = WT3DObj.commonFunc.transToScreenCoord({ x: _obj.position.x + position.x, y: _obj.position.y + position.y, z: _obj.position.z + position.z });

    $("#MarkMessageHelper").remove();

    $("body").append("<div id='MarkMessageHelper' style='position:absolute;left:" + (screenPostion.x - 30) + "px;top:" + screenPostion.y + "px;height:2px;width:2px;z-index:1000;'></div>");

    var urandom = (Math.random() * 100).toFixed(0);

    layer.closeAll();

    layer.tips(html, '#MarkMessageHelper', {

        closeBtn: 1,

        shade: false,

        shadeClose: true,

        area: ["300px", "200px"],

        maxWidth: 1000,

        maxHeight: 350,

        time: 0,//是否定时关闭,0表示不关闭

        cancel: function (index, layero) {

            if (closeFunc) {

                closeFunc();

            }

        },

        tips: [1, "rgba(0,0,0,0.8)"] //还可配置颜色

    });

}
二、虚拟小库房的效果与实现方式
项目中除了大库房的实际应用,还涉及到一个小库房展厅的各种设备接入与实现。
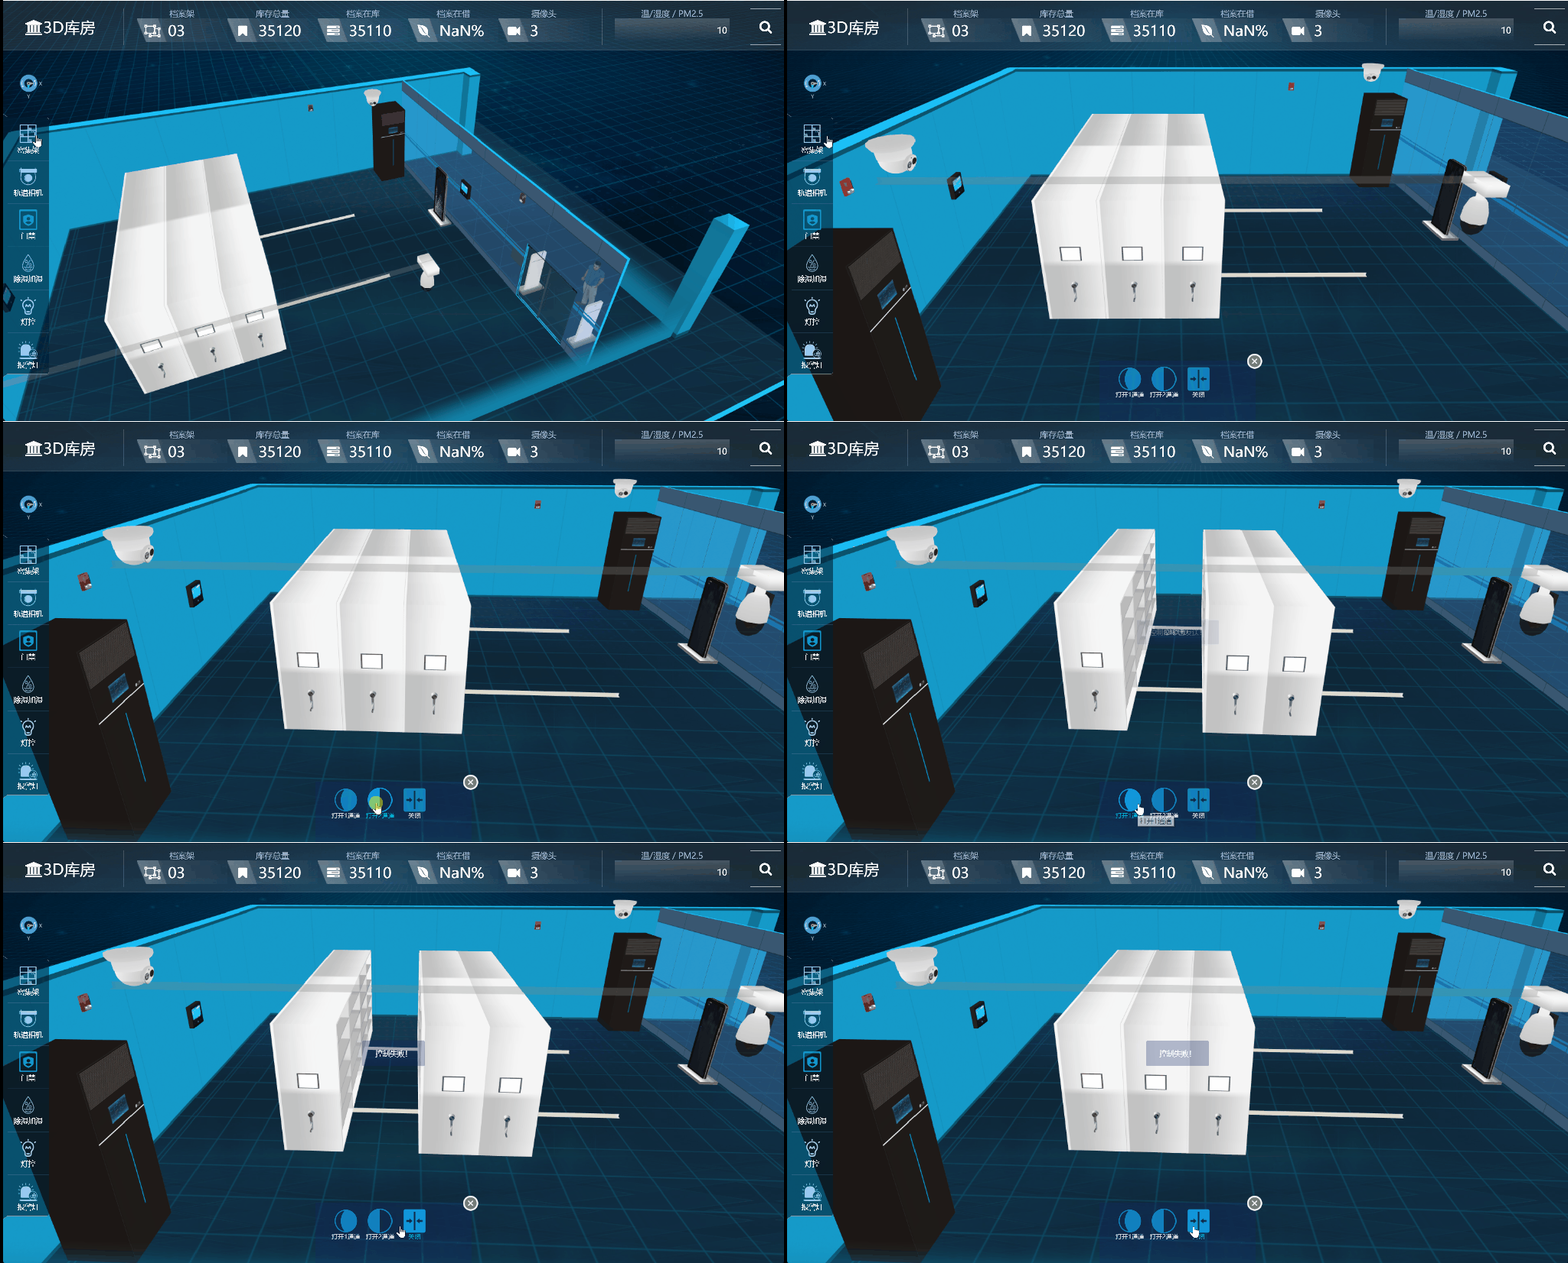
2.1、库房中,接入了轨道摄像机,普通摄像机,温湿度一体机,声光报警灯,灯控开关,门禁,rfid门卡,八防感知,区域控制器等等。小库房主界面效果如下:

2.2、由于小库房展厅的密集架没那么多,这里的打开密集架通道,我们可以动过强耦合的方式,将移动位置直接写死再代码里
代码如下:
//密集架控制

ModelBusiness.prototype.mjjCtrlSystem = function () {

    showposition = { x: 200, y: 700, z: 0 };

    showhtml = "";

    var html = ' <div class="ctrbtn" id="btn_o1"> <img style="width:48px;height:48px;" src="../img/pageimg2/l1.png" title="打开1通道" /><br/>打开1通道</div>\

           <div class="ctrbtn" id="btn_o2"><img style="width:48px;height:48px;" src="../img/pageimg2/l2.png" title="打开2通道" /><br/>打开2通道</div>\

           <div class="ctrbtn" id="btn_o3"><img style="width:48px;height:48px;" src="../img/pageimg2/together.png" title="关闭" /><br/>关闭</div>\

         ';

    //获取位置

    this.showMsg2(null, null,300, html, function () {

        $(".ctrbtn").click(function () {

            {

                var id = $(this).attr("id");

                var state = -1;

                switch (id) {

                    case "btn_o1":

                        {

                            state = "1";

                            WT3DObj.commonFunc.findObject("mjj_1_2").position.x = 2300;

                            WT3DObj.commonFunc.findObject("mjj_1_3").position.x = 1900;

                        }

                        break;

                    case "btn_o2":

                        {

                            state = "2";

                            WT3DObj.commonFunc.findObject("mjj_1_2").position.x = 2879;

                            WT3DObj.commonFunc.findObject("mjj_1_3").position.x = 1500;

                        }

                        break;

                    case "btn_o3":

                        {

                            WT3DObj.commonFunc.findObject("mjj_1_2").position.x = 2879;

                            WT3DObj.commonFunc.findObject("mjj_1_3").position.x = 2428;

                        }

                        break;

                }

                layer.msg("控制命令已发送!");

                webapi.controlDev("Sandtable/shelf", state, function (response) {

                    if (response) {

                        if (response.code == "1") response.msg = "控制成功";

                        layer.msg(response.msg);

                    }

                }, function (error) {

                    layer.msg("控制失败!");

                    console.log(error);

                });

            }

        });

    });

    return;

}
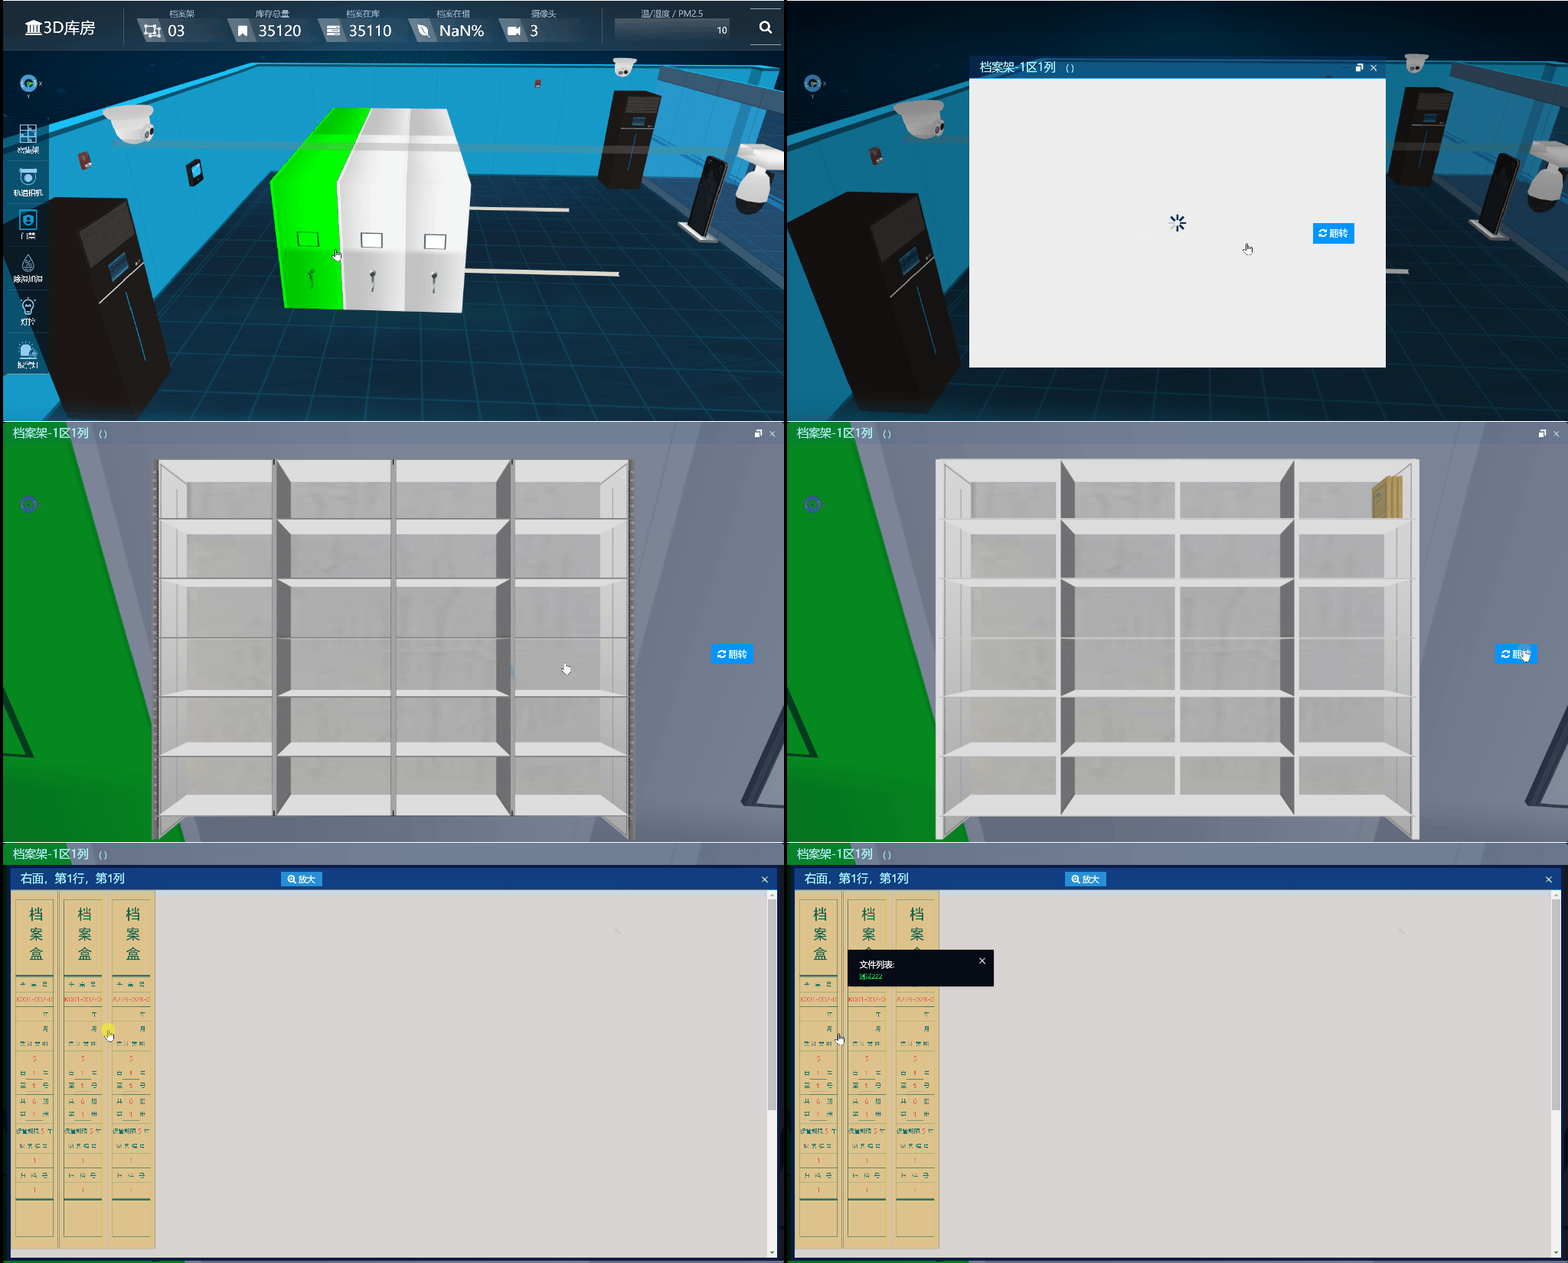
2.3、所有密集架都可以打开,查看内部详情,双击密集架,镜头定位推进,然后打开密集架的内部结构,效果如下:

2.4、当密集架中有档案数据时,3d架子内会自动在对应的位置显示档案盒,双击档案盒对应的格子,为了便于操控,我通过div弹窗的方式,将档案盒详细脊背展现出来,
点击脊背,还详细展示出档案盒内的文件链接列表,这就看具体数据了,可能时pdf world excel 亦或者时拍照存留的图片
具体实现如下:
function openW(a) {
window.parent.$(".layui-layer-setwin").hide();
$("#fzbtn").hide();
window.parent.$("iframe").height($(window.parent).height() - 50);
console.log(a);
var title = "";
var face = 0;
var quno = getQueryString("quno");
var colnub = getQueryString("colnub");
var row = a.name.split("_")[1];
var jie = a.name.split("_")[2];
if (a.name.indexOf("lattice1") >= 0) {
title = "左面,第" + row + "行,第" + jie+ "节";
} else {
title = "右面,第" + row + "行,第" + jie + "列";
face =1;
}
var detail = LatCache["r" + (face) + "_" + row + "_c_" + jie];
if (detail && detail.desc) {
title +="<font style='font-size:16px;margin-left:20px;'>("+ replaceNull(detail.desc)+")</font>";
}
layer.open({
type: 1, title: title,
skin: "layui-layer-rim",
shade: 0.8,
shadeClose: false,
area: [($(window).width() - 10) + "px", ($(window).height() -10) + "px"],
content: '<div style="width:100%;background-color:#d7d3d2 !important;overflow: auto;height: 100%;" id="boxsDivFather"><div id="boxsDiv" style="width:100%;overflow-x: auto;display:flex;overflow-y: hidden;transform-origin:0 0"></div></div>',
cancel: function () {
$("#fzbtn").show();
window.parent.$(".layui-layer-setwin").show();
window.parent.$("iframe").height($(window.parent).height() - 100);
if (boxLayerIndex) {
layer.close(boxLayerIndex);
}
}, success: function () {
scale15 = false;
$(".layui-layer-content").after("<button id='fdbtn' style=' text-align:center;position:absolute; top: 8px;font-size: 16px;left: 500px;width: 80px;height: 28px; background: #288fd8;color: white;border: 0px;margin-left:20px;cursor:pointer;' onclick='fdFunc()'><i class='ace-icon fa fa-search-plus' style='font-size:18px;'></i> 放大</button>");
setTimeout(function () {
webapi.deviceInfo(room, dataId, face, row, jie, function (books) {
var allhtml = "";
books=books.sort(function(a,b){return a.sortNub-b.sortNub});
$.each(books,function(_bindex,_bobj){
boxcacheData["b_"+_bobj.id]=_bobj;
var ftype = 0;
if (mjjparam.fileType && mjjparam.fileType != 0) {
ftype = mjjparam.fileType;
} else if (_bobj.boxType) {
ftype = _bobj.boxType;
}
allhtml += getBoxFaceByType(ftype, _bindex, _bobj)
});
$("#boxsDiv").html(allhtml);
console.log(a.name);
$(".boxSelectCSS").click(function () {
var id = $(this).attr("data-id");
webapi.boxDetailInfo(id, function (files) {
var showhtml = ' <div class="row" style="width:320px; margin-left:7px; margin-top:10px;">'
+ '<div class="col-sm-12" style="margin-top: 10px">';
showhtml += '<div class="input-group">'
+ '<span class="input-group-addon" style="font-size: 16px;">文件列表:</span>'
+ '</div>'
$.each(files, function (_findex,_fobj) {
showhtml += '<div class="input-group">'
+ '<font style="color:#16ff59;cursor:pointer;" onclick="window.open(\'' + _fobj.fileSrc + '\');">' + _fobj.name + '</font>'
+ '</div>';
});
showhtml += '</div></div>';
boxLayerIndex = layer.tips(showhtml, "#b_archiveno_" + id, {
closeBtn: 1,
tips:2,
shade: false,
shadeClose: true,
area: ["280px", "auto"],
maxWidth: 1000,
maxHeight: 750,
time: 0,//是否定时关闭,0表示不关闭
cancel: function (index, layero) {
boxLayerIndex = null;
},
tips: [1, "rgba(0,0,0,0.8)"] //还可配置颜色
});
}, function (err) {
}, false);
});
$(".boxSelectCSS").dblclick(function () {
var id = $(this).attr("data-id");
webapi.boxDetailInfo(id, function (files) {
if (files.length > 0) {
window.open( files[0].fileSrc);
}
}, function (err) {
}, false);
});
var scaleheigt = ($(window).height() - 70) / $("#boxsDiv").height();
if (scaleheigt < 1) {
ScaleSize = scaleheigt;
$("#boxsDiv").width(1 / scaleheigt * 100 + "%");
$("#boxsDiv").css("transform", "scale(" + scaleheigt + ")");
} else {
ScaleSize = 1;
}
}, function () { });
}, 200);
}
});
}
2.5、控制轨道相机的位置,通过选择通道,改变轨道相机的位置
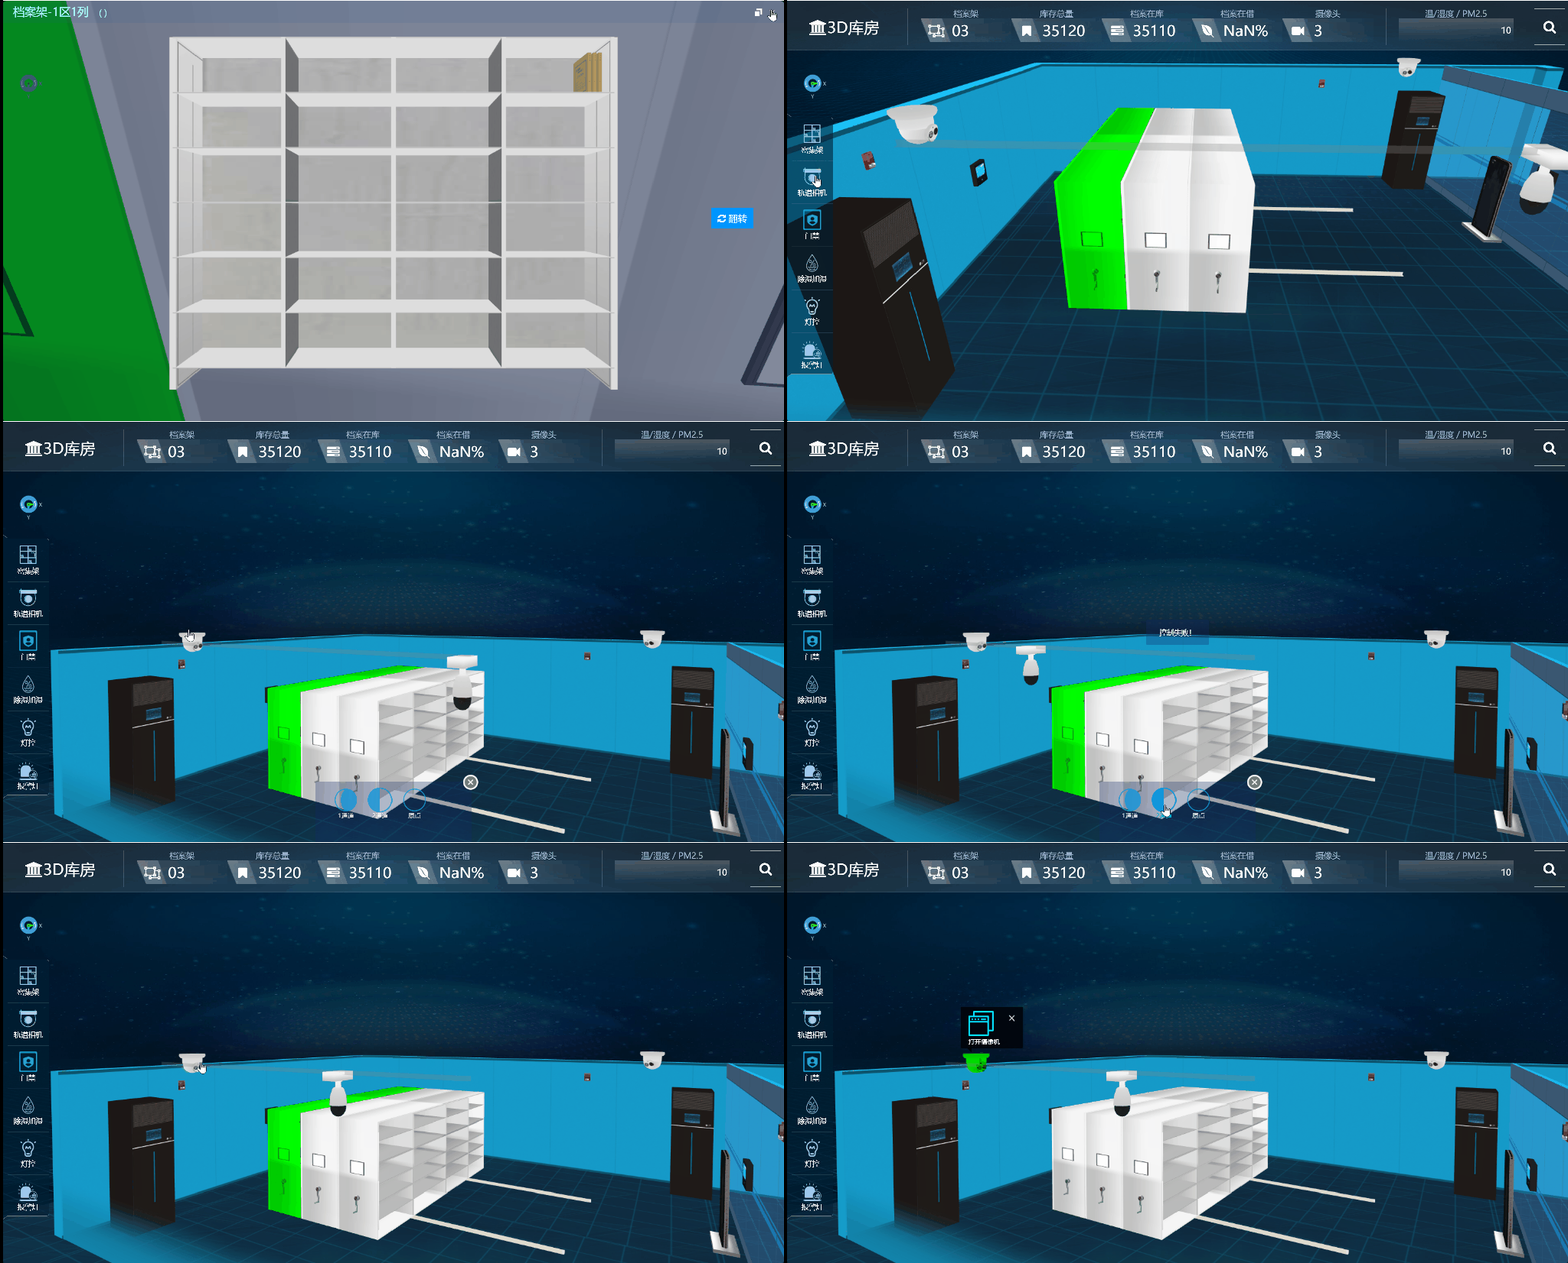
这个实现比较简单,我们只需要修改它的position属性即可,
//轨道摄像机

ModelBusiness.prototype.gdsxjCtrlSystem = function () {

    showposition = { x: 200, y: 700, z: 0 };

    showhtml = "";

    var html = ' <div class="ctrbtn" id="btn_o1"> <img style="width:48px;height:48px;" src="../img/pageimg2/l1.png" title="1通道" /><br/>1通道</div>\

           <div class="ctrbtn" id="btn_o2"><img style="width:48px;height:48px;" src="../img/pageimg2/l2.png" title="2通道" /><br/>2通道</div>\

           <div class="ctrbtn" id="btn_o3"><img style="width:48px;height:48px;" src="../img/pageimg2/l3.png" title="原点" /><br/>原点</div>\

         ';

    //获取位置

    this.showMsg2(null, null, 300, html, function () {

        $(".ctrbtn").click(function () {

            {

                var id = $(this).attr("id");

                var state = -1;

                switch (id) {

                    case "btn_o1":

                        {

                            state = "1";

                                WT3DObj.commonFunc.findObject("xxj_2_263").position.x = 3200;

                        }

                        break;

                    case "btn_o2":

                        {

                            state = "2";

                            WT3DObj.commonFunc.findObject("xxj_2_263").position.x = 2300;

                        }

                        break;

                    case "btn_o3":

                        {

                            WT3DObj.commonFunc.findObject("xxj_2_263").position.x = 1400;

                        }

                        break;

                }

                layer.msg("控制命令已发送!");

                webapi.controlDev("Sandtable/cam", state, function (response) {

                    if (response) {

                        if (response.code == "1") response.msg = "控制成功";

                        layer.msg(response.msg);

                    }

                }, function (error) {

                    layer.msg("控制失败!");

                    console.log(error);

                });

            }

        });

    });

    return;

}
2.6、控制门禁,实现远程开门,在三维里面反馈展示
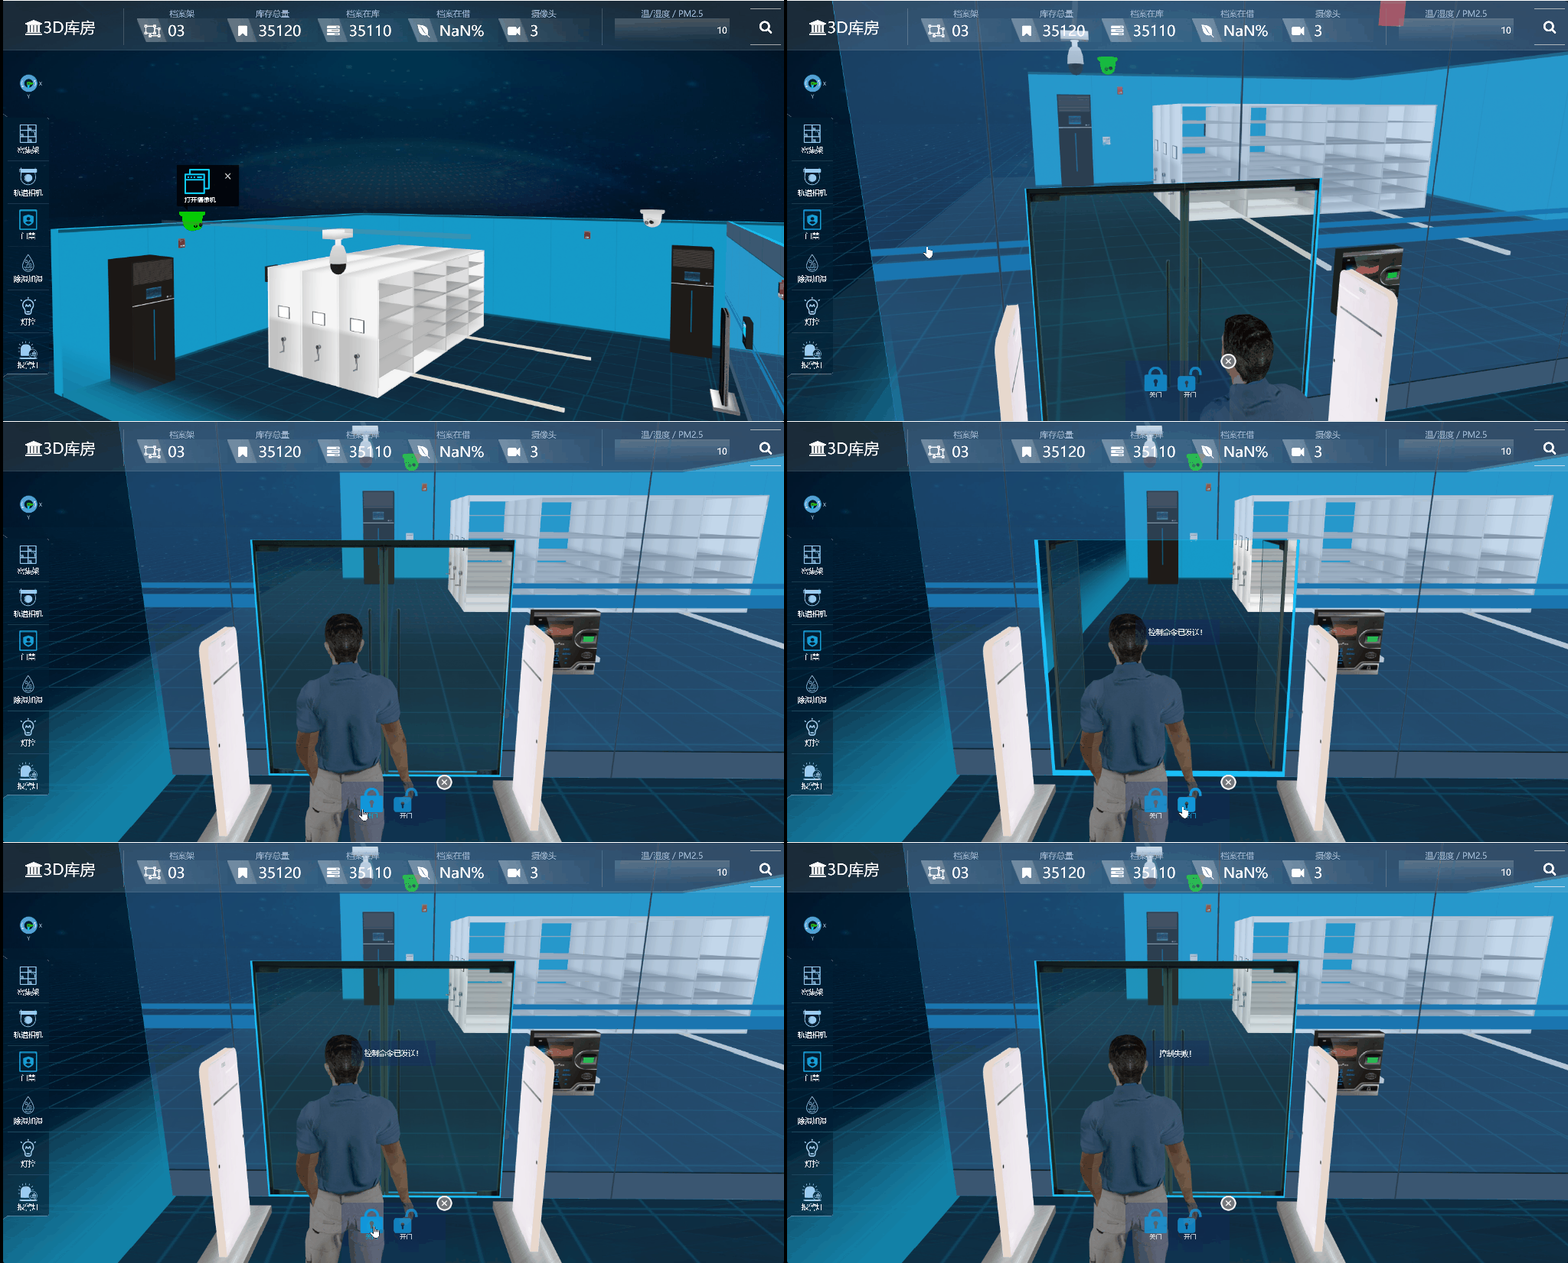
具体实现:
//门禁

ModelBusiness.prototype.doorCtrlSystem = function () {

    showposition = { x: 200, y: 700, z: 0 };

    showhtml = "";

    var html = ' <div class="ctrbtn" id="btn_closedoor"> <img style="width:48px;height:48px;" src="../img/pageimg2/lock.png" title="关灯" /><br/>关门</div>\

           <div class="ctrbtn" id="btn_opendoor"><img style="width:48px;height:48px;" src="../img/pageimg2/unlock.png" title="开门" /><br/>开门</div>\

         ';

    //获取位置

    this.showMsg2(null, null, 200, html, function () {

        $(".ctrbtn").click(function () {

            {

                var id = $(this).attr("id");

                var state = -1;

                switch (id) {

                    case "btn_closedoor":

                        {

                            state = "2";

                            WT3DObj.commonFunc.findObject("door_1").position.x = -163.322

                            WT3DObj.commonFunc.findObject("door_1").position.z = 2680.743

                            WT3DObj.commonFunc.findObject("door_1").rotation.y = 0;

                            WT3DObj.commonFunc.findObject("door_2").position.x = -163.322

                            WT3DObj.commonFunc.findObject("door_2").position.z = 3081.653

                            WT3DObj.commonFunc.findObject("door_2").rotation.y = 0

                        }

                        break;

                    case "btn_opendoor":

                        {

                            state = "1";

                            WT3DObj.commonFunc.findObject("door_1").position.x = 74

                            WT3DObj.commonFunc.findObject("door_1").position.z = 2500

                            WT3DObj.commonFunc.findObject("door_1").rotation.y = Math.PI / 2;

                            WT3DObj.commonFunc.findObject("door_2").position.x = 74

                            WT3DObj.commonFunc.findObject("door_2").position.z = 3250

                            WT3DObj.commonFunc.findObject("door_2").rotation.y = -Math.PI / 2

                            state = "1";

                        }

                        break;

                }

                layer.msg("控制命令已发送!");

                webapi.controlDev("Sadntable/door", state, function (response) {

                    if (response) {

                        if (response.code == "1") response.msg = "控制成功";

                        layer.msg(response.msg);

                    }

                }, function (error) {

                    layer.msg("控制失败!");

                    console.log(error);

                });

            }

        });

    });

    return;

}
2.7、控制温湿度一体机
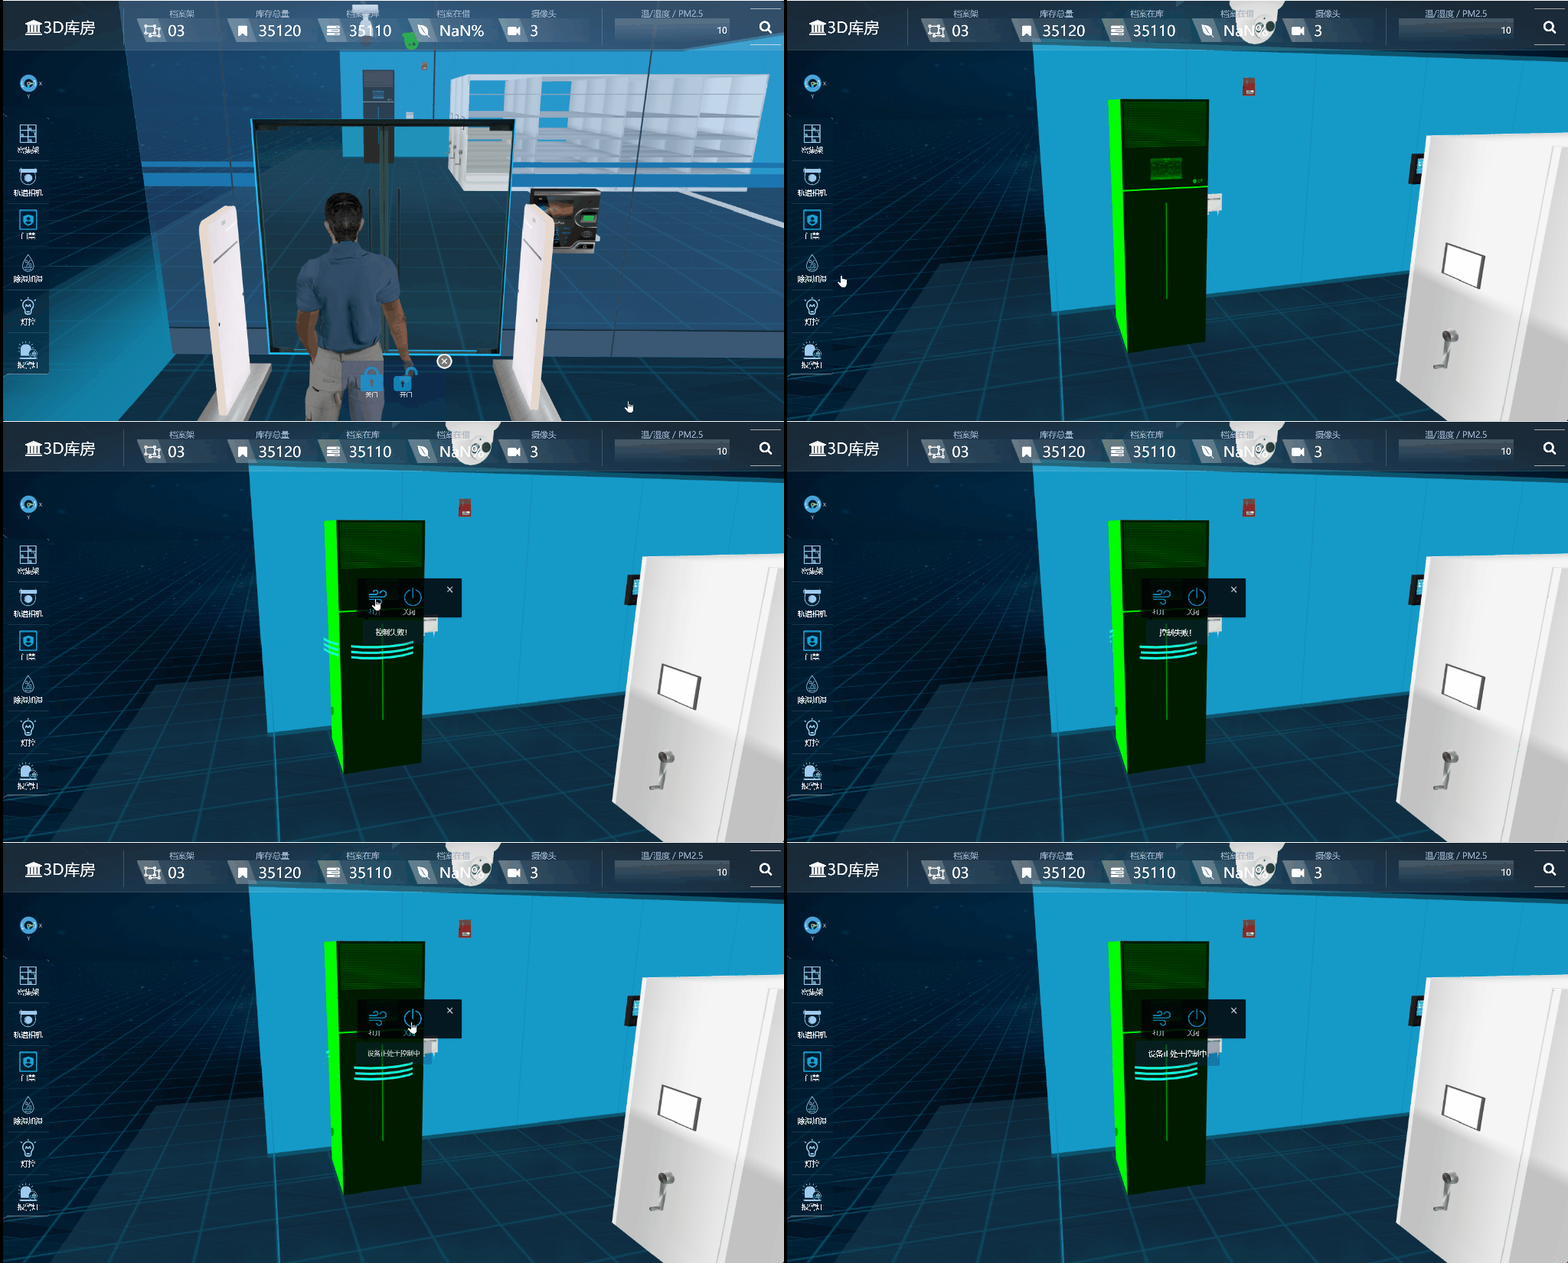
这里实现,也是通过载入开关动画的方式
具体实现:
//一体机    16

ModelBusiness.prototype.ctrlYITIJI = function (model, action) {

   {

        var cresultState = true;

        switch (action) {

            case "1":

                cresultState = modelBusiness.ctrlJSAnimation(model);

                break;

            case "2":

                cresultState = modelBusiness.closeDev(model);

                break;

        }

        //发送控制命令

        if (cresultState) {

            webapi.controlDev("Sandtable/aiodevice", action, function (response) {

                if (response) {

                    if (response.msg == "") response.msg = "控制成功"; layer.msg(response.msg);

                }

            }, function (error) {

                layer.msg("控制失败!");

                console.log(error);

            });

        }

    }

}
2.8、控制灯控系统

这里我们通过加上光照效果,实现方式是修改环境光显示隐藏的属性,即可达到灯光效果,由于全程可见,我们通过地面的阴影来体现灯光的开关。
具体实现:
//灯控

ModelBusiness.prototype.lightCtrlSystem = function () {

    showposition = { x: 200, y: 700, z: 0 };

    showhtml = "";

    var html = ' <div class="ctrbtn" id="btn_closelight"> <img style="width:48px;height:48px;" src="../img/pageimg2/closeLight.png" title="关灯" /><br/>关灯</div>\

           <div class="ctrbtn" id="btn_l3"><img style="width:48px;height:48px;" src="../img/pageimg2/l3.png" title="开灯" /><br/>开灯</div>\

         ';

    //获取位置

    this.showMsg2(null, null, 200, html, function () {

        $(".ctrbtn").click(function () {

            {

                var id = $(this).attr("id");

                var state = -1;

                switch (id) {

                    case "btn_closelight":

                        {

                            state = "2";

                            WT3DObj.commonFunc.findObject("DirectionalLight_429").visible=false;

                        }

                        break;

                    case "btn_l1":

                        {

                            state = 1;

                        }

                        break;

                    case "btn_l2":

                        {

                            state = 2;

                        }

                        break;

                    case "btn_l3":

                        {

                            WT3DObj.commonFunc.findObject("DirectionalLight_429").visible = true;

                            state = "1";

                        }

                        break;

                }

                layer.msg("控制命令已发送!");

                webapi.controlDev("Sandtable/light", state, function (response) {

                    if (response) {

                        if (response.code == "1") response.msg = "控制成功";

                        layer.msg(response.msg);

                    }

                }, function (error) {

                    layer.msg("控制失败!");

                    console.log(error);

                });

            }

        });

    });

    return;

}
2.9、声光报警器触发。

通过修改声光效果的属性来实现。
实现代码如下:
//报警器

ModelBusiness.prototype.alarmCtrlSystem = function () {

    return;

    showposition = { x: 200, y: 700, z: 0 };

    showhtml = "";

    var html = ' <div class="ctrbtn" id="btn_openlight"> <img style="width:48px;height:48px;" src="../img/pageimg2/bf.png" title="布防" /><br/>布防</div>\

         <div class="ctrbtn" id="btn_l1"> <img style="width:48px;height:48px;" src="../img/pageimg2/cf.png" title="撤防" /><br/>撤防</div>\

         ';

    //获取位置

    this.showMsg2(null, null, 200, html, function () {

        $(".ctrbtn").click(function () {

            var _id = $(this).attr("id");

            switch (_id) {

                case "btn_openlight":

                    { }

                    break;

                case "btn_l1":

                    { }

                    break;

                case "btn_l2":

                    { }

                    break;

                case "btn_l3":

                    { }

                    break;

                case "ptdBtn":

                    { }

                    break;

            }

        });

    });

}
2.10、库房内搜索功能,可以通过关键之搜索,快速定位档案位置。

三、该篇总结
本篇文章主要介绍了3D密集架的功能与效果。并且对主要实现逻辑代码进行了讲解
后面的文章会对具体模型的实现方式进行讲解,由于篇幅原因,先讲到这里,后面持续更新。
亦或者通过下列方式交流:
邮箱交流 1203193731@qq.com
微信交流:

如果你有什么要交流的心得 可邮件我
其它相关文章:
使用webgl(three.js)创建3D机房,3D机房微模块详细介绍(升级版二)
如何用webgl(three.js)搭建一个3D库房-第一课
如何用webgl(three.js)搭建一个3D库房,3D密集架,3D档案室,-第二课
使用webgl(three.js)搭建一个3D建筑,3D消防模拟——第三课
使用webgl(three.js)搭建一个3D智慧园区、3D建筑,3D消防模拟,web版3D,bim管理系统——第四课
如何用webgl(three.js)搭建不规则建筑模型,客流量热力图模拟
使用webgl(three.js)搭建一个3D智慧园区、3D建筑,3D消防模拟,web版3D,bim管理系统——第四课(炫酷版一)
使用webgl(three.js)搭建3D智慧园区、3D大屏,3D楼宇,智慧灯杆三维展示,3D灯杆,web版3D,bim管理系统——第六课
物联网3D,物业基础设施3D运维,使用webgl(three.js)与物联网设备结合案例。搭建智慧楼宇,智慧园区,3D园区、3D物业设施,3D楼宇管理系统——第八课
如何用webgl(three.js)搭建一个3D库房,3D密集架,3D档案室(升级版)的更多相关文章
- 如何用webgl(three.js)搭建一个3D库房,3D仓库,3D码头,3D集装箱可视化孪生系统——第十五课
序 又是快两个月没写随笔了,长时间不总结项目,不锻炼文笔,一开篇,多少都会有些生疏,不知道如何开篇,如何写下去.有点江郎才尽,黔驴技穷的感觉. 写随笔,通常三步走,第一步,搭建框架,先把你要写的内容框 ...
- 如何用webgl(three.js)搭建一个3D库房,3D仓库3D码头,3D集装箱,车辆定位,叉车定位可视化孪生系统——第十五课
序 又是快两个月没写随笔了,长时间不总结项目,不锻炼文笔,一开篇,多少都会有些生疏,不知道如何开篇,如何写下去.有点江郎才尽,黔驴技穷的感觉. 写随笔,通常三步走,第一步,搭建框架,先把你要写的内容框 ...
- 如何用webgl(three.js)搭建一个3D库房-第一课
今天我们来讨论一下如何使用当前流行的WebGL技术搭建一个库房并且实现实时有效交互 第一步.搭建一个3D库房首先你得知道库房长啥样,我们先来瞅瞅库房长啥样(这是我在网上找的一个库房图片,百度了“库房” ...
- 如何用webgl(three.js)搭建一个3D库房-第二课
闲话少叙,我们接着第一课继续讲(http://www.cnblogs.com/yeyunfei/p/7899613.html),很久没有做技术分享了.很多人问第二课有没有,我也是抽空写一下第二课. 第 ...
- 如何用webgl(three.js)搭建一个3D库房,3D密集架,3D档案室,-第二课
闲话少叙,我们接着第一课继续讲(http://www.cnblogs.com/yeyunfei/p/7899613.html),很久没有做技术分享了.很多人问第二课有没有,我也是抽空写一下第二课. 第 ...
- 如何用webgl(three.js)搭建处理3D园区、3D楼层、3D机房管线问题(机房升级版)-第九课(一)
写在前面的话: 说点啥好呢?就讲讲前两天的小故事吧,让我确实好好反省了一下. 前两天跟朋友一次技术对话,对方问了一下Geometry与BufferGeometry的具体不同,我一下子脑袋短路,没点到重 ...
- 如何用webgl(three.js)搭建处理3D隧道、3D桥梁、3D物联网设备、3D高速公路、三维隧道桥梁设备监控-第十一课
开篇废话: 跟之前的文章一样,开篇之前,总要写几句废话,大抵也是没啥人看仔细文字,索性我也想到啥就聊啥吧. 这次聊聊疫情,这次全国多地的疫情挺严重的,本人身处深圳,深圳这几日报导都是几十几十的新增病例 ...
- 如何用webgl(three.js)搭建不规则建筑模型,客流量热力图模拟
本节课主要讲解如何用webgl(three.js)搭建一个建筑模型,客流量热力图模拟 使用技术说明: 这里主要用到了three.js,echart.js以及一些其它的js 与css技术,利用webso ...
- 使用webgl(three.js)搭建一个3D智慧园区、3D建筑,3D消防模拟,web版3D,bim管理系统——第四课
序:这段时间忙于奔波,好久没有更新了,今天更新一下,继续上节课的完善讲解,算是对前段时间的一个总结吧.披星戴月的时光也算有点应用效果了. 对于webgl(three.js)性能这一块我在上节课< ...
随机推荐
- robot framework使用SeleniumLibrary打开谷歌浏览器无头模式
注:我百度了一圈并没有发现类似的教程 robot framework的seleniumLibrary一般打开浏览器的方式是用关键字 Open Browser 但是,阅读seleniumLibrary ...
- 关于国密HTTPS 的那些事(二)
关于国密HTTPS 的那些事(二) 三. 需要解决的问题 前文我们了解了https,并梳理了国密https的流程.那么完成这些流程的目的是什么呢?又是怎么来保护数据的安全性呢?我们继续... 上文我们 ...
- Java集合——List,Set,Map总结笔记
1. 集合 Collection 1.1 Java 集合框架 Java 集合框架位于 java.util 包中.Java 集合框架主要包括两种类型的容器,一种是集合(C ...
- 舌头算法的C++实现
观察生活,我们不难发现,吃饭的时候,有时候左边的东西会到右边来,这是为什么呢?就是舌头的作用了. 下面的代码将模拟舌头的运动: #include <iostream> #include & ...
- flask 之 请求钩子
请求钩子 什么是请求钩子? 在客户端和服务器交互的过程中,有些准备工作或扫尾工作需要统一处理,为了让每个视图函数避免编写重复功能的代码,flask提供了统一的接口可以添加这些处理函数,即请求钩子. f ...
- MyBatis的框架设计
1.MyBatis的框架设计 2.整体设计 2.1 总体流程 (1)加载配置并初始化 触发条件:加载配置文件 配置来源于两个地方,一处是配置文件,一处是Java代码的注解,将SQL的配置信 ...
- python解释器和Pycharm编辑器安装使用完整详细教程
一.官网下载或软件管家公众号下载 二.安装Python解释器 1.选择自定义安装并添加到环境变量 2.检验Python是否安装成功 三.安装pycharm编辑器 1.点击安装,修改安装路径,建议安装C ...
- 如果你还不知道Apache Zookeeper?你凭什么拿大厂Offer!!
很多同学或多或少都用到了Zookeeper,并知道它能实现两个功能 配置中心,实现表分片规则的统一配置管理 注册中心,实现sharding-proxy节点的服务地址注册 那么Zookeeper到底是什 ...
- 一文带你掌握【TCP拥塞窗口】原理
❝ 关注公众号:高性能架构探索.后台回复[资料],可以免费领取 ❞ 学过网络相关课程的,都知道TCP中,有两个窗口: 滑动窗口(在我们的上一篇文章中有讲),接收方通过通告发送方自己的可以接受缓冲区大小 ...
- [CSP-S2021] 廊桥分配
链接: P7913 题意: 有 \(m_1\) 架飞机和 \(m_2\) 架飞机停在两个机场,每架飞机有到达和离开的时间,要将 \(n\) 个廊桥分给两个机场,每个廊桥同一时刻只能停一架飞机,需要最大 ...
