halcon——缺陷检测常用方法总结(特征训练)
引言
机器视觉中缺陷检测分为一下几种:
- blob分析+特征
- 模板匹配(定位)+差分:halcon——缺陷检测常用方法总结(模板匹配(定位)+差分) - 唯有自己强大 - 博客园 (cnblogs.com)
- 光度立体:halcon——缺陷检测常用方法总结(光度立体) - 唯有自己强大 - 博客园 (cnblogs.com)
- 特征训练
- 测量拟合:halcon——缺陷检测常用方法总结(测量拟合) - 唯有自己强大 - 博客园 (cnblogs.com)
- 频域+空间域结合:halcon——缺陷检测常用方法总结(频域空间域结合) - 唯有自己强大 - 博客园 (cnblogs.com)
- 深度学习
本篇博文主要是对缺陷图像的纹理特征训练进行详细分析。
特征训练
在纹理中找瑕疵。基于高斯混合模型(GMM)分类器的纹理检查模型,适用于图像金字塔,可以分析纹理的多个频率范围。
要求:训练样本必须完美无瑕疵。
整体步骤:
- 创建模型create_texture_inspection_model或读取模型read_texture_inspection_model
- 添加训练样本add_texture_inspection_model_image
- 查看样本get_texture_inspection_model_image
- 训练模型train_texture_inspection_model
每层金字塔都会训练一个GMM模型,并确定该层的'novelty_threshold'(区分有无瑕疵的阈值)。
参数获取:get_texture_inspection_model_param
参数设定:set_texture_inspection_model_param
参数分析:'patch_normalization':'weber'对亮度鲁棒,‘none’需要亮度作为评判(默认)
'patch_rotational_robustness':'true'对旋转鲁棒,'false'需要旋转作为评判(默认)
'levels':设置具体的金字塔层参与训练,纹理越粗糙,则较低的金字塔层级越可省略。默认auto。
'sensitivity':灵敏度,影响'novelty_threshold'的计算结果。负值会导致更高的阈值,从而更少的发现缺陷。默认0。
'novelty_threshold',阈值,自动计算得到,若结果不理想,可以手动微调。
- 进行检测apply_texture_inspection_model
- 模型保存与释放write_texture_inspection_model
若模型不再需要,则释放clear_texture_inspection_model
halcon案例分析(apply_texture_inspection_model.hdev)
一,创建模型,添加训练样本(完好无损的图像)
TrainingImageIndices := [1,2]

TextureModelFilename := 'texture_model_carpet'

dev_open_window_fit_size (0, 0, Width, Height, -1, -1, WindowHandle1)

dev_display (Image)

*创建模型

 create_texture_inspection_model ('basic', TextureInspectionModel)

 for Index := 0 to |TrainingImageIndices| - 1 by 1

read_image (Image, 'carpet/carpet_' + TrainingImageIndices[Index]$'02')

dev_display (Image)

Message := '添加图片 ' + (Index + 1) + ' of ' + |TrainingImageIndices| + '训练准备'

dev_disp_text (Message, 'window', 12, 12, 'black', [], [])

 *加载训练样本(两张)

 add_texture_inspection_model_image (Image, TextureInspectionModel, Indices)

 endfor


二,初步设置参数后,开始训练
*参数设定'patch_normalization':'weber'对亮度鲁棒,‘none’需要亮度作为评判(默认)

set_texture_inspection_model_param (TextureInspectionModel, 'patch_normalization', 'weber')

Levels := [2,3,4]

* 'levels':设置具体的金字塔层参与训练,纹理越粗糙,则较低的金字塔层级越可省略。默认auto。

set_texture_inspection_model_param (TextureInspectionModel, 'levels', Levels)

* 开始训练

train_texture_inspection_model (TextureInspectionModel)

*查看样本参数'novelty_threshold',阈值,自动计算得到,若结果不理想,可以手动微调。

get_texture_inspection_model_param (TextureInspectionModel, 'novelty_threshold', NoveltyThreshold)

* 查看各个金字塔等级的新颖性得分图像和新颖性区域,可以把'gen_result_handle'设置为'true',

 *之后get_texture_inspection_result_object读取'novelty_score_image'和'novelty_region'。

set_texture_inspection_model_param (TextureInspectionModel, 'gen_result_handle', 'true')

三,对缺陷图像初测试,显示测试结果
*设置窗口,用于显示各个金字塔层图像
WindowWidth := 320
WindowHeight := 280
dev_open_window (0, 0, WindowWidth, WindowHeight, 'black', WindowHandle1)
set_display_font (WindowHandle1, 16, 'mono', 'true', 'false')
dev_open_window (0, WindowWidth + 8, WindowWidth, WindowHeight, 'black', WindowHandle2)
set_display_font (WindowHandle2, 16, 'mono', 'true', 'false')
dev_open_window (0, 2 * WindowWidth + 16, WindowWidth, WindowHeight, 'black', WindowHandle3)
set_display_font (WindowHandle3, 16, 'mono', 'true', 'false')
dev_open_window (WindowHeight + 50, WindowWidth / 2 + 8, 2 * WindowWidth, 2 * WindowHeight, 'black', WindowHandle4)
set_display_font (WindowHandle4, 16, 'mono', 'true', 'false')
WindowHandles := [WindowHandle1,WindowHandle2,WindowHandle3]
** 检测第一张训练图像上的纹理缺陷以微调参数。
for Index := 1 to 3 by 1
ImageIndex := 5
read_image (TestImage, 'carpet/carpet_' + ImageIndex$'02')
*测试当前图像
apply_texture_inspection_model (TestImage, NoveltyRegion, TextureInspectionModel, TextureInspectionResultID)
* 检查调试信息。
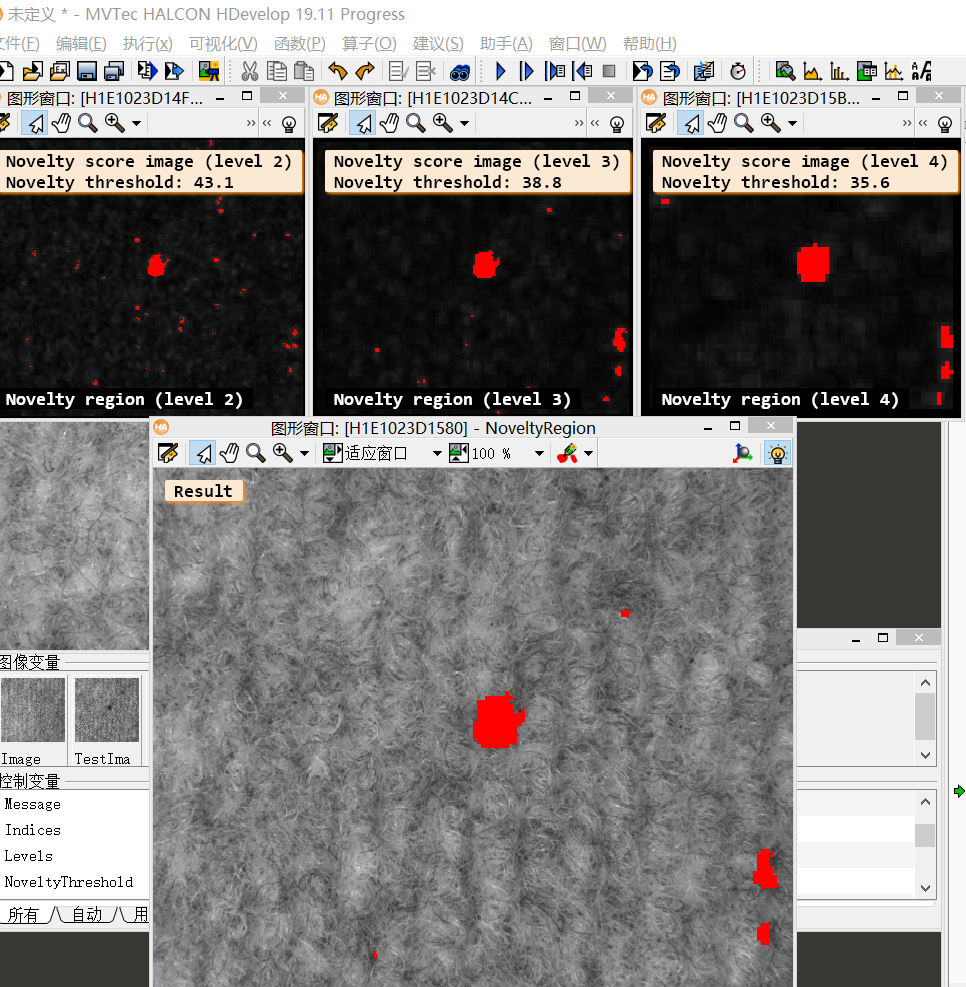
*查看各个金字塔等级的新颖性得分图像(NovScoreImage)和新颖性区域(NovRegionL)
* 新颖性评分图像可用于单独微调新颖性阈值。
get_texture_inspection_result_object (NovScoreImage, TextureInspectionResultID, 'novelty_score_image')
get_texture_inspection_result_object (NovRegion, TextureInspectionResultID, 'novelty_region')
* 显示每层(金字塔)的结果
count_obj (NovScoreImage, Number)
for Level := 1 to Number by 1
CurrentWindow := WindowHandles[Level - 1]
dev_set_window (CurrentWindow)
dev_clear_window ()
select_obj (NovScoreImage, NovScoreImageL, Level)
select_obj (NovRegion, NovRegionL, Level)
get_image_size (NovScoreImageL, Width, Height)
dev_set_part (0, 0, Height - 1, Width - 1)
dev_display (NovScoreImageL)
Legend := 'Novelty region (level ' + Levels[Level - 1] + ')'
dev_set_color ('red')
dev_set_line_width (2)
*
dev_display (NovRegionL)
dev_disp_text (['Novelty score image (level ' + Levels[Level - 1] + ')','Novelty threshold: ' + NoveltyThreshold[Level - 1]$'.1f'], 'window', 12, 12, 'black', [], [])
dev_disp_text (Legend, 'window', WindowHeight - 30, 12, 'white', ['box_color','shadow'], ['black','false'])
endfor
*显示结果
dev_set_window (WindowHandle4)
dev_display (TestImage)
dev_set_line_width (2)
dev_set_color ('red')
dev_display (NoveltyRegion)
area_center (NoveltyRegion, Area, Row, Column)
if (Index < 3)
dev_disp_text ('Result', 'window', 12, 12, 'black', [], [])
else
dev_disp_text ('Final result', 'window', 12, 12, 'black', [], [])
endif
四,根据测试结果进行微调参数
* 新奇阈值的微调。
if (Index == 1)
Message[0] := '图像中有很多小错误.'
Message[1] := '可以通过改变 novelty thresholds的值来调整灵敏度(sensitivity—)'
Message[2] := '例如减少灵敏度参数的值'
dev_disp_text (Message, 'window', 12, 12, 'black', [], []) * 设置阈值计算的灵敏度。 负值导致更高的阈值,因此检测到的缺陷更少。
* 'sensitivity':灵敏度,影响'novelty_threshold'的计算结果。负值会导致更高的阈值,从而更少的发现缺陷。默认0。
set_texture_inspection_model_param (TextureInspectionModel, 'sensitivity', -10)
get_texture_inspection_model_param (TextureInspectionModel, 'novelty_threshold', NoveltyThreshold)
endif
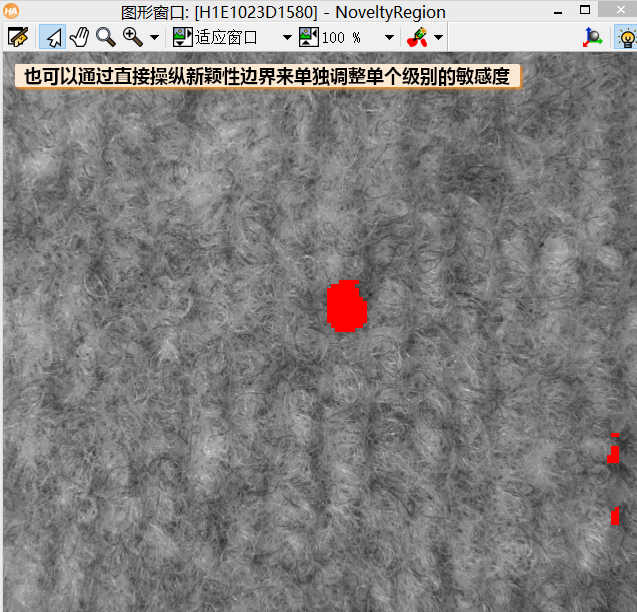
if (Index == 2)
Message := '也可以通过直接操纵新颖性边界来单独调整单个级别的敏感度'
dev_disp_text (Message, 'window', 12, 12, 'black', [], [])
* 新奇阈值的微调。
*
* 从纹理中获取(自动确定的)新奇阈值
* 检查模型并将适当修改的值设置为新的新颖性阈值。
*
*如果我们明确设置新颖性边界,则忽略敏感性。
* 我们在这里将其重新设置为 0 以避免混淆
set_texture_inspection_model_param (TextureInspectionModel, 'sensitivity', 0)
*
Offset := [25,10,30]
get_texture_inspection_model_param (TextureInspectionModel, 'novelty_threshold', NoveltyThreshold)
set_texture_inspection_model_param (TextureInspectionModel, 'novelty_threshold', Offset + NoveltyThreshold)
get_texture_inspection_model_param (TextureInspectionModel, 'novelty_threshold', NoveltyThreshold)
endif
endfor for Level := 1 to |WindowHandles| by 1
dev_set_window (WindowHandles[Level - 1])
dev_clear_window ()
endfor
dev_set_window (WindowHandle4)
dev_clear_window ()

五,至此,模型准备完毕,将全部图像进行缺陷检测并显示
*检测所有测试图像上的纹理缺陷。

NumImages := 7

for Index := 1 to NumImages by 1

    read_image (TestImage, 'carpet/carpet_' + Index$'02')

    *

    *检测当前图像

    apply_texture_inspection_model (TestImage, NoveltyRegion, TextureInspectionModel, TextureInspectionResultID)

    *得到新颖性图像和区域

    get_texture_inspection_result_object (NovScoreImage, TextureInspectionResultID, 'novelty_score_image')

    get_texture_inspection_result_object (NovRegion, TextureInspectionResultID, 'novelty_region')

    * 显示单个金字塔层数的结果

    count_obj (NovScoreImage, Number)

    for Level := 1 to Number by 1

        CurrentWindow := WindowHandles[Level - 1]

        dev_set_window (CurrentWindow)

        dev_clear_window ()

        select_obj (NovScoreImage, NovScoreImageL, Level)

        select_obj (NovRegion, NovRegionL, Level)

        get_image_size (NovScoreImageL, Width, Height)

        dev_set_part (0, 0, Height - 1, Width - 1)

        dev_display (NovScoreImageL)

         Legend := 'Novelty region (level ' + Levels[Level - 1] + ')'

        dev_set_color ('red')

        dev_set_line_width (2)

        *

        dev_display (NovRegionL)

        dev_disp_text (['Novelty score image (level ' + Levels[Level - 1] + ')','Novelty threshold: ' + NoveltyThreshold[Level - 1]$'.1f'], 'window', 12, 12, 'black', [], [])

        dev_disp_text (Legend, 'window', WindowHeight - 50, 12, ['red','white'], ['box_color','shadow'], ['black','false'])

        endfor

            * 显示结果

             dev_set_window (WindowHandle4)

    dev_display (TestImage)

    dev_set_line_width (2)

    dev_set_color ('red')

    dev_display (NoveltyRegion)

    area_center (NoveltyRegion, Area, Row, Column)

    if (Area > 100)

        dev_disp_text ('Not OK', 'window', 12, 12, 'white', 'box_color', 'red')

    else

        dev_disp_text ('OK', 'window', 12, 12, 'white', 'box_color', 'forest green')

    endif

 if (Index < NumImages)

        dev_disp_text ('Press Run (F5) to continue', 'window', 'bottom', 'right', 'black', [], [])

        stop ()

    endif

endfor


【术语解释】
- Patch:相邻像素的集合。
- Novelty Score:在测试过程中,将测试图像的纹理特征与纹理检查模型进行比较,并计算它们的'novelty score'。 该值越大,单个纹理特征越不适合纹理检查模型的可能性越大。
- Novelty Threshold:Novelty Score高于该阈值,则纹理有缺陷。
“ novelty_region”是通过组合不同金字塔等级的新颖性区域而生成的,即不同层级金字塔组成的交集区域。如果只有单层金字塔,那么该层的新颖性区域直接就是novelty_region。
若想查看各个金字塔等级的新颖性得分图像和新颖性区域,可以把'gen_result_handle'设置为'true',之后get_texture_inspection_result_object读取'novelty_score_image'和'novelty_region'。
参考博文:Halcon 纹理缺陷检测 apply_texture_inspection_model - 夕西行 - 博客园 (cnblogs.com)
halcon——缺陷检测常用方法总结(特征训练)的更多相关文章
- halcon——缺陷检测常用方法总结(光度立体)
引言 机器视觉中缺陷检测分为一下几种: blob+特征(官方示例surface_scratch.hdev) blob+差分+特征(官方示例pcb_inspection.hdev) 光度立体 特征训练 ...
- halcon——缺陷检测常用方法总结(模板匹配(定位)+差分)
引言 机器视觉中缺陷检测分为一下几种: blob分析+特征 模板匹配(定位)+差分 光度立体:halcon--缺陷检测常用方法总结(光度立体) - 唯有自己强大 - 博客园 (cnblogs.com) ...
- halcon——缺陷检测常用方法总结(测量拟合)
引言 机器视觉中缺陷检测分为一下几种: blob分析+特征 模板匹配(定位)+差分:halcon--缺陷检测常用方法总结(模板匹配(定位)+差分) - 唯有自己强大 - 博客园 (cnblogs.co ...
- halcon——缺陷检测常用方法总结(频域空间域结合)
摘要 缺陷检测是视觉需求中难度最大一类需求,主要是其稳定性和精度的保证.首先常见缺陷:凹凸.污点瑕疵.划痕.裂缝.探伤等. 缺陷检测算法不同于尺寸.二维码.OCR等算法.后者应用场景比较单一,基本都是 ...
- 图像处理笔记(二十):LAWS纹理滤波应用于缺陷检测
LAWS纹理滤波 texture_laws(Image, 原图像 ImageTexture, 输出值,滤波后图像 FilterType, 过滤器类型 Shift, 灰度值转换,滤波后的灰度值可能会比较 ...
- Opencv+Python实现缺陷检测
实验七.缺陷检测 一. 题目描述 对下面的图片进行缺陷检测操作,请详细地记录每一步操作的步骤. 第一站图片是标准样品,后面几张图中有几个样品有瑕疵,需要你通过计算在图片上显示出哪张是合格,哪张 ...
- NLP用CNN分类Mnist,提取出来的特征训练SVM及Keras的使用(demo)
用CNN分类Mnist http://www.bubuko.com/infodetail-777299.html /DeepLearning Tutorials/keras_usage 提取出来的特征 ...
- OpenCV特征点检测------Surf(特征点篇)
Surf(Speed Up Robust Feature) Surf算法的原理 ...
- 目标检测算法SSD之训练自己的数据集
目标检测算法SSD之训练自己的数据集 prerequesties 预备知识/前提条件 下载和配置了最新SSD代码 git clone https://github.com/weiliu89/caffe ...
随机推荐
- Power BI官方客户案例2021
微软商业应用峰会Power BI客户案例,今年的客户案例相比前2年不同,主要是大客户,基本都是行业Top公司. 选取零售,医药制造,教育,医疗IT等行业龙头.沃尔玛,拜耳,滑铁卢大学的分享内容非常棒, ...
- MySQL5.7升级到8.0过程详解
前言: 不知不觉,MySQL8.0已经发布好多个GA小版本了.目前互联网上也有很多关于MySQL8.0的内容了,MySQL8.0版本基本已到稳定期,相信很多小伙伴已经在接触8.0了.本篇文章主要介绍从 ...
- 普里姆(Prim)算法
概览 普里姆算法(Prim算法),图论中的一种算法,可在加权连通图(即"带权图")里搜索最小生成树.即此算法搜索到的边(Edge)子集所构成的树中,不但包括了连通图里的所有顶点(V ...
- zimbra启用SMTP认证
zmprov modifyServer {{ you domain }} zimbraMtaTlsAuthOnly FALSE zmcontrol restart 查看对应配置 zmprov getS ...
- 关于jmeter线程组和循环次数的设置
初始设置:设置线程数 n = 80,循环次数a = 1,ramp-up period=5 一 计算最后一个线程的生成时间(last) 总共生成80个线程,总共需要5秒,每秒钟会启动16个线程,所以,第 ...
- Mysql 官网下载二进制包_图解步骤
MYSQL下载方式 下载二进制包,直接使用wget下载 [root@db ~]# wget https://downloads.mysql.com/archives/get/p/23/file/mys ...
- shell基础之if语句
Shell流程控制 流程控制是改变程序运行顺序的指令.linux shell有一套自己的流程控制语句,其中包括条件语句(if),循环语句(for,while),选择语句(case).下面我将通过例子介 ...
- docker0详解
docker0:https://blog.csdn.net/kubailing/article/details/87936501 veth pair详解:https://www.cnblogs.com ...
- IDEA 创建 Vue 文件(Day_41)
IDEA 创建 Vue 文件 1. 在setting-->plugins里安装vue插件,安装成功之后重启IDEA 如图 2. 在setting-->Editor-->File Ty ...
- spark-steaming的exactly-once
spark实时计算中会存在数据丢失和数据重复计算的场景, 在receiver收到数据且通过driver的调度executor开始计算数据的时候如果driver突然崩溃,则此时executor就会被杀掉 ...