【HarmonyOS】【JS】鸿蒙Js camera怎么拍照并使用image显示出来
官网中有描述camera组件功能界面属性介绍,但是官网没有具体的demo让我们感受拍照的功能,今天写一篇demo来完善一下拍照的功能
demo 功能如下
第一步首先进行拍照功能
第二步 进行js页面跳转功能
第三步 使用image 显示拍照的照片
第一步首先进行拍照功能
参考链接如下
1.1 html 代码
<div class="container">

    <camera   id='camera-id' flash="on"   deviceposition="back" @error="cameraError">

    </camera>

    <text class="textTakePhoto" on:click="takePhoto" > 拍照</text>

</div>
1.2 css 代码
···
.container {
display: flex;

justify-content: center;

flex-direction: column;

align-items: center;
}
camera {
width: 100%;

height: 80%;
}
.textTakePhoto{
padding: 10px;

border-width: 2vp;

border-color: black;

border-bottom-style: solid;

border-radius: 90vp;

margin-top: 40px;

text-color: black;

font-family: sans-serif;

font-size: 25px;
}
1.3 js 代码
···
export default {
data: {
title: 'World',
src:""
},
cameraError(){
},
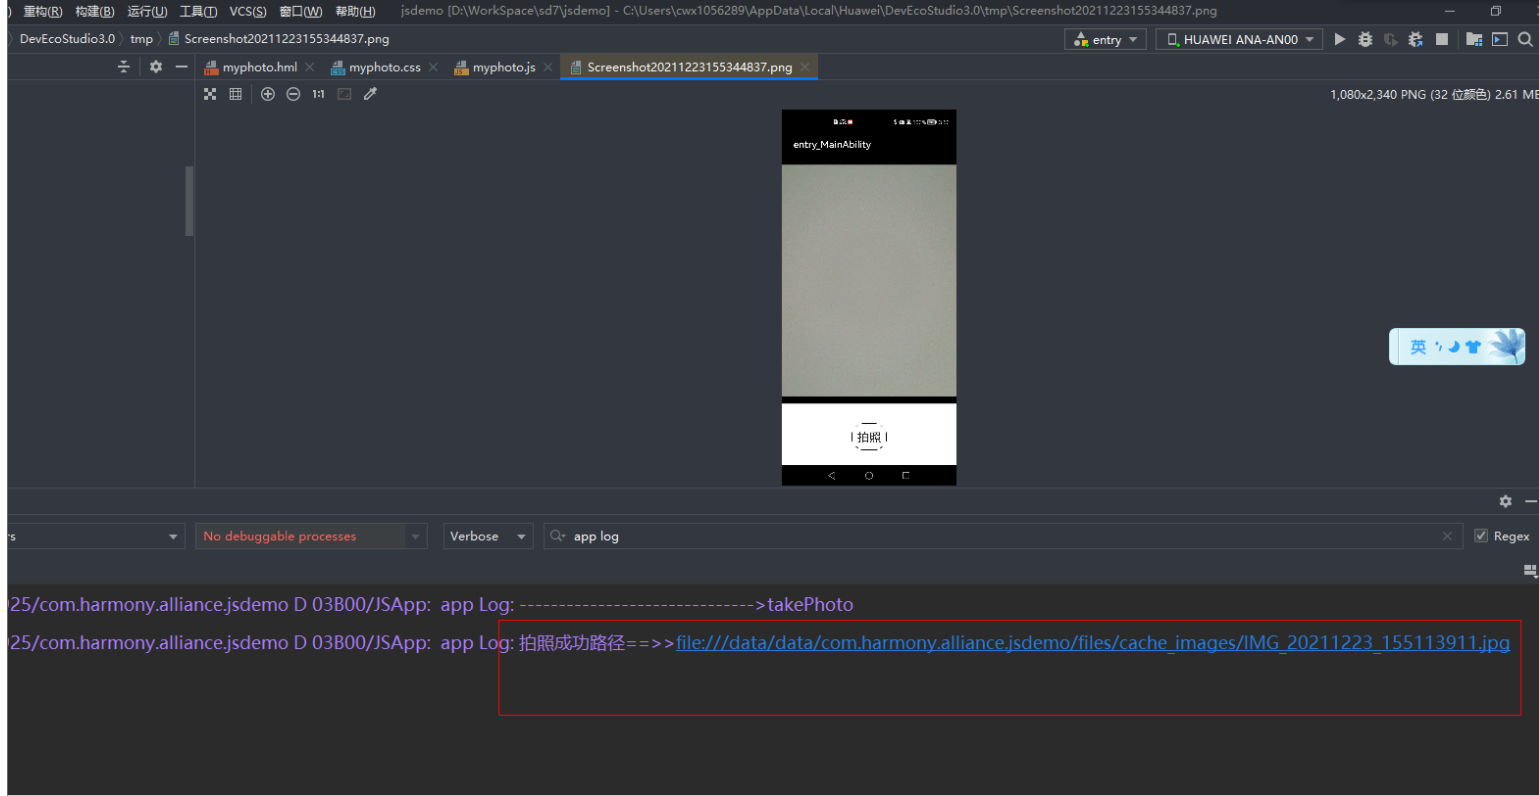
takePhoto(){
var _this=this;
console.log('------------------------------>takePhoto')
var camera = this.$element('camera-id')
camera.takePhoto({
quality:'high',
success(result){
_this. src=result.uri
console.log("拍照成功路径==>>"+_this.src);
//
},
fail(result){
console.info('-------------fail------'+result)
},
complete(result){
// console.info('-------------complete------'+result)
}
})
},
}
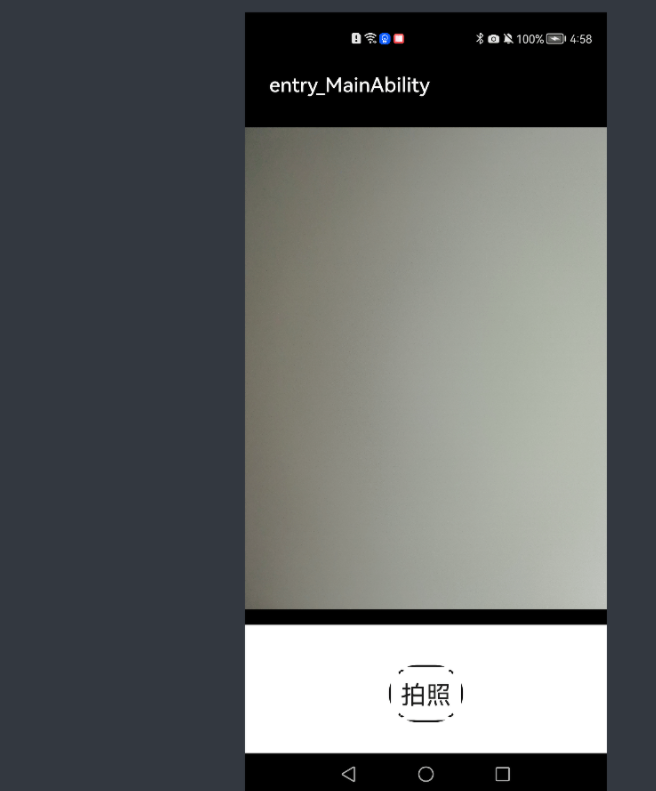
1.4 运行效果
第二步 进行js页面跳转功能
我们可以在拍照中完成(complete)的时候进行跳转另外一个界面,然后对图片路径做出相应的处理
参考资料如下
2.1代码如下
    complete(result){

                console.info('-------------complete------'+result)

                var appsrc="file:///data/data/com.harmony.alliance.jsdemo/files/"

                var path="internal://app/"+_this.src.substring(appsrc.length,_this.src.length)

                console.info('-------------success------'+path )

                router.push({

                    uri:              "pages/myImage/myImage",

                    params: {

                        src: path

                    },

                })

            }
第三步 使用image 显示拍照的照片
3.1 参考资料如下
3.2怎么显示本地图片
Image组件存在一个src假设为internal://app/1.png
其真实路径是file:///data/data/包名 /files/1.png
3.3 hml代码
<div class="container">

    <text>{{src}}</text>

    <image src="{{src}}" style="width: 300px; height: 300px;">

    </image>

</div>
CSS代码
.container {

    display: flex;

    justify-content: center;

    align-items: center;

    flex-direction: column;

    left: 0px;

    top: 0px;

    width: 454px;

    height: 454px;

}

.title {

    font-size: 30px;

    text-align: center;

    width: 200px;

    height: 100px;

}
Js 代码
export default {

   data: {

       title: 'World',

       src:""

   }

}
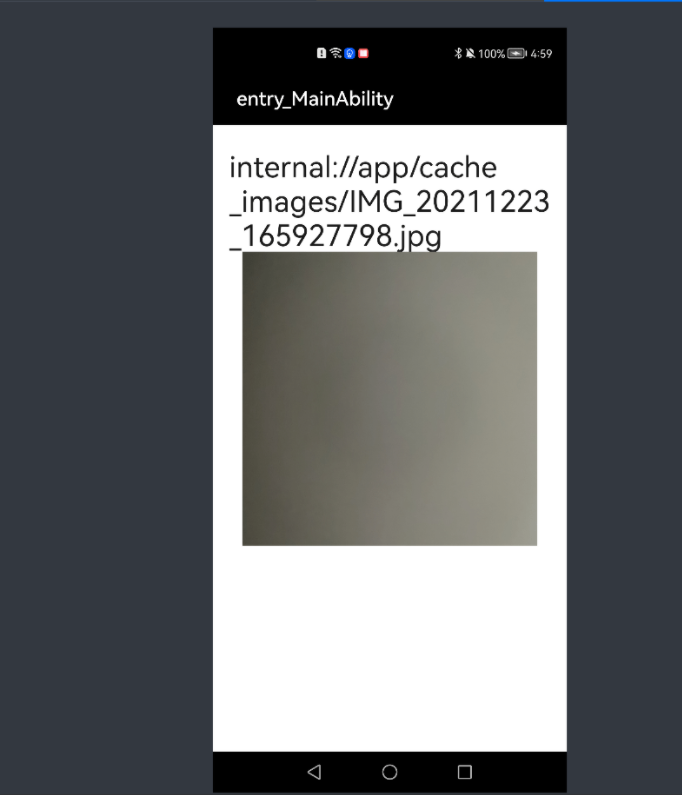
3.4 运行效果
==
更多精彩内容,请见华为开发者官方论坛→https://developer.huawei.com/consumer/cn/forum/home?ha_source=sanfang
【HarmonyOS】【JS】鸿蒙Js camera怎么拍照并使用image显示出来的更多相关文章
- 从微信小程序到鸿蒙js开发【04】——list组件
目录: 1.可滚动区域 2.list + list-item 3.list + list-item-group + list-item 1.可滚动区域 在许多场景中,页面会有一块区域是可滚动的,比如这 ...
- 从微信小程序到鸿蒙js开发【06】——swiper&animator&marquee
目录: 1.swiper轮播图 2.image-animator幻灯片 3.marquee跑马灯 4.nginx动静分离 1.swiper轮播图 微信小程序的swiper组件中只能放置swiper-i ...
- 从微信小程序到鸿蒙js开发【08】——表单组件&注册登录模块
目录: 1.登录模块 2.注册模块 3.系列文章导读 牛年将至,祝大家行行无bug,页页so easy- 在微信小程序中,提供了form组件,可以将input.picker.slider.button ...
- 从微信小程序到鸿蒙js开发【11】——页面路由
目录: 1.router.push()&wx.navigateTo() 2.router.replace()&wx.redirectTo() 3.router.back()&w ...
- 从微信小程序到鸿蒙js开发【12】——storage缓存&自动登录
鸿蒙入门指南,小白速来!从萌新到高手,怎样快速掌握鸿蒙开发?[课程入口] 正文: 在应用开发时,我们常需要将一些数据缓存到本地,以提升用户体验.比如在一个电商的app中,如果希望用户登录成功后,下次打 ...
- 从微信小程序到鸿蒙js开发【13】——list加载更多&回到顶部
鸿蒙入门指南,小白速来!从萌新到高手,怎样快速掌握鸿蒙开发?[课程入口] 目录: 1.list加载更多 2.list回到顶部 3.<从微信小程序到鸿蒙js开发>系列文章合集 1.list加 ...
- 鸿蒙js开发7 鸿蒙分组列表和弹出menu菜单
鸿蒙入门指南,小白速来!从萌新到高手,怎样快速掌握鸿蒙开发?[课程入口]目录:1.鸿蒙视图效果2.js业务数据和事件3.页面视图代码4.跳转页面后的视图层5.js业务逻辑部分6.<鸿蒙js开发& ...
- 从微信小程序到鸿蒙js开发【15】——JS调用Java
鸿蒙入门指南,小白速来!0基础学习路线分享,高效学习方法,重点答疑解惑--->[课程入口] 目录:1.新建一个Service Ability2.完善代码逻辑3.JS端远程调用4.<从微信小 ...
- 鸿蒙JS 开发整理
目录 一.前言: 二.鸿蒙 JS UI框架 2.1 JS UI特性 2.2 架构 2.3 新的UI框架结构 三.API 四.最后 一.前言: 5月25日,华为对外宣布计划在6月2日正式举办鸿蒙手机发布 ...
随机推荐
- Linux下使用JDK11部署Nacos启动报错:Could not find or load main class
Linux下使用JDK11部署Nacos 错误日志 /nacos/jdk-11.0.12/bin/java -server -Xms2g -Xmx2g -Xmn1g -XX:MetaspaceSize ...
- 价格BigDecimal的加减乘除、小数四舍五入、比较
num2必须改用传入String类型 //加法 BigDecimal result1 = num1.add(num2); //减法 BigDecimal result2 = num1.subtract ...
- 【LeetCode】1403. 非递增顺序的最小子序列 Minimum Subsequence in Non-Increasing Order
作者: 负雪明烛 id: fuxuemingzhu 个人博客:http://fuxuemingzhu.cn/ 目录 题目描述 题目大意 解题方法 贪心 日期 题目地址:https://leetcode ...
- 【LeetCode】226. Invert Binary Tree 翻转二叉树(Python)
作者: 负雪明烛 id: fuxuemingzhu 个人博客: http://fuxuemingzhu.cn/ 目录 题目描述 题目大意 解题方法 递归 迭代 日期 题目地址: https://lee ...
- 【LeetCode】373. Find K Pairs with Smallest Sums 解题报告(Python)
[LeetCode]373. Find K Pairs with Smallest Sums 解题报告(Python) 标签: LeetCode 题目地址:https://leetcode.com/p ...
- Lotus and Horticulture
Lotus and Horticulture Accepts: 91 Submissions: 641 Time Limit: 4000/2000 MS (Java/Others) Memory Li ...
- CLION 使用自己的makefile来运行
之前参考过这里和这里,都是说要使用add_custom_target,无奈看不懂 但是前一篇里说它参考的是stackoverflow上的回答,去原帖里发现后来更新的第二高票答案!!!非常好用!!! 在 ...
- 论文翻译:2020_Acoustic Echo Cancellation by Combining Adaptive Digital Filter and Recurrent Neural Network
论文地址:https://arxiv.53yu.com/abs/2005.09237 自适应数字滤波与循环神经网络相结合的回声消除技术 摘要 回声消除(AEC)在语音交互中起关键作用.由于明确的数学原 ...
- IntelliJ IDEA 2019.3 代码提示忽略大小写(IDEA 2019版本如何设置代码提示不分大小写?)
最近在使用IDEA,发现每次只能进行完全匹配,且区分大小写,界面变了IDEA 2019.3 忽略大小写设置跟之前的版本稍微有点不同,跟之前的软件有点点区别,在此记录一下不区分大小写的方法. 1. 使用 ...
- 使用 Android Studio 开发工具创建一个 Android 应用程序,显示一行文字“Hello Android”,并将应用程序的名称更改为“FirstApp”。
需求说明: 使用 Android Studio 开发工具创建一个 Android 应用程序,显示一行文字"Hello Android",并将应用程序的名称更改为"Firs ...