spring boot 2 + shiro 实现权限管理
Shiro是一个功能强大且易于使用的Java安全框架,主要功能有身份验证、授权、加密和会话管理。
看了网上一些文章,下面2篇文章写得不错。
Springboot2.0 集成shiro权限管理
Spring Boot:整合Shiro权限框架
自己动手敲了下代码,在第一篇文章上加入了第二篇文章的Swagger测试,另外自己加入lombok简化实体类代码,一些地方代码也稍微修改了下,过程中也碰到一些问题,最终代码成功运行。
开发版本:
IntelliJ IDEA 2019.2.2
jdk1.8
Spring Boot 2.1.11
MySQL8.0
一、创建SpringBoot项目,添加依赖包和配置application.yml
在IDEA中创建一个新的SpringBoot项目
1、pom.xml引用的依赖包如下:
        <dependency>

            <groupId>org.springframework.boot</groupId>

            <artifactId>spring-boot-starter-web</artifactId>

        </dependency>

        <dependency>

            <groupId>org.apache.shiro</groupId>

            <artifactId>shiro-spring</artifactId>

            <version>1.4.2</version>

        </dependency>

        <dependency>

            <groupId>org.springframework.boot</groupId>

            <artifactId>spring-boot-starter-data-jpa</artifactId>

        </dependency>

        <dependency>

            <groupId>mysql</groupId>

            <artifactId>mysql-connector-java</artifactId>

        </dependency>

        <dependency>

            <groupId>org.projectlombok</groupId>

            <artifactId>lombok</artifactId>

            <version>1.18.10</version>

            <scope>provided</scope>

        </dependency>

        <dependency>

            <groupId>io.springfox</groupId>

            <artifactId>springfox-swagger2</artifactId>

            <version>2.9.2</version>

        </dependency>

        <dependency>

            <groupId>io.springfox</groupId>

            <artifactId>springfox-swagger-ui</artifactId>

            <version>2.9.2</version>

        </dependency>
2、application.yml
spring:

  datasource:

    driver-class-name: com.mysql.cj.jdbc.Driver

    url: jdbc:mysql://localhost:3306/testdb?useSSL=false&serverTimezone=UTC

    username: root

    password: 123456

  jpa:

    hibernate:

      ddl-auto: update #指定为update,每次启动项目检测表结构有变化的时候会新增字段,表不存在时会新建,如果指定create,则每次启动项目都会清空数据并删除表,再新建

      naming:

        physical-strategy: org.hibernate.boot.model.naming.PhysicalNamingStrategyStandardImpl #按字段名字建表

        #implicit-strategy: org.hibernate.boot.model.naming.ImplicitNamingStrategyLegacyJpaImpl #驼峰自动映射为下划线格式

    show-sql: true # 默认false,在日志里显示执行的sql语句

    database: mysql

    database-platform: org.hibernate.dialect.MySQL5InnoDBDialect
二、创建实体类
创建User、Role、Permission三个实体类,根据规则会自动生成两个中间表,最终数据库有5个表。
另外添加一个model处理登录结果。
1、User
package com.example.shiro.entity;

import lombok.Getter;

import lombok.Setter;

import org.springframework.format.annotation.DateTimeFormat;

import javax.persistence.*;

import java.time.LocalDate;

import java.time.LocalDateTime;

import java.util.List;

@Entity

@Getter

@Setter

public class User {

    @Id

    @GeneratedValue(strategy = GenerationType.AUTO)

    private Long userId;

    @Column(nullable = false, unique = true)

    private String userName; //登录用户名

    @Column(nullable = false)

    private String name;//名称(昵称或者真实姓名,根据实际情况定义)

    @Column(nullable = false)

    private String password;

    private String salt;//加密密码的盐

    private byte state;//用户状态,0:创建未认证(比如没有激活,没有输入验证码等等)--等待验证的用户 , 1:正常状态,2:用户被锁定.

    @ManyToMany(fetch= FetchType.EAGER)//立即从数据库中进行加载数据;

    @JoinTable(name = "UserRole", joinColumns = { @JoinColumn(name = "userId") }, inverseJoinColumns ={@JoinColumn(name = "roleId") })

    private List<Role> roleList;// 一个用户具有多个角色

    @DateTimeFormat(pattern = "yyyy-MM-dd HH:mm")

    private LocalDateTime createTime;//创建时间

    @DateTimeFormat(pattern = "yyyy-MM-dd")

    private LocalDate expiredDate;//过期日期

    private String email;

    /**密码盐. 重新对盐重新进行了定义,用户名+salt,这样就不容易被破解 */

    public String getCredentialsSalt(){

        return this.userName+this.salt;

    }

}
说明:
这里使用@Getter,@Setter注解,不能使用@Data注解,因为实体使用了jpa的@oneToMany ,加载方式为lazy,在主表查询时关联表未加载,而主表使用@Data后会实现带关联表属性的hashCode和equals等方法。在运行过程中调用关联表数据时会显示异常 java.lang.stackoverflowerror。
2、Role
package com.example.shiro.entity;

import lombok.Getter;

import lombok.Setter;

import javax.persistence.*;

import java.util.List;

@Entity

@Getter

@Setter

public class Role {

    @Id

    @GeneratedValue(strategy = GenerationType.AUTO)

    private Long roleId; // 编号

    @Column(nullable = false, unique = true)

    private String role; // 角色标识程序中判断使用,如"admin",这个是唯一的:

    private String description; // 角色描述,UI界面显示使用

    private Boolean available = Boolean.TRUE; // 是否可用,如果不可用将不会添加给用户

    //角色 -- 权限关系:多对多关系;

    @ManyToMany(fetch= FetchType.EAGER)

    @JoinTable(name="RolePermission",joinColumns={@JoinColumn(name="roleId")},inverseJoinColumns={@JoinColumn(name="permissionId")})

    private List<Permission> permissions;

    // 用户 - 角色关系定义;

    @ManyToMany

    @JoinTable(name="UserRole",joinColumns={@JoinColumn(name="roleId")},inverseJoinColumns={@JoinColumn(name="userId")})

    private List<User> users;// 一个角色对应多个用户

}
3、Permission
package com.example.shiro.entity;

import lombok.Getter;

import lombok.Setter;

import javax.persistence.*;

import java.util.List;

@Entity

@Getter

@Setter

public class Permission {

    @Id

    @GeneratedValue(strategy = GenerationType.AUTO)

    private Long permissionId;//主键.

    @Column(nullable = false)

    private String permissionName;//名称.

    @Column(columnDefinition="enum('menu','button')")

    private String resourceType;//资源类型,[menu|button]

    private String url;//资源路径.

    private String permission; //权限字符串,menu例子:role:*,button例子:role:create,role:update,role:delete,role:view

    private Long parentId; //父编号

    private String parentIds; //父编号列表

    private Boolean available = Boolean.TRUE;

    //角色 -- 权限关系:多对多关系;

    @ManyToMany(fetch= FetchType.EAGER)

    @JoinTable(name="RolePermission",joinColumns={@JoinColumn(name="permissionId")},inverseJoinColumns={@JoinColumn(name="roleId")})

    private List<Role> roles;

}
4、LoginResult
package com.example.shiro.model;

import lombok.Data;

@Data

public class LoginResult {

    private boolean isLogin = false;

    private String result;

}
三、DAO
1、添加一个DAO基础接口:BaseRepository
package com.example.shiro.repository;

import org.springframework.data.jpa.repository.JpaSpecificationExecutor;

import org.springframework.data.repository.NoRepositoryBean;

import org.springframework.data.repository.PagingAndSortingRepository;

import java.io.Serializable;

@NoRepositoryBean

public interface BaseRepository<T, I extends Serializable> extends PagingAndSortingRepository<T, I>, JpaSpecificationExecutor<T> {

}
2、UserRepository
package com.example.shiro.repository;

import com.example.shiro.entity.User;

public interface UserRepository extends BaseRepository<User,Long> {

    User findByUserName(String userName);

}
四、Service
1、LoginService
package com.example.shiro.service;

import com.example.shiro.model.LoginResult;

public interface LoginService {

    LoginResult login(String userName, String password);

    void logout();

}
2、UserService
package com.example.shiro.service;

import com.example.shiro.entity.User;

public interface UserService {

    User findByUserName(String userName);

}
五、Service.impl
1、LoginServiceImpl
package com.example.shiro.service.impl;

import com.example.shiro.model.LoginResult;

import com.example.shiro.repository.UserRepository;

import com.example.shiro.service.LoginService;

import org.apache.shiro.SecurityUtils;

import org.apache.shiro.authc.AuthenticationException;

import org.apache.shiro.authc.IncorrectCredentialsException;

import org.apache.shiro.authc.UnknownAccountException;

import org.apache.shiro.authc.UsernamePasswordToken;

import org.apache.shiro.session.Session;

import org.apache.shiro.subject.Subject;

import org.springframework.stereotype.Service;

@Service

public class LoginServiceImpl implements LoginService {

    @Override

    public LoginResult login(String userName, String password) {

        LoginResult loginResult = new LoginResult();

        if (userName == null || userName.isEmpty()) {

            loginResult.setLogin(false);

            loginResult.setResult("用户名为空");

            return loginResult;

        }

        String msg = "";

        // 1、获取Subject实例对象

        Subject currentUser = SecurityUtils.getSubject();

//        // 2、判断当前用户是否登录

//        if (currentUser.isAuthenticated() == false) {

//

//        }

        // 3、将用户名和密码封装到UsernamePasswordToken

        UsernamePasswordToken token = new UsernamePasswordToken(userName, password);

        // 4、认证

        try {

            currentUser.login(token);// 传到MyAuthorizingRealm类中的方法进行认证

            Session session = currentUser.getSession();

            session.setAttribute("userName", userName);

            loginResult.setLogin(true);

            return loginResult;

            //return "/index";

        } catch (UnknownAccountException e) {

            e.printStackTrace();

            msg = "UnknownAccountException -- > 账号不存在:";

        } catch (IncorrectCredentialsException e) {

            msg = "IncorrectCredentialsException -- > 密码不正确:";

        } catch (AuthenticationException e) {

            e.printStackTrace();

            msg = "用户验证失败";

        }

        loginResult.setLogin(false);

        loginResult.setResult(msg);

        return loginResult;

    }

    @Override

    public void logout() {

        Subject subject = SecurityUtils.getSubject();

        subject.logout();

    }

}
2、UserServiceImpl
package com.example.shiro.service.impl;

import com.example.shiro.entity.User;

import com.example.shiro.repository.UserRepository;

import com.example.shiro.service.UserService;

import org.springframework.stereotype.Service;

import javax.annotation.Resource;

@Service

public class UserServiceImpl implements UserService {

    @Resource

    private UserRepository userRepository;

    @Override

    public User findByUserName(String userName) {

        return userRepository.findByUserName(userName);

    }

}
六、config配置类
1、创建Realm
package com.example.shiro.config;

import com.example.shiro.entity.Permission;

import com.example.shiro.entity.Role;

import com.example.shiro.entity.User;

import com.example.shiro.service.UserService;

import org.apache.shiro.authc.*;

import org.apache.shiro.authz.AuthorizationInfo;

import org.apache.shiro.authz.SimpleAuthorizationInfo;

import org.apache.shiro.realm.AuthorizingRealm;

import org.apache.shiro.subject.PrincipalCollection;

import org.apache.shiro.util.ByteSource;

import javax.annotation.Resource;

public class MyShiroRealm extends AuthorizingRealm {

    @Resource

    private UserService userService;

    /**

     * 身份认证:验证用户输入的账号和密码是否正确。

     * */

    @Override

    protected AuthenticationInfo doGetAuthenticationInfo(AuthenticationToken token) throws AuthenticationException {

        //获取用户输入的账号

        String userName = (String) token.getPrincipal();

        //通过username从数据库中查找 User对象.

        //实际项目中,这里可以根据实际情况做缓存,如果不做,Shiro自己也是有时间间隔机制,2分钟内不会重复执行该方法

        User user = userService.findByUserName(userName);

        if (user == null) {

            return null;

        }

        SimpleAuthenticationInfo authenticationInfo = new SimpleAuthenticationInfo(

                user,//这里传入的是user对象,比对的是用户名,直接传入用户名也没错,但是在授权部分就需要自己重新从数据库里取权限

                user.getPassword(),//密码

                ByteSource.Util.bytes(user.getCredentialsSalt()),//salt=username+salt

                getName()//realm name

        );

        return authenticationInfo;

    }

    /**

     * 权限信息

     * */

    @Override

    protected AuthorizationInfo doGetAuthorizationInfo(PrincipalCollection principals) {

        SimpleAuthorizationInfo authorizationInfo = new SimpleAuthorizationInfo();

        //如果身份认证的时候没有传入User对象,这里只能取到userName

        //也就是SimpleAuthenticationInfo构造的时候第一个参数传递需要User对象

        User user  = (User)principals.getPrimaryPrincipal();

        for(Role role : user.getRoleList()){

            //添加角色

            authorizationInfo.addRole(role.getRole());

            for(Permission p:role.getPermissions()){

                //添加权限

                authorizationInfo.addStringPermission(p.getPermission());

            }

        }

        return authorizationInfo;

    }

}
2、配置Shiro
package com.example.shiro.config;

import org.apache.shiro.authc.credential.HashedCredentialsMatcher;

import org.apache.shiro.spring.security.interceptor.AuthorizationAttributeSourceAdvisor;

import org.apache.shiro.spring.web.ShiroFilterFactoryBean;

import org.apache.shiro.web.mgt.DefaultWebSecurityManager;

import org.springframework.context.annotation.Bean;

import org.springframework.context.annotation.Configuration;

import org.springframework.web.servlet.handler.SimpleMappingExceptionResolver;

import java.util.HashMap;

import java.util.Map;

import java.util.Properties;

@Configuration

public class ShiroConfig {

    //将自己的验证方式加入容器

    @Bean

    MyShiroRealm myShiroRealm() {

        MyShiroRealm myShiroRealm = new MyShiroRealm();

        myShiroRealm.setCredentialsMatcher(hashedCredentialsMatcher());

        return myShiroRealm;

    }

    //权限管理,配置主要是Realm的管理认证

    @Bean

    DefaultWebSecurityManager securityManager() {

        DefaultWebSecurityManager manager = new DefaultWebSecurityManager();

        manager.setRealm(myShiroRealm());

        return manager;

    }

    //凭证匹配器(密码校验交给Shiro的SimpleAuthenticationInfo进行处理)

    @Bean

    public HashedCredentialsMatcher hashedCredentialsMatcher(){

        HashedCredentialsMatcher hashedCredentialsMatcher = new HashedCredentialsMatcher();

        hashedCredentialsMatcher.setHashAlgorithmName("md5");//散列算法:这里使用MD5算法;

        hashedCredentialsMatcher.setHashIterations(2);//散列的次数,比如散列两次,相当于 md5(md5(""));

        return hashedCredentialsMatcher;

    }

    // Filter工厂,设置对应的过滤条件和跳转条件

    @Bean

    ShiroFilterFactoryBean shiroFilterFactoryBean() {

        ShiroFilterFactoryBean bean = new ShiroFilterFactoryBean();

        bean.setSecurityManager(securityManager());

        Map<String, String> filterMap = new HashMap<String, String>();

        // 登出

        filterMap.put("/logout", "logout");

        // swagger

        filterMap.put("/swagger**/**", "anon");

        filterMap.put("/webjars/**", "anon");

        filterMap.put("/v2/**", "anon");

        // 对所有用户认证

        filterMap.put("/**", "authc");

        // 登录

        bean.setLoginUrl("/login");

        // 首页

        bean.setSuccessUrl("/index");

        // 未授权页面,认证不通过跳转

        bean.setUnauthorizedUrl("/403");

        bean.setFilterChainDefinitionMap(filterMap);

        return bean;

    }

    //开启shiro aop注解支持.

    @Bean

    public AuthorizationAttributeSourceAdvisor authorizationAttributeSourceAdvisor(){

        AuthorizationAttributeSourceAdvisor authorizationAttributeSourceAdvisor = new AuthorizationAttributeSourceAdvisor();

        authorizationAttributeSourceAdvisor.setSecurityManager(securityManager());

        return authorizationAttributeSourceAdvisor;

    }

    //shiro注解模式下,登录失败或者是没有权限都是抛出异常,并且默认的没有对异常做处理,配置一个异常处理

    @Bean(name="simpleMappingExceptionResolver")

    public SimpleMappingExceptionResolver

    createSimpleMappingExceptionResolver() {

        SimpleMappingExceptionResolver r = new SimpleMappingExceptionResolver();

        Properties mappings = new Properties();

        mappings.setProperty("DatabaseException", "databaseError");//数据库异常处理

        mappings.setProperty("UnauthorizedException","/403");

        r.setExceptionMappings(mappings);  // None by default

        r.setDefaultErrorView("error");    // No default

        r.setExceptionAttribute("exception");     // Default is "exception"

        return r;

    }

}
3、配置swagger
package com.example.shiro.config;

import io.swagger.annotations.ApiOperation;

import org.springframework.context.annotation.Bean;

import org.springframework.context.annotation.Configuration;

import springfox.documentation.builders.ApiInfoBuilder;

import springfox.documentation.builders.PathSelectors;

import springfox.documentation.builders.RequestHandlerSelectors;

import springfox.documentation.service.ApiInfo;

import springfox.documentation.service.Contact;

import springfox.documentation.spi.DocumentationType;

import springfox.documentation.spring.web.plugins.Docket;

import springfox.documentation.swagger2.annotations.EnableSwagger2;

@Configuration

@EnableSwagger2

public class SwaggerConfig {

    @Bean

    public Docket api() {

        return new Docket(DocumentationType.SWAGGER_2)

                .apiInfo(apiInfo())

                .select()

                .apis(RequestHandlerSelectors.any())

                .paths(PathSelectors.any()).build();

    }

    private static ApiInfo apiInfo() {

        return new ApiInfoBuilder()

                .title("API文档")

                .description("Swagger API 文档")

                .version("1.0")

                .contact(new Contact("name..", "url..", "email.."))

                .build();

    }

}
七、controller
1、LoginController用来处理登录
package com.example.shiro.controller;

import com.example.shiro.entity.User;

import com.example.shiro.model.LoginResult;

import com.example.shiro.service.LoginService;

import org.springframework.web.bind.annotation.GetMapping;

import org.springframework.web.bind.annotation.PostMapping;

import org.springframework.web.bind.annotation.RequestBody;

import org.springframework.web.bind.annotation.RestController;

import javax.annotation.Resource;

@RestController

public class LoginController {

    @Resource

    private LoginService loginService;

    @GetMapping(value = "/login")

    public String login() {

        return "登录页";

    }

    @PostMapping(value = "/login")

    public String login(@RequestBody User user) {

        System.out.println("login()");

        String userName = user.getUserName();

        String password = user.getPassword();

        LoginResult loginResult = loginService.login(userName,password);

        if(loginResult.isLogin()){

            return "登录成功";

        } else {

            return "登录失败:" + loginResult.getResult();

        }

    }

    @GetMapping(value = "/index")

    public String index() {

        return "主页";

    }

    @GetMapping(value = "/logout")

    public String logout() {

        return "退出";

    }

    @GetMapping("/403")

    public String unauthorizedRole(){

        return "没有权限";

    }

}
2、UserController用来测试访问,权限全部采用注解的方式。
package com.example.shiro.controller;

import org.apache.shiro.authz.annotation.RequiresPermissions;

import org.springframework.web.bind.annotation.GetMapping;

import org.springframework.web.bind.annotation.RequestMapping;

import org.springframework.web.bind.annotation.RestController;

@RestController

@RequestMapping("/user")

public class UserController {

    //用户查询

    @GetMapping("/userList")

    @RequiresPermissions("user:view")//权限管理;

    public String userInfo(){

        return "userList";

    }

    //用户添加

    @GetMapping("/userAdd")

    @RequiresPermissions("user:add")//权限管理;

    public String userInfoAdd(){

        return "userAdd";

    }

    //用户删除

    @GetMapping("/userDel")

    @RequiresPermissions("user:del")//权限管理;

    public String userDel(){

        return "userDel";

    }

}
八、数据库预设一些数据
先运行一遍程序,JPA生成数据库表后,手工执行sql脚本插入样本数据。
用户admin的原始密码是123456。
INSERT INTO `user` (`userId`,`username`,`name`,`password`,`salt`,`state`)

VALUES ('', 'admin', '管理员', 'd3c59d25033dbf980d29554025c23a75', '8d78869f470951332959580424d4bf4f', 1);

INSERT INTO `permission` (`permissionId`,`available`,`permissionname`,`parentid`,`parentids`,`permission`,`resourcetype`,`url`)

VALUES (1,1,'用户管理',0,'0/','user:view','menu','user/userList');

INSERT INTO `permission` (`permissionId`,`available`,`permissionname`,`parentid`,`parentids`,`permission`,`resourcetype`,`url`)

VALUES (2,1,'用户添加',1,'0/1','user:add','button','user/userAdd');

INSERT INTO `permission` (`permissionId`,`available`,`permissionname`,`parentid`,`parentids`,`permission`,`resourcetype`,`url`)

VALUES (3,1,'用户删除',1,'0/1','user:del','button','user/userDel');

INSERT INTO `role` (`roleid`,`available`,`description`,`role`) VALUES (1,1,'管理员','admin');

INSERT INTO `rolepermission` (`permissionid`,`roleid`) VALUES (1,1);

INSERT INTO `rolepermission` (`permissionid`,`roleid`) VALUES (2,1);

INSERT INTO `userrole` (`roleid`,`userId`) VALUES (1,1);
九、swagger测试
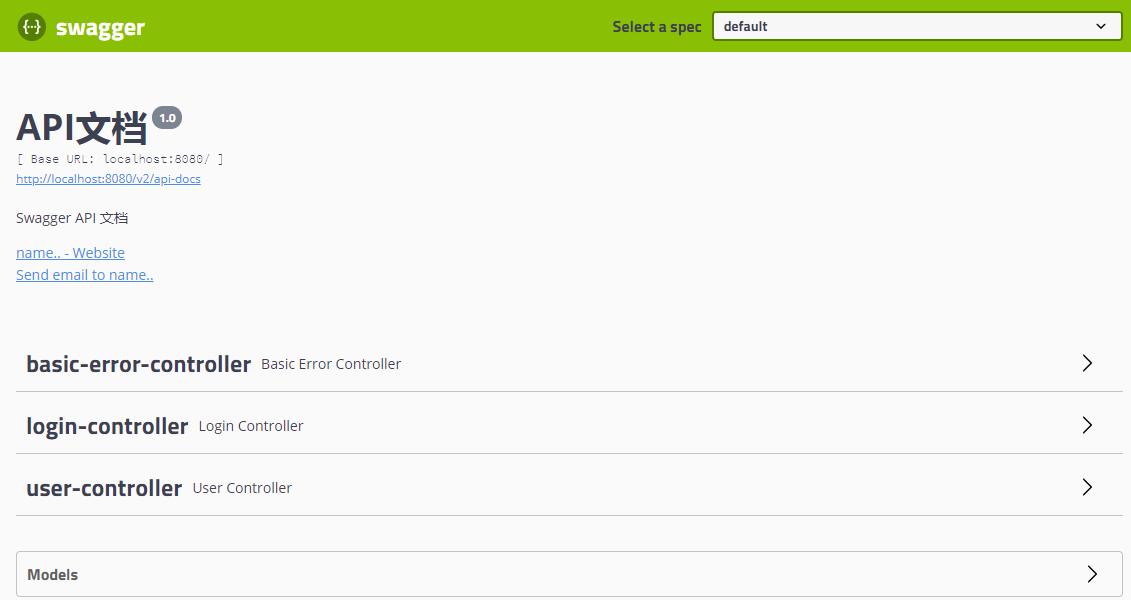
1、启动项目,访问http://localhost:8080/swagger-ui.html
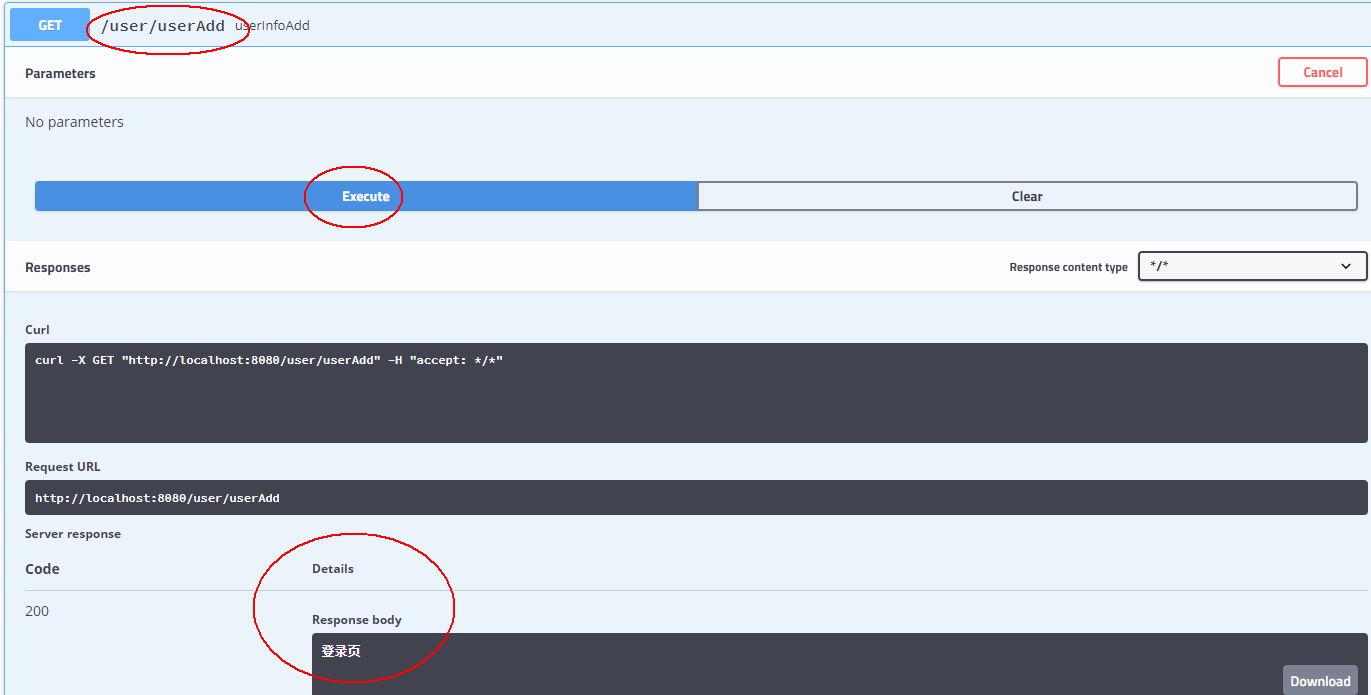
2、访问/user/userAdd, Response body显示登录页
3、访问POST的/login,请求参数输入:
{

"userName": "admin",

"password": "123456"

}

Response body显示登录成功。

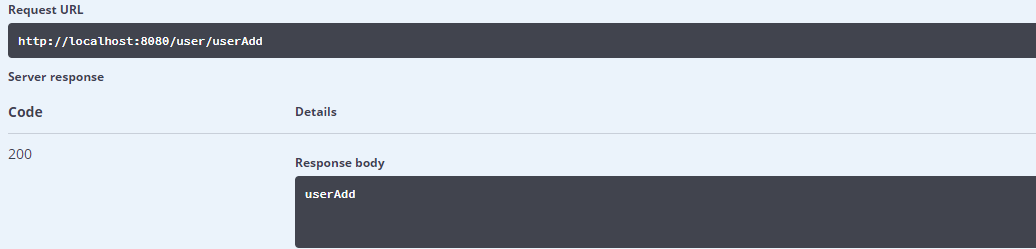
4、再次访问/user/userAdd,因为登录成功了并且有权限,这次Response body显示userAdd
5、访问/user/userDel,因为数据库没有配置权限,所以Response body显示没有权限

spring boot 2 + shiro 实现权限管理的更多相关文章
- Spring Boot集成Shrio实现权限管理
Spring Boot集成Shrio实现权限管理 项目地址:https://gitee.com/dsxiecn/spring-boot-shiro.git Apache Shiro是一个强大且 ...
- Spring Boot 添加Shiro支持
前言: Shiro是一个权限.会话管理的开源Java安全框架:Spring Boot集成Shiro后可以方便的使用Session: 工程概述: (工程结构图) 一.建立Spring Boot工程 参照 ...
- 基于Spring Boot和Shiro的后台管理系统FEBS
FEBS是一个简单高效的后台权限管理系统.项目基础框架采用全新的Java Web开发框架 —— Spring Boot 2.0.3,消除了繁杂的XML配置,使得二次开发更为简单:数据访问层采用Myba ...
- Spring Boot 集成Shiro和CAS
Spring Boot 集成Shiro和CAS 标签: springshirocas 2016-01-17 23:03 35765人阅读 评论(22) 收藏 举报 分类: Spring(42) 版 ...
- Spring Boot 整合 Shiro ,两种方式全总结!
在 Spring Boot 中做权限管理,一般来说,主流的方案是 Spring Security ,但是,仅仅从技术角度来说,也可以使用 Shiro. 今天松哥就来和大家聊聊 Spring Boot ...
- Spring Boot2 系列教程(三十二)Spring Boot 整合 Shiro
在 Spring Boot 中做权限管理,一般来说,主流的方案是 Spring Security ,但是,仅仅从技术角度来说,也可以使用 Shiro. 今天松哥就来和大家聊聊 Spring Boot ...
- 快速搭建Spring Boot + Apache Shiro 环境
个人博客网:https://wushaopei.github.io/ (你想要这里多有) 一.Apache Shiro 介绍及概念 概念:Apache Shiro是一个强大且易用的Java安全框 ...
- spring boot 和shiro的代码实战demo
spring boot和shiro的代码实战 首先说明一下,这里不是基础教程,需要有一定的shiro知识,随便百度一下,都能找到很多的博客叫你基础,所以这里我只给出代码. 官方文档:http://sh ...
- 【shiro】(5)---基于Shiro的权限管理
基于Shiro的权限管理项目搭建 前面写了四篇有关权限的文章,算是这篇文章的铺垫了.这篇文章采用 开发环境 JDK1.8 Eclipse Mav ...
随机推荐
- Fragment源码分析
转载请标明出处:http://blog.csdn.net/shensky711/article/details/53171248 本文出自: [HansChen的博客] 概述 Fragment表示 A ...
- MySQL 格式化时间 成字符串
创建个表: CREATE TABLE `x02基本信息` ( `ID` varchar(32) NOT NULL COMMENT '系统内记录的唯一标识,供系统内部使用.', `名称` varchar ...
- 全排列(STL)
输入一个整数n,输出1~n的全排列(是不是很水) 在此记录stl做法 #include<bits/stdc++.h> using namespace std; ]; int main(){ ...
- U盘安装centos 7 提示 “Warning: /dev/root does not exist
背景介绍:公司需要使用台式机安装Centos 7.5 系统,来部署一个测试的数据库,在安装Centos 7.5 系统的时候,使用U启安装,但有问题. 提示信息如下 如图:安装centos 7时提示 & ...
- X86架构CPU常识(主频,外频,FSB,cpu位和字长,倍频系数,缓存,CPU扩展指令集,CPU内核和I/O工作电压,制造工艺,指令集,超流水线与超标量)
1.主频 主频也叫时钟频率,单位是MHz,用来表示CPU的运算速度. CPU的主频=外频×倍频系数.很多人认为主频就决定着CPU的运行速度,这不仅是个片面的,而且对于服务器来讲,这个认识也出现了偏差. ...
- centos7 安装wps
# cat /etc/redhat-release CentOS Linux release 7.6.1810 (Core) # cat /proc/version Linux version 3.1 ...
- git的基本使用-1
1.git的安装 这里只介绍在 Linux 上安装. 如果你想在 Linux 上用二进制安装程序来安装 Git,可以使用发行版包含的基础软件包管理工具来安装. 如果以 Fedora 上为例,你可以使用 ...
- Docker Compose集成式应用组合及service编排
Compose简介 Compose项目是Docker官方的开源项目,负责实现对Docker容器集群的快速编排.其代码目前在 https://github.com/docker/compose 开源.C ...
- 利用python进行微信好友分析
欢迎python爱好者加入:学习交流群 667279387 本文主要利用python对个人微信好友进行分析并把结果输出到一个html文档当中,主要用到的python包为itchat,pandas,py ...
- Codeforces Round #605 (Div. 3) E - Nearest Opposite Parity
题目链接:http://codeforces.com/contest/1272/problem/E 题意:给定n,给定n个数a[i],对每个数输出d[i]. 对于每个i,可以移动到i+a[i]和i-a ...