
Spring-Boot之Admin服务监控-9
一、Spring Boot Admin用于管理和监控一个或者多个Spring Boot程序。Spring Boot Admin分为Server端和Client 端,Client端可以通过向Http Server端注册,也可以结合SpringCloud的服务注册组件Eureka 进行注册。SpringBoot Admin 提供了用AngularJs 写的 Ul 界面,用于管理和监控。其中监控内容包括Spring Boot的监控组件Actuator的各个Http节点,也支持更高级的功能,包括Turbine、Jmx、Loglevel 等。
二、直接使用Spring Boot Admin监控客户端
1、Admin Server
(1)加入依赖
        <dependency>

            <groupId>org.springframework.boot</groupId>

            <artifactId>spring-boot-starter-web</artifactId>

        </dependency>

        <dependency>

            <groupId>de.codecentric</groupId>

            <artifactId>spring-boot-admin-starter-server</artifactId>

            <version>2.0.4</version>

        </dependency>

        <dependency>

            <groupId>org.springframework.boot</groupId>

            <artifactId>spring-boot-starter-actuator</artifactId>

        </dependency>
(2)编写启动项
package com.cetc;

import de.codecentric.boot.admin.server.config.EnableAdminServer;

import org.springframework.boot.SpringApplication;

import org.springframework.boot.autoconfigure.SpringBootApplication;

@SpringBootApplication

@EnableAdminServer

public class AdminServerApplication {

    public static void main(String[] args) {

        SpringApplication.run(AdminServerApplication.class, args);

    }

}
(3)编写配置文件application.yaml
server:

  port: 8691

spring:

  application:

    name: admin-server

management:

  endpoints:

    web:

      exposure:

        include: ["*"]

  endpoint:

    health:

      show-details: always
2、Admin Client,为了简单使用,我这里还是通过feign的方式去接入Eureka的服务。
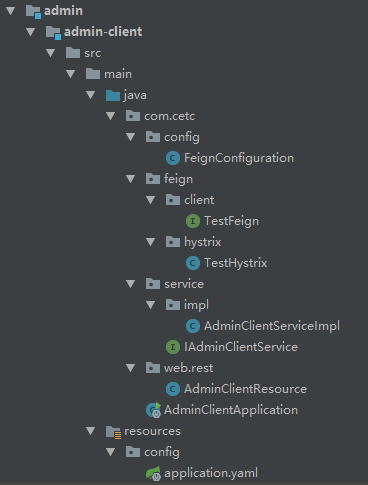
(1)目录结构和Spring-Cloud之Feign声明式调用-4类似,这里全部写出来,有兴趣可以看下方源码
(2)加入依赖
        <dependency>

            <groupId>org.springframework.boot</groupId>

            <artifactId>spring-boot-starter-web</artifactId>

        </dependency>

        <!--admin-client-->

        <dependency>

            <groupId>org.springframework.boot</groupId>

            <artifactId>spring-boot-starter-actuator</artifactId>

        </dependency>

        <dependency>

            <groupId>de.codecentric</groupId>

            <artifactId>spring-boot-admin-starter-client</artifactId>

            <version>2.0.4</version>

        </dependency>

        <!--admin-client-->
(3)启动项没有什么特别的,这里直接编写配置文件application.yaml
server:

  port: 8692

spring:

  application:

    name: admin-client

  boot:

    admin:

      client:

        url: ["http://127.0.0.1:8691"] # 配置注册的admin Server服务

eureka:

  client:

    service-url:

      defaultZone: http://127.0.0.1:8670/eureka/ # 实际开发中建议使用域名的方式

management:

  endpoints:

    web:

      exposure:

        include: ["*"]

  endpoint:

    health:

      show-details: always

    logfile:

      external-file: logs/log.log # 这里的配置主要是在admin server中看到日志记录

logging:

  path: logs

  file: logs/log.log # 日志配置
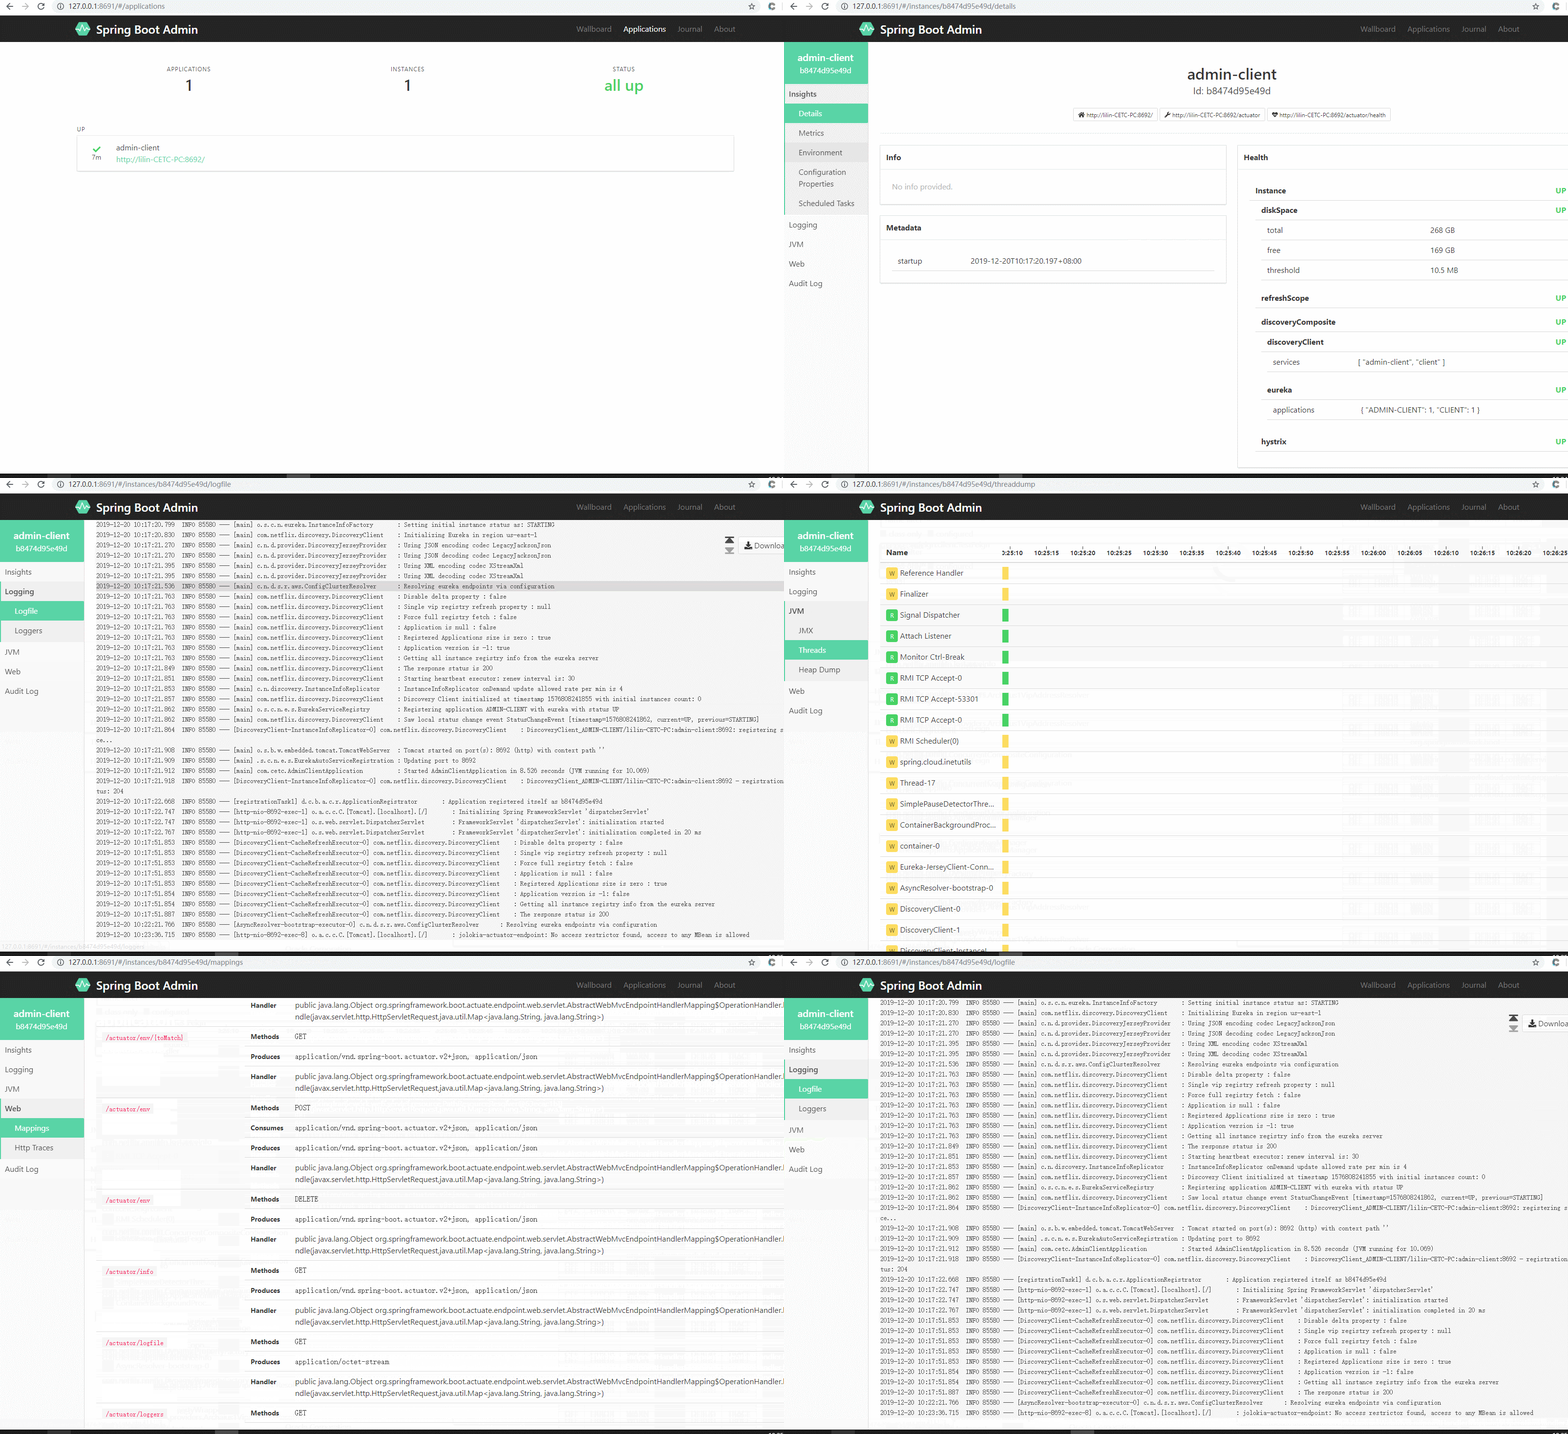
3、测试。启动Eureka-Server,Eureka-Client,Admin-Server,Admin-Client。端口分别为:8670、8673、8691、8692。
(1)Eureka-Server注册效果

(2)Admin-Server效果
三、让Admin-Server通过Eureka注册中心来监控所有服务(这才是重点),这里还加入了Security配置,主要目的是为了安全。
1、Admin-Server
(1)所需依赖
        <dependency>

            <groupId>org.springframework.cloud</groupId>

            <artifactId>spring-cloud-starter-netflix-eureka-client</artifactId>

        </dependency>

        <dependency>

            <groupId>org.springframework.boot</groupId>

            <artifactId>spring-boot-starter-web</artifactId>

        </dependency>

        <dependency>

            <groupId>de.codecentric</groupId>

            <artifactId>spring-boot-admin-starter-server</artifactId>

            <version>2.0.4</version>

        </dependency>

        <dependency>

            <groupId>org.springframework.boot</groupId>

            <artifactId>spring-boot-starter-actuator</artifactId>

        </dependency>

        <dependency>

            <groupId>org.springframework.boot</groupId>

            <artifactId>spring-boot-starter-security</artifactId>

        </dependency>
说明:spring-boot-admin-starter-server的版本选择要慎重,不然会有很多坑。
(2)编写启动项
package com.cetc;

import de.codecentric.boot.admin.server.config.EnableAdminServer;

import org.springframework.boot.SpringApplication;

import org.springframework.boot.autoconfigure.SpringBootApplication;

import org.springframework.cloud.netflix.eureka.EnableEurekaClient;

@SpringBootApplication

@EnableAdminServer

@EnableEurekaClient

public class AdminServerApplication {

    public static void main(String[] args) {

        SpringApplication.run(AdminServerApplication.class, args);

    }

}
(3)编写Security配置,这里也可以参考官网配置:https://codecentric.github.io/spring-boot-admin/2.0.4/#_securing_spring_boot_admin_server
package com.cetc.config;

import org.springframework.context.annotation.Configuration;

import org.springframework.security.config.annotation.web.builders.HttpSecurity;

import org.springframework.security.config.annotation.web.configuration.EnableWebSecurity;

import org.springframework.security.config.annotation.web.configuration.WebSecurityConfigurerAdapter;

@Configuration

@EnableWebSecurity

public class SecurityConfiguration extends WebSecurityConfigurerAdapter{

    @Override

    protected void configure(HttpSecurity http) throws Exception {

        http

            .csrf().disable()

            .authorizeRequests()
        .antMatchers("/assets/**").permitAll()

            .anyRequest().authenticated()

        .and()

            //说明:这里和官网不同的是,因为默认端口为/login,所以我这里直接放开login.html就可以了不用配置loginProcessingUrl

            //在说明一点,这里是采用的本地页面的。如果前后端分开,请配具体的登录接口。

            .formLogin()

            .loginPage("/login.html").permitAll()

        .and()

            //默认接口/logout,不用配置logoutUrl

            .logout()

            .logoutSuccessUrl("/login.html")

        .and()

            //这里必须加入httpBasic,因为Eureka-Server是基于最原始的方式进行验证的。

            .httpBasic();

    }

}
(4)编写配置文件
server:

  port: 8691

spring:

  application:

    name: admin-server

  security:

    user:

      name: admin

      password: admin # 加入登录密码

eureka:

  client:

    service-url:

      defaultZone: http://127.0.0.1:8670/eureka/ # 实际开发中建议使用域名的方式

  instance:

    metadata-map:

      user.name: ${spring.security.user.name}

      user.password: ${spring.security.user.password}

management:

  endpoints:

    web:

      exposure:

        include: ["*"]

  endpoint:

    health:

      show-details: always # 显示具体详情
说明:metadata-map,主要用于方向验证使用。
2、Admin-Client这里不需要修改任何配置,只需要注册配置文件手动注册的配置
server:

  port: 8692

spring:

  application:

    name: admin-client

#  boot:

#    admin:

#      client:

#        url: ["http://127.0.0.1:8691"] # 配置注册的admin Server服务

eureka:

  client:

    service-url:

      defaultZone: http://127.0.0.1:8670/eureka/ # 实际开发中建议使用域名的方式

management:

  endpoints:

    web:

      exposure:

        include: ["*"]

  endpoint:

    health:

      show-details: always

    logfile:

      external-file: logs/log.log # 这里的配置主要是在admin server中看到日志记录

logging:

  path: logs

  file: logs/log.log # 日志配置
3、测试。启动Eureka-Server,Eureka-Client,Admin-Server,Admin-Client。端口分别为:8670、8673、8691、8692。
(1)Eureka-Server效果

(2)Admin-Server效果

说明:为什么Eureka-Client是INSTANCES DOWN的状态。这里服务其实是正常的,最主要的点在于Eureka-Client没有配置actuator。所以访问不到/acturtor/health接口。
四、源码地址:https://github.com/lilin409546297/spring-cloud/tree/master/admin
Spring-Boot之Admin服务监控-9的更多相关文章
- 如何做自己的服务监控?spring boot 2.x服务监控揭秘
Actuator是spring boot项目中非常强大一个功能,有助于对应用程序进行监视和管理,通过 restful api请求来监管.审计.收集应用的运行情况,针对微服务而言它是必不可少的一个环节. ...
- 如何做自己的服务监控?spring boot 1.x服务监控揭秘
1.准备 下载可运行程序:http://www.mkyong.com/spring-boot/spring-boot-hello-world-example-jsp/ 2.添加服务监控依赖 <d ...
- Spring Boot (27) actuator服务监控与管理
actuaotr是spring boot项目中非常强大的一个功能,有助于对应用程序进行监控和管理,通过restful api请求来监管.审计.收集应用的运行情况,针对微服务而言它是必不可少的一个环节. ...
- Spring Cloud第十三篇 | Spring Boot Admin服务监控
本文是Spring Cloud专栏的第十三篇文章,了解前十二篇文章内容有助于更好的理解本文: Spring Cloud第一篇 | Spring Cloud前言及其常用组件介绍概览 Spring Clo ...
- SpringBoot系列——admin服务监控
前言 springboot项目部署起来后,如何实时监控项目的运行状况呢?本文记录使用springboot-admin对服务进行监控. springboot-admin介绍:https://codece ...
- 一文读懂 Spring Boot、微服务架构和大数据治理三者之间的故事
微服务架构 微服务的诞生并非偶然,它是在互联网高速发展,技术日新月异的变化以及传统架构无法适应快速变化等多重因素的推动下诞生的产物.互联网时代的产品通常有两类特点:需求变化快和用户群体庞大,在这种情况 ...
- Spring Boot、微服务架构和大数据
一文读懂 Spring Boot.微服务架构和大数据治理三者之间的故事 https://www.cnblogs.com/ityouknow/p/9034377.html 微服务架构 微服务的诞生并非偶 ...
- Spring Boot开启Druid数据库监控功能
Druid是一个关系型数据库连接池,它是阿里巴巴的一个开源项目.Druid支持所有JDBC兼容的数据库,包括Oracle.MySQL.Derby.PostgreSQL.SQL Server.H2等.D ...
- 一文读懂spring boot 和微服务的关系
欢迎访问网易云社区,了解更多网易技术产品运营经验. Spring Boot 和微服务没关系, Java 微服务治理框架普遍用的是 Spring Cloud. Spring Boot 产生的背景,是开发 ...
- 在5分钟内将Spring Boot作为Windows服务启动
分享优锐课学习笔记~来看一下如何使用Spring Boot创建Windows服务以及通过配置详细信息来快速启动并运行. 最近不得不将Spring Boot应用程序部署为Windows服务,感到惊讶的是 ...
随机推荐
- Eclipse 远程开发插件 RSE 及远程登录
Eclispe 使用私钥登录远程服务器 生成私钥 Window --> Preference --> SSH2 --> Key Management --> Generate ...
- 组合模式( Composite Pattern)
参考文档:http://blog.csdn.net/ai92/article/details/298336 定义: 组合多个对象形成树形结构以表示“整体-部分”的结构层次. 设计动机: 这幅图片我们都 ...
- Spring实现多数据源配置
一.前言 对于小型项目,服务器与数据库是可以在同一台机子上的,但随着业务的庞大与负责,数据库和服务器就会分离开来.同时随着数据量的增大,数据库也要分开部署到多台机子上. 二.Spring配置文件修改 ...
- Spring Cloud Ribbon源码分析---负载均衡实现
上一篇结合 Eureka 和 Ribbon 搭建了服务注册中心,利用Ribbon实现了可配置负载均衡的服务调用.这一篇我们来分析Ribbon实现负载均衡的过程. 从 @LoadBalanced入手 还 ...
- RNN 权重共享
之前在几篇博客中说到了权重共享,但都觉得不够全面,这里做个专题,以后有新的理解都在此更新. 1. 减少运算只是锦上添花之前说到权重共享可以减少运算,是的,但这样说好像是可有可无,只是运算量大小的问题, ...
- RunTime.getRunTime().addShutdownHook的用法
今天在阅读Tomcat源码的时候,catalina这个类中使用了下边的代码,不是很了解,所以google了一下,然后测试下方法,Tomcat中的相关代码如下: Runtime.getRuntime() ...
- SQLServer len 函数, 查字符串长度函数
declare @name char(1000) --注意:char(10)为10位,要是位数小了会让数据出错 set @name='s{sss}fc{fggh}dghdf{cccs}x' selec ...
- PHPUnit 单元测试教程
一.官网下载对应 PHP 版本的代码库 https://phpunit.de/getting-started-with-phpunit.html 二.安装 PHPUnit 官网提供了两种方法安装 1. ...
- Egret《决战沙城》框架学习
源码地址:https://github.com/yicaoyimuys/EgretGameEngine 虽然走花观马看了看,但是收获还是蛮多. mvc: BaseController ...
- (原)使用ass字幕文件通过ffmpeg给视频添加字幕的一些研究
使用ass字幕文件通过ffmpeg给视频添加字幕的一些研究 Author:lihaiping1603@aliyun.com Create:2019-09-04 最近对ffmpeg给视频文件添加字幕效果 ...