
Spring Boot 与任务
一、任务
1、异步任务
package com.yunche.task.service;

import org.springframework.stereotype.Service;

/**

 * @ClassName: TaskService

 * @Description:

 * @author: yunche

 * @date: 2019/02/05

 */

@Service

public class TaskService {

    public void doSomething() {

        try {

            Thread.sleep(3000);

        } catch (InterruptedException e) {

            e.printStackTrace();

        }

        System.out.println("I am doing something");

    }

}
package com.yunche.task.controller;

import com.yunche.task.service.TaskService;

import org.springframework.beans.factory.annotation.Autowired;

import org.springframework.web.bind.annotation.GetMapping;

import org.springframework.web.bind.annotation.RestController;

/**

 * @ClassName: TaskController

 * @Description:

 * @author: yunche

 * @date: 2019/02/05

 */

@RestController

public class TaskController {

    @Autowired

    public TaskService taskService;

    @GetMapping("/say")

    public String say() {

        taskService.doSomething();

        return "Hello world!";

    }

}
访问:http://localhost:8080/say,由于处理 doSomething() 方法会阻塞 3 秒,所以浏览器 3 秒后才会得到字符串
Hello world!。为了加快其返回结果,可以将 doSomething() 方法修改为异步任务执行,首先在方法体上面加上
@Async注解,然后还需要添加@EnableAsync 注解,开启使用异步注解。
@Async

public void doSomething() {

    try {

        Thread.sleep(3000);

    } catch (InterruptedException e) {

        e.printStackTrace();

    }

    System.out.println("I am doing something");

}
package com.yunche.task;

import org.springframework.boot.SpringApplication;

import org.springframework.boot.autoconfigure.SpringBootApplication;

import org.springframework.scheduling.annotation.EnableAsync;

@EnableAsync

@SpringBootApplication

public class TaskApplication {

    public static void main(String[] args) {

        SpringApplication.run(TaskApplication.class, args);

    }

}
此时访问:http://localhost:8080/say,就可以立即得到返回结果了。
2、定时任务
定时任务类似于异步任务也是需要两个注解:@Scheduled、@EnableScheduling。需要注意的是该怎么计划定时任务的时间,即如何书写cron表达式,规则如下图:

来看下例子:
package com.yunche.task.service;

import org.springframework.scheduling.annotation.Scheduled;

import org.springframework.stereotype.Service;

/**

 * @ClassName: ScheduleService

 * @Description:

 * @author: yunche

 * @date: 2019/02/05

 */

@Service

public class ScheduleService {

    /**

     * cron 表达式时间的设置分为 6 个部分:

     * second(秒), minute(分), hour(时), day of month(日), month(月), day of week(周几).每个部分以空格分隔。

     *

     */

    @Scheduled(cron = "0 * * * * 1-5") // 代表每周的周 1 到周 5 的每个小时的每个整分执行任务

    public void test() {

        System.out.println("我是定时任务。。。");

    }

}
package com.yunche.task;

import org.springframework.boot.SpringApplication;

import org.springframework.boot.autoconfigure.SpringBootApplication;

import org.springframework.scheduling.annotation.EnableAsync;

import org.springframework.scheduling.annotation.EnableScheduling;

@EnableScheduling

@EnableAsync

@SpringBootApplication

public class TaskApplication {

    public static void main(String[] args) {

        SpringApplication.run(TaskApplication.class, args);

    }

}
运行主程序,发现确实是整分的时候打印语句。下面是几个实例。
 *  【0 0/5 14,18 * * ?】 每天 14 点整,和 18 点整,每隔 5 分钟执行一次

 *  【0 15 10 ? * 1-6】 每个月的周一至周六 10:15 分执行一次

 *  【0 0 2 ? * 6L】每个月的最后一个周六凌晨 2 点执行一次

 *  【0 0 2 LW * ?】每个月的最后一个工作日凌晨 2 点执行一次

 *  【0 0 2-4 ? * 1#1】每个月的第一个周一凌晨 2 点到 4 点期间,每个整点都执行一次;
3、邮件任务
需要导入 spring-boot-starter-mail 场景启动器,pom 文件:
<dependency>

    <groupId>org.springframework.boot</groupId>

    <artifactId>spring-boot-starter-mail</artifactId>

</dependency>
下面用 163 邮箱给 qq 邮箱发送邮件:首先需要在发送方的邮箱设置中开启一些服务,并保存一个第三方授权码。

spring:

  mail:

    username: xxxx@163.com

    password: 第三方授权码

    host: smtp.163.com
接下来根据邮件是否包含附件,分为 2 种情况:
不带附件,简单文本内容:
package com.yunche.task;

import org.junit.Test;

import org.junit.runner.RunWith;

import org.springframework.beans.factory.annotation.Autowired;

import org.springframework.boot.test.context.SpringBootTest;

import org.springframework.mail.SimpleMailMessage;

import org.springframework.mail.javamail.JavaMailSenderImpl;

import org.springframework.scheduling.annotation.Scheduled;

import org.springframework.test.context.junit4.SpringRunner;

@RunWith(SpringRunner.class)

@SpringBootTest

public class TaskApplicationTests {

    @Autowired

    JavaMailSenderImpl mailSender;

    @Test

    public void contextLoads() {

    	//简单消息使用 SimpleMailMessage 类

        SimpleMailMessage message = new SimpleMailMessage();

        message.setFrom("发送方@163.com");

        message.setSubject("我是主题");

        message.setText("我是普通的文本内容,我想说:你好");

        message.setTo("接收者@qq.com");

        mailSender.send(message);

        System.out.println("发送成功");

    }

}
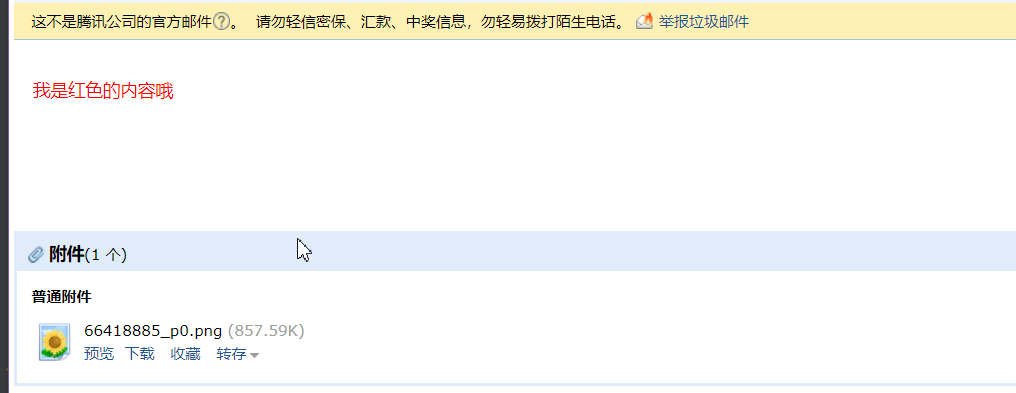
带附件的邮件:
@Test

public void test01() throws MessagingException {

    MimeMessage message= mailSender.createMimeMessage();

    //第二个参数,开启文件上传功能

    MimeMessageHelper helper = new MimeMessageHelper(message, true);

    try {

        //上传一张图片到附件中

        helper.addAttachment("66418885_p0.png", new File("C:\\Users\\Administrator\\Desktop\\wallpaper\\66418885_p0.png"));

        //第二个参数,文本内容以 HTML 方式显示

        helper.setText("<p style='color:red'> 我是红色的内容哦 </p>", true);

        helper.setSubject("我是主题");

        helper.setFrom("发送方@163.com");

        helper.setTo("收件方@qq.com");

    } catch (MessagingException e) {

        e.printStackTrace();

    }

    mailSender.send(message);

    System.out.println("发送成功");

}
二、参考资料
尚硅谷.Spring Boot 高级
Spring Boot 与任务的更多相关文章
- 玩转spring boot——快速开始
开发环境: IED环境:Eclipse JDK版本:1.8 maven版本:3.3.9 一.创建一个spring boot的mcv web应用程序 打开Eclipse,新建Maven项目 选择quic ...
- 【微框架】之一:从零开始,轻松搞定SpringCloud微框架系列--开山篇(spring boot 小demo)
Spring顶级框架有众多,那么接下的篇幅,我将重点讲解SpringCloud微框架的实现 Spring 顶级项目,包含众多,我们重点学习一下,SpringCloud项目以及SpringBoot项目 ...
- 玩转spring boot——开篇
很久没写博客了,而这一转眼就是7年.这段时间并不是我没学习东西,而是园友们的技术提高的非常快,这反而让我不知道该写些什么.我做程序已经有十几年之久了,可以说是彻彻底底的“程序老炮”,至于技术怎么样?我 ...
- 玩转spring boot——结合redis
一.准备工作 下载redis的windows版zip包:https://github.com/MSOpenTech/redis/releases 运行redis-server.exe程序 出现黑色窗口 ...
- 玩转spring boot——AOP与表单验证
AOP在大多数的情况下的应用场景是:日志和验证.至于AOP的理论知识我就不做赘述.而AOP的通知类型有好几种,今天的例子我只选一个有代表意义的“环绕通知”来演示. 一.AOP入门 修改“pom.xml ...
- 玩转spring boot——结合JPA入门
参考官方例子:https://spring.io/guides/gs/accessing-data-jpa/ 接着上篇内容 一.小试牛刀 创建maven项目后,修改pom.xml文件 <proj ...
- 玩转spring boot——结合JPA事务
接着上篇 一.准备工作 修改pom.xml文件 <project xmlns="http://maven.apache.org/POM/4.0.0" xmlns:xsi=&q ...
- 玩转spring boot——结合AngularJs和JDBC
参考官方例子:http://spring.io/guides/gs/relational-data-access/ 一.项目准备 在建立mysql数据库后新建表“t_order” ; -- ----- ...
- 玩转spring boot——结合jQuery和AngularJs
在上篇的基础上 准备工作: 修改pom.xml <project xmlns="http://maven.apache.org/POM/4.0.0" xmlns:xsi=&q ...
- 玩转spring boot——MVC应用
如何快速搭建一个MCV程序? 参照spring官方例子:https://spring.io/guides/gs/serving-web-content/ 一.spring mvc结合thymeleaf ...
随机推荐
- Servlet+JSP 原理
Servlet是用Java编写的Server端程序,与协议和平台无关,可移植行较强. Servlet在编辑时须要导入特定的Servlet API 的包,类似于普通Java程序的写法. Servlet採 ...
- C#下JSON字符串的反序列化
C#下JSON字符串的反序列化,一般都是用newtonsoft.json,比较方便..net当然也有提供相应功能,但觉得比较复杂. 所谓反序列化,就是将一个包含JSON内容的字符串,转换回指定对象(不 ...
- JLabel作为展现元素时需要注意的事项
如果没有内容,JLabel默认透明就无法作为点击区域了,所以为了让其可以响应鼠标事件需要设置 setOpaque(true) 这样就可以响应鼠标事件了 (吐槽一下,多年以前在大学做个web地图导航的网 ...
- lucene .doc文件格式解析——见图
摘自:http://forfuture1978.iteye.com/blog/546841 4.2.2. 文档号及词频(frq)信息 文档号及词频文件里面保存的是倒排表,是以跳跃表形式存在的. 此文件 ...
- STM32: TIMER门控模式控制PWM输出长度
搞了两天单脉冲没搞定,无意中发现,这个利用主从模式的门控方式来控制一路PWM的输出长度很有效. //TIM2 PWM输出,由TIM4来控制其输出与停止 //frequency_tim2:TIM2 PW ...
- Python 返回多个值+Lambda的使用
def MaxMin(a,b): if(a>b): return a,b else: return b,a max,min=MaxMin(8,95) print "最大值为:" ...
- js DOM操作练习
1.有如下html,如果用js获得被选中的option的text描述(非value)<select id="select_id"> <option vlue ...
- [Swift通天遁地]一、超级工具-(13)使用PKHUD制作各种动态提示窗口
★★★★★★★★★★★★★★★★★★★★★★★★★★★★★★★★★★★★★★★★➤微信公众号:山青咏芝(shanqingyongzhi)➤博客园地址:山青咏芝(https://www.cnblogs. ...
- VUE中全局变量的定义和使用
目录 VUE中全局变量的定义和使用 1.工作中遇到的两类问题 1.1 状态值(标志) 1.2 传递字段 2.解决方法 2.1 VUEX 2.2 使用全局变量法管理状态与字段值 3.具体实现 3.1创建 ...
- RT-Thread 设备驱动-硬件定时器浅析与使用
RT-Thread 4.0.0 访问硬件定时器设备 应用程序通过 RT-Thread 提供的 I/O 设备管理接口来访问硬件定时器设备,相关接口如下所示: 函数 描述 rt_device_find() ...