
CentOS7 Install Consul
Centos7 Install Consul
原文链接:http://www.cnblogs.com/caoguo/p/5959962.html
1) 环境
192.168.217.158 consul-

192.168.217.159 consul-

192.168.217.160 consul-

192.168.217.161 agent-
2) 安装
# yum install -y unzip

# wget https://releases.hashicorp.com/consul/0.7.0/consul_0.7.0_linux_amd64.zip

# unzip consul_0..0_linux_amd64.zip

# mv consul /usr/local/bin/
3)配置
# consul-1配置

# consul agent -server -bootstrap-expect  -data-dir /tmp/consul -node=n1 -bind=192.168.217.158 -dc=bj1

# consul-2配置

# consul agent -server -bootstrap-expect  -data-dir /tmp/consul -node=n2 -bind=192.168.217.159 -dc=bj1

# consul-3配置

# consul agent -server -bootstrap-expect  -data-dir /tmp/consul -node=n3 -bind=192.168.217.160 -dc=bj1

# 将consul- consul-3加入集群

[root@consul- ~]# consul join 192.168.217.159 192.168.217.160

Successfully joined cluster by contacting  nodes.

# 配置服务注册文件(也可以从consul api 接口添加服务注册,他会自动持久化)

[root@localhost ~]# vi /etc/consul.d/web3.json

{

"service": {

"name": "web3",

"tags": ["master"],

"address": "127.0.0.1",

"port": ,

"checks": [

{

"http": "http://localhost:10000/health",

"interval": "10s"

}

]

}

# wget https://releases.hashicorp.com/consul/0.7.0/consul_0.7.0_web_ui.zip

#启动客户端agent-

# consul agent -data-dir /tmp/consul -node=n4 -bind=192.168.217.161 -join=192.168.217.158 -dc=bj1 -config-dir=/etc/consul.d -ui-dir /tmp/ui -client=192.168.217.161
4) 测试
# 开一个端口10000的服务

[root@localhost ~]# vi web3.go

package main

import (

"fmt"

"net/http"

)

func handler(w http.ResponseWriter, r *http.Request) {

fmt.Println("hello Web3! This is n3")

fmt.Fprintf(w, "Hello Web3! This is n3")

}

func healthHandler(w http.ResponseWriter, r *http.Request) {

fmt.Println("health check!")

}

func main() {

http.HandleFunc("/", handler)

http.HandleFunc("/health", healthHandler)

http.ListenAndServe(":10000", nil)

}
# 运行服务

# go run web3.go
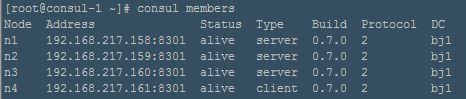
[root@consul- ~]# consul members

Node Address Status Type Build Protocol DC

n1 192.168.217.158: alive server 0.7.  bj1

n2 192.168.217.159: alive server 0.7.  bj1

n3 192.168.217.160: alive server 0.7.  bj1

n4 192.168.217.161: alive client 0.7.  bj1

# consul members -detailed

# curl localhost:/v1/catalog/nodes

# curl localhost:/v1/status/leader

# curl localhost:/v1/status/peers
# 服务发现

# curl -s http://192.168.217.161:8500/v1/catalog/service/web3|python -m json.tool

[

    {

        "Address": "192.168.217.161",

        "CreateIndex": ,

        "ModifyIndex": ,

        "Node": "n4",

        "ServiceAddress": "127.0.0.1",

        "ServiceEnableTagOverride": false,

        "ServiceID": "web3",

        "ServiceName": "web3",

        "ServicePort": ,

        "ServiceTags": [

            "master"

        ],

        "TaggedAddresses": {

            "lan": "192.168.217.161",

            "wan": "192.168.217.161"

        }

    }

]

[root@localhost ~]# dig @127.0.0.1 -p  web3.service.consul SRV

; <<>> DiG 9.9.-RedHat-9.9.-.el7_2. <<>> @127.0.0.1 -p  web3.service.consul SRV

; ( server found)

;; global options: +cmd

;; Got answer:

;; ->>HEADER<<- opcode: QUERY, status: NOERROR, id:

;; flags: qr aa rd; QUERY: , ANSWER: , AUTHORITY: , ADDITIONAL:

;; WARNING: recursion requested but not available

;; QUESTION SECTION:

;web3.service.consul.        IN    SRV

;; ANSWER SECTION:

web3.service.consul.        IN    SRV       n4.node.bj1.consul.

;; ADDITIONAL SECTION:

n4.node.bj1.consul.        IN    A    127.0.0.1

;; Query time:  msec

;; SERVER: 127.0.0.1#(127.0.0.1)

;; WHEN: Thu Oct  :: EDT

;; MSG SIZE  rcvd:

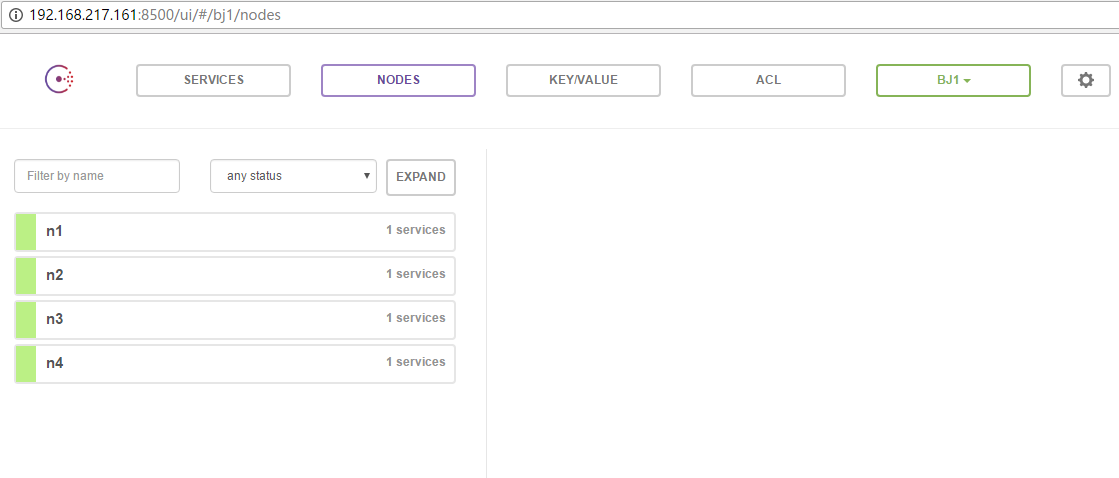
# 浏览器访问

http://192.168.217.161:8500/

CentOS7 Install Consul的更多相关文章
- centos7上consul的集群安装
centos7上consul的安装 ###一 下载 下载文件 wget https://releases.hashicorp.com/consul/0.6.4/consul_0.6.4_linux_a ...
- Centos7 install Openstack - (第四节)添加计算服务(Nova)
Centos7 install Openstack - (第四节)添加计算服务(Nova) 我的blog地址:http://www.cnblogs.com/caoguo 该文根据openstack官方 ...
- Centos7 install Openstack - (第三节)添加镜像服务(Glance)
Centos7 install Openstack - (第三节)添加镜像服务(Glance) 我的blog地址:http://www.cnblogs.com/caoguo 该文根据openstack ...
- (dev mode) install CONSUL on ubuntu
WSL: V18.04.1 1. install $sudo apt-get update$sudo apt-get install consul wsl1017@DESKTOP-14G6K9S:~$ ...
- centos7 install vim8
centos7 install vim8 Git and dependency Git: https://github.com/vim/vim # yum install -y perl-devel ...
- CentOS7 Install Shipyard
# 采集木jj 原文:http://www.cnblogs.com/caoguo/p/5735189.html # CentOS7 Install Shipyard# yum install dock ...
- CentOS7 install vsftpd
#mkdir -p /var/ftp/xcl/ #yum install -y vsftpd#useradd -g ftp -M -d /var/ftp/xcl -s /sbin/nologin xc ...
- centos7 install nginx+fastdfs
说明:centos7单机部署 nginx fastdfs ## 创建一下目录作为存储数据图片的路径 可以自己定义 mkdir -pv /data/application/{storage,tracke ...
- docker centos7创建consul镜像以及用docker-compose启动镜像
直接贴代码了: Dockfile: # Version 0.1 FROM kuba_centos7 MAINTAINER kuba si812cn@163.com # This is the rele ...
随机推荐
- iptraf 网卡 ip 端口 监控 netstat 关闭端口方法
18 commands to monitor network bandwidth on Linux server – BinaryTides https://www.binarytides.com/l ...
- EJB3.0
由于EJB2.0的复杂性,在Spring和Hibernate[1] 等轻量级框架出现后,大量的用户转向应用轻量级框架.在大家的呼声中, EJB 期待已久的EJB3.0规范终于发布了.在本文中将对新的 ...
- JSP 与 ACTION 之间的跳转
<script language="javascript">function delconfirm(url){ if(confirm("你确定要删除本条数据吗 ...
- [Usaco2015DEC] Breed Counting
[题目链接] https://www.lydsy.com/JudgeOnline/problem.php?id=4397 [算法] 树状数组 时间复杂度 : O(QlogN) [代码] #includ ...
- [Usaco2015 OPEN] Palindromic Paths
[题目链接] https://www.lydsy.com/JudgeOnline/problem.php?id=4098 [算法] 显然 , 回文路径中第i个字母的位置(x , y)必然满足 : x ...
- 《JAVA与模式》之责任链模式
责任链模式是一种对象的行为模式.在责任链模式里,很多对象由每一个对象对其下家的引用而连接起来形成一条链.请求在这个链上传递,直到链上的某一个对象决定处理此请求.发出这个请求的客户端并不知道链上的哪一个 ...
- bzoj4720
期望dp n久以前做过,再做一遍 你只能决定决策,不能决定结果,这是这道题的关键,因为我们换了教室不一定成功,所以我们应该这样设dp状态,dp[i][j][k],第i天,换j次,换没换,转移: dp[ ...
- java笔记之线程简述1
1:线程是依赖于进程而存在. 2:什么是进程? 通过任务管理器我们就看到了进程的存在. 而通过观察,我们发现只有运行的程序才会出现进程. 进程:就是正在运行的程序. 进程是系统进行资源分配和调 ...
- jquery的validate的用法
//引入js文件 //jquery 文件 <script src="__PUBLIC__/static/wap/js/jquery.min.js?v=2.1.4">&l ...
- Phoenix数据覆盖的一种解决方案
最近在做实时数仓,需要兼顾离线和实时两种查询方式,大致的方案是数据通过binlog抽取,经Phoenix插入,hive映射hbase表:Phoenix创建索引,实时查询Phoenix:离线查询hive ...