任务44:Identity MVC: EF + Identity实现
使用VSCode开发 Razer的智能感知不好。所以这里切换为VS2017进行开发:
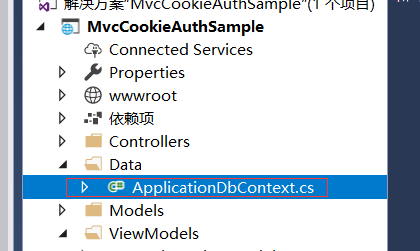
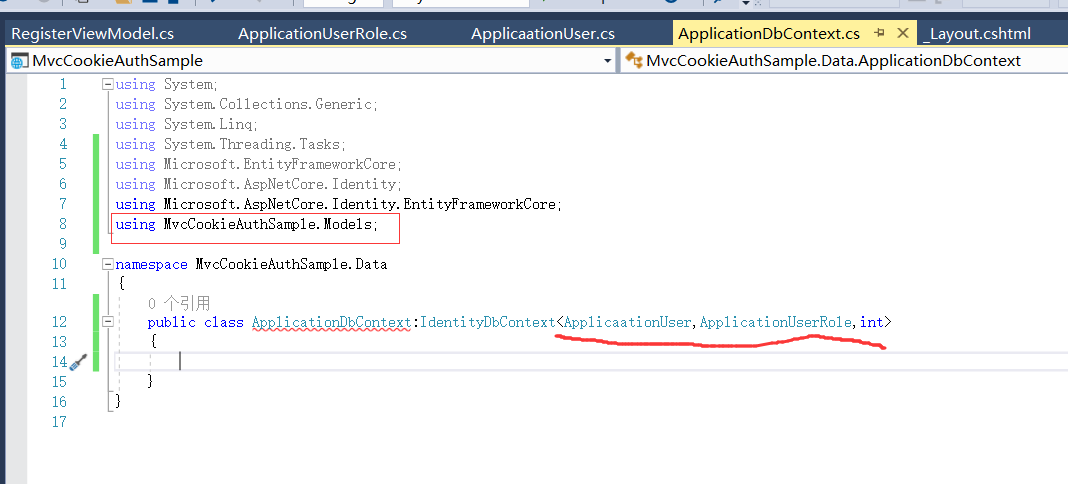
新建一个Data的文件夹来存放我们的DBContext。在Data文件夹下新建:
ApplicationDbContext.cs
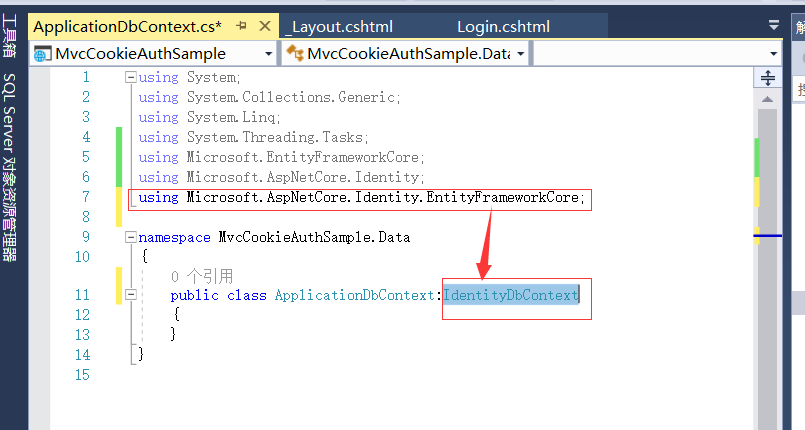
继承:IdentityDbContext在using Microsoft.AspNetCore.Identity.EntityFrameworkCore;的命名空间下面
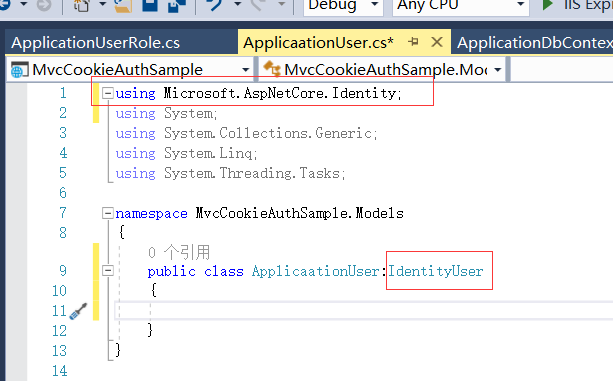
然后在Models里面创建两个实体类:
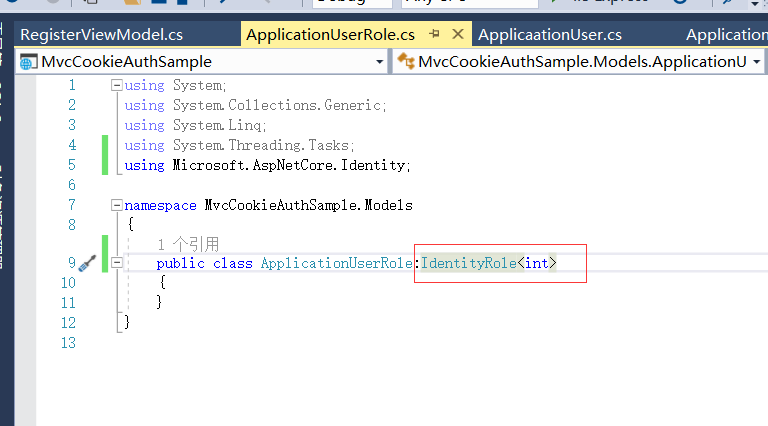
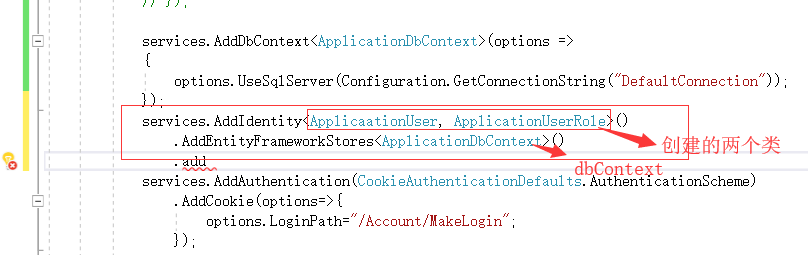
ApplicaationUser和ApplicationUserRole

ApplicaationUser.cs内继承IdentityUser在命名空间using Microsoft.AspNetCore.Identity;下
如果我们想改主键的类型为guid的话,就需要给他一个泛型的参数
这里我们设置主键的类型为int类型的
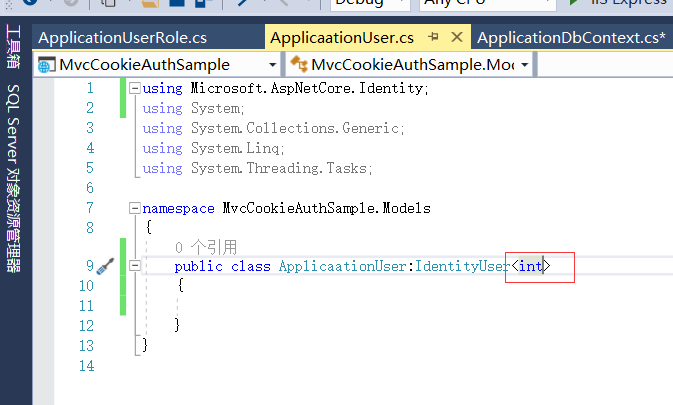
ApplicationUserRole继承:IdentityRole<int>
修改ApplicationDbContext
同时我们还需要一个构造函数来接收我们的DbContextOptions
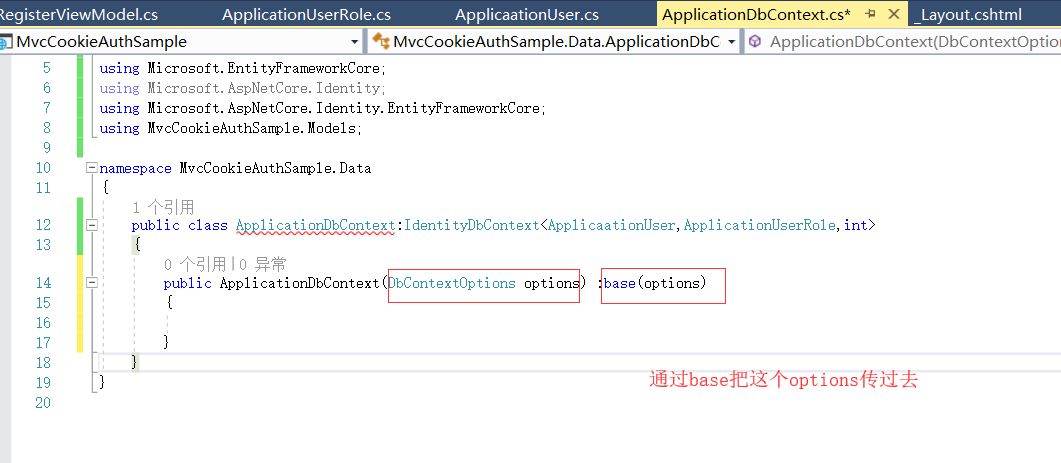
这里加上ApplicationDbContext

StartUp.cs
注册Identity
先引入命名空间:
using MvcCookieAuthSample.Data;

再引入命名空间:
using Microsoft.EntityFrameworkCore;

Configuration.GetConnectionString()是来获取配置文件内配置的数据库链接字符串
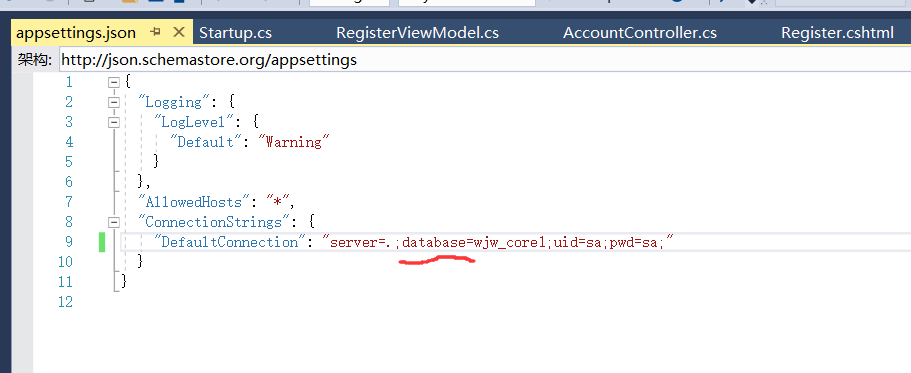
在appsettings.json中自己加上链接字符串:
"ConnectionStrings": {

    "DefaultConnection": "server=.;databse=wjw_core1;uid=sa;pwd=sa;"

  }
然后把我们配置的链接字符串拷贝过来。
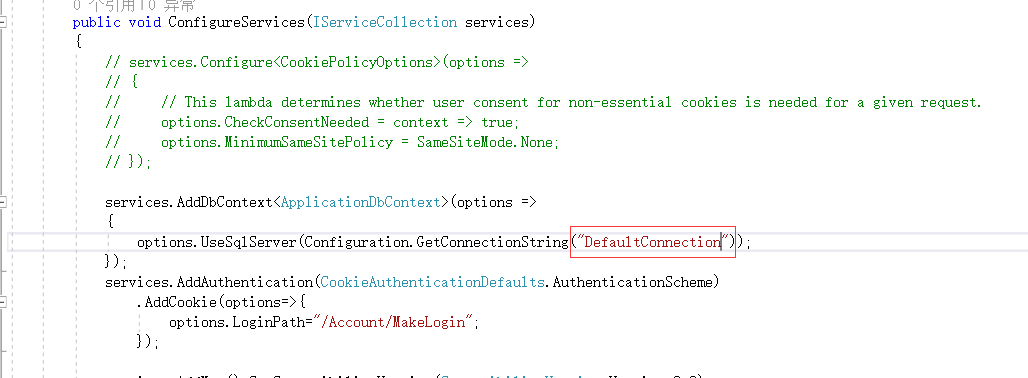
把Identity加进来
再引入命名空间
using Microsoft.AspNetCore.Identity;
密码限制
在identity下有一些默认的密码的限制,会很严格,这里我们改一下:

这样最终的代码
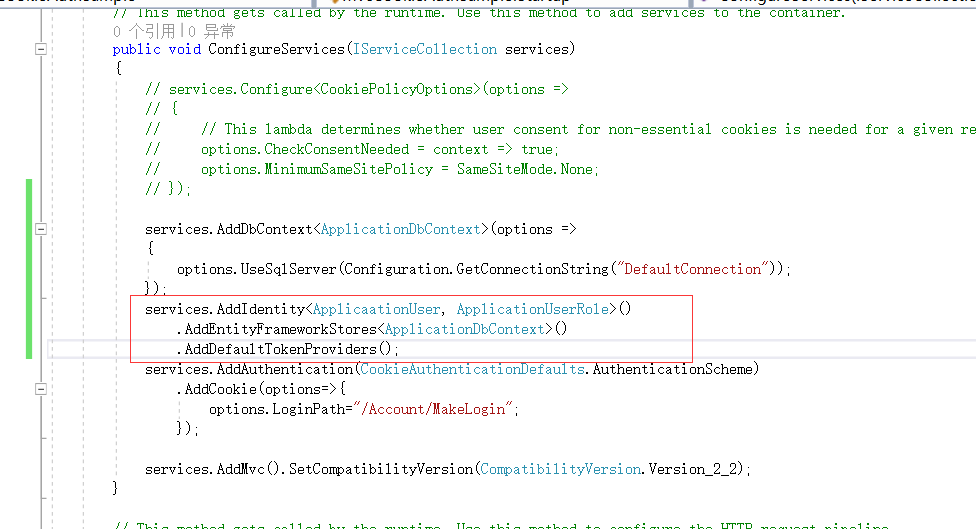
public void ConfigureServices(IServiceCollection services)
{
// services.Configure<CookiePolicyOptions>(options =>
// {
// // This lambda determines whether user consent for non-essential cookies is needed for a given request.
// options.CheckConsentNeeded = context => true;
// options.MinimumSameSitePolicy = SameSiteMode.None;
// }); services.AddDbContext<ApplicationDbContext>(options =>
{
options.UseSqlServer(Configuration.GetConnectionString("DefaultConnection"));
});
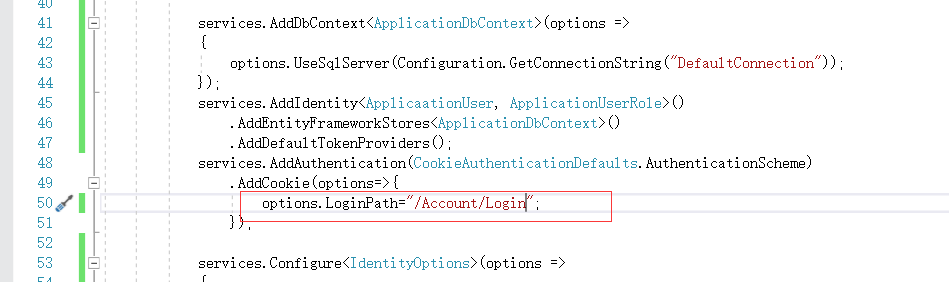
services.AddIdentity<ApplicaationUser, ApplicationUserRole>()
.AddEntityFrameworkStores<ApplicationDbContext>()
.AddDefaultTokenProviders();
services.AddAuthentication(CookieAuthenticationDefaults.AuthenticationScheme)
.AddCookie(options=>{
options.LoginPath="/Account/Login";
}); services.Configure<IdentityOptions>(options =>
{
options.Password.RequireLowercase = false;
options.Password.RequireNonAlphanumeric = false;
options.Password.RequireUppercase = false;
}); services.AddMvc().SetCompatibilityVersion(CompatibilityVersion.Version_2_2);
}
修改这里默认的登陆页面
AccountAcontroller中
UserManager是用来创建用户的
之前我们的ApplicationUser的单词进错了 这里我们统一的修改一下
SignInManager主要是用来登陆的
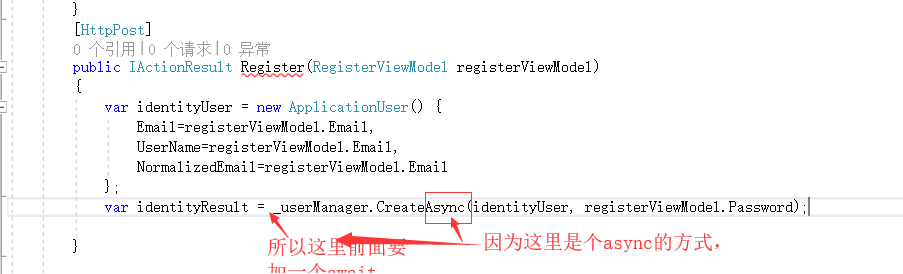
然后这个Action也必须是async的 同时返回的类型用Task去接收

加上判断,如果注册成功就跳转到首页上去

9分58秒
这行我们注册的代码就完成了。下面可以进行代码的测试
密码暴露了。修改密码框的类型为password 。同时确认密码的字段我们修改了为 ConfirmedPassword

重新创建数据库
通过nuget引入包:Microsoft.EntityFrameworkCore.Tools

没有这个包的话 EF的命令是没法用的
11分42秒
执行Migrations
执行EF的migrations命令报了个错误

上面写着让我用dotnet ef migrations remove方法。然后我就用了一下,然后就报了一个错误。发现应该是链接字符串的单词拼写错了
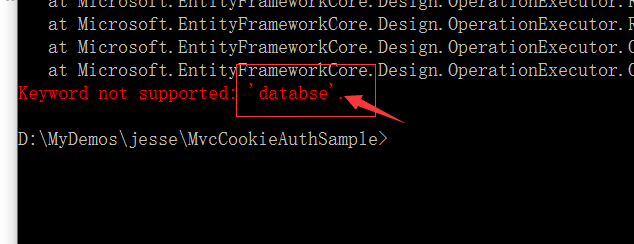
之前这的单词拼写错了。将链接字符串拼成正确的

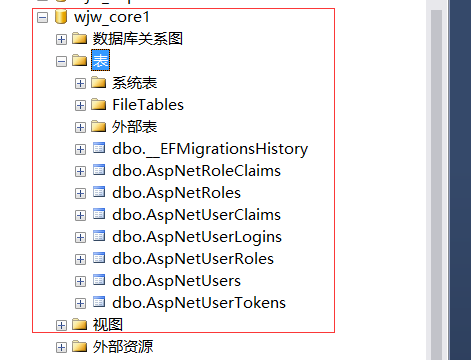
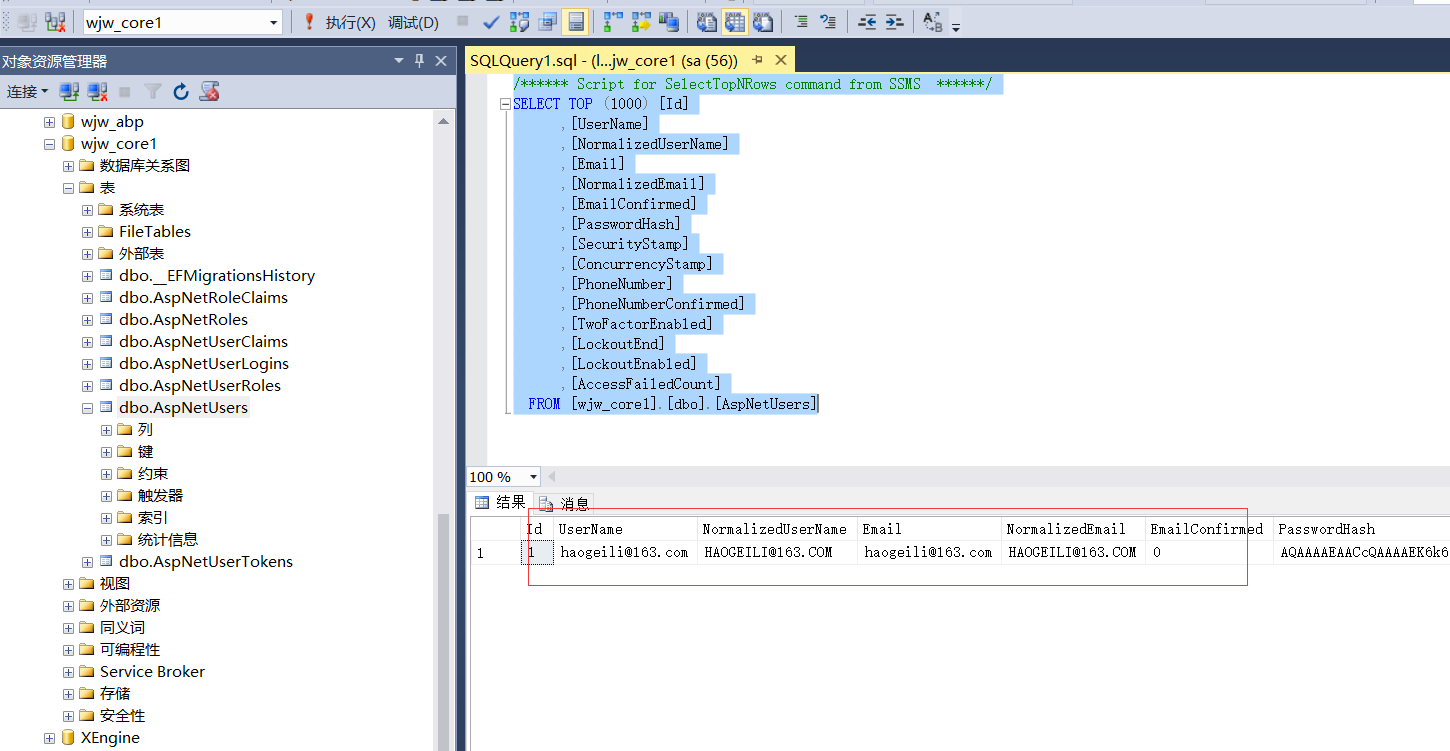
打开sql server 局看到创建好的数据库了。
运行注册
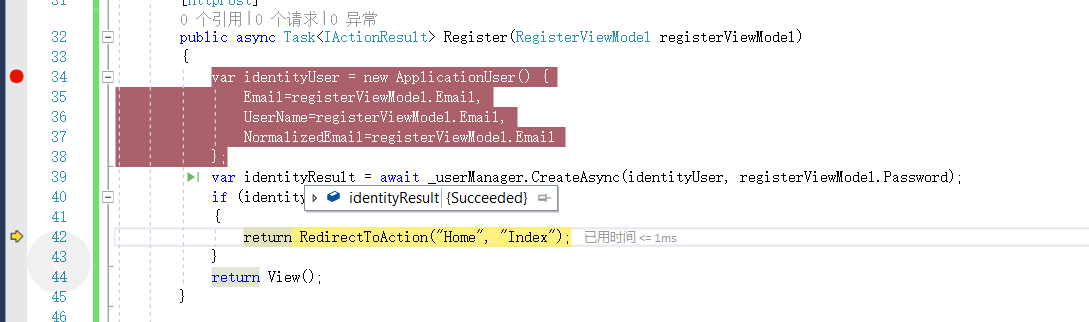
运行页面执行注册。在AccountController里面加断点测试程序是否执行成功了。
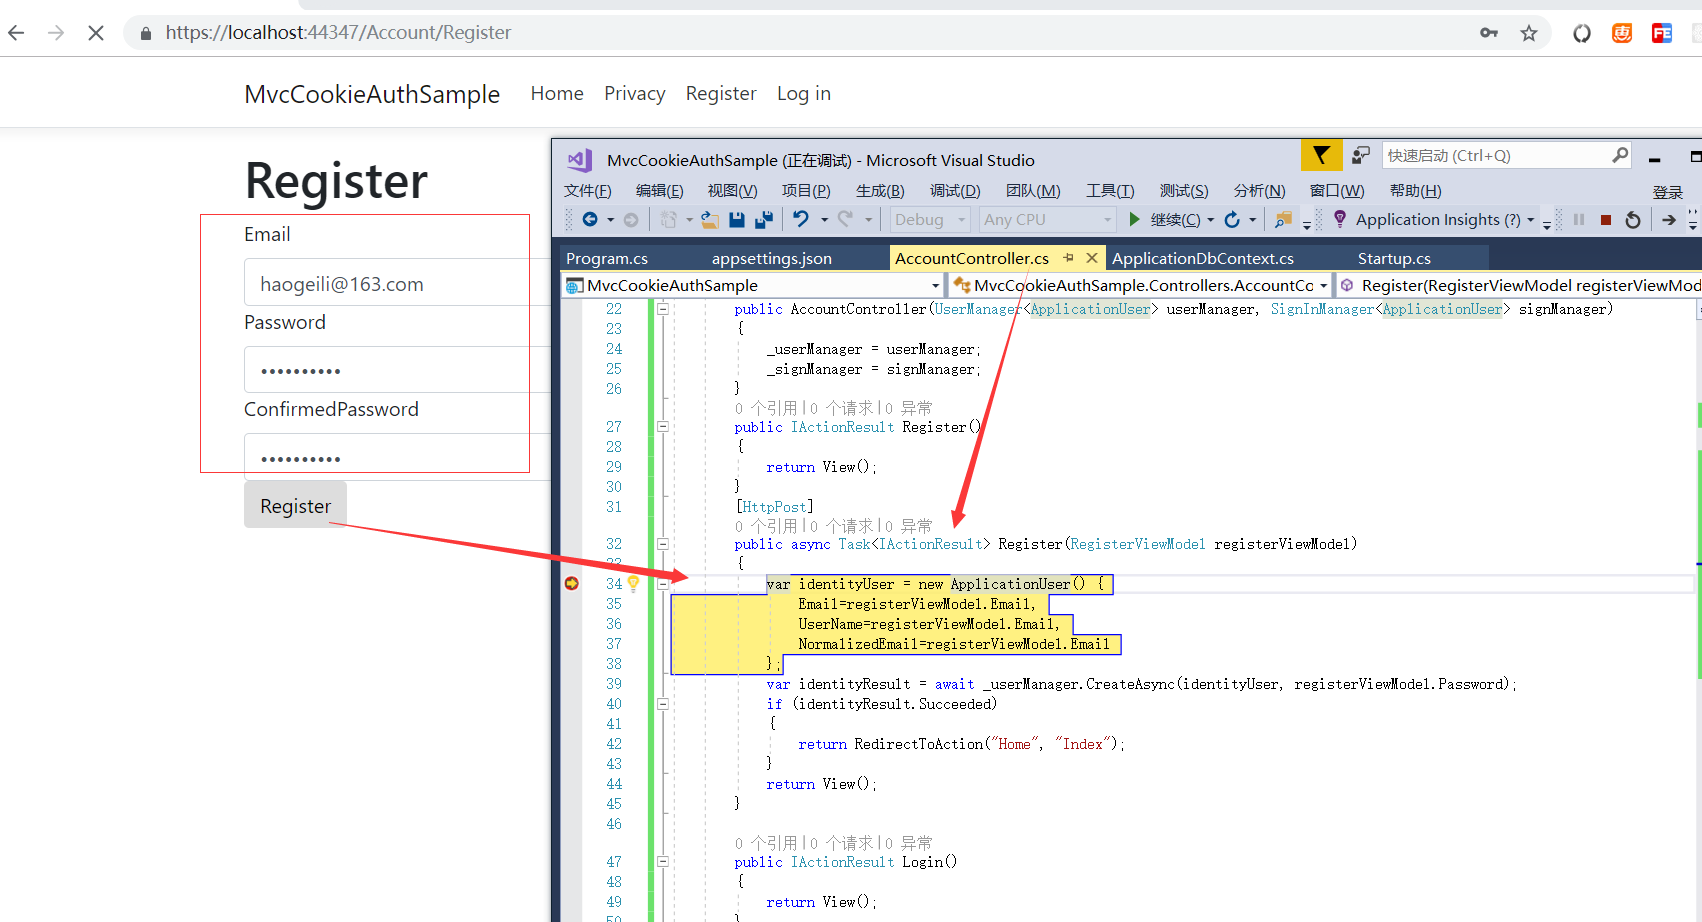
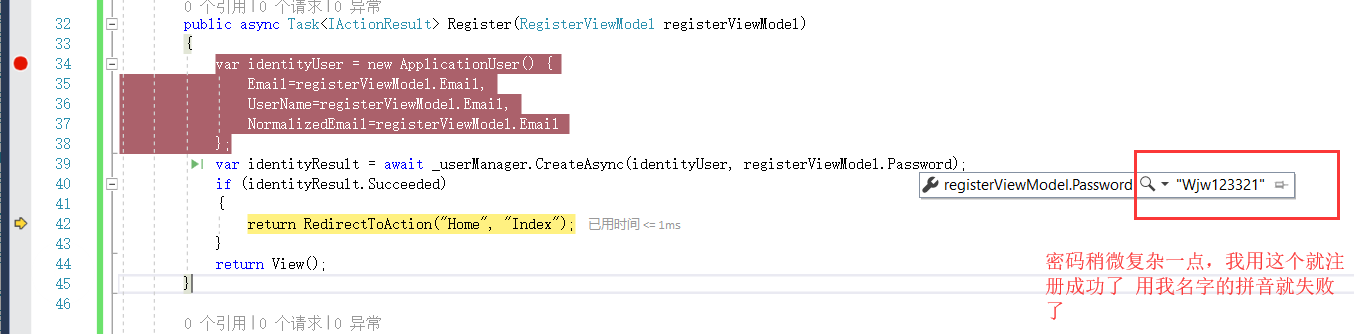
这是注册成功的效果:
正常跳转是跳转到首页。这里跳转的地方,应该前面是是Action 后面是Home的控制器。上面代码我写反了 进行修正。
  public async Task<IActionResult> Register(RegisterViewModel registerViewModel)

        {

            var identityUser = new ApplicationUser() {

                Email=registerViewModel.Email,

                UserName=registerViewModel.Email,

                NormalizedEmail=registerViewModel.Email

            };

            var identityResult = await _userManager.CreateAsync(identityUser, registerViewModel.Password);

            if (identityResult.Succeeded)

            {

                return RedirectToAction("Index", "Home");

            }

            return View();

        }
看一下数据库内的表 就有了我们创建的数据了。
完成
任务44:Identity MVC: EF + Identity实现的更多相关文章
- 【ASP.NET Core快速入门】(十四)MVC开发:UI、 EF + Identity实现、注册实现、登陆实现
前言 之前我们进行了MVC的web页面的Cookie-based认证实现,接下来的开发我们要基于之前的MvcCookieAuthSample项目做修改. MvcCookieAuthSample项目地址 ...
- 菜鸟入门【ASP.NET Core】14:MVC开发:UI、 EF + Identity实现、注册实现、登陆实现
前言 之前我们进行了MVC的web页面的Cookie-based认证实现,接下来的开发我们要基于之前的MvcCookieAuthSample项目做修改. MvcCookieAuthSample项目地址 ...
- 任务45:Identity MVC:注册逻辑实现
任务45:Identity MVC:注册逻辑实现 做登陆 在注册成功直接进行登陆,使用SignIn 这里的signIn实际上是HttpContext.Signin的封装 await _signMana ...
- 任务46:Identity MVC:登录逻辑实现
任务46:Identity MVC:登录逻辑实现 实现登陆的方法 退出方法 _layout里面增加如下的代码: Login.cshtml 运行代码测试: 这个地方的单词之前拼错了.这里进行修正 输入账 ...
- 任务47:Identity MVC:ReturnUrl实现
任务47:Identity MVC:ReturnUrl实现 在最上面加一个私有的方法 登陆也加上returnUrl Login的post方法.加入returnUrl的参数 登陆界面也需要加上 asp- ...
- 任务48:Identity MVC:Model后端验证
任务48:Identity MVC:Model后端验证 RegisterViewModel using System; using System.Collections.Generic; using ...
- 任务49:Identity MVC:Model前端验证
任务49:Identity MVC:Model前端验证 前端验证使用的是jquery的validate的组件 _ValidationScriptsPartial.cshtml 在我们的layout里面 ...
- 任务50:Identity MVC:DbContextSeed初始化
任务50:Identity MVC:DbContextSeed初始化 首先添加seed 每次应用程序启动,监测一下,是否是第一次启动.如果是第一次执行,我们需要在数据库内添加一个记录 比如说我们的用户 ...
- C# MVC+EF—结构搭建
近期做了MVC+EF的项目,现在项目完结了,抽个时间写个小DOM总结一下,顺便加深理解. 一.新建MVC项目,结构是这样的
- easyui datagrid 禁止选中行 EF的增删改查(转载) C# 获取用户IP地址(转载) MVC EF 执行SQL语句(转载) 在EF中执行SQL语句(转载) EF中使用SQL语句或存储过程 .net MVC使用Session验证用户登录 PowerDesigner 参照完整性约束(转载)
easyui datagrid 禁止选中行 没有找到可以直接禁止的属性,但是找到两个间接禁止的方式. 方式一: //onClickRow: function (rowIndex, rowData) ...
随机推荐
- 【JSON注解】注解@JsonIgnoreProperties和@JsonIgnore的另一个使用情况
之前关于这两个注解,是用在JSON循环引用的情况上,那么现在关于这两个注解,还可以使用在另外一种情况上 即: 一般标记在属性或者方法上,返回的json数据即不包含该属性 关于这种情况在什么时候会遇到呢 ...
- BUPT 2012复试机考 1T
题目描述 大家都知道,数据在计算机里中存储是以二进制的形式存储的. 有一天,小明学了C语言之后,他想知道一个类型为unsigned int 类型的数字,存储在计算机中的二进制串是什么样子的. 你能帮帮 ...
- Coursera 机器学习Course Wiki Lecture Notes
https://share.coursera.org/wiki/index.php/ML:Main 包含了每周的Lecture Notes,以便复习回顾的时候使用.
- TCP/IP Protocol Architecture
原文: https://technet.microsoft.com/en-sg/library/cc958821.aspx 1. 主机到网络层 2.网络互连层(互连这个翻译好) ----------- ...
- angularJS---自己定义过滤器
AngularJS还有一个特点就是提供了过滤器.能够通过操作UNIX下管道的方式,操作数据结果. 通过使用管道.能够便于双向的数据绑定中视图的展现. 过滤器在处理过程中,将数据变成新的格式.并且能够使 ...
- SDOI2016R1(不是解题报告)
话说洗澡的时候想了一堆要说的,坐到电脑前反而不知所措了-- 序章 听学长说他们都是省选一周前才停的课.然而我们这届--自聪哥韩大他们在省选两周前悄悄跑路后(据说班主任非常支持),信息小组内部一呼百应, ...
- word2vec学习 spark版
参考资料: http://ir.dlut.edu.cn/NewsShow.aspx?ID=291 http://www.douban.com/note/298095260/ http://machin ...
- 字符串函数---strcat()与strncat具体解释及实现
一.strcat()与strncat() strcat():strcat(dest,src); strcat把src所指向的字符加入到dest结尾处(覆盖原dest结尾处的'\0').并 ...
- mysql创建 存储过程 并通过java程序调用该存储过程
create table users_ning(id primary key auto_increment,pwd int); insert into users_ning values(id,123 ...
- python -- day 11 考试题
1. 文件t1.txt里面的内容为:(6分) 1,alex,22,13651054608,IT 2,wusir,23,13304320533,Tearcher 3,taibai,18,13332353 ...