在QTableView中使用各种自定义委托
QT的MVC(View/Delegate)模型十分强大,可以利用各种控件来对表格的输入进行限制,不过我以前一直没有过,这几天研究了一下,写个小例子,希望大家喜欢。
如果看不懂这个例子,请先看QT的自带例子:http://qt-project.org/doc/qt-4.8/itemviews-spinboxdelegate.html
思路:
1:为每一列定义委托:
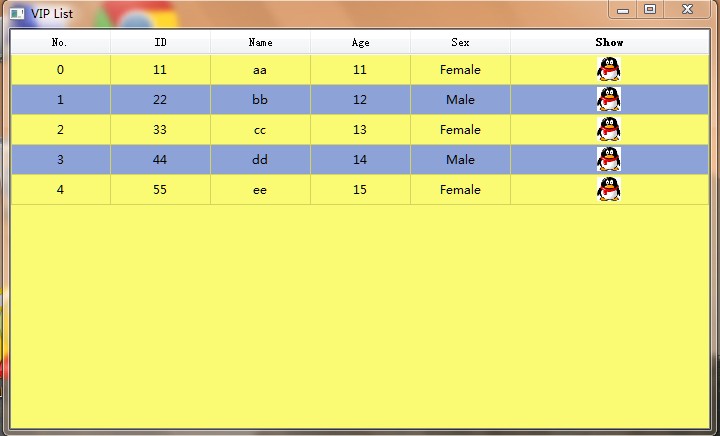
A:第一列是编号列,使用只读委托,令该列的单元格是只读的
B:第三列是ID列,只能输入1-12个数字,利用QLineEdit委托和正则表达式对输入进行限制
C:第四年龄列,利用QSpinBox委托进行输入限制,只能输入1-100之间的数字
D:第五列是性别列,利用QComboBox委托对输入进行限制,该列的单元格只能输入Male或Female
E:第六列是头像列,在该列的单元格中央放置一张头像
2:定义代理类,把所有单元格中的字符居中显示。
3:利用QSS,将表格的背景色弄成黄蓝相间。
截图:
上代码:
- #include <QtGui>
- //编号列,只读委托
- //这个方法我还真想不到,呵呵
- class ReadOnlyDelegate : public QItemDelegate
- {
- Q_OBJECT
- public:
- ReadOnlyDelegate(QObject *parent = 0): QItemDelegate(parent) { }
- QWidget *createEditor(QWidget*parent, const QStyleOptionViewItem &option,
- const QModelIndex &index) const
- {
- return NULL;
- }
- };
- //ID列,只能输入1-12个数字
- //利用QLineEdit委托和正则表达式对输入进行限制
- class UserIDDelegate : public QItemDelegate
- {
- Q_OBJECT
- public:
- UserIDDelegate(QObject *parent = 0): QItemDelegate(parent) { }
- QWidget *createEditor(QWidget *parent, const QStyleOptionViewItem &option,
- const QModelIndex &index) const
- {
- QLineEdit *editor = new QLineEdit(parent);
- QRegExp regExp("[0-9]{0,10}");
- editor->setValidator(new QRegExpValidator(regExp, parent));
- return editor;
- }
- void setEditorData(QWidget *editor, const QModelIndex &index) const
- {
- QString text = index.model()->data(index, Qt::EditRole).toString();
- QLineEdit *lineEdit = static_cast<QLineEdit*>(editor);
- lineEdit->setText(text);
- }
- void setModelData(QWidget *editor, QAbstractItemModel *model,
- const QModelIndex &index) const
- {
- QLineEdit *lineEdit = static_cast<QLineEdit*>(editor);
- QString text = lineEdit->text();
- model->setData(index, text, Qt::EditRole);
- }
- void updateEditorGeometry(QWidget *editor,
- const QStyleOptionViewItem &option, const QModelIndex &index) const
- {
- editor->setGeometry(option.rect);
- }
- };
- //年龄列,利用QSpinBox委托进行输入限制,只能输入1-100之间的数字
- class AgeDelegate : public QItemDelegate
- {
- Q_OBJECT
- public:
- AgeDelegate(QObject *parent = 0): QItemDelegate(parent) { }
- QWidget *createEditor(QWidget *parent, const QStyleOptionViewItem &option,
- const QModelIndex &index) const
- {
- QSpinBox *editor = new QSpinBox(parent);
- editor->setMinimum(1);
- editor->setMaximum(100);
- return editor;
- }
- void setEditorData(QWidget *editor, const QModelIndex &index) const
- {
- int value = index.model()->data(index, Qt::EditRole).toInt();
- QSpinBox *spinBox = static_cast<QSpinBox*>(editor);
- spinBox->setValue(value);
- }
- void setModelData(QWidget *editor, QAbstractItemModel *model,
- const QModelIndex &index) const
- {
- QSpinBox *spinBox = static_cast<QSpinBox*>(editor);
- spinBox->interpretText();
- int value = spinBox->value();
- model->setData(index, value, Qt::EditRole);
- }
- void updateEditorGeometry(QWidget *editor,
- const QStyleOptionViewItem &option, const QModelIndex &index) const
- {
- editor->setGeometry(option.rect);
- }
- };
- //性别列,利用QComboBox委托对输入进行限制
- //这一列的单元格只能输入Male或Female
- class SexDelegate : public QItemDelegate
- {
- Q_OBJECT
- public:
- SexDelegate(QObject *parent = 0): QItemDelegate(parent) { }
- QWidget *createEditor(QWidget *parent, const QStyleOptionViewItem &option,
- const QModelIndex &index) const
- {
- QComboBox *editor = new QComboBox(parent);
- editor->addItem("Female");
- editor->addItem("Male");
- return editor;
- }
- void setEditorData(QWidget *editor, const QModelIndex &index) const
- {
- QString text = index.model()->data(index, Qt::EditRole).toString();
- QComboBox *comboBox = static_cast<QComboBox*>(editor);
- int tindex = comboBox->findText(text);
- comboBox->setCurrentIndex(tindex);
- }
- void setModelData(QWidget *editor, QAbstractItemModel *model,
- const QModelIndex &index) const
- {
- QComboBox *comboBox = static_cast<QComboBox*>(editor);
- QString text = comboBox->currentText();
- model->setData(index, text, Qt::EditRole);
- }
- void updateEditorGeometry(QWidget *editor,
- const QStyleOptionViewItem &option, const QModelIndex &index) const
- {
- editor->setGeometry(option.rect);
- }
- };
- //头像列,只是在单元格中央放一张小图而已
- class IconDelegate : public QItemDelegate
- {
- Q_OBJECT
- public:
- IconDelegate(QObject *parent = 0): QItemDelegate(parent) { }
- void paint(QPainter *painter, const QStyleOptionViewItem &option,
- const QModelIndex & index ) const
- {
- //show.bmp是在工程目录中的一张图片(其实就是QQ的图标啦,呵呵)
- QPixmap pixmap = QPixmap("show.bmp").scaled(24, 24);
- qApp->style()->drawItemPixmap(painter, option.rect, Qt::AlignCenter, QPixmap(pixmap));
- }
- };
- //代理类,把所有单元格中的字符居中显示
- class VIPModel : public QStandardItemModel
- {
- Q_OBJECT
- public:
- VIPModel(QObject *parent=NULL) : QStandardItemModel(parent) { }
- VIPModel(int row, int column, QObject *parent=NULL)
- : QStandardItemModel(row, column, parent) { }
- QVariant data(const QModelIndex &index, int role = Qt::DisplayRole) const
- {
- if( Qt::TextAlignmentRole == role )
- return Qt::AlignCenter;
- return QStandardItemModel::data(index, role);
- }
- };
- #include "main.moc"
- int main(int argc, char *argv[])
- {
- QApplication app(argc, argv);
- VIPModel *model = new VIPModel(5, 5);
- QTableView *tableView = new QTableView;
- //把表格的背景调成黄蓝相间
- //这种方法是在网上看到的,用起来还真方便啊
- tableView->setAlternatingRowColors(true);
- tableView->setStyleSheet("QTableView{background-color: rgb(250, 250, 115);"
- "alternate-background-color: rgb(141, 163, 215);}");
- tableView->setWindowTitle("VIP List");
- tableView->resize(700, 400);
- tableView->setModel(model);
- QStringList headerList;
- headerList << "No." << "ID" << "Name" << "Age" << "Sex" << "Show";
- model->setHorizontalHeaderLabels(headerList);
- tableView->verticalHeader()->setVisible(false);
- tableView->horizontalHeader()->setStretchLastSection(true);
- //为每一列加载委托
- ReadOnlyDelegate readOnlyDelegate;
- tableView->setItemDelegateForColumn(0, &readOnlyDelegate);
- UserIDDelegate userIDDelegate;
- tableView->setItemDelegateForColumn(1, &userIDDelegate);
- AgeDelegate spinBoxDelegate;
- tableView->setItemDelegateForColumn(3, &spinBoxDelegate);
- SexDelegate comboBoxDelegate;
- tableView->setItemDelegateForColumn(4, &comboBoxDelegate);
- IconDelegate iconDelegate;
- tableView->setItemDelegateForColumn(5, &iconDelegate);
- for(int i=0; i<10; i++)
- {
- QModelIndex index = model->index(i, 0, QModelIndex());
- model->setData(index, i);
- }
- tableView->show();
- return app.exec();
- }
http://blog.csdn.net/small_qch/article/details/7753434
在QTableView中使用各种自定义委托的更多相关文章
- Qt自定义委托在QTableView中绘制控件、图片、文字(内容比较全)
自定义委托,继承于,QStyledItemDelegate类,重载Paint()函数, 1.实现在QTableView中绘制 格式字符串 2.实现在QTableView中绘制进度条 3.实现在QTab ...
- Qt自定义委托在QTableView中绘制控件、图片、文字
自定义委托,继承于,QStyledItemDelegate类,重载Paint()函数, 1.实现在QTableView中绘制 格式字符串 2.实现在QTableView中绘制进度条 3.实现在QTab ...
- C#中在多个地方调用同一个触发器从而触发同一个自定义委托的事件
场景 在Winfom中可以在页面上多个按钮或者右键的点击事件中触发同一个自定义的委托事件. 实现 在位置一按钮点击事件中触发 string parentPath = System.IO.Directo ...
- QTableView中嵌入复选框CheckBox 的四种方法总结
搜索了一下,QTableView中嵌入复选框CheckBox方法有四种: 第一种不能之前显示,必须双击/选中后才能显示,不适用. 第二种比较简单,通常用这种方法. 第三种只适合静态显示静态数据用 第四 ...
- 转载:QTableView中嵌入可视化组件
出处:http://qimo601.iteye.com/blog/1538364 QTableView中嵌入可视化组件方法有四种: 第一种不能之前显示,必须双击/选中后才能显示,不适用. 第二种比较简 ...
- qt QTableView中嵌入复选框CheckBox 的四种方法总结
第一种不能之前显示,必须双击/选中后才能显示,不适用. 第二种比较简单,通常用这种方法. 第三种只适合静态显示静态数据用 第四种比较适合扩展,它除了可以嵌入复选框,还可以通过paint()绘制其它控件 ...
- 自定义委托类型 - .Net自带委托类型
委托是一个类,它定义了方法的类型,使得可以将方法当作另一个方法的参数来进行传递. 与其他的类不同,委托类具有一个签名,并且它只能对与其签名匹配的方法进行引用. 一.自定义委托类型 1.语法结构:访问修 ...
- c#中的delegate(委托)和event(事件)
c#中的delegate(委托)和event(事件) 一.delegate是什么东西? 完全可以把delegate理解成C中的函数指针,它允许你传递一个类A的方法m给另一个类B的对象,使得类B的对象能 ...
- 26.QT-模型视图之自定义委托
在上一章学习 25.QT-模型视图 后,本章接着学习视图委托 视图委托(Delegate)简介 由于模型负责组织数据,而视图负责显示数据,所以当用户想修改显示的数据时,就要通过视图中的委托来完成 视图 ...
随机推荐
- HC-MAC: A Hardware-Constrained Cognitive MAC for Efficient Spectrum Management
IEEE JOURNAL ON SELECTED AREAS IN COMMUNICATIONS, VOL. 26, NO. 1, JANUARY 2008 正如上篇文章提到的,这篇论文设计的Mac协 ...
- Swift是一个提供RESTful HTTP接口的对象存储系统
Swift是一个提供RESTful HTTP接口的对象存储系统,最初起源于Rackspace的Cloud Files,目的是为了提供一个和AWS S3竞争的服务. Swift于2010年开源,是Ope ...
- PV与并发之间换算的算法 换算公式
- Summary Ranges 解答
Question Given a sorted integer array without duplicates, return the summary of its ranges. For exam ...
- html5 laboratory - drawing in the canvas
html5 laboratory - drawing in the canvas Creating a bar chart with canvas 21st February 2010 The exp ...
- VMware 虚拟机的网络连接方式详解
VMWare提供了三种工作模式,它们是bridged(桥接模式).NAT(网络地址转换模式)和host-only(主机模式).要想在网络管理和维护中合理应用它们,你就应该先了解一下这三种工作 ...
- structs2标签
Struts2常用标签总结 一 介绍 1.Struts2的作用 Struts2标签库提供了主题.模板支持,极大地简化了视图页面的编写,而且,struts2的主题.模板都提供了很好的扩展性.实现了更好的 ...
- ubuntu 文件readonly的问题: W10: Warning: Changing a readonly file 解决办法
日前,笔者遇到一个奇怪且让人蛋疼的问题,借用别人的话"大家在linux上编辑文件的时候,明明是使用的root登录的,可是这种至高无上的权限在按下i的时候被那串红色错误亵渎了W10: Warn ...
- JS 清除IE缓存
js中自动清除ie缓存方法 — 常用 对于动态文件,比如 index.asp?id=... 或者 index.aspx?id=... 相信有经验的程序员都知道怎样禁止浏览器缓存数据了. 但是对于静 ...
- Ffmpeg和SDL创建线程(转)
Spawning Threads Overview Last time we added audio support by taking advantage of SDL's audio functi ...