
python人脸识别
需要掌握知识python,opencv和机器学习一类的基础
过一段时间代码上传github,本人菜j一个,虽然是我自己写的,也有好多不懂,或者我这就是错误方向
链接:https://pan.baidu.com/s/15IK5RWrRAr_wNLFreuK7VQ 提取码:ykkn
人脸识别的步骤:

人脸检测

    haar人脸检测,

    lbp人脸检测

特征处理

    图片大小尺寸统一

    彩色灰度转换

    图片编成一维矩阵

特征提取处理

    归一化

    特征选择-删除低方差的特征

    分析进行特征降维

    训练集与测试集以一定比例数据分割

预测与训练

    朴素贝叶斯算法的预测

    决策树进行预测

    K-近邻预测

    得出准确率
程序运行:自己安装调用的库
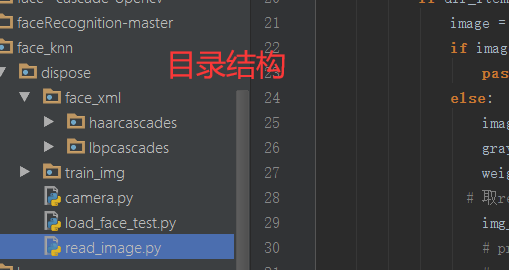
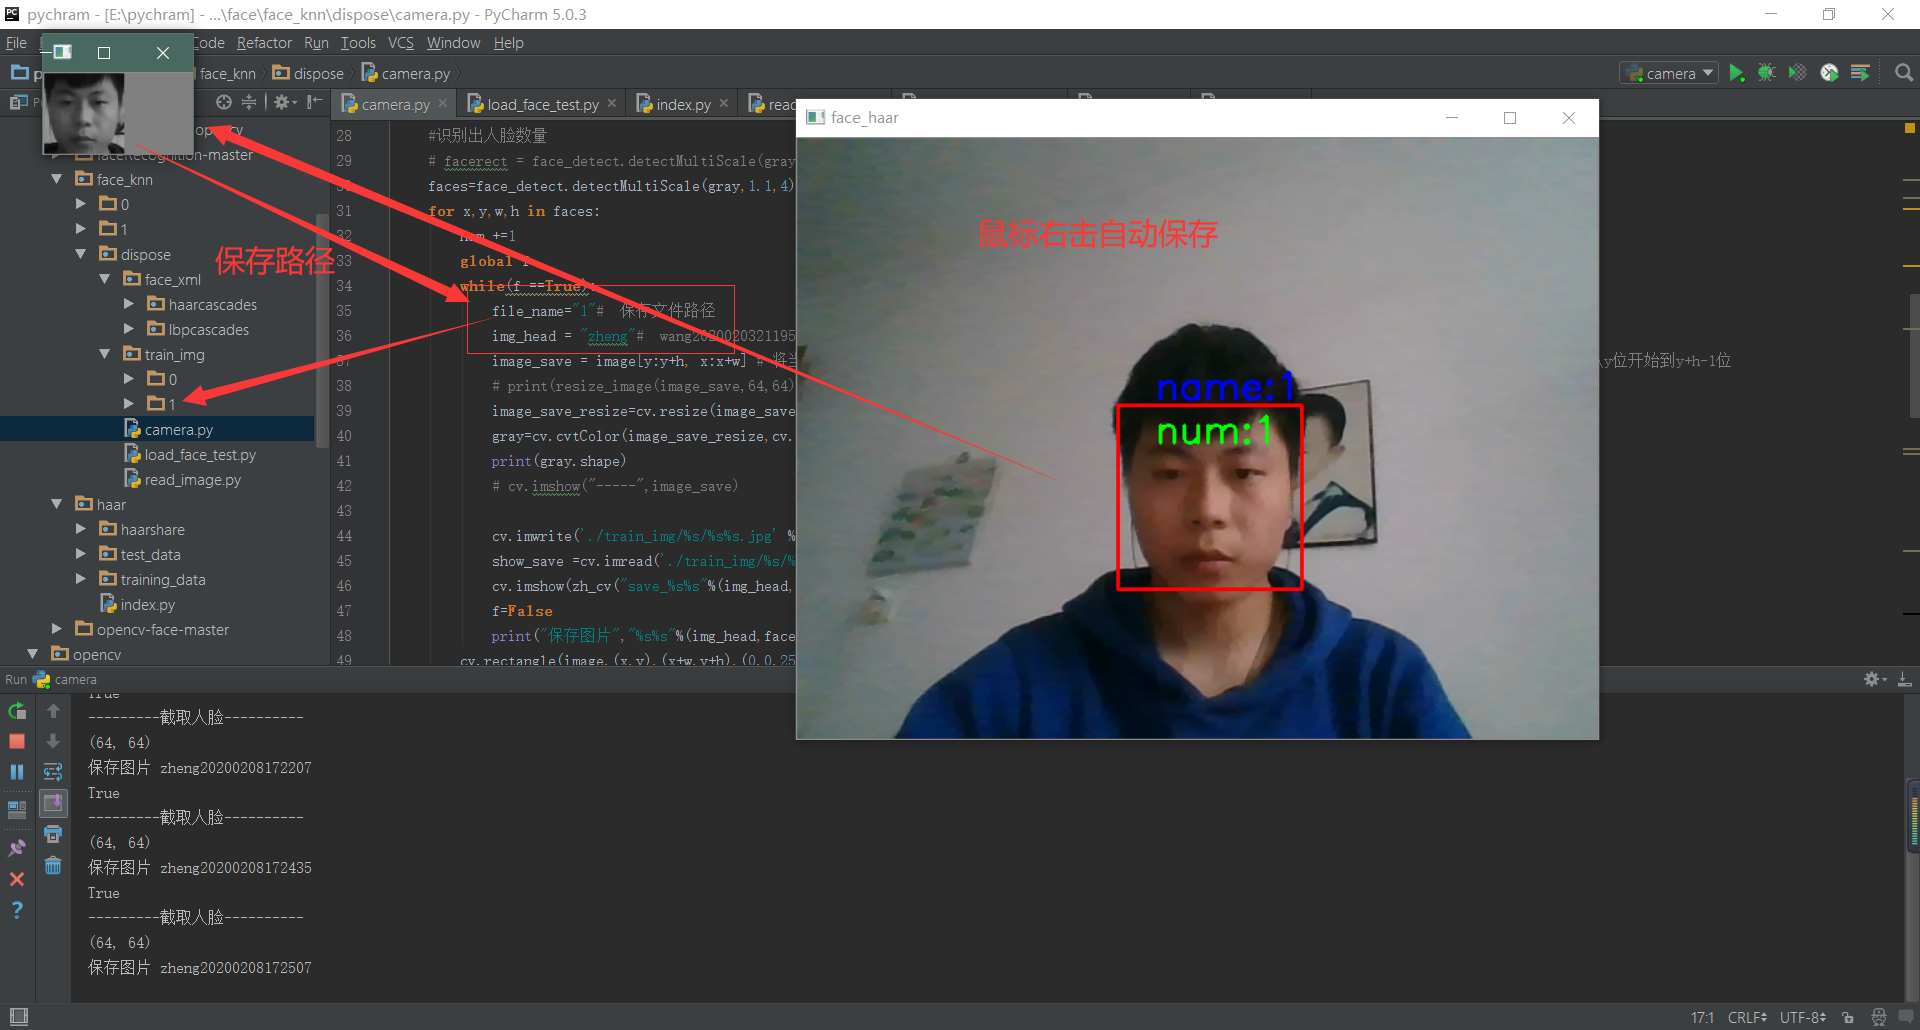
camera.py 运行会调用笔记本摄像头,鼠标右击会保存摄像头检测的人脸,保存到0和1文件夹,但是保存文件的路径需要自己手改
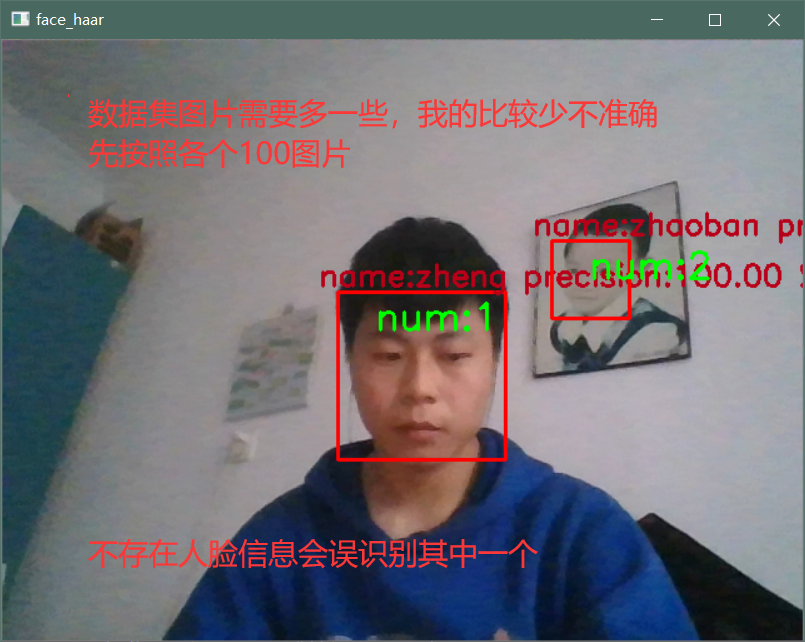
read_image 会调用保存两个文件夹采集的人脸数据图片,test_pre方法读取的图片路径使用自己人脸照片(属于上面采集两个人脸之一)
load_face_test.py 是把俩个程序结合出来,再有人脸数据集和haarcascades和lbp(opencv自带人脸检测网上可下就是慢,lbp是对比用的,我这里最后没有使用)
# camera.py 运行会调用笔记本摄像头,鼠标右击会保存摄像头检测的人脸,保存到0和1文件夹,但是保存文件的路径需要自己手改
import cv2 as cv

import time

def zh_cv(string):

    return  string.encode("gbk").decode(errors="ignore")

def get_video():

    capture =cv.VideoCapture()# VideoCapture() 开发默认摄像头,如果你有多个摄像头可以试试除0之外的其他参数

    print("-----打开摄像头--------")

    while(capture.isOpened()) :

        ret, frame=capture.read()

        if ret ==False :

            break;

        # print(frame)

        cv.flip(frame,)# 左右变换

        # print("---------haar检测算法----------")

        face_detect_dome(frame)

        # face_lbp_dome(frame)

        # cv.imshow("voide",frame)

        # cv.imshow(zh_cv("摄像头"),frame)

        c=cv.waitKey()

        if c == :

            break;

def face_detect_dome(image):

    num =

    gray=cv.cvtColor(image,cv.COLOR_BGR2GRAY)

    face_detect=cv.CascadeClassifier("./face_xml/haarcascades/haarcascade_frontalface_alt.xml")

    #识别出人脸数量

    # facerect = face_detect.detectMultiScale(gray, scaleFactor=1.2, minNeighbors=, minSize=(, ))

    faces=face_detect.detectMultiScale(gray,1.1,)

    for x,y,w,h in faces:

        num +=

        global f

        while(f ==True):

            file_name=""#  保存文件路径

            img_head = "zheng"#  wang20200203211958

            image_save = image[y:y+h, x:x+w] # 将当前帧含人脸部分保存为图片,注意这里存的还是彩色图片,前面检测时灰度化是为了降低计算量;这里访问的是从y位开始到y+h-1位

            # print(resize_image(image_save,,))

            image_save_resize=cv.resize(image_save,(,))

            gray=cv.cvtColor(image_save_resize,cv.COLOR_BGR2GRAY)# 灰度

            print(gray.shape)

            # cv.imshow("-----",image_save)

            cv.imwrite('./train_img/%s/%s%s.jpg' %(file_name,img_head,face_time()), gray)

            show_save =cv.imread('./train_img/%s/%s%s.jpg' %(file_name,img_head,face_time()))

            cv.imshow(zh_cv("save_%s%s"%(img_head,face_time())),show_save)

            f=False

            print("保存图片","%s%s"%(img_head,face_time()))

        cv.rectangle(image,(x,y),(x+w,y+h),(,,),)

        #          原图         位置  ,h         颜色

        # cv.namedWindow("face lbp",cv.WINDOW_NORMAL)

        # 显示当前捕捉到了多少人脸图片了

        font = cv.FONT_HERSHEY_SIMPLEX

        cv.putText(image, 'num:%d' % (num), (x + , y + ), font, , (, , ), )

        cv.putText(image, 'name:%d' % (num), (x + , y -), font, , (, , ), )

        # cv.namedWindow("face_haar",cv.WINDOW_NORMAL)

        cv.setMouseCallback('face_haar',img_save)

        cv.imshow("face_haar",image)

def face_lbp_dome(image):

    gray=cv.cvtColor(image,cv.COLOR_BGR2GRAY)

    face_detect=cv.CascadeClassifier("./face_xml/lbpcascades/lbpcascade_frontalface.xml")

    faces=face_detect.detectMultiScale(gray,1.1,)

    print("---------lbp----------")

    for x,y,w,h in faces:

        cv.rectangle(image,(x,y),(x+w,y+h),(,,),)

        #          原图         位置  w,h         颜色

        cv.namedWindow("face_lbp",cv.WINDOW_NORMAL)

        cv.setMouseCallback('face_lbp',img_save)

        cv.imshow("face_lbp",image)

def img_save(event, x, y, flags, param):

    global f

    if event == cv.EVENT_RBUTTONDOWN:

        f = True

        print(f)

        print("---------截取人脸----------")

        # cv.waitKey()

def face_time():

    # print(time.strftime("%Y%m%d%H%M%S", time.localtime()))

    n_time =str(time.strftime("%Y%m%d%H%M%S", time.localtime()))

    return n_time

if __name__ == '__main__':

    f = False

    get_video()
#read_image 会调用保存两个文件夹采集的人脸数据图片,test_pre方法读取的图片路径使用自己人脸照片(属于上面采集两个人脸之一)
import os

from sklearn.preprocessing import MinMaxScaler, StandardScaler

from sklearn.decomposition import PCA

import numpy as np

from sklearn.model_selection import train_test_split, GridSearchCV

from sklearn.preprocessing import StandardScaler

from sklearn.naive_bayes import MultinomialNB

import cv2

images = []

labels = []

img_list =[]

# path_name是当前工作目录,后面会由os.getcwd()获得

def read_path(path_name):

    for dir_item in os.listdir(path_name): # os.listdir() 方法用于返回指定的文件夹包含的文件或文件夹的名字的列表

        # 从当前工作目录寻找训练集图片的文件夹

        full_path = os.path.abspath(os.path.join(path_name, dir_item))

        if os.path.isdir(full_path): # 如果是文件夹,继续递归调用,去读取文件夹里的内容

            read_path(full_path)

        else: # 如果是文件了

            if dir_item.endswith('.jpg'):

                image = cv2.imread(full_path)

                if image is None: # 遇到部分数据有点问题,报错'NoneType' object has no attribute 'shape'

                    pass

                else:

                    image_resize=cv2.resize(image,(,))

                    gray=cv2.cvtColor(image_resize,cv2.COLOR_BGR2GRAY)# 灰度

                    weight,height = gray.shape

                  # 取reshape后的矩阵的第一维度数据,即所需要的数据列表

                    img_reshape = gray.reshape(,weight*height)[]

                    # print(list(img_reshape))

                    #   转换列表添加images

                    image_list=list(img_reshape)

                    images.append(image_list)

                    # global labels

                    labels.append(path_name)

                    # 标注数据,me文件夹下是我,指定为0,其他指定为1,这里的0和1不是logistic regression二分类输出下的0和1,而是softmax下的多分类的类别

        label = np.array(["%s"%"zhaoban" if label.endswith("%d"%)   else "unknow" for label in labels])

    # label = np.array([endwith(labels)])

    return images,label

def mm(img_mm):

    """

    归一化处理

    :return: NOne

    """

    mm = MinMaxScaler(feature_range=(,))

    data = mm.fit_transform(img_mm)

    print(data)

    print("----------归一化处理-------------")

    return data

def pca(img_pca):

    """

    主成分分析进行特征降维

    :return: None

    """

    pca = PCA(n_components=0.9)

    data = pca.fit_transform(img_pca)

    print("------------主成分分析进行特征降维---------------")

    # print(data)

    return data

def stand(stand_data):

    """

    标准化缩放

    :return:

    """

    std = StandardScaler()

    data = std.fit_transform(stand_data)

    # print(data)

    return data

def naviebayes(data,target):

    """

    朴素贝叶斯进行文本分类

    :return: None,t

    """

    # news = fetch_20newsgroups(subset='all')

    # 进行数据分割

    x_train, x_test, y_train, y_test = train_test_split(data,target, test_size=0.25)

    mlt = MultinomialNB(alpha=1.0)

    mlt.fit(x_train, y_train)

    # print(x_test)

    # print(test_pre())

    y_predict = mlt.predict(test_pre())

    print("分类类别为:", y_predict)

    # # 得出准确率

    print("准确率为:", mlt.score(x_test, y_test))

    return None

def test_pre():

    image_test =[]

    image =cv2.imread("qq.jpg")

    image_resize=cv2.resize(image,(,))

    gray=cv2.cvtColor(image_resize,cv2.COLOR_BGR2GRAY)# 灰度

    weight,height = gray.shape

  # 取reshape后的矩阵的第一维度数据,即所需要的数据列表

    img_reshape = gray.reshape(,weight*height)[]

    # print(list(img_reshape))

    #   转换列表添加images

    image_list=list(img_reshape)

    image_test.append(image_list)

    return image_test

if __name__ == "__main__":

    # print(read_path("./train_img/"))

    images ,labels= read_path("./train_img/")

    # image_mm =mm(images)

    # image_stand =stand(image_mm)

    # image_pca=pca(image_mm)

    print("---------------------------------------")

    naviebayes(images,labels)

    print("-----------------")
#load_face_test.py 是把俩个程序结合出来,再有人脸数据集和haarcascades和lbp(opencv自带人脸检测网上可下就是慢,lbp是对比用的,我这里最后没有使用)

import cv2 as cv

import time

import os

from sklearn.preprocessing import MinMaxScaler, StandardScaler

from sklearn.decomposition import PCA

import numpy as np

from sklearn.model_selection import train_test_split, GridSearchCV

from sklearn.preprocessing import StandardScaler

from sklearn.naive_bayes import MultinomialNB

import cv2

images = []

labels = []

img_list =[]

# path_name是当前工作目录,后面会由os.getcwd()获得

def read_path(path_name):

    for dir_item in os.listdir(path_name): # os.listdir() 方法用于返回指定的文件夹包含的文件或文件夹的名字的列表

        # 从当前工作目录寻找训练集图片的文件夹

        full_path = os.path.abspath(os.path.join(path_name, dir_item))

        if os.path.isdir(full_path): # 如果是文件夹,继续递归调用,去读取文件夹里的内容

            read_path(full_path)

        else: # 如果是文件了

            if dir_item.endswith('.jpg'):

                image = cv2.imread(full_path)

                if image is None: # 遇到部分数据有点问题,报错'NoneType' object has no attribute 'shape'

                    pass

                else:

                    image_resize=cv2.resize(image,(,))

                    gray=cv2.cvtColor(image_resize,cv2.COLOR_BGR2GRAY)# 灰度

                    weight,height = gray.shape

                  # 取reshape后的矩阵的第一维度数据,即所需要的数据列表

                    img_reshape = gray.reshape(,weight*height)[]

                    # print(list(img_reshape))

                    #   转换列表添加images

                    image_list=list(img_reshape)

                    images.append(image_list)

                    # global labels

                    labels.append(path_name)

                    # 标注数据,me文件夹下是我,指定为0,其他指定为1,这里的0和1不是logistic regression二分类输出下的0和1,而是softmax下的多分类的类别

    # dict ={:"办",:"long"}

    # for key in range():

    #     print(dict[key])

    label = np.array(["%s"%"zheng" if label.endswith("%d"%)   else "zhaoban" for label in labels])

    # label = np.array(["%s"%dict[i] if label.endswith("%d"%(i for i in range())) for label in labels])

    return images,label

def mm(img_mm):

    """

    归一化处理

    :return: NOne

    """

    mm = MinMaxScaler(feature_range=(,))

    data = mm.fit_transform(img_mm)

    print(data)

    print("----------归一化处理-------------")

    return data

def pca(img_pca):

    """

    主成分分析进行特征降维

    :return: None

    """

    pca = PCA(n_components=0.9)

    data = pca.fit_transform(img_pca)

    print("------------主成分分析进行特征降维---------------")

    # print(data)

    return data

def stand(stand_data):

    """

    标准化缩放

    :return:

    """

    std = StandardScaler()

    data = std.fit_transform(stand_data)

    # print(data)

    return data

def naviebayes(data,target,test_img):

    """

    朴素贝叶斯进行文本分类

    :return: None,t

    """

    # news = fetch_20newsgroups(subset='all')

    # 进行数据分割

    x_train, x_test, y_train, y_test = train_test_split(data,target, test_size=0.25)

    mlt = MultinomialNB(alpha=1.0)

    mlt.fit(x_train, y_train)

    # print(x_test)

    # print(test_pre())

    y_predict = mlt.predict(test_img)

    print("分类类别为:", y_predict)

    # # 得出准确率

    print("准确率为:", mlt.score(x_test, y_test))

    return y_predict,mlt.score(x_test, y_test)

def test_pre(gray):

    image_test =[]

    weight,height = gray.shape

  # 取reshape后的矩阵的第一维度数据,即所需要的数据列表

    img_reshape = gray.reshape(,weight*height)[]

    # print(list(img_reshape))

    #   转换列表添加images

    image_list=list(img_reshape)

    image_test.append(image_list)

    return image_test

def zh_cv(string):

    return  string.encode("gbk").decode(errors="ignore")

def get_video():

    capture =cv.VideoCapture()# VideoCapture() 开发默认摄像头,如果你有多个摄像头可以试试除0之外的其他参数

    print("-----打开摄像头--------")

    while(capture.isOpened()) :

        ret, frame=capture.read()

        if ret ==False :

            break;

        # print(frame)

        cv.flip(frame,)# 左右变换

        # print("---------haar检测算法----------")

        face_detect_dome(frame)

        # face_lbp_dome(frame)

        # cv.imshow("voide",frame)

        # cv.imshow(zh_cv("摄像头"),frame)

        c=cv.waitKey()

        if c == :

            break;

def face_detect_dome(image):

    num =

    gray=cv.cvtColor(image,cv.COLOR_BGR2GRAY)

    face_detect=cv.CascadeClassifier("./face_xml/haarcascades/haarcascade_frontalface_alt.xml")

    #识别出人脸数量

    # facerect = face_detect.detectMultiScale(gray, scaleFactor=1.2, minNeighbors=, minSize=(, ))

    faces=face_detect.detectMultiScale(gray,1.1,)

    for x,y,w,h in faces:

        num +=

        image_save = image[y:y+h, x:x+w] # 将当前帧含人脸部分保存为图片,注意这里存的还是彩色图片,前面检测时灰度化是为了降低计算量;这里访问的是从y位开始到y+h-1位++

        # print(resize_image(image_save,,))

        image_save_resize=cv.resize(image_save,(,))

        gray=cv.cvtColor(image_save_resize,cv.COLOR_BGR2GRAY)# 灰度

        predict,score =naviebayes(images,labels,test_pre(gray))

        print(score)

        global f

        # while(f ==True):

        #     file_name=""

        #     img_head = "wang"#  wang20200203211958

        #     print(gray.shape)

        #     cv.imwrite('./train_img/%s/%s%s.jpg' %(file_name,img_head,face_time()), gray)

        #     show_save =cv.imread('./train_img/%s/%s%s.jpg' %(file_name,img_head,face_time()))

        #     cv.imshow(zh_cv("save_%s%s"%(img_head,face_time())),show_save)

        #     f=False

        #     print("保存图片","%s%s"%(img_head,face_time()))

            # image_test =cv.imread('./train_img/%s/%s%s.jpg' %(file_name,img_head,face_time()))

            # cv.imshow("-----",image_save)

        cv.rectangle(image,(x,y),(x+w,y+h),(,,),)

        #          原图         位置  ,h         颜色

        # cv.namedWindow("face lbp",cv.WINDOW_NORMAL)

        # 显示当前捕捉到了多少人脸图片了

        font = cv.FONT_HERSHEY_SIMPLEX

        cv.putText(image, 'num:%d' % (num), (x + , y + ), font, , (, , ), )

        cv.putText(image, 'name:%s precision:%3.2f %%' % (predict[],score*),(x -, y -), font, 0.8, (, , ), )

        #cv.namedWindow("face_haar",cv.WINDOW_NORMAL)

        cv.setMouseCallback('face_haar',img_save)

        cv.imshow("face_haar",image)

def face_lbp_dome(image):

    gray=cv.cvtColor(image,cv.COLOR_BGR2GRAY)

    face_detect=cv.CascadeClassifier("./face_xml/lbpcascades/lbpcascade_frontalface.xml")

    faces=face_detect.detectMultiScale(gray,1.1,)

    print("---------lbp----------")

    for x,y,w,h in faces:

        cv.rectangle(image,(x,y),(x+w,y+h),(,,),)

        #          原图         位置  w,h         颜色

        cv.namedWindow("face_lbp",cv.WINDOW_NORMAL)

        cv.setMouseCallback('face_lbp',img_save)

        cv.imshow("face_lbp",image)

def img_save(event, x, y, flags, param):

    global f

    if event == cv.EVENT_RBUTTONDOWN:

        f = True

        print(f)

        print("---------截取人脸----------")

        # cv.waitKey()

def face_time():

    # print(time.strftime("%Y%m%d%H%M%S", time.localtime()))

    n_time =str(time.strftime("%Y%m%d%H%M%S", time.localtime()))

    return n_time

if __name__ == '__main__':

    f = False

    images ,labels= read_path("./train_img/")

    get_video()
python人脸识别的更多相关文章
- Python人脸识别最佳教材典范,40行代码搭建人脸识别系统!
Face Id是一款高端的人脸解锁软件,官方称:"在一百万张脸中识别出你的脸."百度.谷歌.腾讯等各大企业都花费数亿来鞭策人工智能的崛起,而实际的人脸识别技术是否有那么神奇? 绿帽 ...
- 【python人脸识别】使用opencv识别图片中的人脸
概述: OpenCV是一个基于BSD许可(开源)发行的跨平台计算机视觉库 为什么有OpenCV? 计算机视觉市场巨大而且持续增长,且这方面没有标准API,如今的计算机视觉软件大概有以下三种: 1.研究 ...
- Python人脸识别 + 手机推送,老板来了你就会收到短信提示
- 总结几个简单好用的Python人脸识别算法
原文连接:https://mp.weixin.qq.com/s/3BgDld9hILPLCIlyysZs6Q 哈喽,大家好. 今天给大家总结几个简单.好用的人脸识别算法. 人脸识别是计算机视觉中比较常 ...
- OpenCV+python 人脸识别
首先给大家推荐一本书:机器学习算法原理与编程实践 本文内容全部转载于书中,相当于一个读书笔记了吧 绪论 1992年麻省理工学院通过实验对比了基于结构特征的方法与基于模版匹配的方法,发现模版匹配的方法要 ...
- 简单的 Python 人脸识别实例
案例一 导入图片 思路: 1.导入库 2.加载图片 3.创建窗口 4.显示图片 5.暂停窗口 6.关闭窗口 # 1.导入库 import cv2 # 2.加载图片 img = cv2.imread(' ...
- python人脸识别项目face-recognition
该项目基于Github上面的开源项目人脸识别face-recognition,主要是对图像和视频中的人脸进行识别,在开源项目给出的例子基础上对视频人脸识别的KNN算法进行了实现. 0x1 工程项目结构 ...
- python 人脸识别试水(一)
1.安装python,在这里我的版本是python 3.6 2.安装pycharm,我的版本是pycharm 2017 3.安装pip pip 版本10 4.安装 numpy :pip ins ...
- python 人脸识别
"""Performs face alignment and calculates L2 distance between the embeddings of image ...
随机推荐
- 【一起学源码-微服务】Nexflix Eureka 源码五:EurekaClient启动要经历哪些艰难险阻?
前言 在源码分析三.四都有提及到EurekaClient启动的一些过程.因为EurekaServer在集群模式下 自己本身就是一个client,所以之前初始化eurekaServerContext就有 ...
- CountDownLanuch,CyclicBarrier,Semaphore,Lock
一.你在项目中用过CountDownLanuch,CyclicBarrier,Semaphore吗? 1.CountDownLanuch是一个同步的工具类,它允许一个或多个线程一直等待,直到其他线程执 ...
- python版飞机大战代码简易版
# -*- coding:utf-8 -*- import pygame import sys from pygame.locals import * from pygame.font import ...
- 负载均衡基本原理与lvs
前言: 之前在山西的项目上使用的是lvs下的NAT模式,但另外两个模式并没有涉及,今天系统的整理下关于负载均衡的相关理论与lvs各模式的相关优点与不足,知其然与所以然,而后能针对性的应用: 基本介绍 ...
- 浅谈Go类型转换之间的那些事
试着答一答这些问题 s[i]和(for _,v range)的v的区别是什么 var s string = "AB" fmt.Println(reflect.TypeOf(s[0] ...
- InnoDB与MyISAM的区别(高性能MySQL笔记)
1.InnoDB支持事务,MyISAM不支持,也就是说MyISAM不支持事务回滚操作,这个功能可能是致命的 2.InnoDB支持行锁,MyISAM只支持表锁,不过InnoDB的行锁是建立在索引之上的, ...
- 海思dv300cv500交叉编译webrtc
感谢声网提供的webrtc国内源码镜像. 首先要安装好海思编译工具链和git. 先替换一下webrtc代码的仓库网址路径 git config --global user.email "10 ...
- 迷你PS小程序-集成的开放式画报、油墨电子签名、图片拖拽可单独食用
米娜桑,哦哈哟~ 个人制作,该文章主要讲解最近基于uni-app框架编写的集图文拖拽等多方位编辑.油墨电子签名.开放式海报于一体的小程序的制作思路和实现代码. 目录 1.完整源码链接 2.实现思路 3 ...
- 详细解析Java虚拟机的栈帧结构
欢迎关注微信公众号:万猫学社,每周一分享Java技术干货. 什么是栈帧? 正如大家所了解的,Java虚拟机的内存区域被划分为程序计数器.虚拟机栈.本地方法栈.堆和方法区.(什么?你还不知道,赶紧去看看 ...
- ubuntu pycharm、idea创建快捷方式
编辑/usr/share/application/pycharm.desktop [Desktop Entry] Type=Application Name=Pycharm GenericName=P ...