JavaScript实现图片裁剪预览效果~(第一个小玩具)
感觉开始学习的前一个月真的太不珍惜慕课网的资源了 上面蛮多小玩意真的蛮适合我这样刚入门JavaScript的同学加深使用理解
大概收藏了百来门或大或小的课程 有一个感觉就是学这个真的比光是看书看概念更有意思的多
预览效果
大概思路:分为三层来实现 类似PS的图层叠加 最底下一层垫着 并设置透明度 中间一层就是那个选取框中的明亮画布,使用clip属性实现 第三层是选取框及其八个触点
html与css代码
<!DOCTYPE html>

<html>

<head>

    <meta charset="utf-8">

    <meta http-equiv="X-UA-Compatible" content="IE=edge">

    <title>Page Title</title>

    <link rel="stylesheet" type="text/css" href="style.css"/><!--注意这个"/"-->

    <script type="text/javascript" src="jquery-1.8.1.min.js"></script>

    <script type="text/javascript" src="jquery-ui-1.10.4.custom.min.js"></script>

    <script src="edition2.js"></script>

    <style>

        body{

    background-color: gray;

}

#box{

    height: 400px;

    width: 600px;

    position: absolute;

    top: 150px;

    left: 200px;

}

#img1{

    height: 400px;

    width: 600px;

    position: absolute;

    top: 0;

    left: 0;

    opacity: 0.3;

}

#img2{

    height: 400px;

    width: 600px;

    position: absolute;

    top: 0;

    left: 0;

    /* display: none; */

    clip: rect(0,200px,200px,0);

}

#main{

    position: absolute;

    border: 1px solid #fff;

    width: 200px;

    height: 200px;

    cursor: move;

}

.min{

    position: absolute;

    font-size: 0;

    width: 8px;

    height: 8px;

    background-color: #fff;

}

.top{

    left: 50%;

    top: -4px;

    margin-left: -4px;

    cursor: n-resize;

}

.lefttop{

    left:-4px;

    top: -4px;

    cursor: nw-resize;

}

.righttop{

    /* background-color: aqua; */

    right: -4px;

    /* 绝对定位中的right*/

    top: -4px;

    cursor: ne-resize;

}

.left{

    top:50%;

    margin-top: -4px;

    left: -4px;

    cursor: w-resize;

}

.leftdown{

    bottom: -4px;

    left: -4px;

    cursor: sw-resize;

}

.down{

    bottom: -4px;

    left:50%;

    margin-left: -4px;

    cursor:s-resize;

}

.rightdown{

    bottom: -4px;

    right: -4px;

    cursor: se-resize;

}

.right{

    top: 50%;

    margin-top: -4px;

    right: -4px;

    cursor: e-resize;

}

#pre{

    position: absolute;

    left: 850px;

    top: 150px;

    width: 600px;

    height: 400px;

}

#img3{

    position: absolute;

    height: 400px;

    width: 600px;

}

    </style>

</head>

<body>

    <div id="box">

            <img id="img1" src="img1.jpg" alt="pic">

            <img id="img2" src="img1.jpg" alt="pic">

            <div id="main">

                <div id="lefttop" class="min lefttop"></div>

                <div id="top" class="min top" ></div>

                <div id="righttop" class="min righttop"></div>

                <div id="left" class="min left"></div>

                <div id="leftdown" class="min leftdown"></div>

                <div id="down" class="min down"></div>

                <div id="rightdown" class="min rightdown"></div>

                <div id="right" class="min right"></div>

            </div>

    </div>

    <div id="pre">

        <img id="img3" src="img1.jpg" alt="pic">

    </div>

</body>

</html>
比较难的地方主要是在js
将解释直接贴在js注释中了 懂的自然懂
document.onselectstart = new Function('event.returnValue = false;');
window.onload = function(){//其实这里是不是可以用JQuery选择器?
var box = document.getElementById("box");
var main = document.getElementById("main");
var rightController = document.getElementById("right");
var topController = document.getElementById("top");
var leftController = document.getElementById("left");
var downController = document.getElementById("down");
var lefttopController = document.getElementById("lefttop");
var leftdownController = document.getElementById("leftdown");
var righttopController = document.getElementById("righttop");
var rightdownController = document.getElementById("rightdown");
var whetherdown = false;
var contact = "";//被按下的触点
$( "#main" ).draggable({ containment: 'parent' ,drag: setArea});
//添加鼠标按下事件
rightController.onmousedown = function(e){
e.stopPropagation();//冒泡 至于原理我还在研究
whetherdown = true;
contact = "right";
};
topController.onmousedown = function(e){
e.stopPropagation();
whetherdown = true;
contact = "top";
};
leftController.onmousedown = function(e){
e.stopPropagation();
whetherdown = true;
contact = "left";
};
downController.onmousedown = function(e){
e.stopPropagation();
whetherdown = true;
contact = "down";
};
lefttopController.onmousedown = function(e){
e.stopPropagation();
whetherdown = true;
contact = "lefttop";
};
leftdownController.onmousedown = function(e){
e.stopPropagation();
whetherdown = true;
contact = "leftdown";
};
rightdownController.onmousedown = function(e){
e.stopPropagation();
whetherdown = true;
contact = "rightdown";
};
righttopController.onmousedown = function(e){
e.stopPropagation();
whetherdown = true;
contact = "righttop";
};
//鼠标事件加在window上
window.onmousemove = function(e){
e.stopPropagation();
if(whetherdown == true){
switch(contact){
case"right":
rightMove(e);
break;
case"top":
topMove(e);
break;
case"left":
leftMove(e);
break;
case"down":
downMove(e);
break;
case"righttop":
topMove(e);
rightMove(e);
break;
case"rightdown":
rightMove(e);
downMove(e);
break;
case"lefttop":
topMove(e);
leftMove(e);
break;
case"leftdown":
leftMove(e);
downMove(e);
break;
}
var width = main.offsetWidth;
var height = main.offsetHeight;
setArea();
}
};
//松开事件
window.onmouseup = function(e){
whetherdown = false;
contact = ""
};
setArea();
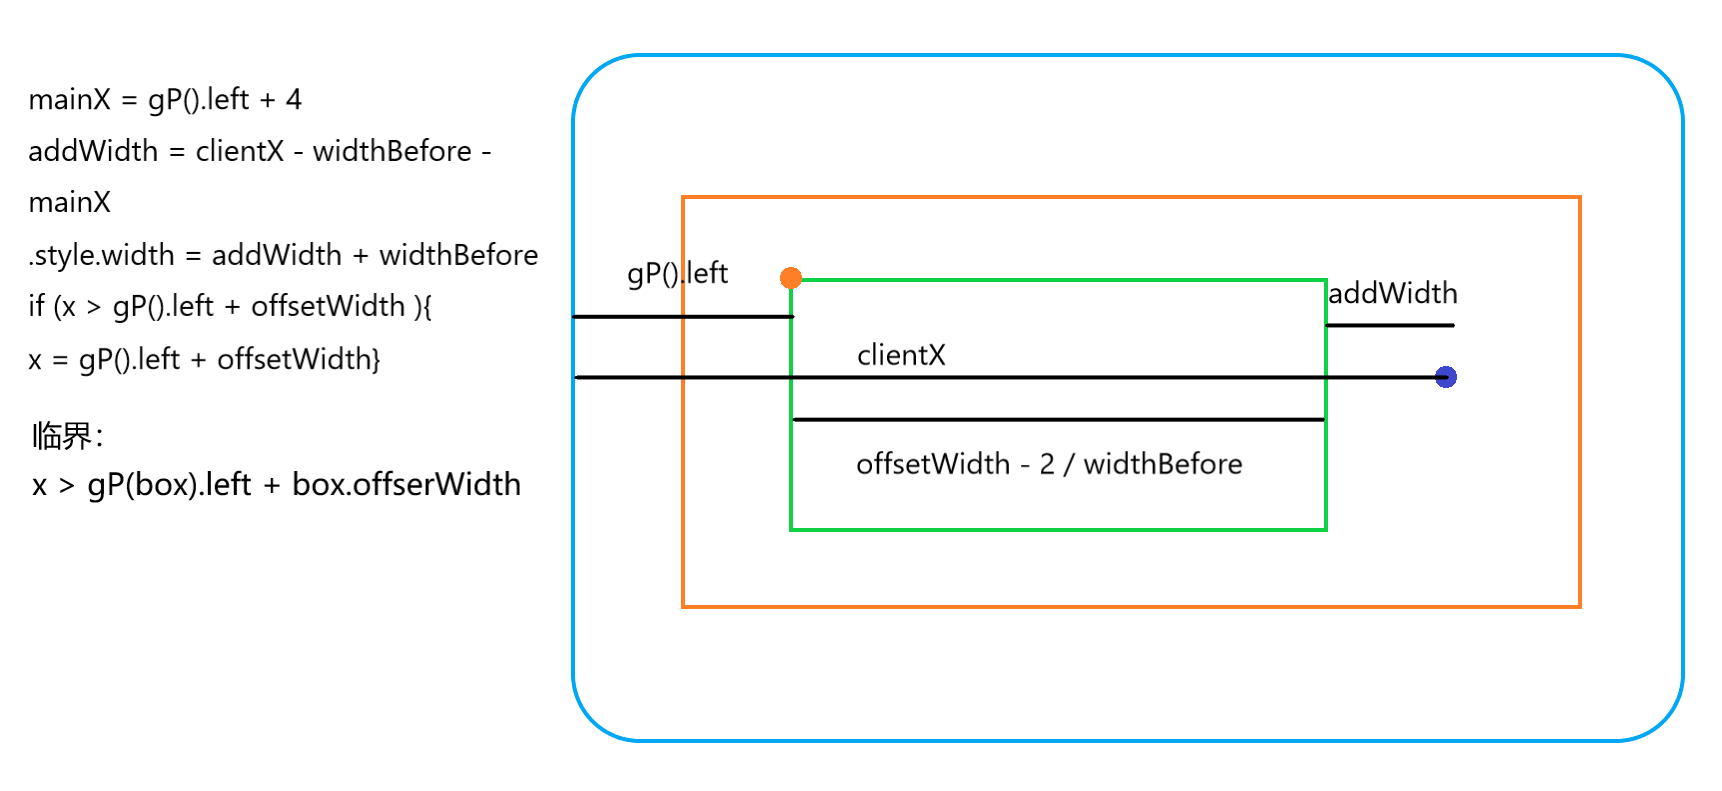
function rightMove(e){
var x = e.clientX;
if(x > getPosition(box).left + box.offsetWidth){
x = getPosition(box).left + box.offsetWidth;
console.log(x);
}
// var addWidth = "";//鼠标移动后增加的宽度
var widthBefore = main.offsetWidth - 2;//变化前宽度
var mainX = getPosition(lefttop).left + 4;
var addWidth = x - mainX - widthBefore;//鼠标移动后增加的宽度
main.style.width = addWidth + widthBefore + "px";//变化后宽度
}
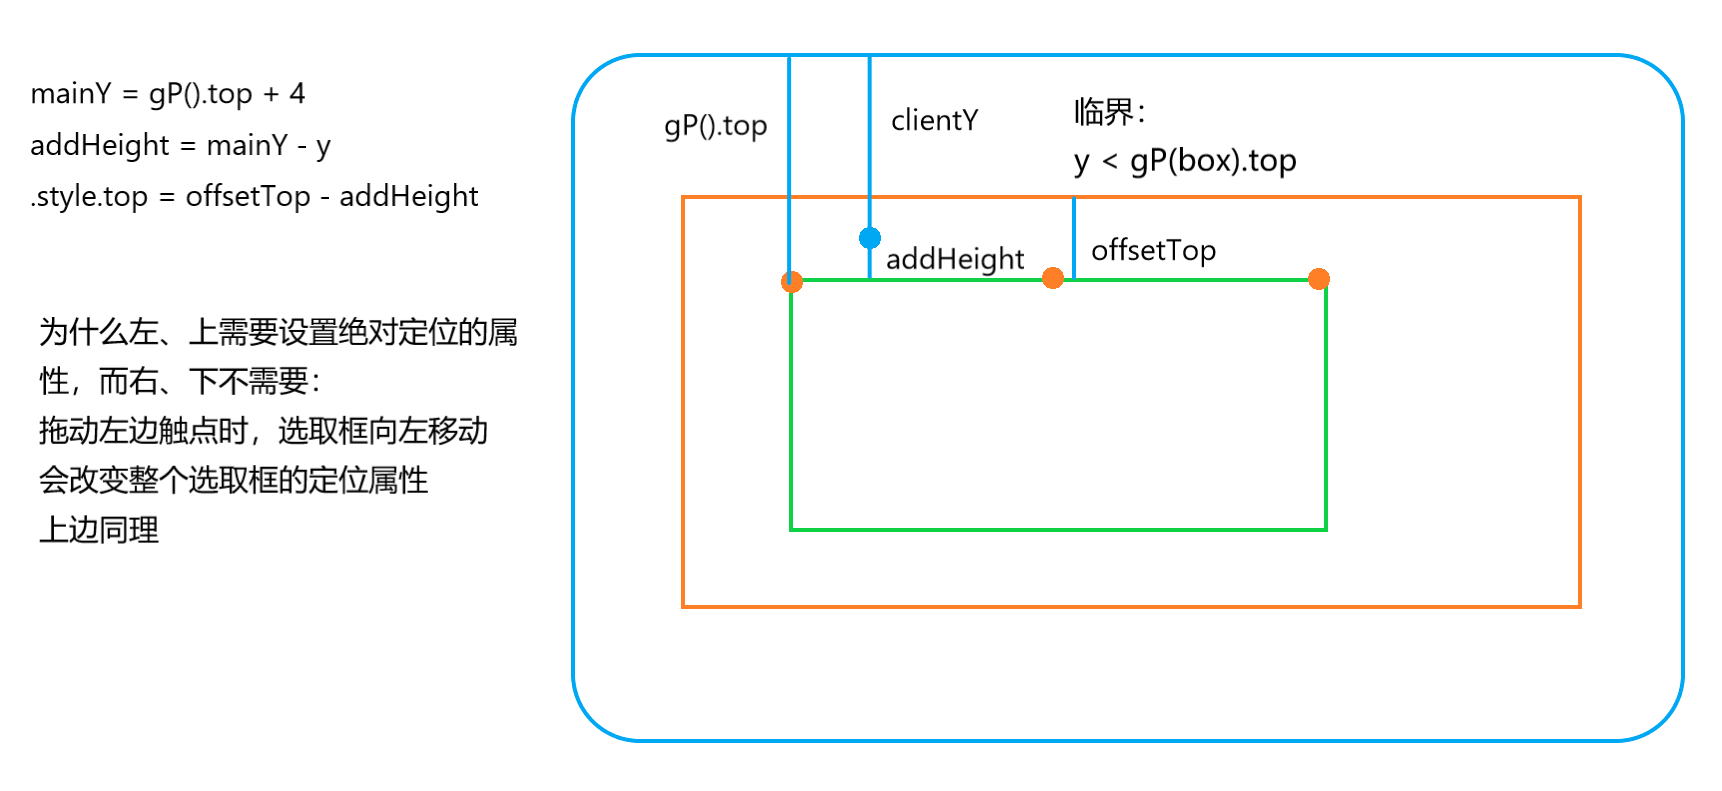
function topMove(e){
var y = e.clientY;
if(y < getPosition(box).top){
y = getPosition(box).top;
}
var mainY = getPosition(lefttop).top + 4;//选取框相对于屏幕上边距离
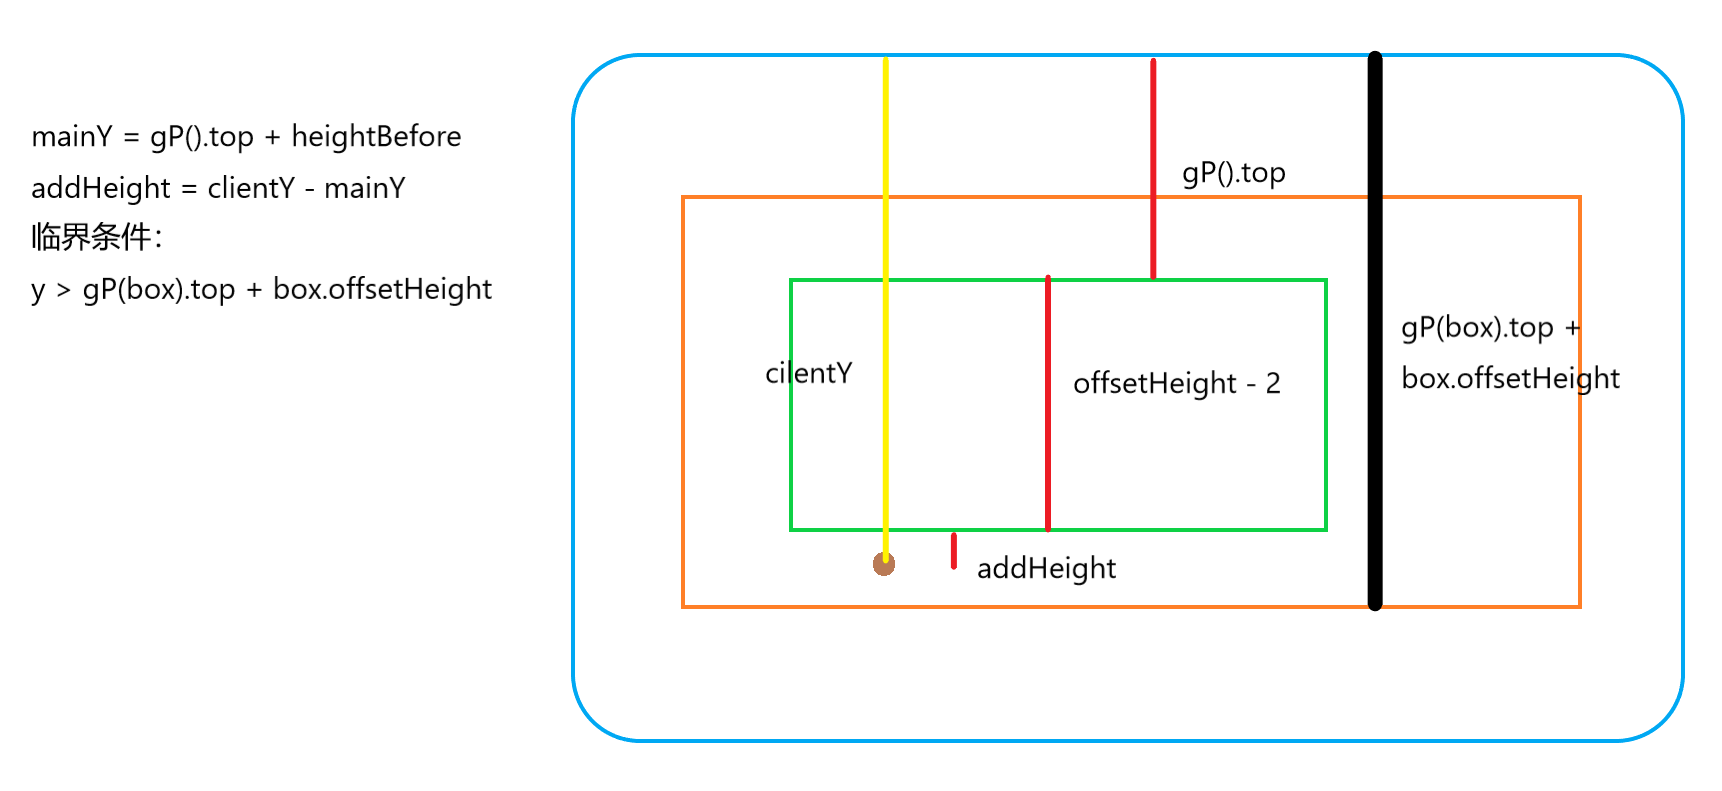
var addHeight = mainY - y;//增加的高度
var heightBefore = main.offsetHeight - 2;//原来的高度
main.style.height = heightBefore + addHeight + "px";
main.style.top = main.offsetTop - addHeight + "px";
}
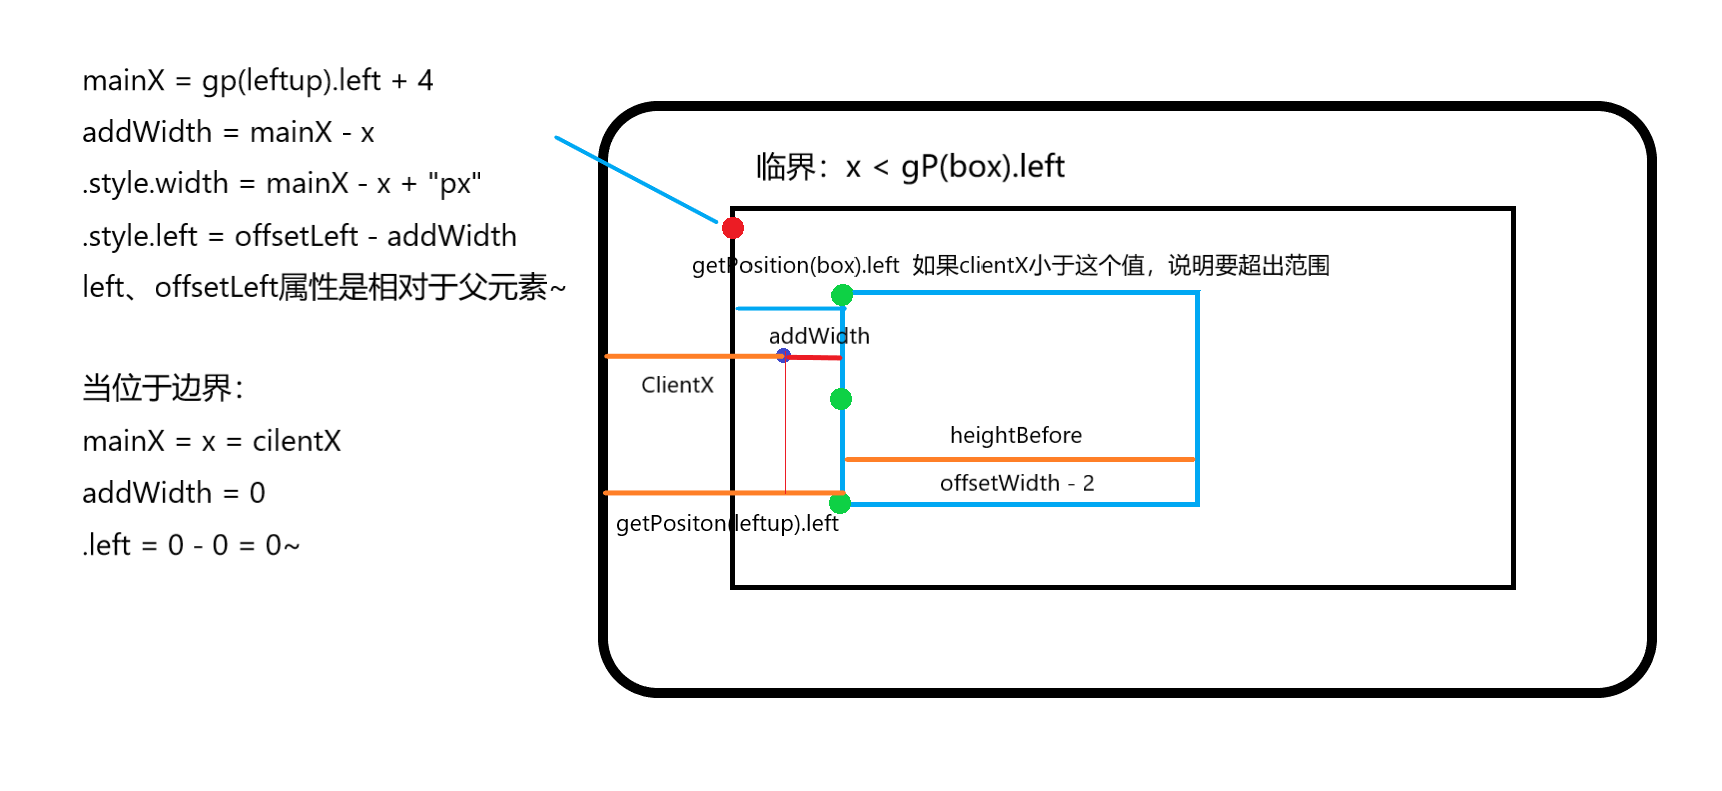
function leftMove(e){
var x = e.clientX;//横坐标
if(x < getPosition(box).left){
x = getPosition(box).left
}
var mainX = getPosition(lefttop).left + 4;
var addWidth = mainX - x;
var widthBefore = main.offsetWidth -2;
main.style.width = widthBefore + addWidth + "px";
main.style.left = main.offsetLeft - addWidth + "px";//调整决定定位的属性
}
function downMove(e){
var y = e.clientY;
if(y > getPosition(box).top + box.offsetHeight){
y = getPosition(box).top + box.offsetHeight
}
var heightBefore = main.offsetHeight - 2;
var mainY = getPosition(lefttop).top +4;
var addHeight = y - heightBefore - mainY;
main.style.height = addHeight + heightBefore + "px";
}
//获取元素相对于屏幕左边距离 通过offsetLeft
function getPosition(node){
var left = node.offsetLeft;
var top = node.offsetTop;
var parent = node.offsetParent;
while(parent != null){
left += parent.offsetLeft;
top += parent.offsetTop;
parent = parent.offsetParent;
}
return {"left":left,"top":top};
}
//设置选取区域高亮
function setArea(){
var top = main.offsetTop;
var right = main.offsetLeft + main.offsetWidth;
var bottom = main.offsetTop + main.offsetHeight;
var left = main.offsetLeft;
var img2 = document.getElementById("img2");
img2.style.clip = "rect(" + top + "px," + right + "px,"
+ bottom + "px," + left + "px)";
preview({"top":top,"right":right,"bottom":bottom,"left":left});//注意这样写的好处
}
//预览函数
function preview(view){
var img3 = document.getElementById("img3");
img3.style.top = -view.top + "px";
img3.style.left = -view.left + "px";
img3.style.clip = "rect(" + view.top + "px," + view.right + "px," + view.bottom + "px," + view.left + "px)";
}
}
还有一个比较难的地方在于理解 做了几张图便于一目了然的的看懂js中四个方向的拖动为什么要这样写
大概效果就是这样实现的 由于jQuery我还在学习 那个使用jQuery拖动模块的我还需要研究研究 告辞...
我爱前端!
JavaScript实现图片裁剪预览效果~(第一个小玩具)的更多相关文章
- node.js平台下,cropper.js实现图片裁剪预览并转换为base64发送至服务端。
一 .准备工作 1.首先需要先下载cropper,常规使用npm,进入项目路径后执行以下命令: npm install cropper 2. cropper基于jquery,在此不要忘记引入jq,同时 ...
- cropper.js实现图片裁剪预览并转换为base64发送至服务端。
一 .准备工作 1.首先需要先下载cropper,常规使用npm,进入项目路径后执行以下命令: npm install cropper 2. cropper基于jquery,在此不要忘记引入jq,同时 ...
- javascript实现图片的预览
简单javascript代码 实现上传图片预览 <body> <!-- 设置当有图片准备上传时触发javascript代码--> <input type="fi ...
- Jquery 下实现 图片大图预览效果
<!DOCTYPE html> <html> <head> <meta charset="utf-8"> <meta http ...
- Java实现图片裁剪预览功能
在项目中.我们须要做些类似头像上传,图片裁剪的功能,ok看以下文章! 须要插件:jQuery Jcrop 后端代码: package org.csg.upload; import java.awt.R ...
- 微信小程序实现图片放大预览效果
可以直接用微信程序自己的api很方便的实现 核心方法 wx.previewImage: 直接上代码, wxml: <!--pages/prewpicture/prew.wxml--> &l ...
- javascript和HTML5上传图片之前实现预览效果
一:FileList对象与file对象 FileList对象表示用户选择的文件列表,在HTML4中,file控件内只允许放置一个文件,但是到了HTML5中,通过添加multiple属性,file控件内 ...
- JS兼容各个浏览器的本地图片上传即时预览效果
JS兼容各个浏览器的本地图片上传即时预览效果 很早以前 在工作曾经碰到这么一个需求,当时也是纠结了很久,也是google了很久,没有碰到合适的demo,今天特意研究了下这方面的的问题,所以也就做了个简 ...
- JS兼容各个浏览器的本地图片上传即时预览效果\、
在firefox\chrome\ie10等浏览器中可以使用HTML5中的内容实现图片即时预览效果,在IE10以下浏览器中使用滤镜来解决图片显示问题. HTML5中的FileReader对象主要是把文件 ...
随机推荐
- debian的python蓝牙库
sudo apt--dev pip install bluepy
- <亲测>.NET Core项目在Linux上使用QRCoder时出错"Unable to load DLL 'gdiplus'"
Centos 7 解决方案如下: yum install libgdiplus-devel
- django之创建项目,添加app
一.创建django程序 终端命令:django-admin startproject sitename IDE创建Django程序时,本质上都是自动执行上述命令 其他常用命令: python man ...
- [蓝桥杯ALGO-53.算法训练_最小乘积(基本型)
问题描述 给两组数,各n个. 请调整每组数的排列顺序,使得两组数据相同下标元素对应相乘,然后相加的和最小.要求程序输出这个最小值. 例如两组数分别为: -5和- 那么对应乘积取和的最小值应为: (-) ...
- Netty Tutorial Part 1: Introduction to Netty [z]
Netty Tutorial, Part 1: Introduction to Netty Update: Part 1.5 Has Been Published: Netty Tutorial P ...
- C#应用jstree实现无限级节点的方法
下载jstree.js下载地址: http://jstree.com/ 当前下载版本: jsTree 3.3.1 第一步:下载完成后引用js+css <link href="~/plu ...
- 描述wxWidgets中事件处理的类型转化
wxWidgets是一个比较常用的UI界面库,我曾经试着使用wxWidgets写一个UI编辑工具,在此期间,学习了一些wxWidgets的知识.我对wxWidgets的绑定(Bind)比较好奇,想知道 ...
- RabbitMQ用户角色及权限控制(转)
转载至:https://blog.csdn.net/awhip9/article/details/72123257 2017年05月15日 10:39:26 awhip9 阅读数:3538 ### ...
- HTTP RFC解析
HTTP协议(HyperText Transfer Protocol,超文本传输协议)HTTP是一个属于应用层的面向对象的协议,由于其简捷.快速的方式,适用于分布式超媒体信息系统.它于1990年提出, ...
- MySQL 之 mysqlbinlog解析binlog乱码问题解密
发现mysql库的binlog日志出来都是乱码,如下所示: BINLOG ’ IXZqVhNIAAAALQAAAGcBAAAAAHoAAAAAAAEABHRlc3QAAno0AAEDAABUOcnY ...