Win10环境Tensorflow-GPU13.1/JupyterNotebook的安装
参考 :
Anaconda Tensorflow GPU 版本的安装问题
https://blog.csdn.net/u010977034/article/details/62038698
Windows10环境下安装Anaconda和tensorflow-gpu,然后在jupyter notebook上使用
https://blog.csdn.net/qq_37392244/article/details/85003425
利用conda安装指定版本的tensorflow
conda install --channel https://conda.anaconda.org/anaconda tensorflow=1.6.0
Tensorflow-gpu搭建CUDA 10.0与cuDNN等版本问题
https://blog.csdn.net/weixin_42718092/article/details/85001140
查询Tensorflow与CUDA/CuDNN的版本关系
查询官网说明:
https://tensorflow.google.cn/install/source_windows
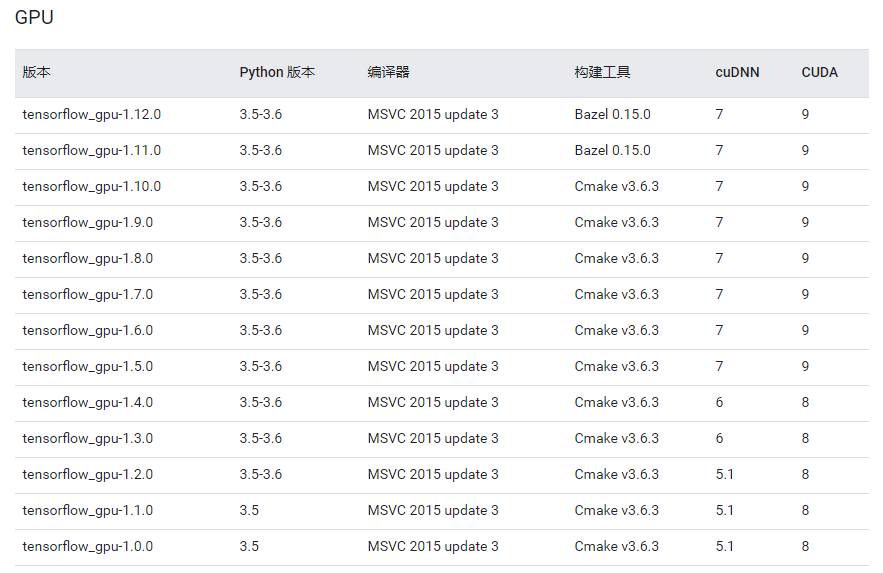
查询CUDA要求的GUP Driver Version
查询官网说明:

确定并安装需要的各个版本
python-3.6
tensorflow-gpu-1.13
cuda-10.0
cudnn-7.5
CUDA下载地址: https://developer.nvidia.com/cuda-toolkit-archive
CuDNN下载地址:https://developer.nvidia.com/rdp/cudnn-download
(下载CuDNN需要注册账号,注册过程比较简单)
说明:本次安装的tensorflow需要与Jupyter notebook集成,所以此处只安装CUDA和CuDNN(安装前确保GPU驱动已经安装且版本一致)。
CUDA是NVIDIA推出的运算平台,CuDNN是专门针对Deep Learning框架设计的一套GPU计算加速方案。在安装之前要查询下最新TensorFLow发行版支持到了哪个版本。另外,也要确认CUDA版本是否支持自己的显卡。
安装好CUDA后,再将下载好的cudnn文件解压缩,得到一个文件夹:
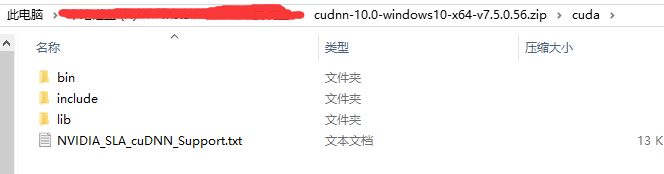
将里面的三个文件夹复制到C:\Program Files\NVIDIA GPU Computing Toolkit\CUDA\v10.0中
Anaconda的下载和安装
安装Anaconda(一个开源的Python发行版本)的最新版本。Anaconda包含了conda、Python等180多个科学包及其依赖项,功能强大。
Anaconda下载地址:https://www.anaconda.com/download/
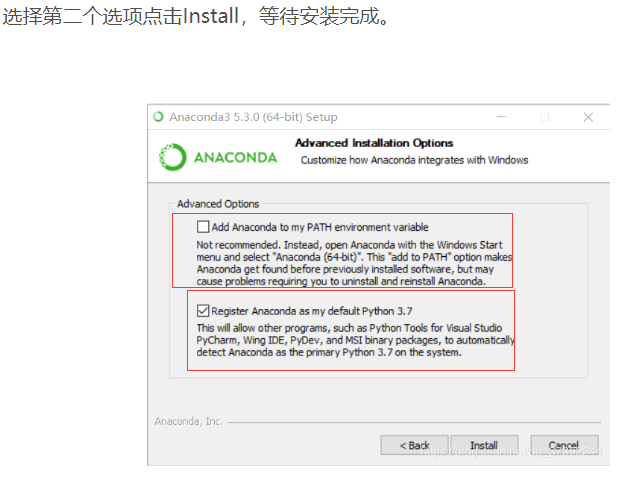
本次安装 的是Anaconda3-2018.12-Windows-x86_64,以下截图来自上述博客,主要用于说明有关的设置:
创建tensorflow环境
1、打开Anaconda Prompt
2、建立一个conda环境,命名为tensorflow_gpu
执行:conda create -n tensorflow_gpu python=3.6
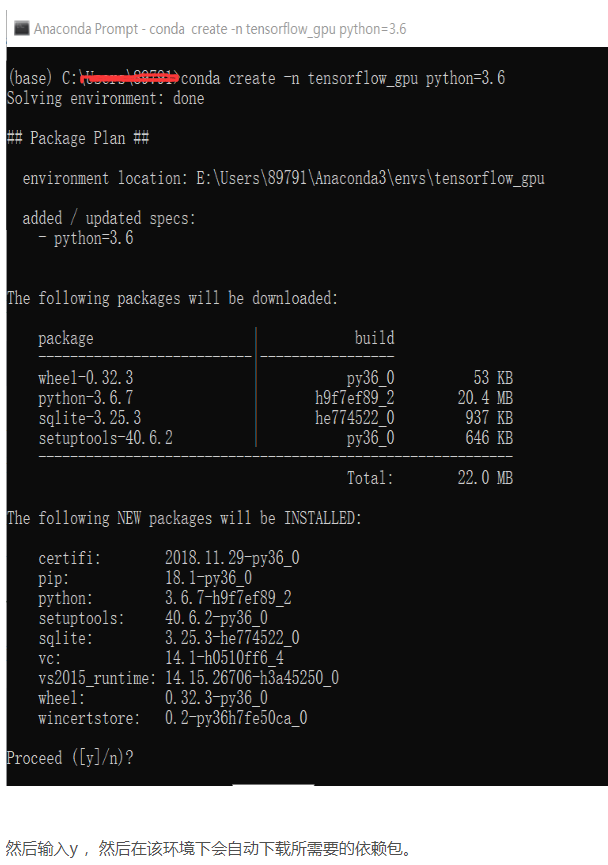
3.进入到tensorflow_gpu环境中,在这个环境下面完成之后tensorflow-gpu的安装。
进入创建好的环境中,执行命令:activate tensorflow_gpu
安装tensorflow-gpu,执行命令:conda install --channel https://conda.anaconda.org/anaconda tensorflow-gpu
(该命令的查询方式,见下附【在Anaconda如何确定要安装的tf-gpu版本】)
查看tensorlfow的版本:

为了后面安装的tensorflow-gpu可以在jupyter notebook中使用 ,需要安装这两个包,用conda命令安装:
- conda install ipython
- conda install jupyter
执行命令:ipython kernelspec install-self --user
看到类似这个结果:Installed kernelspec python3 in C:\Users\XXX\Jupyter\kernels\python3
然后就可以使用jupyter notebook了,使用的时候先用activate tensorflow_gpu命令打开建立的环境,然后再用jupyter notebook命令打开jupyter notebook就可以了。
4、jupyter notebook的使用
打开终端Anaconda Prompt,然后输入activate tensorflow_gpu,进入创建好的环境中,再用jupyter notebook命令打开jupyter notebook即可。
5、修改notebook文件的存放目录
执行命令: jupyter notebook --no-browser --ip=0.0.0.0 --allow-root --NotebookApp.token= --notebook-dir='C:\\Users\\dell\\MyJupyterCode'
在Anaconda如何确定要安装的tf-gpu版本
参考:https://blog.csdn.net/u010977034/article/details/62038698
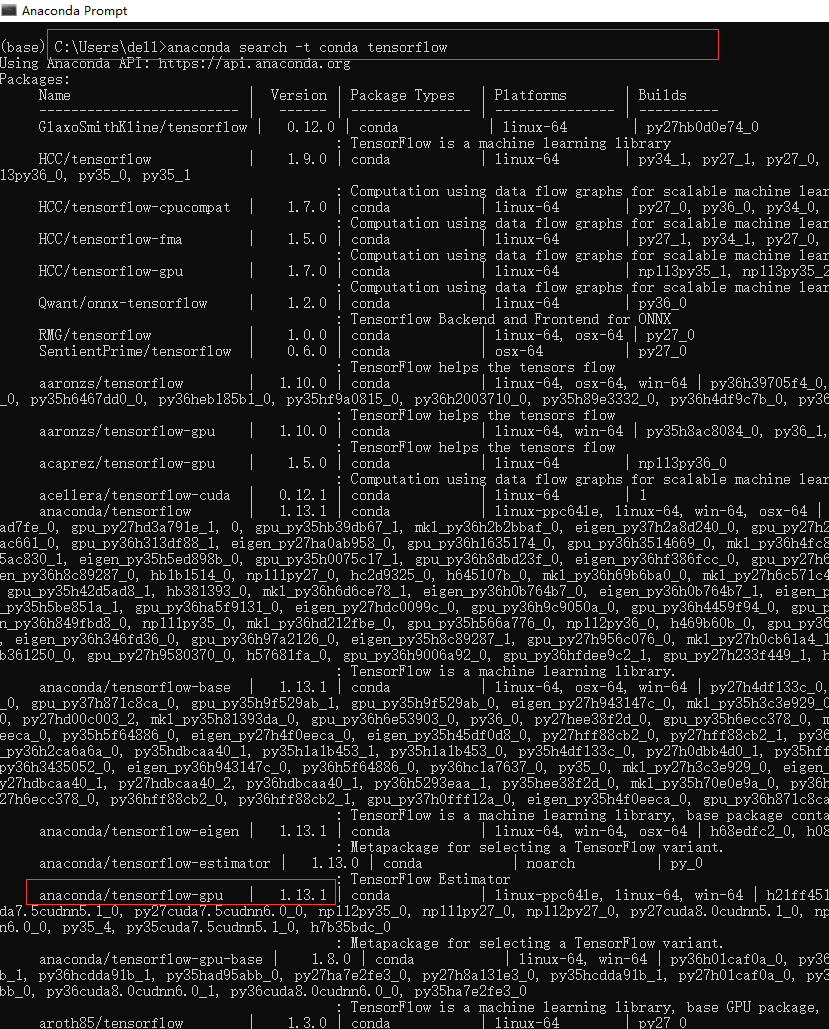
1、打开终端Anaconda Prompt,执行命令:anaconda search -t conda tensorflow
此指令会查询conda环境中有哪些tensorflow安装包,通过查看版本,选择最高的版本安装。如下图
2、此处查询到的最高版本是 anaconda/tensorflow-gpu 1.13.1,则执行命令:anaconda show anaconda/tensorflow-gpu
这个命令令会告诉你怎么安装这个包
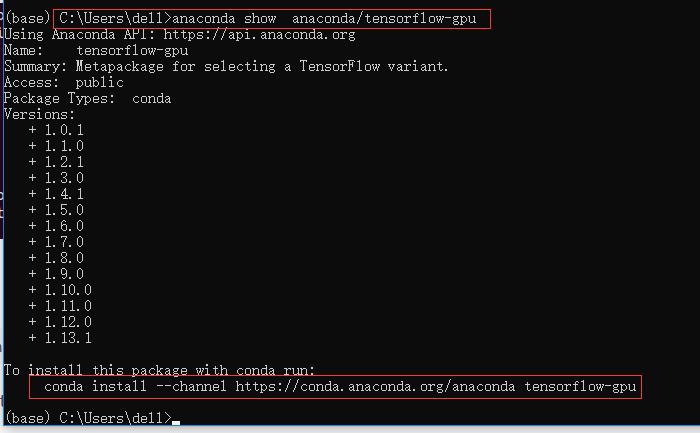
3、根据提示,在终端执行:
conda install --channel https://conda.anaconda.org/anaconda tensorflow-gpu
4、在第1步中可以看到,anaconda/tensorflow-gpu 带着版本号 1.13.1。因此,如果有多个版本,而你想安装一个指定的版本,则应该在命令后面加入版本信息,如:
conda install --channel https://conda.anaconda.org/anaconda tensorflow-gpu=1.13.1
如何删除已经建立 的conda环境

执行命令:
- deactivate tensorflow_gpu
- conda remove -n tensorflow --all
- conda info --envs
遇到的问题
第一次安装后,在jupyter book中运行import tensorflow as tf时,报错。
重要的报错信息是:ImportError: DLL load failed: 找不到指定的模块。ModuleNotFoundError: No module named '_pywrap_tensorflow_internal'
解决方案:
Anaconda中安装 的tensorflow-gpu版本太低,与CUDA/Cudnn不匹配,重新按上述方法选择13.1安装即可。
--------------------详细报错信息如下-------------------------------------------------------
ImportError Traceback (most recent call last)
~\AppData\Local\conda\conda\envs\tensorflow_gpu\lib\site-packages\tensorflow\python\pywrap_tensorflow_internal.py in swig_import_helper()
17 try:
---> 18 return importlib.import_module(mname)
19 except ImportError:
~\AppData\Local\conda\conda\envs\tensorflow_gpu\lib\importlib\__init__.py in import_module(name, package)
125 level += 1
--> 126 return _bootstrap._gcd_import(name[level:], package, level)
127
~\AppData\Local\conda\conda\envs\tensorflow_gpu\lib\importlib\_bootstrap.py in _gcd_import(name, package, level)
~\AppData\Local\conda\conda\envs\tensorflow_gpu\lib\importlib\_bootstrap.py in _find_and_load(name, import_)
~\AppData\Local\conda\conda\envs\tensorflow_gpu\lib\importlib\_bootstrap.py in _find_and_load_unlocked(name, import_)
~\AppData\Local\conda\conda\envs\tensorflow_gpu\lib\importlib\_bootstrap.py in _load_unlocked(spec)
~\AppData\Local\conda\conda\envs\tensorflow_gpu\lib\importlib\_bootstrap.py in module_from_spec(spec)
~\AppData\Local\conda\conda\envs\tensorflow_gpu\lib\importlib\_bootstrap_external.py in create_module(self, spec)
~\AppData\Local\conda\conda\envs\tensorflow_gpu\lib\importlib\_bootstrap.py in _call_with_frames_removed(f, *args, **kwds)
ImportError: DLL load failed: 找不到指定的模块。
During handling of the above exception, another exception occurred:
ModuleNotFoundError Traceback (most recent call last)
~\AppData\Local\conda\conda\envs\tensorflow_gpu\lib\site-packages\tensorflow\python\pywrap_tensorflow.py in <module>()
40 sys.setdlopenflags(_default_dlopen_flags | ctypes.RTLD_GLOBAL)
---> 41 from tensorflow.python.pywrap_tensorflow_internal import *
42 from tensorflow.python.pywrap_tensorflow_internal import __version__
~\AppData\Local\conda\conda\envs\tensorflow_gpu\lib\site-packages\tensorflow\python\pywrap_tensorflow_internal.py in <module>()
20 return importlib.import_module('_pywrap_tensorflow_internal')
---> 21 _pywrap_tensorflow_internal = swig_import_helper()
22 del swig_import_helper
~\AppData\Local\conda\conda\envs\tensorflow_gpu\lib\site-packages\tensorflow\python\pywrap_tensorflow_internal.py in swig_import_helper()
19 except ImportError:
---> 20 return importlib.import_module('_pywrap_tensorflow_internal')
21 _pywrap_tensorflow_internal = swig_import_helper()
~\AppData\Local\conda\conda\envs\tensorflow_gpu\lib\importlib\__init__.py in import_module(name, package)
125 level += 1
--> 126 return _bootstrap._gcd_import(name[level:], package, level)
127
ModuleNotFoundError: No module named '_pywrap_tensorflow_internal'
During handling of the above exception, another exception occurred:
ImportError Traceback (most recent call last)
<ipython-input-1-41389fad42b5> in <module>()
----> 1 import tensorflow as tf
~\AppData\Local\conda\conda\envs\tensorflow_gpu\lib\site-packages\tensorflow\__init__.py in <module>()
22
23 # pylint: disable=wildcard-import
---> 24 from tensorflow.python import *
25 # pylint: enable=wildcard-import
26
~\AppData\Local\conda\conda\envs\tensorflow_gpu\lib\site-packages\tensorflow\python\__init__.py in <module>()
49 import numpy as np
50
---> 51 from tensorflow.python import pywrap_tensorflow
52
53 # Protocol buffers
~\AppData\Local\conda\conda\envs\tensorflow_gpu\lib\site-packages\tensorflow\python\pywrap_tensorflow.py in <module>()
50 for some common reasons and solutions. Include the entire stack trace
51 above this error message when asking for help.""" % traceback.format_exc()
---> 52 raise ImportError(msg)
53
54 # pylint: enable=wildcard-import,g-import-not-at-top,unused-import,line-too-long
ImportError: Traceback (most recent call last):
File "C:\Users\dell\AppData\Local\conda\conda\envs\tensorflow_gpu\lib\site-packages\tensorflow\python\pywrap_tensorflow_internal.py", line 18, in swig_import_helper
return importlib.import_module(mname)
File "C:\Users\dell\AppData\Local\conda\conda\envs\tensorflow_gpu\lib\importlib\__init__.py", line 126, in import_module
return _bootstrap._gcd_import(name[level:], package, level)
File "<frozen importlib._bootstrap>", line 978, in _gcd_import
File "<frozen importlib._bootstrap>", line 961, in _find_and_load
File "<frozen importlib._bootstrap>", line 950, in _find_and_load_unlocked
File "<frozen importlib._bootstrap>", line 648, in _load_unlocked
File "<frozen importlib._bootstrap>", line 560, in module_from_spec
File "<frozen importlib._bootstrap_external>", line 922, in create_module
File "<frozen importlib._bootstrap>", line 205, in _call_with_frames_removed
ImportError: DLL load failed: 找不到指定的模块。
During handling of the above exception, another exception occurred:
Traceback (most recent call last):
File "C:\Users\dell\AppData\Local\conda\conda\envs\tensorflow_gpu\lib\site-packages\tensorflow\python\pywrap_tensorflow.py", line 41, in <module>
from tensorflow.python.pywrap_tensorflow_internal import *
File "C:\Users\dell\AppData\Local\conda\conda\envs\tensorflow_gpu\lib\site-packages\tensorflow\python\pywrap_tensorflow_internal.py", line 21, in <module>
_pywrap_tensorflow_internal = swig_import_helper()
File "C:\Users\dell\AppData\Local\conda\conda\envs\tensorflow_gpu\lib\site-packages\tensorflow\python\pywrap_tensorflow_internal.py", line 20, in swig_import_helper
return importlib.import_module('_pywrap_tensorflow_internal')
File "C:\Users\dell\AppData\Local\conda\conda\envs\tensorflow_gpu\lib\importlib\__init__.py", line 126, in import_module
return _bootstrap._gcd_import(name[level:], package, level)
ModuleNotFoundError: No module named '_pywrap_tensorflow_internal'
Failed to load the native TensorFlow runtime.
See https://www.tensorflow.org/install/install_sources#common_installation_problems
for some common reasons and solutions. Include the entire stack trace
above this error message when asking for help.
Win10环境Tensorflow-GPU13.1/JupyterNotebook的安装的更多相关文章
- 学习笔记24—win10环境下python版libsvm的安装
1.前言 由于毕业设计需要用到libsvm,所以最近专心于配置libsvm,曾经尝试过在matlab中安装,但是没有成功.最终在Python环境中完成安装. 2.LIBSVM介绍 LIBSVM 是台湾 ...
- Tensorflow安装教程-Win10环境下
背景:最新版的Tensoflow已经支持Python3.6 首先,下载并安装Anaconda3 内置Python3.6的版本 https://www.continuum.io/downloads 安装 ...
- Ubuntu 环境 TensorFlow (最新版1.4) 源码编译、安装
Ubuntu 环境 TensorFlow 源码编译安装 基于(Ubuntu 14.04LTS/Ubuntu 16.04LTS/) 一.编译环境 1) 安装 pip sudo apt-get insta ...
- win10环境下Android SDK下载安装及配置教程
最近在配置Android环境时,发现网上许多教程都是在win7版本下进行配置的且存在许多问题,按照流程无法正确配置环境,因此我在收集网上资料及亲自配置成功的情况下,写出此文章.如有无法配置成功的话,欢 ...
- win10环境下安装Ubantu双系统(超详解)
win10环境下安装Ubantu双系统 1.准备工作: 先去ubantu官网(https://www.ubuntu.com/download)去下载ubantu镜像.根据自己的实际情况选择32位的或者 ...
- win10环境下MySql(5.7.21版本)安装过程
windows10上安装mysql(详细步骤) 2016年09月06日 08:09:34 阅读数:60405 环境:windwos 10(1511) 64bit.mysql 5.7.14 时间:201 ...
- C# winform程序免安装.net framework在XP/win7/win10环境运行!(转)
C# winform程序免安装.net framework在XP/win7/win10环境运行! 前文: 首先感谢群里的大神宇内流云 提供的anyexec for windows版本. 经过本人搭 ...
- Win10下Tensorflow的安装
Win10下Tensorflow的安装 1. Tensorflow简介 TensorFlow是谷歌基于DistBelief进行研发的第二代人工智能学习系统,其命名来源于本身的运行原理.Tensor(张 ...
- YApi——手摸手,带你在Win10环境下安装YApi可视化接口管理平台
手摸手,带你在Win10环境下安装YApi可视化接口管理平台 YApi YApi 是高效.易用.功能强大的 api 管理平台,旨在为开发.产品.测试人员提供更优雅的接口管理服务.可以帮助开发者轻松创建 ...
随机推荐
- Android-Messenger跨进程通信
http://blog.csdn.net/lmj623565791/article/details/47017485 一.概述 我们可以在客户端发送一个Message给服务端,在服务端的handler ...
- MapReduce运行原理和过程
原文 一.Map的原理和运行流程 Map的输入数据源是多种多样的,我们使用hdfs作为数据源.文件在hdfs上是以block(块,Hdfs上的存储单元)为单位进行存储的. 1.分片 我们将这一个个bl ...
- servlet 中处理 json 请求,并访问 service 类,返回处理结果
前言:jar 包中的 servlet 必须可以处理前端发出的 ajax 请求,接收参数,并返回结果. github地址:yuleGH github 这里有个约定,url 地址是 .json 结尾的,如 ...
- Oracle中UNION和ORDER BY共用方法
问题 SQL语句中,UNION拼接两个单独的SQL时候,单独的SQL中加入ORDER BY会报错,ORDER BY只能放在句末. // 会报错的语句 SELECT S.S_ID AS ID,S.S_N ...
- css3 flex弹性盒子布局梳理,打通任督二脉
挺早就接触了css的flex布局,深入使用也就是在近期移动端开发.老来多健忘,只能自己梳理一下知识点,当做温故知新吧. ,请原谅小白的才疏学浅,写的不到位的地方请指正. flex属性用于设置或检索弹性 ...
- Python 调度算法 死锁 静动态链接 分页分段
1 select poll epoll的区别基本上select有3个缺点: 连接数受限查找配对速度慢数据由内核拷贝到用户态poll改善了第一个缺点 epoll改了三个缺点. (1)select,pol ...
- Available to Promise (ATP) in SAP-SD
One short note before we start off the subject: Availability refers to the projections of future mat ...
- MBTIles实现
MBTIles实现 3.1 Compliant(符合) python: raster2mb (write) python: mbutil (read/write) python: landez (wr ...
- [SSRS / RV] (.rdlc报表)冻结表头,固定行列标题
转自:https://blog.csdn.net/dietime1943/article/details/72846171?utm_source=blogxgwz9 Reporting Service ...
- Charles抓取https请求
最近公司将Windows产品的http请求,替换成https请求了,当https请求超过5次失败,就自动切换回http请求.测试时使用Charles抓包测试. 一.http抓包 http抓包比较简单, ...