微信小程序入门八头像上传
1. action-sheet 底部弹出可选菜单组件
2. wx.uploadFile 将本地资源上传到服务器
3. wx.chooseImage 从本地相册选择图片或使用相机拍照。
4. wx.previewImage 预览图片
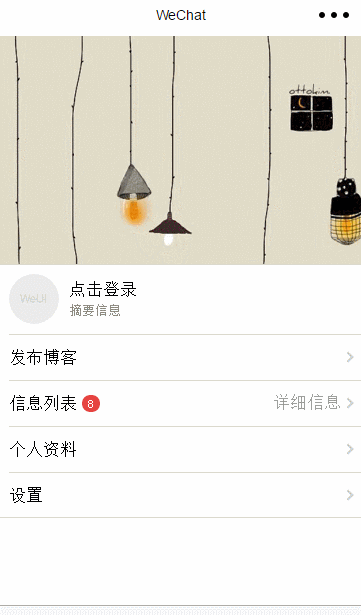
效果图:
wxml代码:
<!--

变量说明:

windowHeight :设备的窗口的高度

windowWidth : 设备的窗口的宽度

actionSheetHidden : 组件是否显示

actionSheetItems :组件菜单项

-->

<view class="page__bd" style="height: {{windowHeight * 0.8}}px; width: {{windowWidth}}px;">

<view class="weui-cells weui-cells_after-title me-info"

style="top:{{windowHeight * 0.4}}px;">

<view class="weui-cell">

<view class="weui-cell__hd" style="position: relative;margin-right: 10px;">

<image src="{{userImg}}" style="width: 50px; height: 50px; display: block;border-radius:25px;" bindtap="clickImage"/>

</view>

<view class="weui-cell__bd">

<navigator url="../login/login" >

点击登录</navigator>

<view style="font-size: 13px;color: #888888;">摘要信息</view>

</view>

</view>

<view class="weui-cell weui-cell_access">

<view class="weui-cell__bd">

<view style="display: inline-block; vertical-align: middle">发布博客</view>

</view>

<view class="weui-cell__ft weui-cell__ft_in-access"></view>

</view>

<view class="weui-cell weui-cell_access">

<view class="weui-cell__bd">

<view style="display: inline-block; vertical-align: middle">信息列表</view>

<view class="weui-badge" style="margin-left: 5px;">8</view>

</view>

<view class="weui-cell__ft weui-cell__ft_in-access">详细信息</view>

</view>

<view class="weui-cell weui-cell_access">

<view class="weui-cell__bd">

<view style="display: inline-block; vertical-align: middle">个人资料</view>

</view>

<view class="weui-cell__ft weui-cell__ft_in-access"></view>

</view>

<view class="weui-cell weui-cell_access">

<view class="weui-cell__bd">

<view style="display: inline-block; vertical-align: middle">设置</view>

</view>

<view class="weui-cell__ft weui-cell__ft_in-access"></view>

</view>

</view>

<action-sheet hidden="{{actionSheetHidden}}" bindchange="actionSheetbindchange">

<block wx:for="{{actionSheetItems}}" wx:key="unique">

<action-sheet-item bindtap="{{item.bindtap}}">{{item.txt}}</action-sheet-item>

</block>

<action-sheet-cancel class="cancel">取消</action-sheet-cancel>

</action-sheet>

</view>

wxss代码:

.page__bd{

background: url(https://www.itit123.cn/image/meBack.jpg) no-repeat;

background-size:cover;

}
js代码:
var util = require('../../utils/util.js');

var app = getApp();

Page({

data: {

userImg: "../../images/pic_160.png", // 头像图片路径

actionSheetHidden: true, // 是否显示底部可选菜单

actionSheetItems: [

{ bindtap: 'changeImage', txt: '修改头像' },

{ bindtap: 'viewImage', txt: '查看头像' }

] // 底部可选菜单

},

// 初始化加载获取设备长宽

onLoad: function (options) {

var that = this;

wx.getSystemInfo({

success: function (res) {

that.setData({

windowHeight: res.windowHeight,

windowWidth: res.windowWidth

})

}

});

},

// 点击头像 显示底部菜单

clickImage: function () {

var that = this;

that.setData({

actionSheetHidden: !that.data.actionSheetHidden

})

},

// 点击其他区域 隐藏底部菜单

actionSheetbindchange: function () {

var that = this;

that.setData({

actionSheetHidden: !that.data.actionSheetHidden

})

},

// 上传头像

changeImage: function () {

var that = this;

wx.chooseImage({

count: 1, // 默认9

sizeType: ['original', 'compressed'], // 可以指定是原图还是压缩图,默认二者都有

sourceType: ['album', 'camera'], // 可以指定来源是相册还是相机,默认二者都有

success: function (res) {

// 返回选定照片的本地文件路径列表,tempFilePath可以作为img标签的src属性显示图片,只有一张图片获取下标为0

var tempFilePaths = res.tempFilePaths[0];

that.setData({

userImg: tempFilePaths,

actionSheetHidden: !that.data.actionSheetHidden

})

util.uploadFile('/itdragon/uploadImage', tempFilePaths, 'imgFile' ,{}, function (res) {

console.log(res);

if (null != res) {

that.setData({

userImg: res

})

} else {

// 显示消息提示框

wx.showToast({

title: '上传失败',

icon: 'error',

duration: 2000

})

}

});

}

})

},

// 查看原图

viewImage: function () {

var that = this;

wx.previewImage({

current: '', // 当前显示图片的http链接

urls: [that.data.userImg] // 需要预览的图片http链接列表

})

}

});
utils.js代码:
//上传文件

function uploadFile(url, filePath, name, formData, cb) {

console.log('a=' + filePath)

wx.uploadFile({

url: rootDocment + url,

filePath: filePath,

name: name,

header: {

'content-type': 'multipart/form-data'

}, // 设置请求的 header

formData: formData, // HTTP 请求中其他额外的 form data

success: function (res) {

if (res.statusCode == 200 && !res.data.result_code) {

return typeof cb == "function" && cb(res.data)

} else {

return typeof cb == "function" && cb(false)

}

},

fail: function () {

return typeof cb == "function" && cb(false)

}

})

}
后台服务器代码:
@RequestMapping("uploadImage")

@ResponseBody

public String uploadHeadImage(HttpServletRequest request, @RequestParam(value = "imgFile" , required=false) MultipartFile imageFile) {

try {

System.out.println("imageFile :::: " + imageFile);

String realPath = request.getSession().getServletContext().getRealPath("/");

if(imageFile!=null){

if(GenerateUtils.allowUpload(imageFile.getContentType())){

String fileName = GenerateUtils.rename(imageFile.getOriginalFilename());

String saveName = fileName.substring(0,fileName.lastIndexOf("."));

File dir = new File(realPath + "image");

if(!dir.exists()){

dir.mkdirs();

}

File file = new File(dir,saveName+".jpg");

imageFile.transferTo(file);

return "https://www.itit123.cn/sierew/image/"+file.getName();

}

}

} catch (Exception e) {

e.printStackTrace();

}

return "null";

}
微信小程序入门八头像上传的更多相关文章
- 微信小程序--更换用户头像/上传用户头像/更新用户头像
changeAvatar:function (){ var that=this; wx.chooseImage({ count: 1, // 默认9 sizeType: ['original', 'c ...
- 微信小程序简单封装图片上传组件
微信小程序简单封装图片上传组件 希望自己 "day day up" -----小陶 我从哪里来 在写小程序的时候需要上传图片,个人觉得官方提供的 Uploader 组件不是太好用, ...
- 微信小程序实现图片是上传、预览功能
本文实例讲述了微信小程序实现图片上传.删除和预览功能的方法,分享给大家供大家参考,具体如下: 这里主要介绍一下微信小程序的图片上传图片删除和图片预览 1.可以调用相机也可以从本地相册选择 2.本地实现 ...
- 微信小程序:多张图片上传
最近在写小程序的相册,需要多张图片的上传.因为小程序不支持数组的多张图片同时上传,然后根据自己的需求+借鉴网上各位大神的案例,总算搞定.分享下,不足之处,多多指教哦 页面wxml: <form ...
- 微信小程序实现图片裁剪上传(wepy)
参考https://github.com/we-plugin/we-cropper,在wepy中实现,参考的具体例子是we-cropper/example/cutInside/ 项目上传图片时2:3的 ...
- 微信小程序 压缩图片并上传
转自https://segmentfault.com/q/1010000012507519 wxml写入 <view bindtap='uploadImg'>上传</view> ...
- 微信小程序裁剪图片后上传
上传图片的时候调起裁剪页面,裁剪后再回调完成上传; 图片裁剪直接用we-cropper https://github.com/we-plugin/we-cropper we-cropper使用详细 ...
- 微信小程序压缩图片并上传到服务器(拿去即用)
这里注意一下,图片压缩后的宽度是画布宽度的一半 canvasToTempFilePath 创建画布的时候会有一定的时间延迟容易失败,这里加setTimeout来缓冲一下 这是单张图片压缩,多张的压缩暂 ...
- 天河微信小程序入门《四》:融会贯通,form表单提交数据库
天河在阔别了十几天之后终于又回来了.其实这篇文章里的demo是接着(天河微信小程序入门<三>)后面就做了的,但是因为最近在做别的项目,所以就偷懒没有发出来.放到今天来看,从前台提交数据到数 ...
随机推荐
- JavaBean+Servlet 开发时,JavaBean 编写问题
在开发 JavaBean 时,遇见一个问题: ***** 表单字段为空,提交时出现 nullPointerException 异常: 表单字段不为空,提交正常. 使用 JavaBean ,JSP页 ...
- CentOS7 yum 安装 PHP 5.6.24
配置yum源 追加CentOS 6.5的epel及remi源. # rpm -Uvh http://ftp.iij.ad.jp/pub/linux/fedora/epel/6/x86_64/epel- ...
- 运用tp5上传图片,并生成缩略图
最近想做个相册,需要用到上传图像,并且考虑到性能问题,还要生成缩略图,就学习下.在网上看了很多大神写的文章,经过各种调试总算出来了,分享下.不好之处,多多指教 ps:运用tp5图片类生成缩略图 ...
- python德国信用评分卡建模(附代码AAA推荐)
欢迎关注博主主页,学习python视频资源,还有大量免费python经典文章 python信用评分卡建模视频系列教程(附代码) 博主录制 https://study.163.com/course/i ...
- SQL语法基础之INSEART语句
SQL语法基础之INSEART语句 作者:尹正杰 版权声明:原创作品,谢绝转载!否则将追究法律责任. 一.查看帮助信息 1>.查看INSERT方法的帮助信息 mysql> ? INSERT ...
- 深入浅出 JavaWeb:Servlet必会必知
一.Web服务器 从事web开发的人,会很清楚一个东西叫HTTP服务器,比如JEE开发—Tomcat,Jetty,.NET开发—ISS等.HTTP服务器是使用 HTTP(超文本传输协议) 与客户机浏览 ...
- Python复习笔记(八)迭代器和生成器和协程
1. 迭代器 1.1 可迭代对象 判断xxx_obj是否可以迭代 在第1步成立的前提下,调用 iter 函数得到 xxx_obj 对象的 __iter__ 方法的返回值 __iter__ 方法的返回值 ...
- python web 开发
第一个 简单的 WSGI demo from wsgiref.simple_server import make_server def application(environ, start_respo ...
- CSS脱离文档流&浮动
什么是文档流? 将窗体从上至下分成一行一行,并在每行中按从左至右依次排放元素,称为文档流,也称为普通流.这个应该不难理解,HTML中全部元素都是盒模型,盒模型占用一定的空间,依次排放在HTML中,形成 ...
- kudu系列: Java API使用和效率测试
Kudu+Impala很适合数据分析, 但直接使用Insert values语句往Kudu表插入数据, 效率实在不好, 测试下来insert的速度仅为80笔/秒. 原因也是显然的, Kudu本身写入效 ...