运维监控-基于yum的方式部署 Zabbix Agent 4.0 版本
运维监控-基于yum的方式部署 Zabbix Agent 4.0 版本
作者:尹正杰
版权声明:原创作品,谢绝转载!否则将追究法律责任。
上一篇博客我们分享了如何基于yum的方式部署zabbix 4.0.0版本。接下来,我们就监控其他主机的item项吧。
一.在需要监控的主机上部署zabbix-agent服务
1>.安装zabbix-agent
[root@node102 ~]# rpm -Uvh https://repo.zabbix.com/zabbix/4.0/rhel/7/x86_64/zabbix-release-4.0-1.el7.noarch.rpm

Retrieving https://repo.zabbix.com/zabbix/4.0/rhel/7/x86_64/zabbix-release-4.0-1.el7.noarch.rpm

warning: /var/tmp/rpm-tmp.pYEOk0: Header V4 RSA/SHA512 Signature, key ID a14fe591: NOKEY

Preparing...                          ################################# [%]

Updating / installing...

   :zabbix-release-4.0-.el7         ################################# [%]

[root@node102 ~]#

[root@node102 ~]#
[root@node102 ~]# rpm -Uvh https://repo.zabbix.com/zabbix/4.0/rhel/7/x86_64/zabbix-release-4.0-1.el7.noarch.rpm
[root@node102 ~]# cat /etc/yum.repos.d/zabbix.repo

[zabbix]

name=Zabbix Official Repository - $basearch

baseurl=https://mirrors.aliyun.com/zabbix/zabbix/4.0/rhel/7/$basearch/

enabled=

gpgcheck=

gpgkey=file:///etc/pki/rpm-gpg/RPM-GPG-KEY-ZABBIX-A14FE591

[zabbix-non-supported]

name=Zabbix Official Repository non-supported - $basearch

baseurl=https://mirrors.aliyun.com/zabbix/non-supported/rhel/7/$basearch/

enabled=

gpgkey=file:///etc/pki/rpm-gpg/RPM-GPG-KEY-ZABBIX

gpgcheck=

[root@node102 ~]#
[root@node102 ~]# cat /etc/yum.repos.d/zabbix.repo #修改zabbix的源为阿里云
[root@node102 ~]# yum -y install zabbix-agent

Loaded plugins: fastestmirror

zabbix                                                                                                          | 2.9 kB  ::

zabbix-non-supported                                                                                            |   B  ::

Loading mirror speeds from cached hostfile

 * base: mirrors.aliyun.com

 * extras: mirrors.aliyun.com

 * updates: mirrors..com

Resolving Dependencies

--> Running transaction check

---> Package zabbix-agent.x86_64 :4.0.-.el7 will be installed

--> Finished Dependency Resolution

Dependencies Resolved

=======================================================================================================================================

 Package                            Arch                         Version                            Repository                    Size

=======================================================================================================================================

Installing:

 zabbix-agent                       x86_64                       4.0.-.el7                        zabbix                        k

Transaction Summary

=======================================================================================================================================

Install   Package

Total size:  k

Installed size: 1.5 M

Downloading packages:

warning: /var/cache/yum/x86_64//zabbix/packages/zabbix-agent-4.0.-.el7.x86_64.rpm: Header V4 RSA/SHA512 Signature, key ID a14fe591: NOKEY

Retrieving key from file:///etc/pki/rpm-gpg/RPM-GPG-KEY-ZABBIX-A14FE591

Importing GPG key 0xA14FE591:

 Userid     : "Zabbix LLC <packager@zabbix.com>"

 Fingerprint: a184 8f53 52d0 22b9 471d 83d0 082a b56b a14f e591

 Package    : zabbix-release-4.0-.el7.noarch (installed)

 From       : /etc/pki/rpm-gpg/RPM-GPG-KEY-ZABBIX-A14FE591

Running transaction check

Running transaction test

Transaction test succeeded

Running transaction

Warning: RPMDB altered outside of yum.

  Installing : zabbix-agent-4.0.-.el7.x86_64                                                                                     /

  Verifying  : zabbix-agent-4.0.-.el7.x86_64                                                                                     /

Installed:

  zabbix-agent.x86_64 :4.0.-.el7

Complete!

[root@node102 ~]#
[root@node102 ~]# yum -y install zabbix-agent #安装zabbix的代理服务
2>.配置zabbix-agent
[root@node102 ~]# cat /etc/hosts | grep yinzhengjie

172.30.1.101 node101.yinzhengjie.org.cn

172.30.1.102 node102.yinzhengjie.org.cn

172.30.1.103 node103.yinzhengjie.org.cn

[root@node102 ~]#

[root@node102 ~]# hostname

node102.yinzhengjie.org.cn

[root@node102 ~]#

[root@node102 ~]# hostname -i

172.30.1.102

[root@node102 ~]#

[root@node102 ~]# cat /etc/hosts | grep yinzhengjie

172.30.1.101 node101.yinzhengjie.org.cn

172.30.1.102 node102.yinzhengjie.org.cn

172.30.1.103 node103.yinzhengjie.org.cn

[root@node102 ~]#

[root@node102 ~]#

[root@node102 ~]# grep Server /etc/zabbix/zabbix_agentd.conf  | grep -v ^#

Server=127.0.0.1

ServerActive=127.0.0.1

[root@node102 ~]#

[root@node102 ~]#

[root@node102 ~]# sed -i 's#Server=127.0.0.1#Server=node101.yinzhengjie.org.cn#' /etc/zabbix/zabbix_agentd.conf

[root@node102 ~]#

[root@node102 ~]# sed -i 's#ServerActive=127.0.0.1#ServerActive=node101.yinzhengjie.org.cn#' /etc/zabbix/zabbix_agentd.conf

[root@node102 ~]#

[root@node102 ~]#

[root@node102 ~]# grep Server /etc/zabbix/zabbix_agentd.conf  | grep -v ^#

Server=node101.yinzhengjie.org.cn

ServerActive=node101.yinzhengjie.org.cn

[root@node102 ~]#
3>.启动zabbix-agent
[root@node102 ~]# systemctl enable zabbix-agent

Created symlink from /etc/systemd/system/multi-user.target.wants/zabbix-agent.service to /usr/lib/systemd/system/zabbix-agent.service.

[root@node102 ~]#

[root@node102 ~]# systemctl start zabbix-agent

[root@node102 ~]#

[root@node102 ~]# systemctl status zabbix-agent

● zabbix-agent.service - Zabbix Agent

   Loaded: loaded (/usr/lib/systemd/system/zabbix-agent.service; enabled; vendor preset: disabled)

   Active: active (running) since Fri -- :: PST; 3s ago

  Process:  ExecStart=/usr/sbin/zabbix_agentd -c $CONFFILE (code=exited, status=/SUCCESS)

 Main PID:  (zabbix_agentd)

   CGroup: /system.slice/zabbix-agent.service

           ├─ /usr/sbin/zabbix_agentd -c /etc/zabbix/zabbix_agentd.conf

           ├─ /usr/sbin/zabbix_agentd: collector [idle  sec]

           ├─ /usr/sbin/zabbix_agentd: listener # [waiting for connection]

           ├─ /usr/sbin/zabbix_agentd: listener # [waiting for connection]

           ├─ /usr/sbin/zabbix_agentd: listener # [waiting for connection]

           └─ /usr/sbin/zabbix_agentd: active checks # [idle  sec]

Feb  :: node102.yinzhengjie.org.cn systemd[]: Starting Zabbix Agent...

Feb  :: node102.yinzhengjie.org.cn systemd[]: Started Zabbix Agent.

[root@node102 ~]#

[root@node102 ~]#

[root@node102 ~]# ss -ntl | grep 10050          #很显然服务已经启动成功了,端口是存在的,别忘记关闭防火墙和selinux哟,为了就是试验方便!

LISTEN                     *:                    *:*

LISTEN                    :::                   :::*

[root@node102 ~]#

[root@node102 ~]#
[root@node102 ~]# sed -i 's#SELINUX=enforcing#SELINUX=disabled#' /etc/selinux/config

[root@node102 ~]#

[root@node102 ~]# setenforce

[root@node102 ~]#

[root@node102 ~]# getenforce

Permissive

[root@node102 ~]#
[root@node102 ~]# sed -i 's#SELINUX=enforcing#SELINUX=disabled#' /etc/selinux/config #禁用selinux
[root@node102 ~]#

[root@node102 ~]# systemctl disable firewalld

Removed symlink /etc/systemd/system/dbus-org.fedoraproject.FirewallD1.service.

Removed symlink /etc/systemd/system/basic.target.wants/firewalld.service.

[root@node102 ~]#

[root@node102 ~]# systemctl stop firewalld

[root@node102 ~]#

[root@node102 ~]# systemctl status firewalld

● firewalld.service - firewalld - dynamic firewall daemon

   Loaded: loaded (/usr/lib/systemd/system/firewalld.service; disabled; vendor preset: enabled)

   Active: inactive (dead)

Feb  :: node102.yinzhengjie.org.cn systemd[]: Starting firewalld - dynamic firewall daemon...

Feb  :: node102.yinzhengjie.org.cn systemd[]: Started firewalld - dynamic firewall daemon.

Feb  :: node102.yinzhengjie.org.cn systemd[]: Stopping firewalld - dynamic firewall daemon...

Feb  :: node102.yinzhengjie.org.cn systemd[]: Stopped firewalld - dynamic firewall daemon.

[root@node102 ~]#

[root@node102 ~]#
[root@node102 ~]# systemctl stop firewalld #关闭防火墙
4>.测试zabbix-agent服务是否正常
[root@node101 ~]# hostname

node101.yinzhengjie.org.cn

[root@node101 ~]#

[root@node101 ~]#

[root@node101 ~]# hostname -i

172.30.1.101

[root@node101 ~]#

[root@node101 ~]# yum -y install telnet

Loaded plugins: fastestmirror

base                                                                                                            | 3.6 kB  ::

extras                                                                                                          | 3.4 kB  ::

mysql-connectors-community                                                                                      | 2.5 kB  ::

mysql-tools-community                                                                                           | 2.5 kB  ::

mysql56-community                                                                                               | 2.5 kB  ::

updates                                                                                                         | 3.4 kB  ::

zabbix                                                                                                          | 2.9 kB  ::

zabbix-non-supported                                                                                            |   B  ::

Loading mirror speeds from cached hostfile

 * base: mirrors.aliyun.com

 * extras: ftp.sjtu.edu.cn

 * updates: mirrors.nwsuaf.edu.cn

Resolving Dependencies

--> Running transaction check

---> Package telnet.x86_64 :0.17-.el7 will be installed

--> Finished Dependency Resolution

Dependencies Resolved

=======================================================================================================================================

 Package                       Arch                          Version                                 Repository                   Size

=======================================================================================================================================

Installing:

 telnet                        x86_64                        :0.17-.el7                           base                          k

Transaction Summary

=======================================================================================================================================

Install   Package

Total download size:  k

Installed size:  k

Downloading packages:

telnet-0.17-.el7.x86_64.rpm                                                                                   |   kB  ::

Running transaction check

Running transaction test

Transaction test succeeded

Running transaction

  Installing : :telnet-0.17-.el7.x86_64                                                                                         /

  Verifying  : :telnet-0.17-.el7.x86_64                                                                                         /

Installed:

  telnet.x86_64 :0.17-.el7

Complete!

[root@node101 ~]#
[root@node101 ~]# yum -y install telnet #安装telnet测试工具
[root@node101 ~]# telnet node102.yinzhengjie.org.cn

Trying 172.30.1.102...

Connected to node102.yinzhengjie.org.cn.

Escape character is '^]'.                #很显然,服务时正常的

Connection closed by foreign host.

[root@node101 ~]#
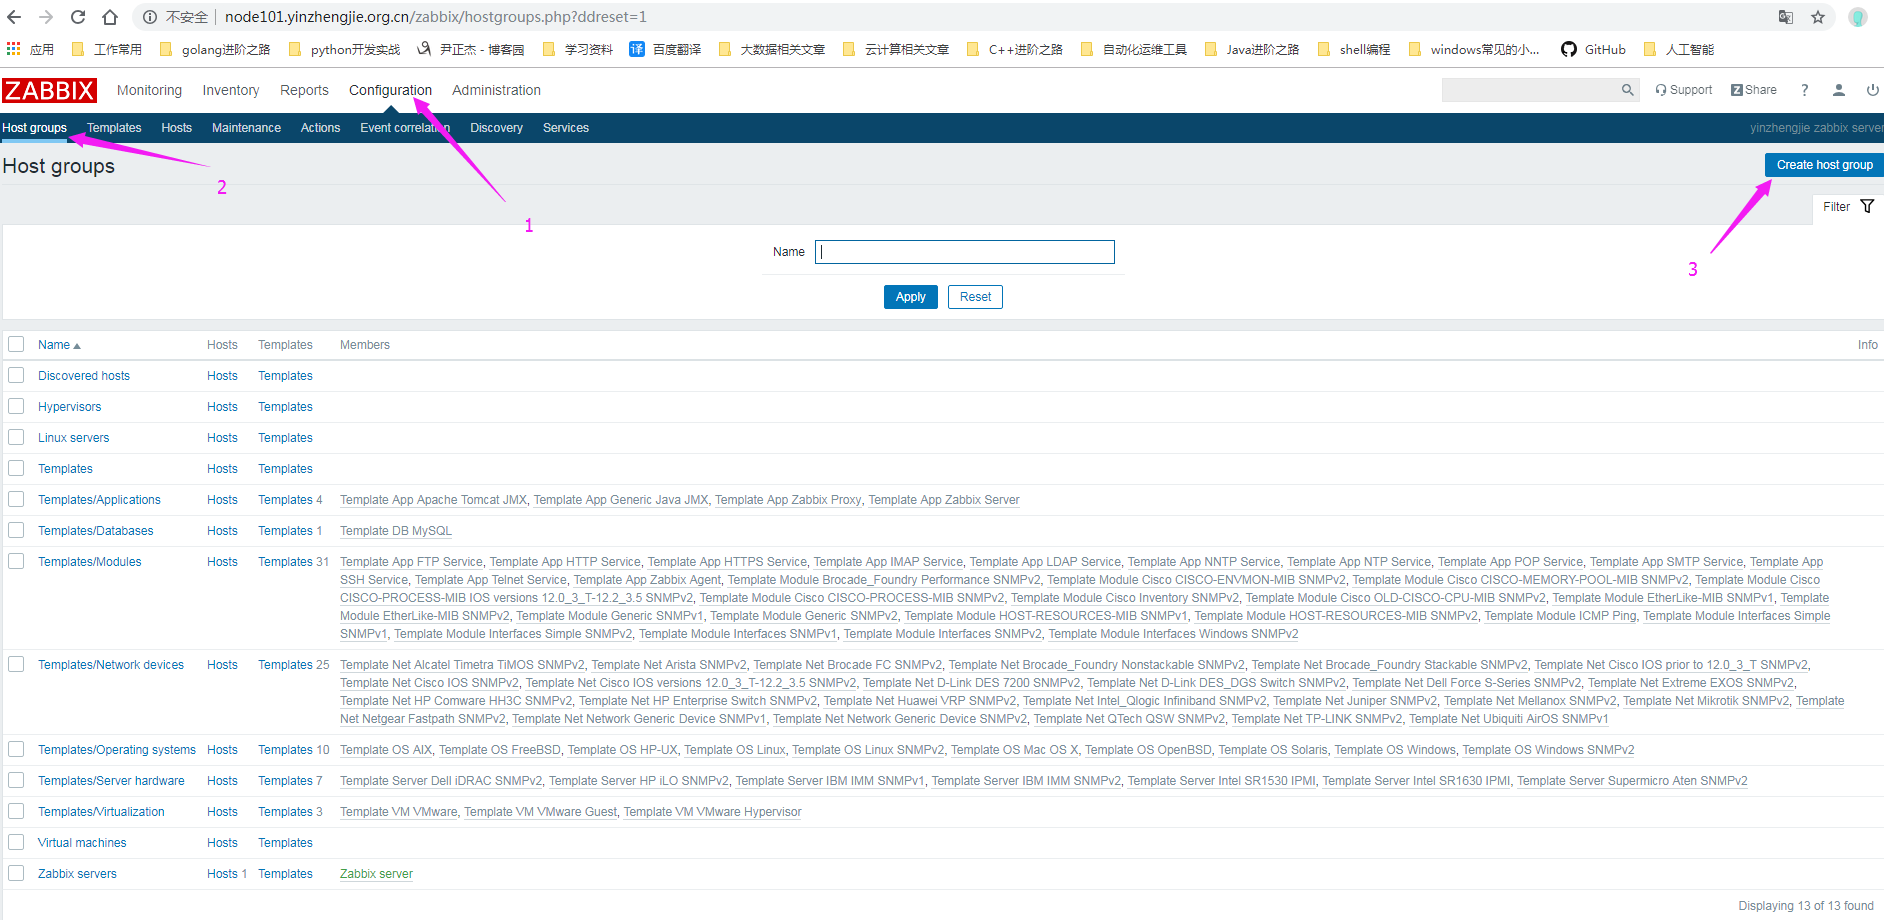
二.在zabbix Server添加对node102.yinzhengjie.org.cn节点的监控
1>.如下图所示,点击创建一个主机组
2>.输入要创建的组名,名称你可以自定义
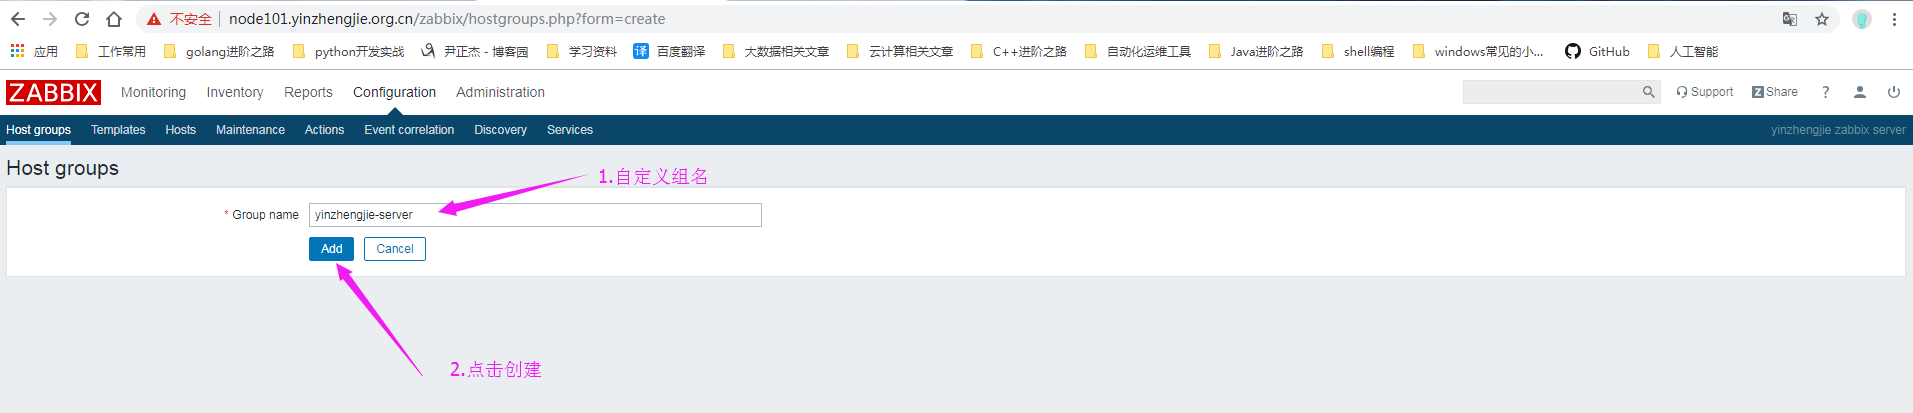
3>.组名添加完成

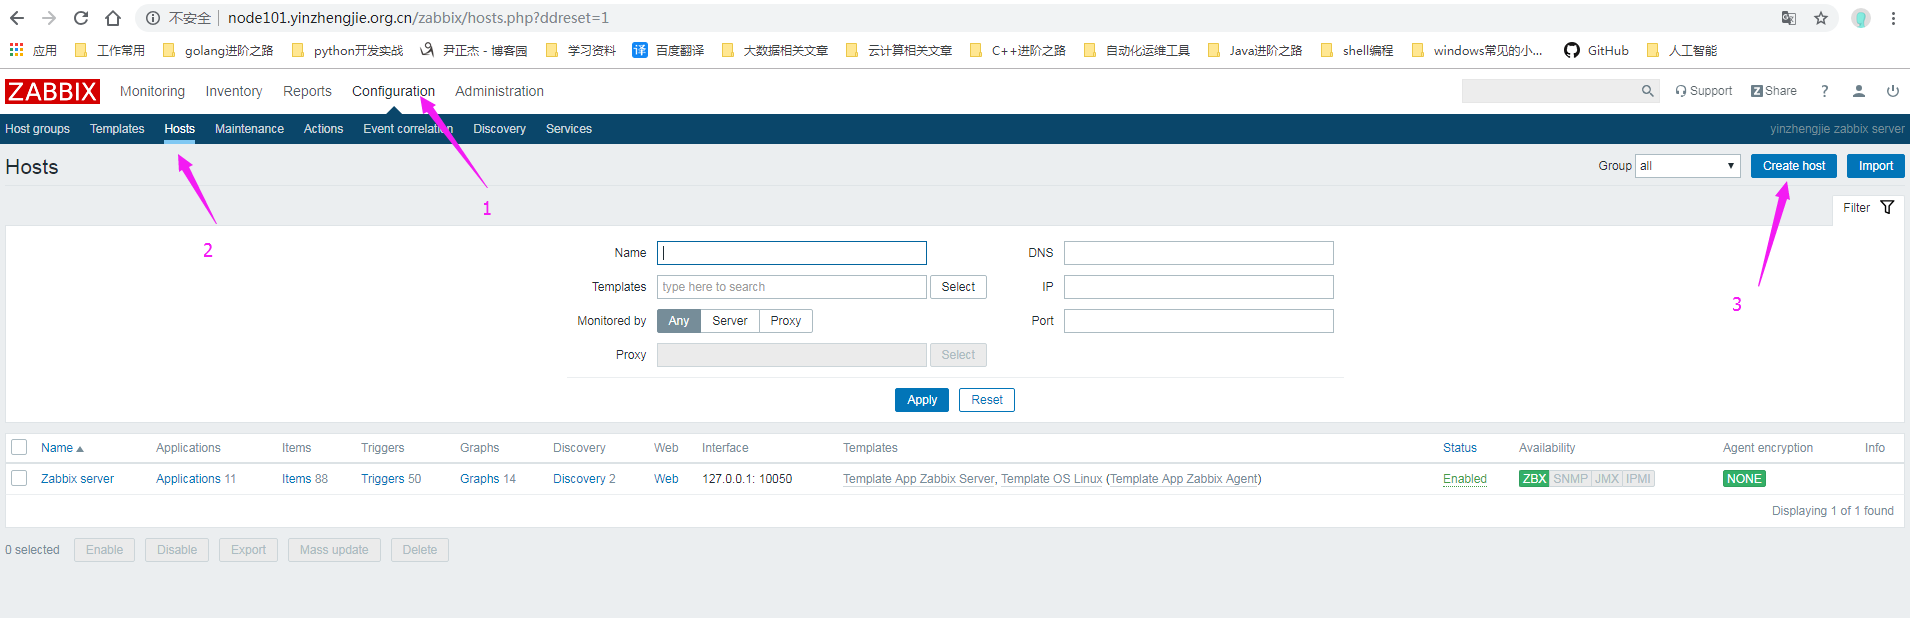
4>.如下图所示,点击创建主机
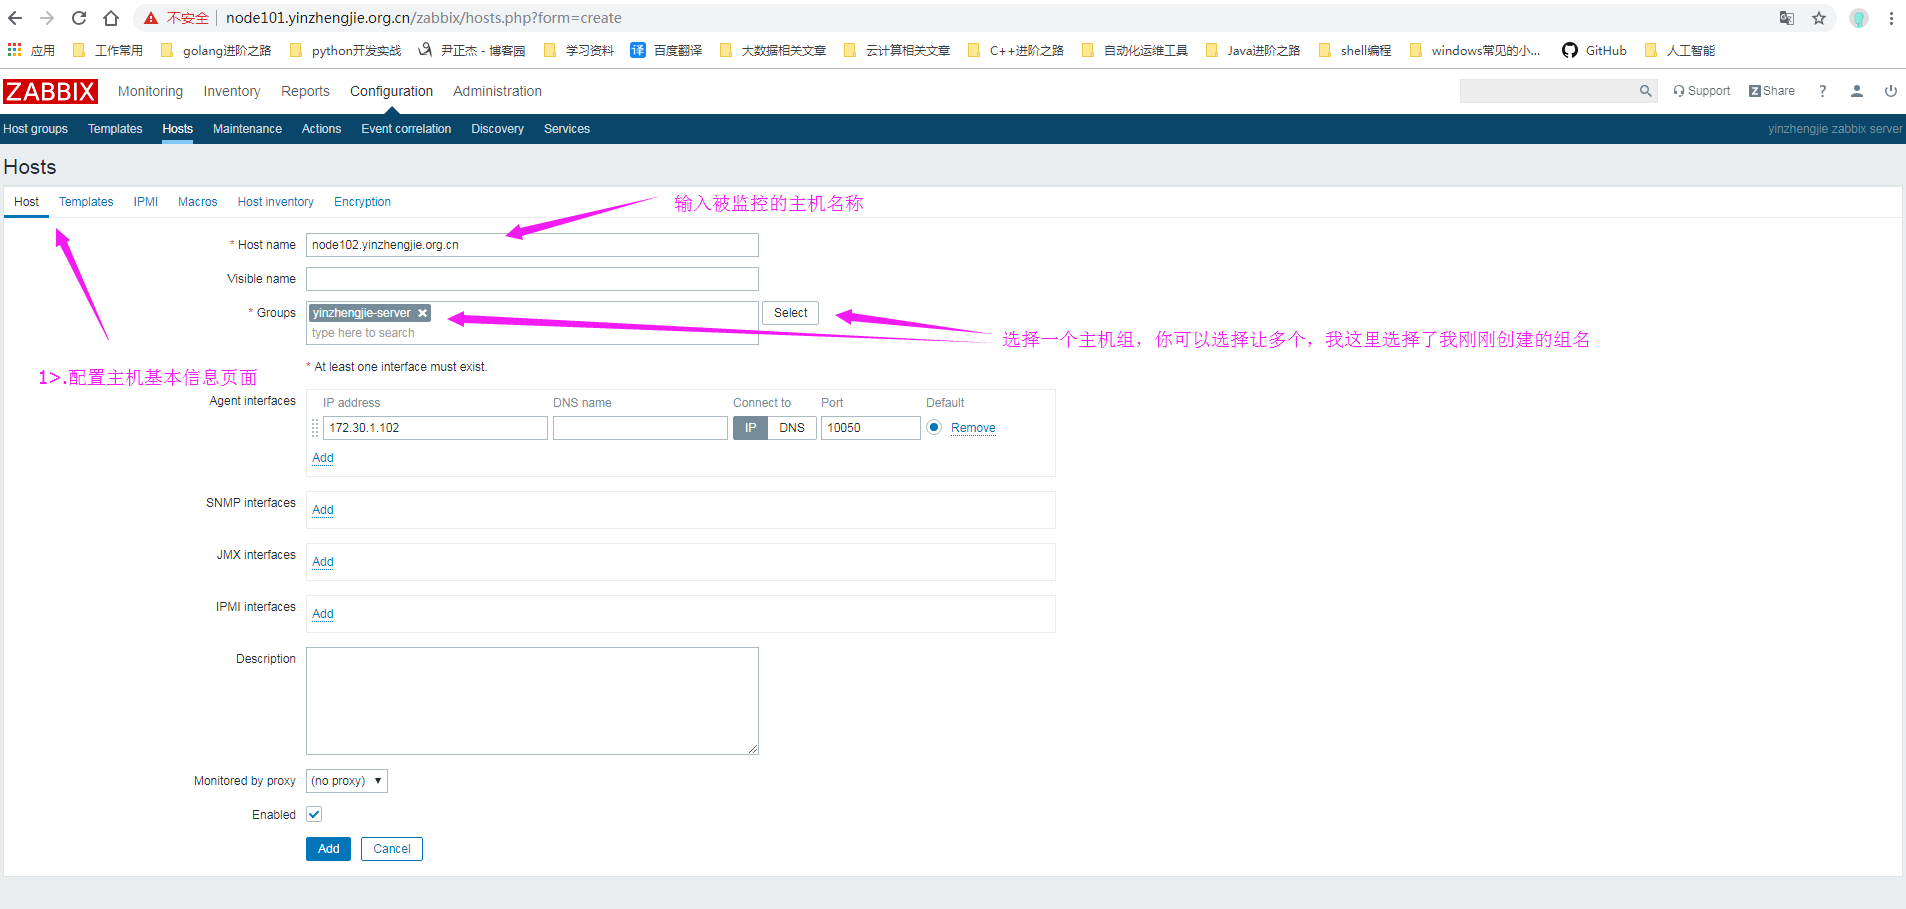
5>.配置被监控主机的基本信息(注意,带有*是必须要填写的!必须至少存在一个接口。)
6>.连接模板
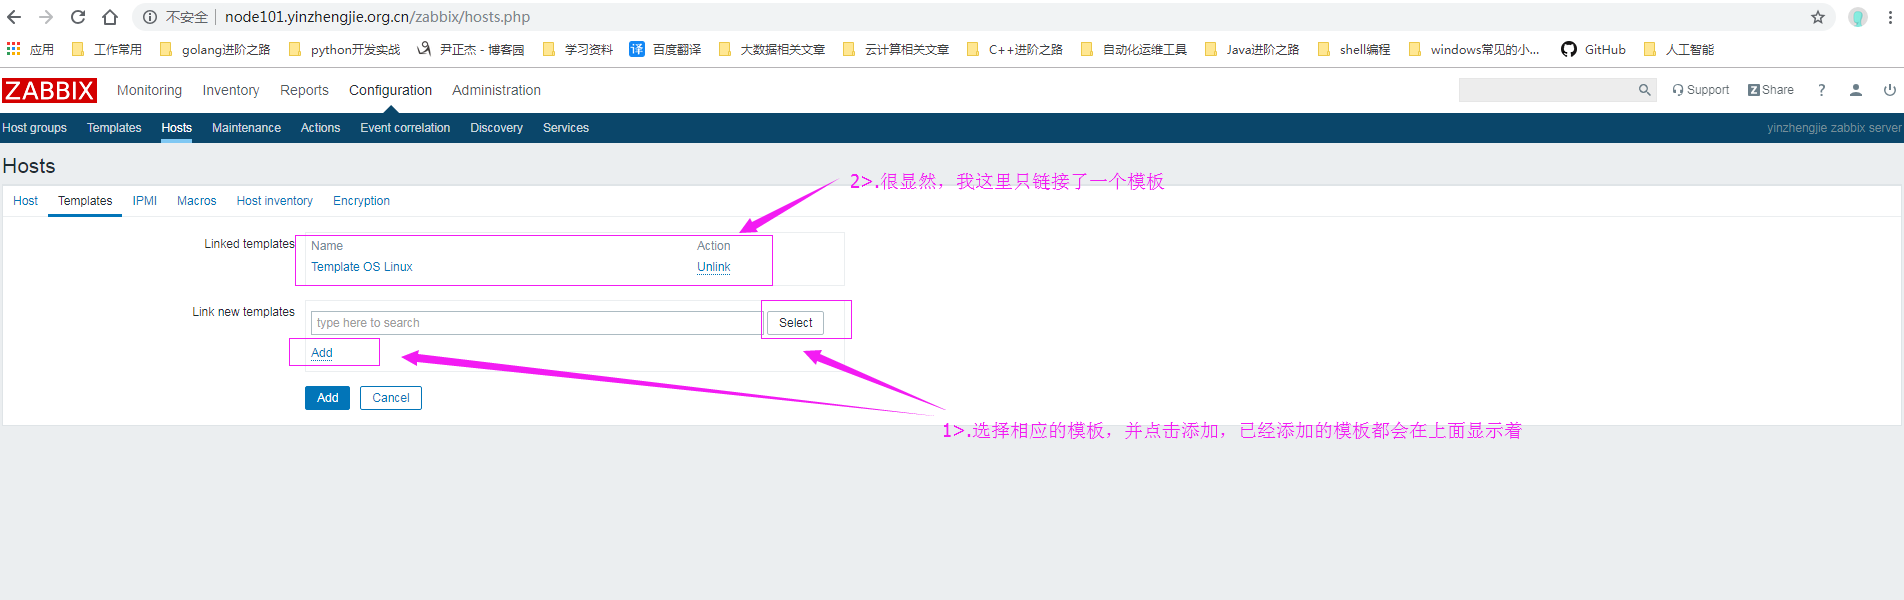
7>.点击添加按钮
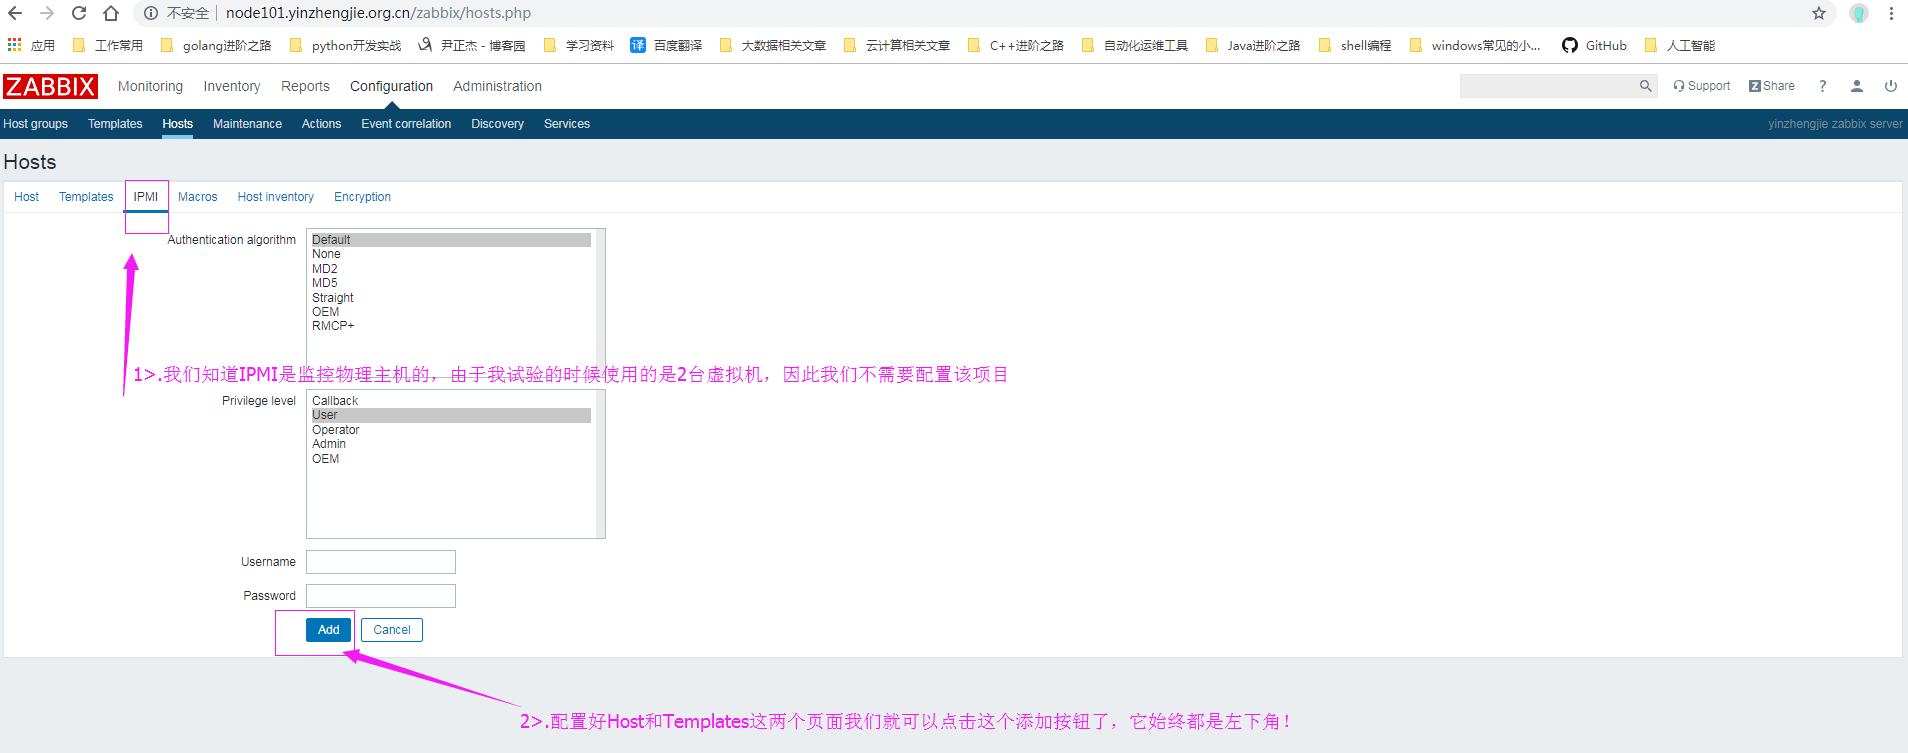
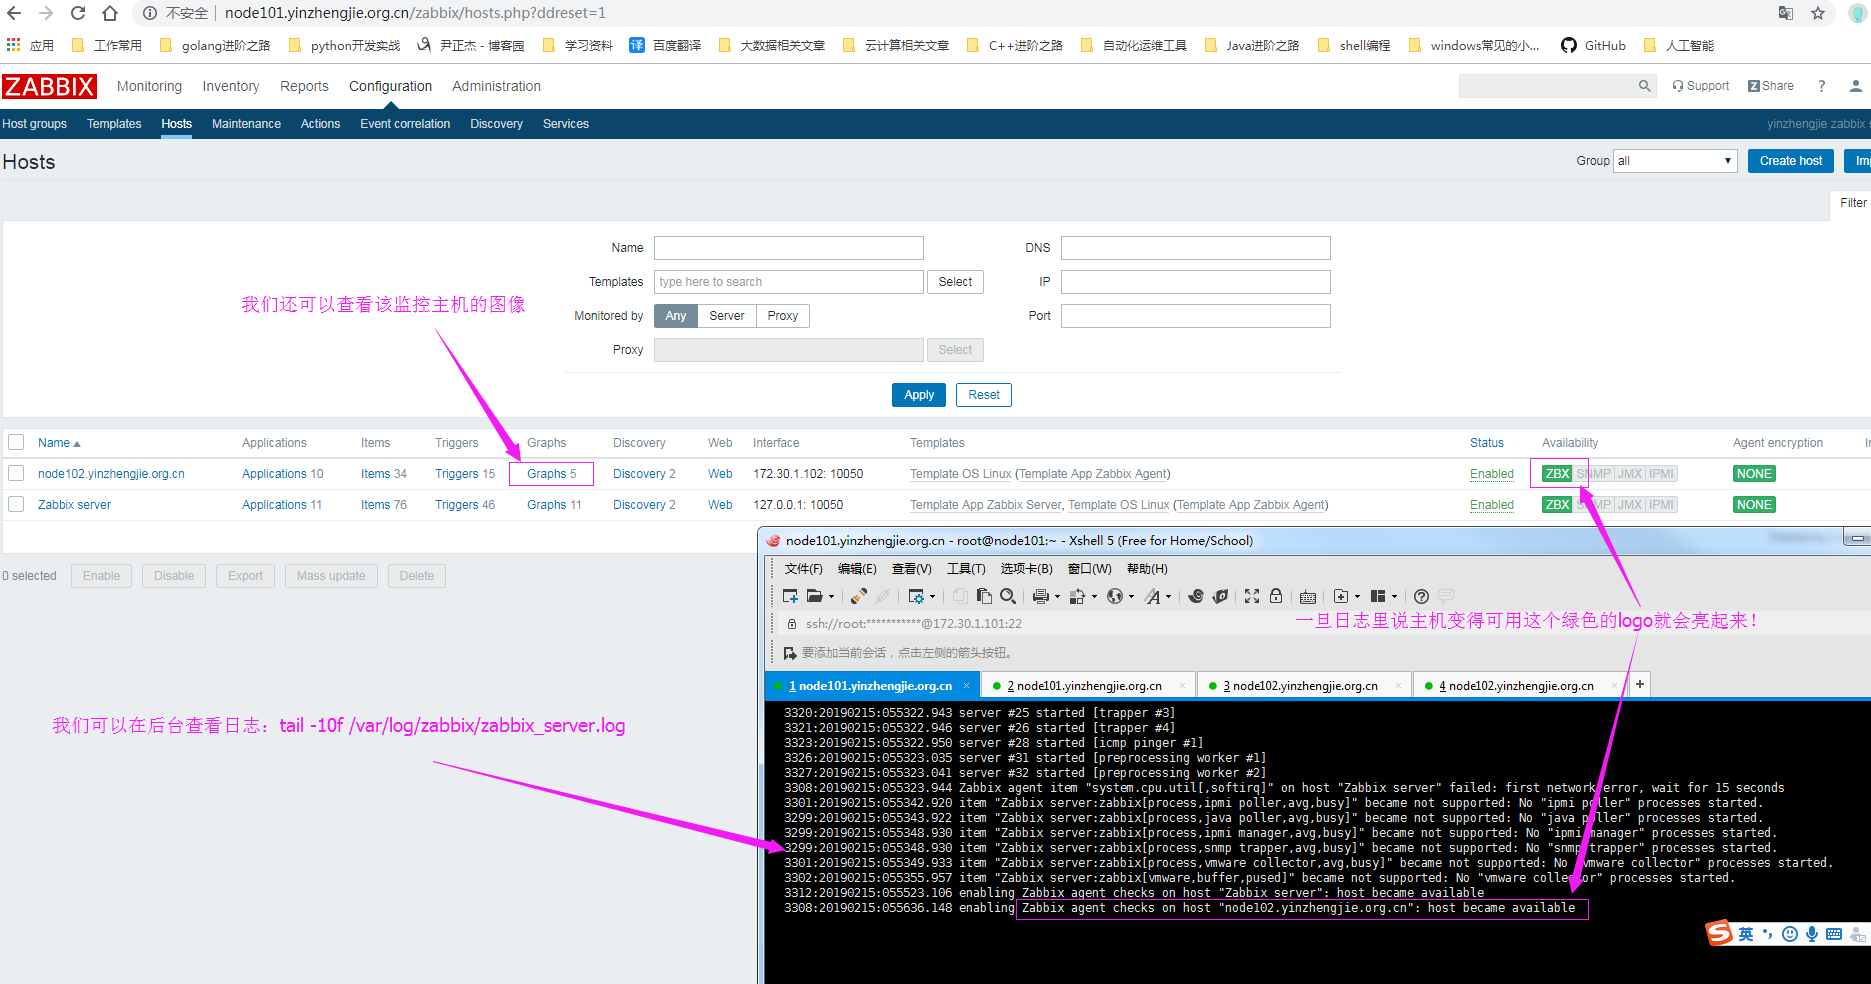
8>.添加完成

9>.等待30s左右,Zabbix Server就会监控到Zabbix agent的item了,监控成功,我们会看到一个绿灯
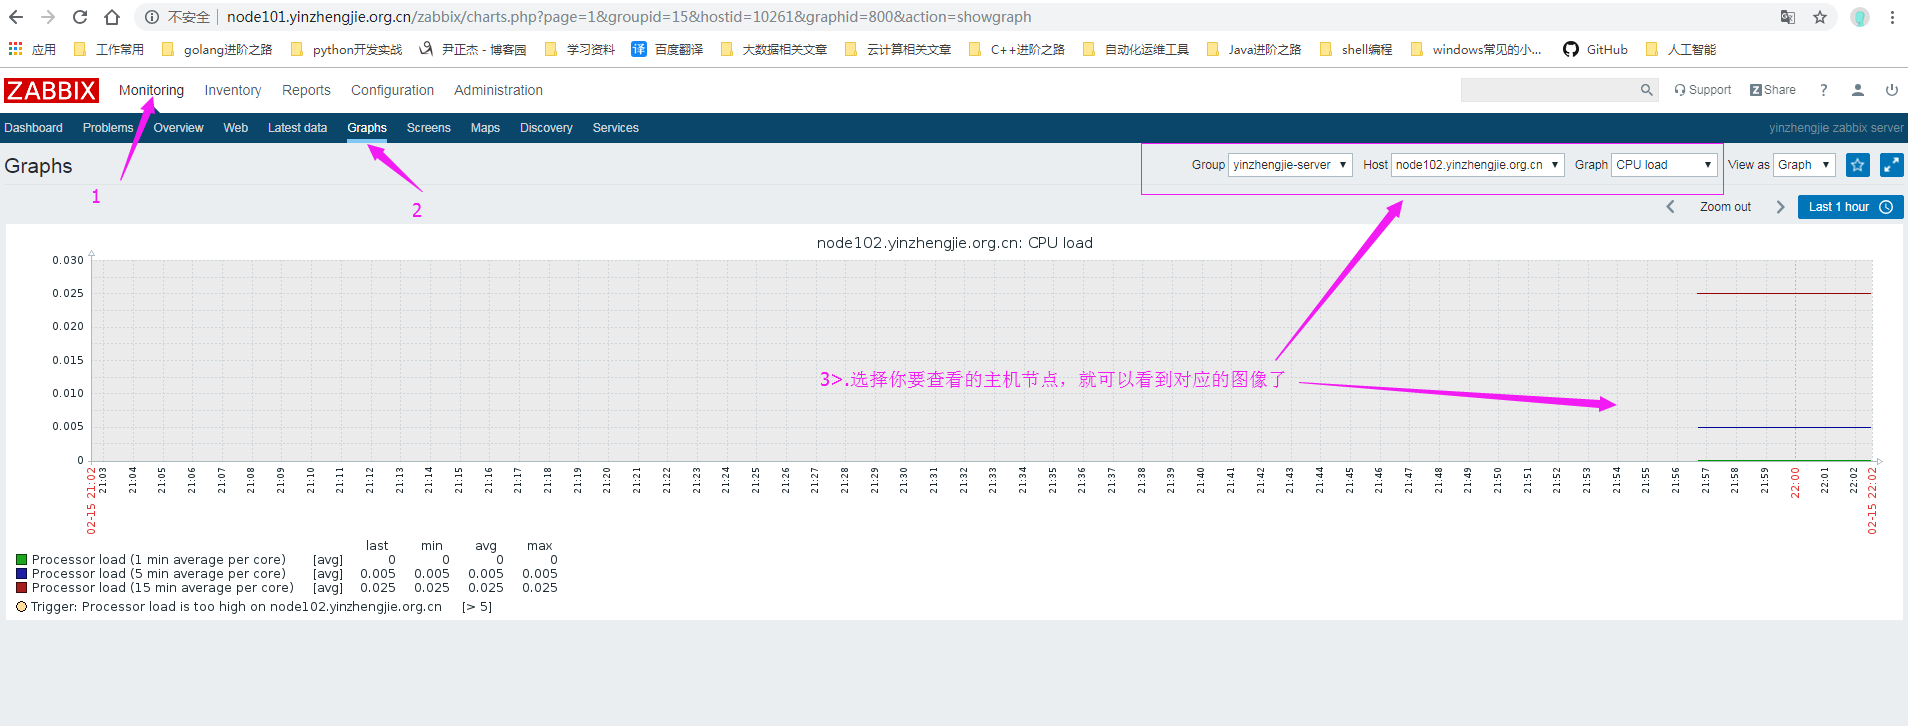
10>.查看监控的图像
运维监控-基于yum的方式部署 Zabbix Agent 4.0 版本的更多相关文章
- 运维监控-基于yum的方式部署Zabbix Server 4.0 版本
运维监控-基于yum的方式部署Zabbix Server 4.0 版本 作者:尹正杰 版权声明:原创作品,谢绝转载!否则将追究法律责任. 一.如何选择zabbix版本 1>.打开zabbix官方 ...
- OpenStack与ZStack深度对比:架构、部署、计算、运维监控等
摘要 OpenStack从2010年开源至今,已经走过9个年头,其正在进入主流企业市场,但该项目依然面临较难部署和管理的老问题.有一点是毫无疑问的,那就是OpenStack保持着高速增长的态势,超过5 ...
- Telegraf+Influxdb+Grafana自动化运维监控
概述:Telegraf收集信息,influxdb时序数据库存储数据,grafana平台展示数据,并进行监控告警,组成一个自动化运维监控平台. 一.influxdb InfluxDB是一个由Infl ...
- 建设DevOps统一运维监控平台,全面的系统监控 Zabbix VS Nagios VS Open-Falcon OR Prometheus
前言 随着Devops.云计算.微服务.容器等理念的逐步落地和大力发展,机器越来越多,应用越来越多,服务越来越微,应用运行基础环境越来多样化,容器.虚拟机.物理机不一而足.面对动辄几百上千个虚拟机.容 ...
- 运维监控-使用Zabbix Server 添加自定义 item
运维监控-使用Zabbix Server 监控自定义 item 作者:尹正杰 版权声明:原创作品,谢绝转载!否则将追究法律责任. 本篇博客就直接开门见山如何使用Zabbix Server 监控自定义 ...
- 运维监控-Open-Falcon安装Agent实战篇
运维监控-Open-Falcon安装Agent实战篇 作者:尹正杰 版权声明:原创作品,谢绝转载!否则将追究法律责任. 本文参考链接来自:http://book.open-falcon.org/zh/ ...
- 运维监控-Open-Falcon介绍
运维监控-Open-Falcon介绍 作者:尹正杰 版权声明:原创作品,谢绝转载!否则将追究法律责任. 一.Open-Falcon 介绍 监控系统是整个运维环节,乃至整个产品生命周期中最重要的一环,事 ...
- Lnmp搭建zabbix运维监控系统
使用目的? 在公司项目中需要做一个日志监控,最开始选择的是efk,但是efk的资料相对较少并且之前对这几个产品都没接触过,使用起来难度.于是选择了zabbix作为项目的运维监控系统. zabbix能做 ...
- Prometheus 运维监控
Prometheus 运维监控 1.Prometheus 介绍详解 2.Prometheus 安装部署 3.Prometheus 配置文件详解 4.Prometheus PromSQL 常用资源 5. ...
随机推荐
- 前端vue拖拽
工作上遇到的需求:页面上需要拖拽一个小方块div拷贝至保存的容器中. 一.可拖拽 那么我们需要对小方块div进行授权,设置draggable="true"允许其被拖动 二.定义拖拽 ...
- nodejs eggjs框架 爬虫 readhub.me
最近做了一款 高仿ReadHub小程序 微信小程序 canvas 自动适配 自动换行,保存图片分享到朋友圈 https://gitee.com/richard1015/News 具体代码已被开源, ...
- js获取参数 解决乱码
获取参数 function GetQueryString(name) { var reg = new RegExp("(^|&)" + name + "=([^& ...
- Vmware 控制脚本
#_*_ coding:utf8 _*_ import sys,time import yaml import re import os import ssl import random import ...
- Python3入门基础--str常用方法
Python基础之String常用方法 str():将其他类型的变量转换为str类型,例如: name = 'Jack' age = 22 course = ['web','Java','mysql' ...
- [洛谷P4147] 玉蟾宫
类型:单调栈 传送门:>Here< 题意:求一个$01$矩阵中最大子矩形(全是$1$)的面积 解题思路 单调栈的一个经典应用 考虑维护一个数组$p[i][j]$表示$(i,j)$往上最多有 ...
- Catch the Theves HDU - 3870(s - t平面图最小割)
题意: 板题...建个图..跑一遍spfa就好了...嘻嘻... 注意..数组大小就好啦..400 * 400 = 1600 我也是抑郁了..沙雕的我.. #include <iostream& ...
- CODEFORCES掉RATING记 #5
比赛:Codeforces Round #429 (Div. 2) 时间:2017.8.1晚 这次感觉状态不好,就去打div2了 A:有\(26\)种颜色的气球,每种的数量不一样,你要把这 ...
- project 2013 任务显示编号
1. 方法 格式-->大纲数字勾起来即可 2.结果
- 【CF1097E】Egor and an RPG game(动态规划,贪心)
[CF1097E]Egor and an RPG game(动态规划,贪心) 题面 洛谷 CodeForces 给定一个长度为\(n\)的排列\(a\),定义\(f(n)\)为将一个任意一个长度为\( ...