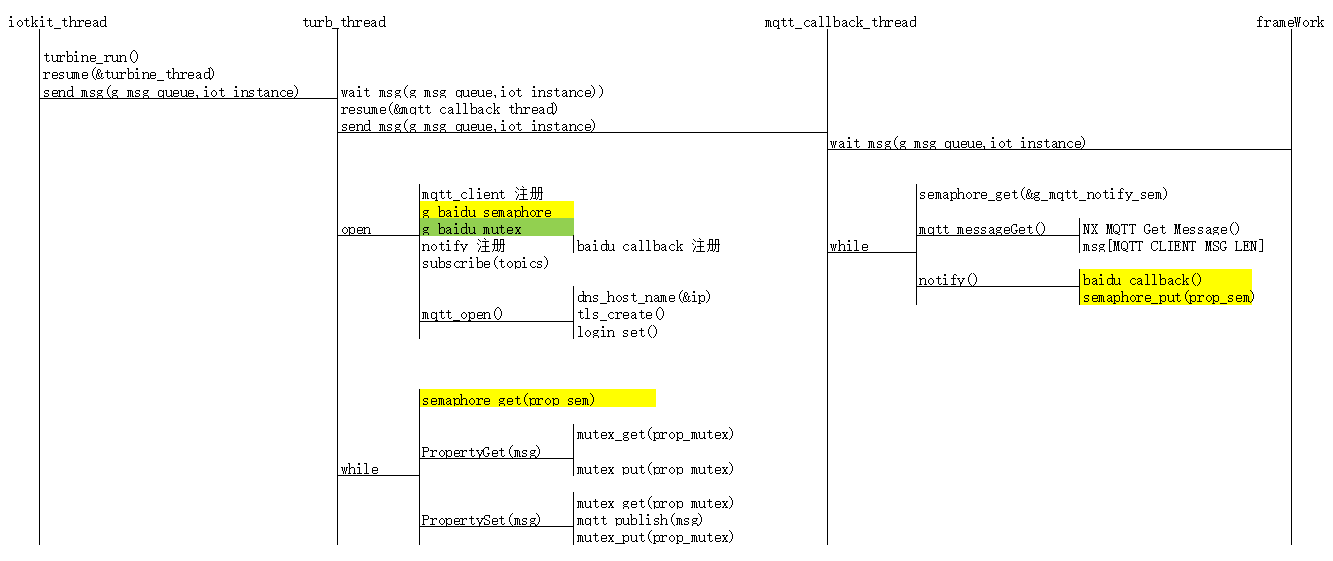
MQTT事件回调流程
TLS 如下强调:
1、每个IOT设备应该有一对独有的公钥/私钥
2、SERVER的认证通过SERVER的"root certificate"

SSL产生过程:
$ openssl genrsa -out deviceCertOne.key

$ openssl req -new -key deviceCertOne.key -out deviceCertOne.csr

$ openssl x509 -req -in deviceCertOne.csr -CA sampleCACertificateOne.pem -Cakey sampleCACertificateOne.key -CAcreateserial -out deviceCertOne.crt -days  -sha256
数据区分配:


程序架构:
关键数据封装:
/** Protocol definitions */

typedef enum e_iot_service_protocol {

    IOT_SERVICE_PROTO_MQTT,         ///< MQTT protocol

} iot_service_protocol_t;

/** IoT Service configuration structure  */

typedef struct st_iot_service_cfg {

    const char              *p_name;

    iot_service_protocol_t  protocol;

    mqtt_client_instance_t  *p_mqtt_client;

} iot_service_cfg_t;

/** IoT Service control structure */

typedef struct st_iot_service_ctrl_t {

    mqtt_client_instance_t  * p_mqtt_client;

    TX_SEMAPHORE         prop_sem;

    TX_MUTEX                prop_mutex;

    int                     debug;

} iot_service_ctrl_t;

static iot_service_ctrl_t baidu_iot_ctrl;

mqtt_client_instance_t g_mqtt_client = {

     .p_cfg     = &g_mqtt_cfg,

     .p_ctrl    = &g_mqtt_ctrl,

     .p_api     = &nx_mqtt_api,

};

static iot_service_cfg_t baidu_iot_cfg = {

     .p_name        = "BAIDU",

     .protocol      = IOT_SERVICE_PROTO_MQTT,

     .p_mqtt_client = &g_mqtt_client,

};

static iot_service_instance_t baidu_iot = {

     .p_cfg         = &baidu_iot_cfg,

     .p_ctrl        = &baidu_iot_ctrl,

     .p_api         = &baidu_iot_api,

};

static ssp_err_t BAIDU_Open(iot_service_ctrl_t * p_ctrl, iot_service_cfg_t const * const p_cfg)

{

    ssp_err_t status;

    mqtt_client_api_t *p_api;

    mqtt_client_ctrl_t *p_mqtt_ctrl;

    p_ctrl->p_mqtt_client = p_cfg->p_mqtt_client;

    p_api = p_ctrl->p_mqtt_client->p_api;

    p_mqtt_ctrl = p_ctrl->p_mqtt_client->p_ctrl;

    p_mqtt_ctrl->p_iot_service_ctrl = (void *)p_ctrl;

    p_mqtt_ctrl->notify = baidu_callback;

    p_ctrl->prop_sem = g_baidu_semaphore;

    p_ctrl->prop_mutex = g_baidu_mutex;

}

void turbine_main(ULONG data)

{

    ULONG i = , freq_ms = CLOUD_UPDATE_FREQ_MS;

    ULONG ticks;

    struct sensors old, new;

    iot_service_instance_t *p_iots;

    const iot_service_api_t *p_api;

    ssp_err_t status;

    UINT retry_count = SECT_UPDATE_RETRY_COUNT;

    p_iots = (iot_service_instance_t *)data;

    p_api = p_iots->p_api;

    /* Send a pointer to the IoT Service instance via the message

     * queue. This will be picked up by the MQTT Notifier Thread

     */

    tx_queue_send(&g_msg_queue, &p_iots, TX_WAIT_FOREVER);

    tx_thread_resume(&mqtt_callback_thread);

    status = p_api->open(p_iots->p_ctrl, p_iots->p_cfg);

}
MQTT相关API:
#define nxd_mqtt_client_create                _nxde_mqtt_client_create

#define nxd_mqtt_client_login_set             _nxde_mqtt_client_login_set

#define nxd_mqtt_client_will_message_set      _nxde_mqtt_client_will_message_set

#define nxd_mqtt_client_delete                _nxde_mqtt_client_delete

#define nxd_mqtt_client_connect               _nxde_mqtt_client_connect

#define nxd_mqtt_client_secure_connect        _nxde_mqtt_client_secure_connect

#define nxd_mqtt_client_publish               _nxde_mqtt_client_publish

#define nxd_mqtt_client_subscribe             _nxde_mqtt_client_subscribe

#define nxd_mqtt_client_unsubscribe           _nxde_mqtt_client_unsubscribe

#define nxd_mqtt_client_disconnect            _nxde_mqtt_client_disconnect

#define nxd_mqtt_client_receive_notify_set    _nxde_mqtt_client_receive_notify_set

#define nxd_mqtt_client_message_get           _nxde_mqtt_client_message_get

#define nxd_mqtt_client_disconnect_notify_set _nxde_mqtt_client_disconnect_notify_set

//Client Id是客户端到服务器唯一的标识,必须是在客户端到服务器唯一的ID,是处理QoS级别1和2消息ID的关键

//一般使用设备的Unique ID,配置ClientID回调:

mqtt_client_id_callback()

//设备Unique ID

g_fmi.p_api->uniqueIdGet(&uid)//SERVER获取MQTT数据:

nxd_mqtt_client_message_get

//MQTT反控设备事件回调:

nxd_mqtt_client_receive_notify_set->NX_MQTT_notify_callback->aws_callback->AWS_PropertyGet

//MQTT主动上报数据

turbine_main->update_iot_service->

//信号量用于MQTT事件同步:

g_mqtt_notify_sem

//MQTT AWS地址&认证

g_mqtt_cfg.p_root_ca = (uint8_t *) aws_ca_cert_der;

#define AWS_SERVER_ADDRESS      "iotmoonraker.us-west-2.prod.iot.us-west-2.amazonaws.com"
综上:MQTT要注意两个回调,一个是配置获取Client ID的回调,如上:
另一个为配置获取订阅消息的回调,如下:
status = nxd_mqtt_client_receive_notify_set(p_ctrl->p_secure_client, NX_MQTT_notify_callback);

if(status)

{

    nxd_mqtt_client_unsubscribe(p_ctrl->p_secure_client, (CHAR *)p_name, strlen(p_name));

    NX_MQTT_log_msg(p_ctrl, "Could not set notify function (0x%02x)\r\n", status);

    return SSP_ERR_ABORTED;

}
回调:信号量的方式通知可以接受MQTT服务器推送的消息,即客户端订阅的消息
static void NX_MQTT_notify_callback(NXD_MQTT_CLIENT * p_client, UINT number_of_messages)

{

    mqtt_client_ctrl_t *p_ctrl;

    p_ctrl = g_mqtt_client.p_ctrl;

    p_ctrl->num_messages += number_of_messages;

    tx_semaphore_put(&g_mqtt_notify_sem);

}
MQTT接收事件处理线程:
void mqtt_callback_thread_entry(void) {

    UINT tstatus;

    mqtt_client_ctrl_t *p_ctrl;

    mqtt_client_instance_t *p_mqtt_client;

    iot_service_instance_t *p_iots;

    /* Get the IoT cloud provider via the message queue */

    tx_queue_receive(&g_msg_queue, &p_iots, TX_WAIT_FOREVER);

    while () {

        /* This thread will be woken up by the MQTT notify function when

         * a message is received on the subscribed topic.

         */

        tstatus = tx_semaphore_get(&g_mqtt_notify_sem, TX_WAIT_FOREVER);

        if (tstatus != TX_SUCCESS)

            continue;

        /* Get the selected IoT service and MQTT client and call the notify callback */

        p_mqtt_client = p_iots->p_ctrl->p_mqtt_client;

        p_ctrl = p_mqtt_client->p_ctrl;

        while (p_ctrl->num_messages > ) {

            p_mqtt_client->p_api->messageGet(p_ctrl);

            if (p_ctrl->notify)

                p_ctrl->notify(p_iots->p_ctrl);

            p_ctrl->num_messages--;

        }

    }

}
static ssp_err_t NX_MQTT_Subscribe(mqtt_client_ctrl_t * p_ctrl, char const * p_name,

                                    mqtt_client_qos_t qos)

{

    UINT status;

    status = nxd_mqtt_client_subscribe(p_ctrl->p_secure_client, (CHAR *)p_name, strlen(p_name), qos);

    if(status) {

        NX_MQTT_log_msg(p_ctrl, "Could not subscribe to MQTT topic %s (0x%02x)\r\n", p_name, status);

        return SSP_ERR_ABORTED;

    }

    status = nxd_mqtt_client_receive_notify_set(p_ctrl->p_secure_client, NX_MQTT_notify_callback);

    if(status) {

        nxd_mqtt_client_unsubscribe(p_ctrl->p_secure_client, (CHAR *)p_name, strlen(p_name));

        NX_MQTT_log_msg(p_ctrl, "Could not set notify function (0x%02x)\r\n", status);

        return SSP_ERR_ABORTED;

    }

    return SSP_SUCCESS;

}

static void NX_MQTT_notify_callback(NXD_MQTT_CLIENT * p_client, UINT number_of_messages)

{

    mqtt_client_ctrl_t *p_ctrl;

    SSP_PARAMETER_NOT_USED (p_client);

    p_ctrl = g_mqtt_client.p_ctrl;

    p_ctrl->num_messages += number_of_messages;

    tx_semaphore_put(&g_mqtt_notify_sem);

}

void mqtt_callback_thread_entry(void) {

    UINT tstatus;

    mqtt_client_ctrl_t *p_ctrl;

    mqtt_client_instance_t *p_mqtt_client;

    iot_service_instance_t *p_iots;

    /* Get the IoT cloud provider via the message queue */

    tx_queue_receive(&g_msg_queue, &p_iots, TX_WAIT_FOREVER);

    while () {

        /* This thread will be woken up by the MQTT notify function when

         * a message is received on the subscribed topic.

         */

        tstatus = tx_semaphore_get(&g_mqtt_notify_sem, TX_WAIT_FOREVER);

        if (tstatus != TX_SUCCESS)

            continue;

        /* Get the selected IoT service and MQTT client and call the notify callback */

        p_mqtt_client = p_iots->p_ctrl->p_mqtt_client;

        p_ctrl = p_mqtt_client->p_ctrl;

        while (p_ctrl->num_messages > ) {

            p_mqtt_client->p_api->messageGet(p_ctrl);

            if (p_ctrl->notify)

                p_ctrl->notify(p_iots->p_ctrl);

            p_ctrl->num_messages--;

        }

    }

}

static void aws_callback(void *p_context)

{

    iot_service_ctrl_t *p_ctrl = (iot_service_ctrl_t *)p_context;

    tx_semaphore_put(&p_ctrl->prop_sem);

}

static ssp_err_t AWS_Open(iot_service_ctrl_t * p_ctrl, iot_service_cfg_t const * const p_cfg)

{

    ssp_err_t status;

    mqtt_client_api_t *p_api;

    mqtt_client_ctrl_t *p_mqtt_ctrl;

    p_ctrl->p_mqtt_client = p_cfg->p_mqtt_client;

    p_api = p_ctrl->p_mqtt_client->p_api;

    p_mqtt_ctrl = p_ctrl->p_mqtt_client->p_ctrl;

    p_mqtt_ctrl->p_iot_service_ctrl = (void *)p_ctrl;

    p_mqtt_ctrl->notify = aws_callback;

    p_ctrl->prop_sem = g_aws_semaphore;

    p_ctrl->prop_mutex = g_aws_mutex;

}

static ssp_err_t AWS_PropertyGet(iot_service_ctrl_t const * p_ctrl, char const * p_name[], char *p_value[], uint32_t valLen, uint32_t num)

{

    ssp_err_t status;

    UINT tstatus;

    mqtt_client_api_t *p_api;

    mqtt_client_ctrl_t *p_mqtt_ctrl;

    UCHAR *msg, *buf, *q;

    unsigned int i;

    p_api = p_ctrl->p_mqtt_client->p_api;

    p_mqtt_ctrl = p_ctrl->p_mqtt_client->p_ctrl;

    msg = p_mqtt_ctrl->msg;

    status = tx_mutex_get((TX_MUTEX *)&p_ctrl->prop_mutex, TX_WAIT_FOREVER);

    //snprintf(p_mqtt_ctrl->msg, sizeof(p_mqtt_ctrl->msg), "");

    status = p_api->publish(p_mqtt_ctrl, aws_topics[AWS_IOT_TOPIC_GET], NULL, , MQTT_QOS_0);

    if (status != SSP_SUCCESS) {

        tx_mutex_put((TX_MUTEX *)&p_ctrl->prop_mutex);

        return status;

    }

    tstatus = tx_semaphore_get((TX_SEMAPHORE *)&p_ctrl->prop_sem, );

    if (tstatus != TX_SUCCESS)

    {

        tx_mutex_put((TX_MUTEX *)&p_ctrl->prop_mutex);

        return SSP_ERR_ABORTED;

    }

    /* Check if get was accepted */

    status = SSP_ERR_INTERNAL;

    if (strcmp((char *)p_mqtt_ctrl->topic, aws_topics[AWS_IOT_TOPIC_GET_ACCEPTED]) == ) {

        /* Get values */

        msg = p_mqtt_ctrl->msg;

        for (i = ; i < num; i++) {

            memset(p_value[i], , valLen);

            buf = (UCHAR *)strstr((const char *)msg, "desired");

            if (buf == NULL)

                break;

            buf += strlen("desired");

            buf = (UCHAR *)strstr((const char *)buf, p_name[i]);

            if (buf == NULL)

                continue;

            buf += strlen(p_name[i]);

            buf = (UCHAR *)strstr((const char *)buf, ":");

            if (buf == NULL)

                continue;

            buf += ;

            buf = (UCHAR *)strstr((const char *)buf, "\"");

            buf += ;

            q = (UCHAR *)strstr((const char *)buf, "\"");

            if (q == NULL)

                continue;

            strncpy(p_value[i], (const char *)buf, MIN(valLen, (size_t)(q - buf)));

            status = SSP_SUCCESS;

        }

    }

    tx_mutex_put((TX_MUTEX *)&p_ctrl->prop_mutex);

    return status;

}
MQTT事件回调流程的更多相关文章
- Red5 项目的流事件回调流程和注意事项
回调流程 参考:Red5的一般客户端连接各个事件的触发顺序,经验证实际过程如下: 程序开始(在RED5启动的时候会自动去启动APP,从而触发以上事件) Start:MyChatRoomappStart ...
- Android Multimedia框架总结(十二)CodeC部分之OMXCodec与OMX事件回调流程
转载请把头部出处链接和尾部二维码一起转载,本文出自逆流的鱼yuiop:http://blog.csdn.net/hejjunlin/article/details/52629449 前言:上篇文中分析 ...
- Android按键事件传递流程(二)
5 应用层如何从Framework层接收按键事件 由3.2和4.5.4节可知,当InputDispatcher通过服务端管道向socket文件描述符发送消息后,epoll机制监听到了I/O事件, ...
- 用block做事件回调来简化代码,提高开发效率
我们在自定义view的时候,通常要考虑view的封装复用,所以如何把view的事件回调给Controller就是个需要好好考虑的问题, 一般来说,可选的方式主要有target-action和de ...
- backbone collection add 事件回调参数
this.listenTo(this.collection, 'add', this.renderBook); renderBook: function (item) { var bookView = ...
- OSG事件回调
OSG中的节点主要使用回调(CallBack)来完成用户临时.需要每帧执行的工作.根据回调功能被调用的时机划分为更新回调(Update CallBack)和人机交互时间回调(Event CallBac ...
- java工作流引擎Jflow流程事件和流程节点事件设置
流程实例的引入和设置 关键词: 开源工作流引擎 Java工作流开发 .net开源工作流引擎 流程事件 工作流节点事件 应用场景: 在一些复杂的业务逻辑流程中需要在某个节点或者是流程结束后做一些 ...
- 细说javascripe事件传播流程
当我们使用js时,经常会遇到事件传播流程的问题,下面我说一下我的观点. 在js触发某个事件时会相应生成一个事件对象,而这个事件对象则会根据DOM事件流的方向进传递,而传递的顺序如下图所示: 事件对象会 ...
- Guava 源码分析(Cache 原理 对象引用、事件回调)
前言 在上文「Guava 源码分析(Cache 原理)」中分析了 Guava Cache 的相关原理. 文末提到了回收机制.移除时间通知等内容,许多朋友也挺感兴趣,这次就这两个内容再来分析分析. 在开 ...
随机推荐
- hdu1010感想
杭电这道题是用dfs走迷宫问题,一直wa是因为没有将走过的地方标记,所以如果遇到走迷宫的问题一定要将走过的地方标记,如下: &&nx<n&&ny>=& ...
- INSPIRED启示录 读书笔记 - 第35章 情感接纳曲线
技术接纳曲线 涉及了技术创新者.尝鲜者.早期消费大众.后期消费大众和跟随者,很少有产品能越过鸿沟——获得尝鲜者以外消费者的青睐 不同类型的用户具有不同的情感需求,除了技术接纳曲线模型描述用户外,还应该 ...
- SpringBoot Mybatis 入门
Mybatis for Java API官方文档:http://www.mybatis.org/mybatis-3/zh/java-api.html Mybatis语法介绍 @Select 查询,所有 ...
- Linux FTP 上传一键脚本
下面来介绍一下这个 FTP 上传一键脚本 ftp_upload.sh. 用途:用于在Linux系统下搭建FTP客户端向FTP服务器端上传文件: 总结一下 ftp_upload.sh 特点:1.支持文件 ...
- Hessian与Spring整合
1.服务端与Spring的整合 1.1:web.xml中配置控制器 <servlet> <servlet-name>hessian</servlet-name> & ...
- 解决Linux系统在设置alias命令重启后失效的问题
在使用linux系统的过程中,大多数情况下都是在字符界面下进行的.有些比较长的命令我们不希望每次都重复输入,这样不仅浪费时间而且还容易出错:我们会使用alias命令来解决 比如: alias ll=' ...
- Luogu-2495 [SDOI2011]消耗战
虚树第一题 对于每次询问的点建立一棵虚树,然后在树上DP,一个点的答案就是这个点的父边切断的代价与所有儿子切断的代价去最小值,当然如果这个节点是资源点则必须切父边 注意在虚树上一条边的代价应该是中间所 ...
- spring boot 使用thymeleaf3.0以及thymeleaf的热部署
spring boot 截止1.5.4,默认使用thymeleaf2.0,会有一些很蛋疼的地方比如xml格式之类的,具体哪些就不说了 -> 替换为3.0版本 pom中加入 <propert ...
- CentOS 7 安装 maven
下载地址 http://maven.apache.org/download.cgi 版本 apache-maven-3.3.9 -bin.tar.gz tar -xvf apache-maven-3. ...
- 集群环境ssh免密码登录设置
一.准备工作 1) 用客户端工具(ssh client或者putty)连接到linux服务器.在root用户下输入命令 vi /etc/hosts,用vi编辑hosts文件,如下: #127.0.0. ...