
微信小程序基础知识
一、基本目录结构
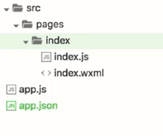
app.js 定义app入口
app.json 定义页面配置
index.js 页面中的事件和监听
index.wxml 定义布局文件
1.app.json配置基本信息
{
“pages”:[ //配置目录信息
“pages/index/index”, //第一条即是程序启动的首页
“pages/logs/logs”
],
“window”:{ //窗口样式
“backgroundTextStyle”:”Light”,
“navigationBackgroundColor:”#fff”,
“navigationBarTitleText”:”WeChat”,
“navigationBarTextStyle”:”black”
},
"tabBar": { //底部菜单栏配置
“color”:”#333”, //字体颜色
"list": [{
"pagePath": "pages/index/index",
“iconPath”:”images/icon.png”,
"text": "首页"
}, {
"pagePath": "pages/logs/logs",
"text": "日志"
}]
},
"networkTimeout": { //网络超时配置
"request": 10000,
"downloadFile": 10000
},
"debug": true
}
2.app.js配置全局方法并调用 //页面加载后自动执行
var
config={
onLaunch:function(){
var
logs=wx.getStorageSync(‘logs’)||[];
logs.unshift(Date.now())
wx.setStorageSync(‘logs’,logs)
},
getUserInfo:function(cb){
var
that=this;
if(this.globalData.userInfo){
typeof cb==”function”&&cb(this.globalData.userInfo)
}else{
wx.login({
success:function(){
wx.getUserInfo({
success:function(res){
that. globalData.userInfo=res.userInfo
}
})
}
})
}
},
globaolData:{
userInfo:null
}
}
App(config); //传入config参数
3./pages/index/index.js
配置页面入口
var
app=getApp(); //获取app.js对象
var
pageConfig=({
data:{
motto:”Hello
World”,
userInfo:{}
},
//事件处理函数
bindViewTap:function(){
wx.navigateTo({
url:’../logs/logs’
})
},
onLoad:function(){
var
that=this;
//调用应用实例方法获取全局数据
app.getUserInfo(function(){
//更新数据
that.setData({
userInfo:userInfo
})
})
},
testClick:function(){ //绑定一个自定义的方法
App. getUserInfo() //调用App中设置的方法
}
})
Page(pageConfig); //页面初始化
4.
/pages/index/index.json当前页面配置 //只能配置相关window显示,覆盖app.json中的配置
{
“backgroundTextStyle”:”dark”,
“navigationBackgroundColor:”#fff”,
}
5.
/pages/index/index.wxss当前页面css设置 //覆盖app.wxss中的设置
6./pages/index/index.wxml
配置页面逻辑与ui
二、视图与渲染
1.快速配置一个页面
①在pages目录下新建一个文件firstPage,再创建first.js和first.wxml
②在app.json中配置页面信息
“pages”:[ //配置目录信息
“pages/index/index”,
“pages/logs/logs”,
“pages/first/first”,
]
③在first.js中添加Page(); //页面初始化
④在first.wxml中写入需要显示的信息 //页面初始化
2.小程序的标签
①条件标签wx:if,wx:else
②{{data}}双花括号展示数据 //数据来自Page函数中的data
<view class="container">
<view class="userinfo">
<button wx:if="{{!hasUserInfo && canIUse}}"> 获取头像昵称 </button>
<block wx:else>
<image src="{{userInfo.avatarUrl}}" background-size="cover"></image>
<text class="userinfo-nickname">{{userInfo.nickName}}</text>
</block>
</view>
</view>
③循环标签wx:for
<view wx:for=”{{[‘aaa’,’bbb’,’ccc’]}}”></view>
//第二种写法
<view wx:for=”{{[‘aaa’,’bbb’,’ccc’]}}” wx:for-item=”item” wx:for-index=”ix”>
{{ix}} – {{item}}
</view>
3.使用模板
方法一:
1.在pages/目录下,新建页面,如:/templates/header.wxml
2.在其他任意页面使用<include src=”../templates/header”/>引入该模板
方法二:
1.在pages/目录下,新建页面,如:/templates/header.wxml
2.在该页面中声明几个带有name的版本标签
< template name=”header1”>这是模板1</ template >
< template name=”header2”>这是模板2</ template >
3.在其他任意页面使用:
<import src=”../templates/header” />
< template is=”footer1” />
动态导入数据到模板:
调用模板页:
<import src=”../templates/header” />
< template is=”footer1” data=”{{text:’这是导入的数据信息’}}”/>
模板页:
< template name=”header2”>
{{text}}
</ template >
三、小程序事件
1.bind与catch绑定点击事件,catch会阻止事件冒泡
<view class=”view1” bindtap=”view1click”></view> //会冒泡
<view class=”view1” catchtap=”view1click”></view> //不会冒泡
view1函数写在该页面js文件中即:
Page({
view1:function(){
console.log(‘click’);
}
})
2.事件对象
<view class=”view1” bindtap=”view1click” data-title=”titletest” data-id=”100”></view>
Page({
view1:function(event){
console.log(event);
}
})
currentTarget: 绑定事件的组件
target: 发生事件的组件
事件的数据源传递:
在currentTarget下有dataset
其中dataset为{id:”100”,title:”titletest”}
元素的值如input中的值,在currentTarget下的detail.value之中
四、小程序的生命周期
1.App.js定义的全局生命周期及方法
App({
onLaunch: function(options) {
//小程序加载的时候
},
onLoad:function(options){
//数据加载完成
},
onReady:function(){
//页面渲染完成
},
onShow: function(options) {
// 小程序前台显示的时候调用
},
onHide: function() {
// 小程序进入后台运行的时候调用
},
onUnload: function() {
// 页面被卸载
},
onError: function(msg) {
console.log(msg)
},
userSetF:function(){}, //自定义的全局方法
globalData: {} //全局数据对象
})
2.写在每个页面的Page中则是当前页面的方法和周期
五、页面之间的跳转路由
1.调用方法跳转
wx.navigateTo({ //当前页面不关闭,打开新页面并跳转
url:”../logs/logs?id=100” //传递参数到新页面
})
wx.redirectTo({ //关闭当前页面,打开新页面并跳转
url:”../logs/logs?id=100” //传递参数到新页面
})
2.标签跳转
<navigator url=” ../logs/logs?id=100” redirect> //设置redirect属性
<text>点击跳转</text>
</ navigator >
3.新页面接收传递过来的参数:
Page({
onLoad:function(options){ //在生命周期函数onLoad中参数会接收url传递过来的数据
console.log(options)
},
})
六、小程序UI组件
1.页面的布局支持两种
flex布局:
相对绝对定位布局:
使用单位rxp,微信小程序特有的像素单位,会自动适配屏幕
2.页面的基础组件
视图容器组件:view;scrooll-view;swiper
view:基础视图容器,可以理解为div
scroll-view:带滚动条的容器,上下滚动需要设置高度
属性scroll-into-view=”{{intoview}}”
,可以设置intoview为某个id
swiper:轮播图容器
icon组件
text组件
progress进度条组件
表单组件:button checkbox input label picker radio slider switch form
picker:下拉选框
slider:滑块
form:属性form-type
3.操作反馈组件
action-sheet
//模态底部选择框
<action-sheet hidden=”{{actionSheetHidden}}”
bindchange=”actionSheetChange”>
//通过数据控制是否显示隐藏
<action-sheet-item data-name=”item1”>item1</action-sheet-item>
</action-sheet>
modal
//模态框
<modal confitm-text=”确认”
cancle-text=”取消” hidden=”{{modalHidden}}” bindConfirm=”modalChange”
bindCancel=”modalCancel”></modal>
toast
//弹窗提示
<toast hidden=”{{toastHidden}}” duration=”3000”
bindchange=”toastChange”></toast>
loading
//弹窗提示
<loading hidden=”{{loadingHidden}}”>加载中…</loading>
4.导航跳转组件navigator(类似a标签,微信无a标签)
<navigator url=” ../logs/logs?id=100”
redirect>
//设置redirect属性
<text>点击跳转</text>
</ navigator >
5.多媒体组件
image
video audio
6.地图组件
map
7.画布与游戏组件
canvas
七、小程序API(基础部分API)
1.请求服务器数据
wx.request({
url:””,
data:{},
header:{ //请求头信息
‘Content-Type’:’application/json’
},
success:function(res){},
fail:function(res){}
})
2.图片选择与微信拍照
wx.chooseImage({
count:1, //选择图片张数,最多为9张
sizeType:[‘origina’,’compressed’],//设置是原图还是压缩图片
sourceType:[‘album’,’camera’],//设置来源是相机还是相册
success:function(res){
var tempFilePath=res.tempFilePaths;
//设置全局data的值,改变显示效果
that.setData()
}
})
3.文件上传与下载
上传文件:
wx.chooseImage({
count:1, //选择图片张数,最多为9张
sizeType:[‘origina’,’compressed’],//设置是原图还是压缩图片
sourceType:[‘album’,’camera’],//设置来源是相机还是相册
success:function(res){
var
tempFilePath=res.tempFilePaths;
//设置全局data的值,改变显示效果
wx.uploadFile({ //上传图片
url:’’,
filePath:’ tempFilePath[0]’,
name:’file’,
formData:{
‘user’:’test’
}
})
})
下载文件:
wx.downloadFile({
//上传图片
url:’’, //文件下载地址
type:’image’, //获取文件的类型,一共三总:image/audio/video
name:’file’,
success:function(res){
console.log(res.
tempFilePaths)
}
})
4.websocket
//开启链接
wx.connectSocket({
url:’’,
method:’GET’,
success:function(res){
}
})
//发送消息
wx.sendSocketMessage({
data:”你好我是小程序”,
success:function(res){
},
fail:function(){},
complete:function(){
}
})
//监听服务器返回消息
wx.onSocketMessage(function(res){
console.log(res)
})
//关闭链接
wx.onSocketClose(function(res){
console.log(res)
})
5.音乐播放和控制
//播放音乐
wx.playBackgroundAudio({
dataUrl:”http://”,
success:function(res){
},
fail:function(){},
complete:function(){
}
})
//监听音乐播放
wx.onBackgroundAudio(function(res){})
6.缓存数据(有最大限制,用户退出不会清除)
//添加缓存
wx.setStorageSync(‘’log’,logs) //同步设置
wx.setStorage (‘’log’,logs) //异步设置
//获取缓存
wx.getStorageSync(‘’log’ )
//移除缓存
wx.removeStorage(‘’log’ )
7.位置信息
//获取当前位置
wx.getLocation({
type:’wgs84’, //使用gps类型的坐标
success:function(res){
var
latitude=res.latitude //获取坐标的返回值
var
longitude=res.longitude
wx.openLocation({ //打开地图
latitude:
latitude,
longitude:
longitude,
scale:10
})
wx.chooseLocation({ //用户选择坐标
success:function(res){
//success
},
fail:function(res){
},
complete:function(res){
},
})
}
})
8.设备相关API
//获取网络信息
wx.getNetworkType({
success:function(res){
console.log(res)//success
},
})
//获取设备信息
wx.getSystemInfo({
success:function(res){
console.log(res)//success
},
})
//获取重力感应,每秒调用5次
wx.onAccelerometerChange(function(res){})
//获取罗盘信息,每秒调用5次
wx.onCompassChange(function(res){})
//拨打电话,
wx.makePhoneCall({
phoneNumber:’134000000’
})
9.交互API
//弹出提示框
wx.showToast({
title:’成功’,
icon:’success’,
duration:2000
})
//弹出模态框
wx.showModal({
title:’提示’,
content:’这是一个模态弹窗’,
success:function(res){
if(res.confirm){
console.log(‘用户点击确定’)
}
},
})
10.导航和导航条API
//设置导航条信息
wx.setNavigationBarTitle({
title:’这是title’,
success:function(res){
}
})
wx.showNavigationBarLoading()
//导航条跳转设置
wx.navigateBack(OBJECT)
wx.navigateTo(OBJECT)
11.动画API
在wxml中的标签添加数据
<image
animation=”{{animationData}}”></image>
page({
data:{
animationData:[]
},
bindViewTap:function(){
//第一步创建动画
var
animation=wx.createAnimation({
duration:3000,
timingFunction:’linear’,
delay:0,
transformOrigin:’50%
50% 0’ //初始位置
})
//第二步设置动画行为
animation.rotate(90).step();
//第三步将设置的动画绑定到需要显示的元素的data上
this.setData({animationData: animation.export()})
}
})
12.绘图(canvas)
var context=wx.createContext()
context.rect(5,5,25,25)
context.stroke()
context.scale(2,2)
context.stroke()
wx.drawCanvas({
canvasId:’firstCanvas’,
action:context.getActions()
})
微信小程序基础知识的更多相关文章
- 微信小程序基础知识笔记
微信小程序笔记 文件构成 全局文件 app.json 小程序全局配置文件,必要,自动生成 app.js 小程序入口JS文件,一般只需申明全局变量.处理生命周期以及版本升级即可,必要 app.wxss ...
- 微信小程序基础
前言 什么是微信小程序,它是一种轻量级的APP,它与常规App来说,无需下载安装即可使用,它嵌于微信App中,要使用微信小程序你只需要搜索一下微信小程序的名称就好,如近期的"Google的画 ...
- 微信小程序基础入门
准备 Demo 项目地址 https://github.com/zce/weapp-demo Clone or Download(需准备GIT环境) $ cd path/to/project/root ...
- 微信小程序基础之开源项目库汇总
awesome-github-wechat-weapp 是由OpenDigg整理并维护的微信小程序开源项目库集合.我们会定期同步OpenDigg上的项目到这里,也欢迎各位提交项目给我们. (链接:ht ...
- 微信小程序基础之在微信上显示和体验小程序?
随着小程序正式上线,用户现在可以通过二维码.搜索等方式体验到开发者们开发的小程序了. 用户只要将微信更新至最新版本,体验过小程序后,便可在发现页面看到小程序TAB,但微信并不会通过这个地方向用户推荐小 ...
- 微信小程序基础之交互操作控件
好久没有写关于微信小程序的文章了,今天简单的发表一篇,内容比较简单,包括:ActionSheet上拉菜单.AlertAction提示框.SuccessAction完成框.LoadingAction加载 ...
- 微信小程序基础之input输入框控件
今天主要详写一下微信小程序中的Input输入框控件,输入框在程序中是最常见的,登录,注册,获取搜索框中的内容等等都需要,同时,还需要设置不同样式的输入框,今天的代码中都要相应的使用. input输入框 ...
- 微信小程序基础之试图控件View、ScrollView、Swiper
今天写一篇关于微信小程序视图控件的文章,主要是介绍界面的搭建和部分操作js交互功能的介绍,转载请注明出处,谢谢~ 首先显示首页结构.创建三个navigator,用来跳转页面: <!--index ...
- 微信小程序基础之创建使用教程
本文档将带你一步步创建完成一个微信小程序,并可以在手机上体验该小程序的实际效果.这个小程序的首页将会显示欢迎语以及当前用户的微信头像,点击头像,可以在新开的页面中查看当前小程序的启动日志. 1. 获取 ...
随机推荐
- 在List中删除符合条件的内容
objDAList.RemoveAll(s => s.daCID == "20170725152407CD");
- 关于springboot 打包问题 jar包和 war包
起因:项目开发完成 需要打包部署了 发现自己不会打包 那么开始网上学习打包? 那么怎么来打包那? 我们以前没有采用springboot 时候我们都是直接将项目打成war包形式 然后放到tomc ...
- Qt 飞机仪表显示
使用Qt简单谢了一个飞机的一小部分仪表,还没有写完,目前只写了一个界面,不过思想应该是一样的. 效果图如下 其中主要由转速表,和下面的部分数字显示构成 转速表代码 .h文件 #ifndef CONTR ...
- Python 3基础教程28-内置函数
本文介绍Python中的内置函数,Python中有很多内置的,功能强大的函数,可以帮我们解决很多问题,有些方法,根本不需要你去再次编写实现函数,你直接调用就可以.在这之前,需要介绍下,如何在windo ...
- CSS3 : box-shadow
box-shadow 用于设置边框阴影,语法: box-shadow: h-shadow v-shadow blur spread color inset; -moz-box-shadow: h-sh ...
- COJ 2192: Wells弹键盘 (dp)
2192: Wells弹键盘 Description Wells十分羡慕和佩服那些会弹钢琴的人比如子浩君,然而Wells只会弹键盘…… Wells的键盘只有10个键,从1,2,3,……,9,0,如下图 ...
- LeetCode 全解(bug free 训练)
1.Two Sum Given an array of integers, return indices of the two numbers such that they add up to a s ...
- python安装Django
现在有很多建站系统,很多都是基于php的,比如WordPress. 而Django 是老牌基于Python的CMS框架了,一直听说很强大,甚至曾经很红的Ruby On Rails都参考了它的很多概念, ...
- JS让网页上文字出现键盘打字的打字效果
一个挺简单的网页特效:JS让网页上文字出现键盘打字的打字效果实现 演示地址:http://codepen.io/guihailiuli/pen/jPOYMZ 以代码形式实现过程分析: <html ...
- Qt5.6关联VS2013,配置VAssistX
1. 安装Qt qt-creator-opensource-windows-x86-4.2.0.exe 2. 安装Qt VS插件 qt-vs-addin-1.2.5.exe 3. 配置ASSISTX ...