
Shrinking images on Linux
When creating images from existing ISOs you often need to allocate a number of MB for the image to at least fit the files that are in the ISO. Predicting the exact size of the image is hard, even for a program. In this case you will create an image that is larger than actually needed: the image is much larger than the files on the image are combined.
This post will show how to shrink an existing image to a more optimal size. We will do this on Linux, since all required tools are available there: GParted, fdisk and truncate.
Requirements
- A Linux PC
- Some knowledge how the terminal works will helps
- The unoptimal image (myimage.img in this example)
Creating loopback device
GParted is a great application that can handle partition tables and filesystems quite well. In this tutorial we will use GParted to shrink the filesystem (and its accompaning partition in the partition table).
GParted operates on devices, not simple files like images. This is why we first need to create a device for the image. We do this using the loopback-functionality of Linux.
First we will enable loopback if it wasn't already enabled:
$ sudo modprobe loop
Now we can request a new (free) loopback device:
$ sudo losetup -f
This will return the path to a free loopback device. In this example this is /dev/loop0.
Next we create a device of the image:
$ sudo losetup /dev/loop0 myimage.img
Now we have a device /dev/loop0 that represents myimage.img. We want to access the partitions that are on the image, so we need to ask the kernel to load those too:
$ sudo partprobe /dev/loop0
This should give us the device /dev/loop0p1, which represents the first partition in myimage.img. We do not need this device directly, but GParted requires it.
Resize partition using GParted
Next we can load the device using GParted:
$ sudo gparted /dev/loop0
This should show a window similar to the following:

Now notice a few things:
- There is one partition.
- The partition allocates the entire disk/device/image.
- The partition is filled partly.
We want to resize this partition so that is fits it content, but not more than that.
Select the partition and click Resize/Move. A window similar to the following will popup:
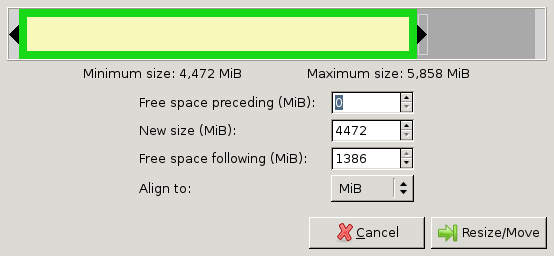
Drag the right bar to the left as much as possible.
Note that sometimes GParted will need a few MB extra to place some filesystem-related data. You can press the up-arrow at the New size-box a few times to do so. For example, I pressed it 10 times (=10MiB) for FAT32 to work. For NTFS you might not need to at all.
Finally press Resize/Move. You will return to the GParted window. This time it will look similar to the following:
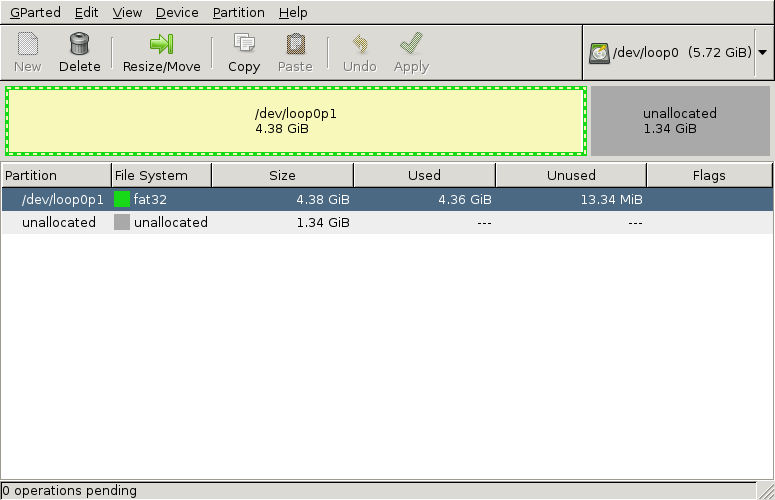
Notice that there is a part of the disk unallocated. This part of the disk will not be used by the partition, so we can shave this part off of the image later. GParted is a tool for disks, so it doesn't shrink images, only partitions, we have to do the shrinking of the image ourselves.
Press Apply in GParted. It will now move files and finally shrink the partition, so it can take a minute or two, most of the time it finishes quickly. Afterwards close GParted.
Now we don't need the loopback-device anymore, so unload it:
$ sudo losetup -d /dev/loop0
Shaving the image
Now that we have all the important data at the beginning of the image it is time to shave of that unallocated part. We will first need to know where our partition ends and where the unallocated part begins. We do this using fdisk:
$ fdisk -l myimage.img
Here we will see an output similar to the following:
Disk myimage.img:  MB,  bytes,  sectors

Units = sectors of  *  =  bytes

Sector size (logical/physical):  bytes /  bytes

I/O size (minimum/optimal):  bytes /  bytes

Disk identifier: 0x000ea37d

Device Boot Start End Blocks Id System

myimage.img1    b W95 FAT32
Note two things in the output:
- The partition ends on block 9181183 (shown under End)
- The block-size is 512 bytes (shown as sectors of 1 * 512)
We will use these numbers in the rest of the example. The block-size (512) is often the same, but the ending block (9181183) will differ for you. The numbers mean that the parition ends on byte 9181183*512 of the file. After that byte comes the unallocated-part. Only the first 9181183*512 bytes will be useful for our image.
Next we shrink the image-file to a size that can just contain the partition. For this we will use the truncate command (thanks uggla!). With the truncate command need to supply the size of the file in bytes. The last block was 9181183 and block-numbers start at 0. That means we need (9181183+1)*512 bytes. This is important, else the partition will not fit the image. So now we use truncate with the calculations:
$ truncate --size=$[(+)*] myimage.img
Now copy the new image over to your phone, where it should act exactly the same as the old/big image.
[1]https://softwarebakery.com//shrinking-images-on-linux
Shrinking images on Linux的更多相关文章
- Linux 驱动开发
linux驱动开发总结(一) 基础性总结 1, linux驱动一般分为3大类: * 字符设备 * 块设备 * 网络设备 2, 开发环境构建: * 交叉工具链构建 * NFS和tftp服务器安装 3, ...
- Linux Process Virtual Memory
目录 . 简介 . 进程虚拟地址空间 . 内存映射的原理 . 数据结构 . 对区域的操作 . 地址空间 . 内存映射 . 反向映射 .堆的管理 . 缺页异常的处理 . 用户空间缺页异常的校正 . 内核 ...
- linux hugepage
The intent of this file is to give a brief summary of hugetlbpage support inthe Linux kernel. This ...
- Linux下的Libsvm使用历程录
原文:http://blog.csdn.net/meredith_leaf/article/details/6714144 Linux下的Libsvm使用历程录 首先下载Libsvm.Python和G ...
- linux内核分析之进程地址空间管理
1.struct task_struct 进程内核栈是操作系统为管理每一个进程而分配的一个4k或者8k内存大小的一片内存区域,里面存放了一个进程的所有信息,它能够完整的描述一个正在执行的程序:它打开的 ...
- Linux内存管理 (8)malloc
专题:Linux内存管理专题 关键词:malloc.brk.VMA.VM_LOCK.normal page.special page. 每章问答: malloc()函数是C函数库封装的一个核心函数,对 ...
- Kernel parameters for Db2 database server installation (Linux and UNIX)
Db2 11.1 For root installations, the database manager uses a formula to automatically adjust kernel ...
- linux 逻辑卷管理 /dev/mapper/VolGroup-lv_root 100%调整分区大小
1.解决过程 # df -h // 查看分区 # umount /home // 取消挂载 # e2fsck -f /dev/mapper/VolGroup-lv_home // 分区检测 ...
- Linux进程虚拟地址空间管理2
2017-04-12 前篇文章对Linux进程地址空间的布局以及各个部分的功能做了简要介绍,本文主要对各个部分的具体使用做下简要分析,主要涉及三个方面:1.MMAP文件的映射过程 2.用户 内存的动态 ...
随机推荐
- BZOJ.3566.[SHOI2014]概率充电器(概率DP 树形DP)
BZOJ 洛谷 这里写的不错,虽然基本还是自己看转移... 每个点的贡献都是\(1\),所以直接求每个点通电的概率\(F_i\),答案就是\(\sum F_i\). 把\(F_x\)分成:父节点通电给 ...
- 用cocoapods导入第三方库,找不到对应的文件
解决办法 1.找到TARGETS -> Build Settings -> SearchPaths -> User Header Search Paths 在后面的空白处双击 2. ...
- 在页面上获取web项目信息
获取协议名称:request.getScheme() 获取域名:request.getServerName() 获取项目名称:request.getContextPath() 使用EL表达式获取项目名 ...
- vue 监听路由变化
方法一:通过 watch // 监听,当路由发生变化的时候执行 watch:{ $route(to,from){ console.log(to.path); } }, 或 // 监听,当路由发生变化的 ...
- vue_mint-ui
npm install mint-ui -S main.js import { Button } from 'mint-ui'; import "mint-ui/lib/style.css& ...
- centos7下NFS使用与配置
NFS是Network File System的缩写,即网络文件系统.客户端通过挂载的方式将NFS服务器端共享的数据目录挂载到本地目录下. nfs为什么需要RPC?因为NFS支持的功能很多,不同功能会 ...
- 关于word粘贴图片无法显示的原因
今天在进行word文档粘贴图片编辑操作的时候,老是无法完整的显示图片.或者干脆就不显示图片,以为是qq截图的图片格式无法粘贴到word文档里面,用Photoshop更改图片的格式仍然无法显示(将png ...
- LeetCode 78 - 子集
给定一组不含重复元素的整数数组 nums,返回该数组所有可能的子集(幂集). 说明:解集不能包含重复的子集. 示例: 输入: nums = [1,2,3]输出:[ [3], [1], [2], [1, ...
- JAVA基础积累
1.ajax同步和异步的区别: 同步是指一个线程要等待上一个线程执行完才能开始执行,同步可以看做是一个单线程操作,只要客户端请求了,在服务器没有反馈信息之前是一个线程阻塞状态.异步是一个线程在执行中, ...
- js常用正则表达式判断
1.判断IP:端口 <html> <head> </head> <body> ip:port<input type="" na ...