SpringBoot整个RabbitMQ详细~
搭建环境
1、安装RabbitMQ,我是用的是Docker方式安装的,大家根据个人习惯自行安装哈
docker run -d -p 5672:5672 -p 15672:15672 --name rabbitmq -e RABBITMQ_DEFAULT_USER=qbb -e RABBITMQ_DEFAULT_PASS=qbb rabbitmq:3.8-management
SpringBoot整合RabbitMQ
Producer生产者端代码
1、创建一个maven工程
2、导入相关的依赖
<?xml version="1.0" encoding="UTF-8"?>

<project xmlns="http://maven.apache.org/POM/4.0.0"

         xmlns:xsi="http://www.w3.org/2001/XMLSchema-instance"

         xsi:schemaLocation="http://maven.apache.org/POM/4.0.0 http://maven.apache.org/xsd/maven-4.0.0.xsd">

    <modelVersion>4.0.0</modelVersion>

    <groupId>com.qbb</groupId>

    <artifactId>springboot-rabbitmq</artifactId>

    <version>1.0-SNAPSHOT</version>

    <parent>

        <groupId>org.springframework.boot</groupId>

        <artifactId>spring-boot-starter-parent</artifactId>

        <version>2.6.7</version>

    </parent>

    <dependencies>

        <dependency>

            <groupId>org.springframework.boot</groupId>

            <artifactId>spring-boot-starter-amqp</artifactId>

        </dependency>

        <dependency>

            <groupId>org.springframework.boot</groupId>

            <artifactId>spring-boot-starter-test</artifactId>

        </dependency>

    </dependencies>

</project>
3、编写application.yml配置文件
server:

  port: 9001

spring:

  application:

    name: springboot-rabbitmq

  rabbitmq:

    host: # 你MQ的地址

    port: 5672

    username: admin

    password: admin

    virtual-host: /
4、主启动类
package com.qbb.rabbitmq;

import org.springframework.boot.SpringApplication;

import org.springframework.boot.autoconfigure.SpringBootApplication;

/**

 * @author QiuQiu&LL (个人博客:https://www.cnblogs.com/qbbit)

 * @version 1.0

 * @date 2022-07-28  21:33

 * @Description:

 */

@SpringBootApplication

public class SpringBootRabbitMQ {

    public static void main(String[] args) {

        SpringApplication.run(SpringBootRabbitMQ.class, args);

    }

}
5、业务逻辑
(1)我们创建一个RabbitMQConfig的配置类,帮助我们来创建交换机、队列以及绑定关系
package com.qbb.rabbitmq.config;
import org.springframework.amqp.core.*;
import org.springframework.beans.factory.annotation.Qualifier;
import org.springframework.context.annotation.Bean;
import org.springframework.context.annotation.Configuration;
/**
* @author QiuQiu&LL (个人博客:https://www.cnblogs.com/qbbit)
* @version 1.0
* @date 2022-07-28 21:34
* @Description:
*/
@Configuration
public class RabbitMQConfig {
/**
* 交换机名称
*/
public static final String TOPIC_EXCHANGE_NAME = "qiu_topic_exchange";
/**
* 队列名称
*/
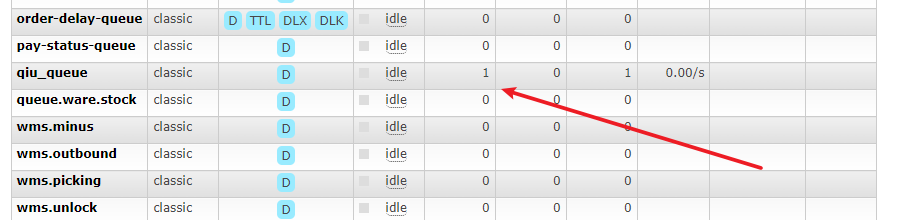
public static final String QUEUE_NAME = "qiu_queue";
/**
* 创建交换机
*
* @return
*/
@Bean("qiuExchange")
public Exchange createExchange() {
return ExchangeBuilder.topicExchange(TOPIC_EXCHANGE_NAME).durable(true).build();
}
/**
* 创建队列
*
* @return
*/
@Bean("qiuQueue")
public Queue createQueue() {
return QueueBuilder.durable(QUEUE_NAME).build();
}
/**
* 绑定交换机和队列
*
* @param qiuExchange
* @param qiuQueue
* @return
*/
@Bean
public Binding binding(@Qualifier("qiuExchange") Exchange qiuExchange, @Qualifier("qiuQueue") Queue qiuQueue) {
return BindingBuilder.bind(qiuQueue).to(qiuExchange).with("qiu.#").noargs();
}
}
(2)编写Producer发送消息的测试代码
package com.qbb.rabbitmq;

import com.qbb.rabbitmq.config.RabbitMQConfig;

import org.junit.jupiter.api.Test;

import org.springframework.amqp.rabbit.core.RabbitTemplate;

import org.springframework.beans.factory.annotation.Autowired;

import org.springframework.boot.test.context.SpringBootTest;

/**

 * @author QiuQiu&LL (个人博客:https://www.cnblogs.com/qbbit)

 * @version 1.0

 * @date 2022-07-28  21:56

 * @Description:

 */

@SpringBootTest

public class ProducerTest {

    @Autowired

    private RabbitTemplate rabbitTemplate;

    @Test

    public void testSendMsg(){

        rabbitTemplate.convertAndSend(RabbitMQConfig.TOPIC_EXCHANGE_NAME,

                "qiu.haha", "等我完成目标就来找你~");

    }

}

Consumer消费者端代码
1、创建一个maven工程
2、导入相关的依赖
<?xml version="1.0" encoding="UTF-8"?>

<project xmlns="http://maven.apache.org/POM/4.0.0"

         xmlns:xsi="http://www.w3.org/2001/XMLSchema-instance"

         xsi:schemaLocation="http://maven.apache.org/POM/4.0.0 http://maven.apache.org/xsd/maven-4.0.0.xsd">

    <modelVersion>4.0.0</modelVersion>

    <groupId>com.qbb</groupId>

    <artifactId>springboot-rabbitmq-consumer</artifactId>

    <version>1.0-SNAPSHOT</version>

    <parent>

        <groupId>org.springframework.boot</groupId>

        <artifactId>spring-boot-starter-parent</artifactId>

        <version>2.6.7</version>

    </parent>

    <dependencies>

        <dependency>

            <groupId>org.springframework.boot</groupId>

            <artifactId>spring-boot-starter-amqp</artifactId>

        </dependency>

        <dependency>

            <groupId>org.springframework.boot</groupId>

            <artifactId>spring-boot-starter-test</artifactId>

        </dependency>

    </dependencies>

</project>
3、编写application.yml配置文件
server:

  port: 9002

spring:

  application:

    name: springboot-rabbitmq

  rabbitmq:

    host:

    port: 5672

    username: admin

    password: admin

    virtual-host: /
4、主启动类
package com.qbb.rabbitmq;

import org.springframework.boot.SpringApplication;

import org.springframework.boot.autoconfigure.SpringBootApplication;

/**

 * @author QiuQiu&LL (个人博客:https://www.cnblogs.com/qbbit)

 * @version 1.0

 * @date 2022-07-28  22:09

 * @Description:

 */

@SpringBootApplication

public class SpringBootRabbitMQConsumer {

    public static void main(String[] args) {

        SpringApplication.run(SpringBootRabbitMQConsumer.class, args);

    }

}
5、业务逻辑
(1)创建一个MQListener监听器,用于监听队列消费消息
package com.qbb.rabbitmq.listener;

import org.springframework.amqp.core.Message;

import org.springframework.amqp.rabbit.annotation.RabbitListener;

import org.springframework.stereotype.Component;

/**

 * @author QiuQiu&LL (个人博客:https://www.cnblogs.com/qbbit)

 * @version 1.0

 * @date 2022-07-28  22:10

 * @Description:

 */

@Component

public class RabbitMQListener {

    /**

     * 监听队列

     *

     * @param message

     */

    @RabbitListener(queues = "qiu_queue")

    public void msgConsumer(Message message) {

        System.out.println("message = " + message);

    }

}
(2)启动主程序测试一下

RabbitMQ高级特性
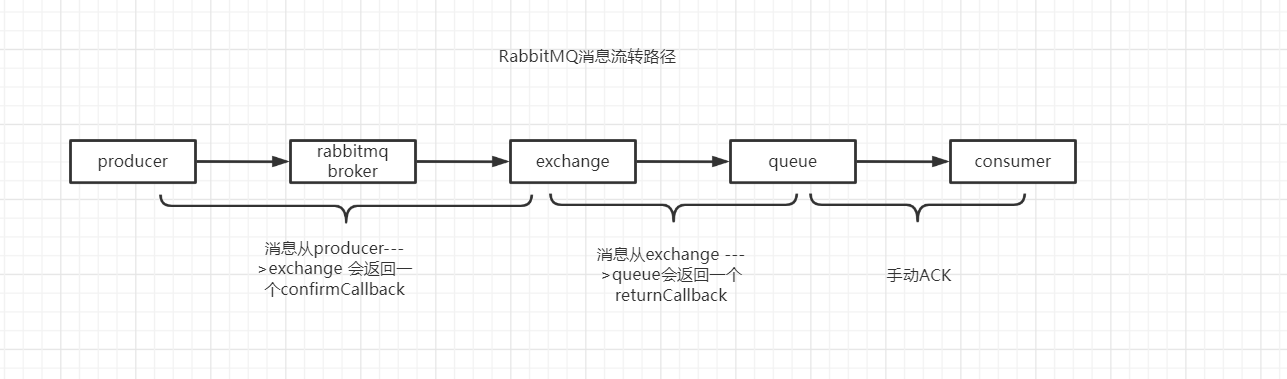
1、消息可靠性投递confirm确认模式和return回退模式
- 修改yml配置文件
spring:

  application:

    name: springboot-rabbitmq

  rabbitmq:

    host:

    port: 5672

    username: admin

    password: admin

    virtual-host: /

    # 是否触发回调方法

    # NONE值是禁用发布确认模式,是默认值

    # CORRELATED值是发布消息成功到交换器后会触发回调方法

    # SIMPLE值经测试有两种效果:

    #     其一效果和CORRELATED值一样会触发回调方法

    #     其二在发布消息成功后使用rabbitTemplate

    #       调用waitForConfirms或waitForConfirmsOrDie方法等待broker节点返回发送结果,根据返回结果来判定下一步的逻辑,

    #       要注意的点是waitForConfirmsOrDie方法如果返回false则会关闭channel,则接下来无法发送消息到broker;

    publisher-confirm-type: correlated

    publisher-returns: true

    listener:

      simple:

        # 开启手动确定

        acknowledge-mode: manual
- 编写测试代码
package com.qbb.rabbitmq;

import com.qbb.rabbitmq.config.RabbitMQConfig;

import org.junit.jupiter.api.Test;

import org.springframework.amqp.core.Message;

import org.springframework.amqp.rabbit.connection.CorrelationData;

import org.springframework.amqp.rabbit.core.RabbitTemplate;

import org.springframework.beans.factory.annotation.Autowired;

import org.springframework.boot.test.context.SpringBootTest;

/**

 * @author QiuQiu&LL (个人博客:https://www.cnblogs.com/qbbit)

 * @version 1.0

 * @date 2022-07-28  21:56

 * @Description:

 */

@SpringBootTest

public class ProducerTest {

    @Autowired

    private RabbitTemplate rabbitTemplate;

    @Test

    public void testSendMsg(){

        /**

         * false:RabbitMQ会把消息直接丢弃

         * true:RabbitMQ会调用Basic.Return命令将消息返回给生产者

         */

        rabbitTemplate.setMandatory(true);

        //设置ReturnsCallback

        rabbitTemplate.setReturnsCallback( returnedMessage -> {

            //消息对象

            Message message = returnedMessage.getMessage();

            //错误码

            int replyCode = returnedMessage.getReplyCode();

            //错误信息

            String replyText = returnedMessage.getReplyText();

            //交换机

            String exchange = returnedMessage.getExchange();

            //路由key

            String routingKey = returnedMessage.getRoutingKey();

            System.out.println("消息从交换机到队列失败,详细信息如下:");

            System.out.println("消息对象:"+message);

            System.out.println("错误码:"+replyCode);

            System.out.println("错误信息:"+replyText);

            System.out.println("交换机:"+exchange);

            System.out.println("路由key:"+routingKey);

        });

        //设置ConfirmCallback

        rabbitTemplate.setConfirmCallback(new RabbitTemplate.ConfirmCallback() {

            /**

             * @param correlationData 相关配置信息

             * @param ack 交换机是否成功收到消息

             * @param cause 错误信息

             */

            @Override

            public void confirm(CorrelationData correlationData, boolean ack, String cause) {

                if (ack){

                    System.out.println("成功发送消息到交换机");

                }else {

                    System.out.println("消息发送到交换机失败");

                    System.out.println("失败原因:"+cause);

                }

            }

        });

        // 错误的示例,大家自行修改

        rabbitTemplate.convertAndSend(RabbitMQConfig.TOPIC_EXCHANGE_NAME,

                "qiu.haha", "等我完成目标就来找你~");

    }

}
2、Consumer端手动ACK
RabbitMQ提供了三种确认方式:
- 自动确认:acknowledge="none"
- 手动确认:acknowledge="manual"
- 根据异常情况确认:acknowledge="auto" (不推荐)
修改配置文件
 listener:

      type: simple

      simple:

        #采用手动应答

        acknowledge-mode: manual

        prefetch: 1 #限制每次发送一条数据。
添加一个ACKListener监听器
package com.qbb.rabbitmq.listener;

import com.rabbitmq.client.Channel;

import org.springframework.amqp.core.Message;

import org.springframework.amqp.rabbit.annotation.RabbitListener;

import org.springframework.stereotype.Component;

import java.io.IOException;

/**

 * @author QiuQiu&LL (个人博客:https://www.cnblogs.com/qbbit)

 * @version 1.0

 * @date 2022-07-29  21:32

 * @Description:

 */

@Component

public class AckListener {

    @RabbitListener(queues = {"akc-queue"})

    public void testQueue(Message message, Channel channel) throws IOException {

        System.out.println("ack-queue消费:" + new String(message.getBody()));

        /*

              listener:

                type: simple

                simple:

                  #采用手动应答

                  acknowledge-mode: manual

                  prefetch: 1 #限制每次发送一条数据。

         */

//        采用手动ack,一条条的消费

        channel.basicAck(message.getMessageProperties().getDeliveryTag(), false);

        /**

         * 参数一:DeliveryTag

         * 参数二:是否接收多个消息

         * 参数三:是否重回队列,如果为true消息会重新回到queue, broker会重新发送该消息给消费端

         */

        //channel.basicNack(message.getMessageProperties().getDeliveryTag(),true,true);

    }

}
测试

3、Consumer端限流
修改配置文件
#采用手动应答

acknowledge-mode: manual

prefetch: 1 #限制每次消费N条数据。
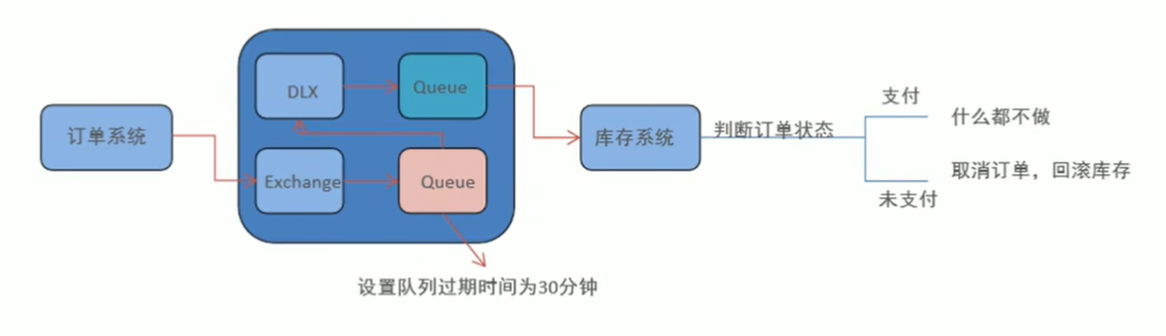
4、TTL
- 设置队列的过期时间
- x-message-ttl,单位:ms(毫秒),这样的话进入队列的所有消息都遵循这个过期时间。
- 设置单个消息的过期时间(expiretion)
- expiration,单位:ms(毫秒),这样的话只有这条消息有过期时间。这里的消息过期了,如果这条消息是在头部,才会丢弃
5、死信队列
- 消息成为死信的三种情况
- 消息超过了队列的最大长度(max-length)
- Consumer端basicNAck|basicReject,消费端拒收,并且requeue=false不重新入队
- 消息过期
6、延迟队列(RabbitMQ没有这个实现)
- 但是我们可以通过TTL+死信队列解决
7、日志与监控
http://ip:15672/直接访问web图形化界面,用命令也可以查看,但是个人感觉没有图形化界面友好!!!
8、保证消息的幂等性
- 使用乐观锁的方式解决
SpringBoot整个RabbitMQ详细~的更多相关文章
- Springboot接入RabbitMQ详细教程
本文适用于对 RabbitMQ 有所了解的人,在此不讨论MQ的原理,只讨论如何接入.其实Spring Boot 集成 RabbitMQ 非常简单,本文章使用的是Spring Boot 提供了sprin ...
- 功能:SpringBoot整合rabbitmq,长篇幅超详细
SpringBoot整合rabbitMq 一.介绍 消息队列(Message Queue)简称mq,本文将介绍SpringBoot整合rabbitmq的功能使用 队列是一种数据结构,就像排队一样,遵循 ...
- SpringBoot集成RabbitMQ
官方说明:http://www.rabbitmq.com/getstarted.html 什么是MQ? MQ全称为Message Queue, 消息队列(MQ)是一种应用程序对应用程序的通信方法.MQ ...
- rabbitmq学习(五):springboot整合rabbitmq
一.Springboot对rabbitmq的支持 springboot提供了对rabbitmq的支持,并且大大简化了rabbitmq的相关配置.在springboot中,框架帮我们将不同的交换机划分出 ...
- SpringBoot 整合 RabbitMQ(包含三种消息确认机制以及消费端限流)
目录 说明 生产端 消费端 说明 本文 SpringBoot 与 RabbitMQ 进行整合的时候,包含了三种消息的确认模式,如果查询详细的确认模式设置,请阅读:RabbitMQ的三种消息确认模式 同 ...
- Springboot 整合RabbitMq ,用心看完这一篇就够了
该篇文章内容较多,包括有rabbitMq相关的一些简单理论介绍,provider消息推送实例,consumer消息消费实例,Direct.Topic.Fanout的使用,消息回调.手动确认等. (但是 ...
- RabbitMQ入门到进阶(Spring整合RabbitMQ&SpringBoot整合RabbitMQ)
1.MQ简介 MQ 全称为 Message Queue,是在消息的传输过程中保存消息的容器.多用于分布式系统 之间进行通信. 2.为什么要用 MQ 1.流量消峰 没使用MQ 使用了MQ 2.应用解耦 ...
- SpringBoot整合RabbitMQ实现六种工作模式
RabbitMQ主要有六种种工作模式,本文整合SpringBoot分别介绍工作模式的实现. 前提概念 生产者 消息生产者或者发送者,使用P表示: 队列 消息从生产端发送到消费端,一定要通过队列转发,使 ...
- SpringBoot集成rabbitmq(二)
前言 在使用rabbitmq时,我们可以通过消息持久化来解决服务器因异常崩溃而造成的消息丢失.除此之外,我们还会遇到一个问题,当消息生产者发消息发送出去后,消息到底有没有正确到达服务器呢?如果不进行特 ...
- SpringBoot之RabbitMQ的使用
一 .RabbitMQ的介绍 RabbitMQ是消息中间件的一种,消息中间件即分布式系统中完成消息的发送和接收的基础软件,消息中间件的工作过程可以用生产者消费者模型来表示.即,生产者不断的向消息队列发 ...
随机推荐
- WPF学习 - 自定义Panel
WPF中的Panel(面板),是继承自FrameworkElement的抽象类,表示一个可以用来排列子元素的面板. 在WPF中,一种预设了几种常用的面板,如Grid.StackPanel.WrapPa ...
- 2D KD-Tree实现
KD-tree 1.使用背景 在项目中遇到一个问题: 如何算一个点到一段折线的最近距离~折线的折点可能有上千个, 而需要检索的点可能出现上万的数据量, 的确是个值得思考的问题~ 2.暴力解法 有个比较 ...
- 安装软件提示 "无法完成操作, 因为文件包含病毒或潜在的垃圾软件" 如何处理
在Windows端安装一些小众电脑软件的时候,经常会遇到无法安装的问题,比较常见的情况是会提示 "无法完成操作, 因为文件包含病毒或潜在的垃圾软件", 或者提示"不能执行 ...
- KRPano JS 场景编辑器源码
KRPano JS编辑器,可以运行在Node环境中. 源码地址:https://github.com/xxweimei/krpano-editor-js 或者下载zip包:http://pan.bai ...
- 5.2 磁盘CRC32完整性检测
CRC校验技术是用于检测数据传输或存储过程中是否出现了错误的一种方法,校验算法可以通过计算应用与数据的循环冗余校验(CRC)检验值来检测任何数据损坏.通过运用本校验技术我们可以实现对特定内存区域以及磁 ...
- ChatGPT多个APIkey如何自主切换
chatgpt目前账户大多数为18美金,那么用户在调用api时候出现金额不足要手动更换chatgpt 当前方法为了解决多账户自主切换api使用. 创建一个名为$arr的数组,它包含几个key.我们使用 ...
- 客制开发tiptop程序随记-pta表结构问题-误删表的恢复
添加字段的语法:alter table tablename add (column datatype [default value][null/not null],-.); 删除字段的语法:alter ...
- .NET微服务系列之Saga分布式事务案例实践
自从Wing正式发布以后,很多童鞋反馈对Saga分布式事务比较感兴趣,今天就跟大家分享一下"跨行转账"的分布式事务实践案例,入门使用教程请自行前往Wing官方文档. 假设自己名下有 ...
- 12. 用Rust手把手编写一个wmproxy(代理,内网穿透等), TLS的双向认证信息及token验证
12. 用Rust手把手编写一个wmproxy(代理,内网穿透等), TLS的双向认证信息及token验证 项目 ++wmproxy++ gite: https://gitee.com/tickbh/ ...
- Go 代码块与作用域,变量遮蔽问题详解
Go 代码块与作用域详解 目录 Go 代码块与作用域详解 一.引入 二.代码块 (Block) 2.1 代码块介绍 2.2 显式代码块 2.3 隐式代码块 2.4 空代码块 2.5 支持嵌套代码块 三 ...