1-15-2-RAID1 企业级RAID磁盘阵列的搭建(RAID1、RAID5、RAID10)
大纲:
1、创建RAID1
2、创建RAID5
3、创建RAID10
===============================
1、创建RAID1
RAID1原理:需要两块或以上磁盘,可添加热备盘。
在写入数据时,会在另一块磁盘中生成该文件的镜像(即同步)。
两块磁盘中的内容完全一致。
故当一块磁盘损坏时,可使用另一块镜像盘中的数据。(当拥有热备盘时,若镜像盘损坏,可由热备盘替代)
磁盘利用率为50%,即两块100G的磁盘构成RAID1只能提供100G的可用空间。
实战:创建RAID1
第一步:给虚拟机添加三块硬盘,并开机检查。
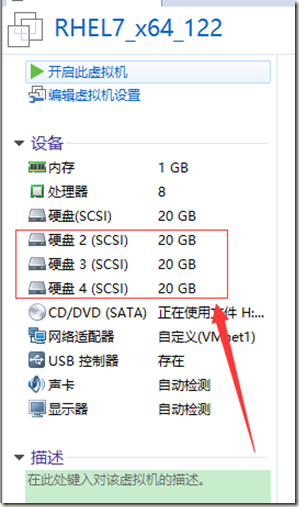
[root@localhost ~]# ls /dev/sd*
/dev/sda /dev/sda1 /dev/sda2 /dev/sdb /dev/sdc /dev/sdd
[root@localhost ~]#
效果如图:

第二步:分别对三块磁盘分区,并修改其标签
使用相同办法,分别对/dev/sdb、/dev/sdc、/dev/sdd进行分区
[root@localhost ~]# fdisk /dev/sdb
Welcome to fdisk (util-linux 2.23.2).
Changes will remain in memory only, until you decide to write them.
Be careful before using the write command.
Device does not contain a recognized partition table
Building a new DOS disklabel with disk identifier 0xeed790f7.
Command (m for help): n
Partition type:
p primary (0 primary, 0 extended, 4 free)
e extended
Select (default p):
Using default response p
Partition number (1-4, default 1):
First sector (2048-41943039, default 2048):
Using default value 2048
Last sector, +sectors or +size{K,M,G} (2048-41943039, default 41943039):
Using default value 41943039
Partition 1 of type Linux and of size 20 GiB is set
Command (m for help): t
Selected partition 1
Hex code (type L to list all codes): fd
Changed type of partition 'Linux' to 'Linux raid autodetect'
Command (m for help): p
Disk /dev/sdb: 21.5 GB, 21474836480 bytes, 41943040 sectors
Units = sectors of 1 * 512 = 512 bytes
Sector size (logical/physical): 512 bytes / 512 bytes
I/O size (minimum/optimal): 512 bytes / 512 bytes
Disk label type: dos
Disk identifier: 0xeed790f7
Device Boot Start End Blocks Id System
/dev/sdb1 2048 41943039 20970496 fd Linux raid autodetect
Command (m for help): w
The partition table has been altered!
Calling ioctl() to re-read partition table.
Syncing disks.
[root@localhost ~]#
效果如图:

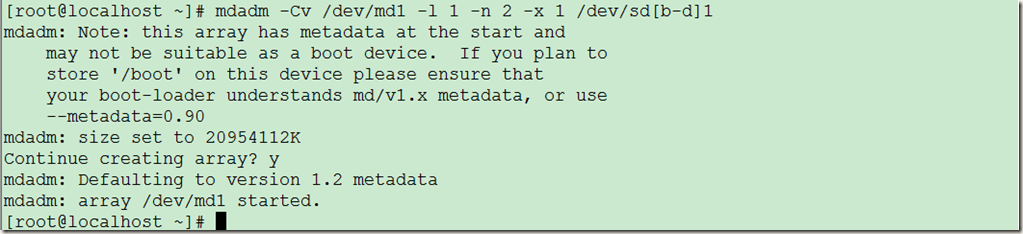
第三步:创建RAID1磁盘阵列
检查三块磁盘是否被其他磁盘阵列使用
mdadm –E /dev/sd[b-d]1

使用分区后的三块磁盘,创建RAID1磁盘阵列
(其中-n指定两块设备,-x指定一个热备盘,-l 指定级别为RAID1 -C创建 -v显示信息 /dev/md1—>指定创建的设备名)
mdadm -Cv /dev/md1 -l 1 -n 2 -x 1 /dev/sd[b-d]1
检查:
[root@localhost ~]# ls /dev/md1
/dev/md1
[root@localhost ~]# mdadm -D /dev/md1
/dev/md1:
Version : 1.2
Creation Time : Sun Aug 21 01:26:17 2016
Raid Level : raid1
Array Size : 20954112 (19.98 GiB 21.46 GB)
Used Dev Size : 20954112 (19.98 GiB 21.46 GB)
Raid Devices : 2
Total Devices : 3
Persistence : Superblock is persistent
Update Time : Sun Aug 21 01:28:01 2016
State : clean
Active Devices : 2
Working Devices : 3
Failed Devices : 0
Spare Devices : 1
Name : localhost.localdomain:1 (local to host localhost.localdomain)
UUID : 9f8c8a03:8036f47c:788bd593:8c0c83cd
Events : 17
Number Major Minor RaidDevice State
0 8 17 0 active sync /dev/sdb1
1 8 33 1 active sync /dev/sdc1
2 8 49 - spare /dev/sdd1
[root@localhost ~]# mdadm -E /dev/md1
mdadm: No md superblock detected on /dev/md1.
[root@localhost ~]# mdadm -E /dev/sd[b-d]1
/dev/sdb1:
Magic : a92b4efc
Version : 1.2
Feature Map : 0x0
Array UUID : 9f8c8a03:8036f47c:788bd593:8c0c83cd
Name : localhost.localdomain:1 (local to host localhost.localdomain)
Creation Time : Sun Aug 21 01:26:17 2016
Raid Level : raid1
Raid Devices : 2
Avail Dev Size : 41908224 (19.98 GiB 21.46 GB)
Array Size : 20954112 (19.98 GiB 21.46 GB)
Data Offset : 32768 sectors
Super Offset : 8 sectors
Unused Space : before=32680 sectors, after=0 sectors
State : clean
Device UUID : 483270f1:90ae6527:ab2ceee6:58ee030d
Update Time : Sun Aug 21 01:28:01 2016
Bad Block Log : 512 entries available at offset 72 sectors
Checksum : 5e434c0e - correct
Events : 17
Device Role : Active device 0
Array State : AA ('A' == active, '.' == missing, 'R' == replacing)
/dev/sdc1:
Magic : a92b4efc
Version : 1.2
Feature Map : 0x0
Array UUID : 9f8c8a03:8036f47c:788bd593:8c0c83cd
Name : localhost.localdomain:1 (local to host localhost.localdomain)
Creation Time : Sun Aug 21 01:26:17 2016
Raid Level : raid1
Raid Devices : 2
Avail Dev Size : 41908224 (19.98 GiB 21.46 GB)
Array Size : 20954112 (19.98 GiB 21.46 GB)
Data Offset : 32768 sectors
Super Offset : 8 sectors
Unused Space : before=32680 sectors, after=0 sectors
State : clean
Device UUID : b6a96682:0ca07895:8fafe1f0:c5761864
Update Time : Sun Aug 21 01:28:01 2016
Bad Block Log : 512 entries available at offset 72 sectors
Checksum : be54c04a - correct
Events : 17
Device Role : Active device 1
Array State : AA ('A' == active, '.' == missing, 'R' == replacing)
/dev/sdd1:
Magic : a92b4efc
Version : 1.2
Feature Map : 0x0
Array UUID : 9f8c8a03:8036f47c:788bd593:8c0c83cd
Name : localhost.localdomain:1 (local to host localhost.localdomain)
Creation Time : Sun Aug 21 01:26:17 2016
Raid Level : raid1
Raid Devices : 2
Avail Dev Size : 41908224 (19.98 GiB 21.46 GB)
Array Size : 20954112 (19.98 GiB 21.46 GB)
Data Offset : 32768 sectors
Super Offset : 8 sectors
Unused Space : before=32680 sectors, after=0 sectors
State : clean
Device UUID : 9ee8a186:310bc49c:66788d58:ec4b1d9a
Update Time : Sun Aug 21 01:28:01 2016
Bad Block Log : 512 entries available at offset 72 sectors
Checksum : 678c0856 - correct
Events : 17
Device Role : spare
Array State : AA ('A' == active, '.' == missing, 'R' == replacing)
[root@localhost ~]#
查看磁盘阵列状态信息:

生成配置信息:
[root@localhost ~]# mdadm -Dvs >> /etc/mdadm.conf
[root@localhost ~]# cat !$ # !$ --> 上一条命令最后一个参数

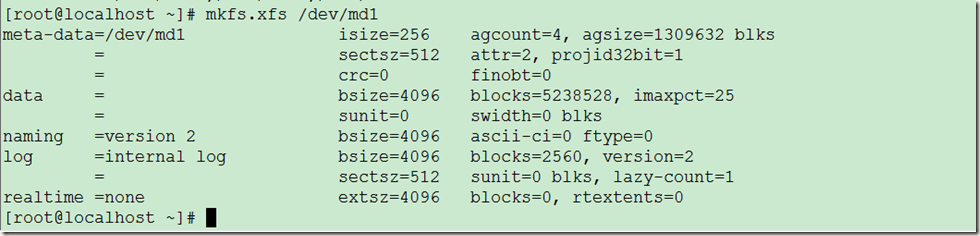
第四步:格式化并挂载
[root@localhost ~]# mkfs.xfs /dev/md1
效果如图:
[root@localhost ~]# mkdir /disk
[root@localhost ~]# mount /dev/md1 /disk
[root@localhost ~]# df –h | tail –1
效果如图:

第五步:设置开机启动
[root@localhost ~]# echo "/dev/md1 /disk xfs defaults 0 0 " >> /etc/fstab
[root@localhost ~]# cat !$
[root@localhost ~]# df | grep /disk
[root@localhost ~]# umount /disk
[root@localhost ~]# mount –a #测试,umount /disk 模拟重启,mount –a 模拟开机
[root@localhost ~]# df | tail –1 #检查挂载结果
效果如图: 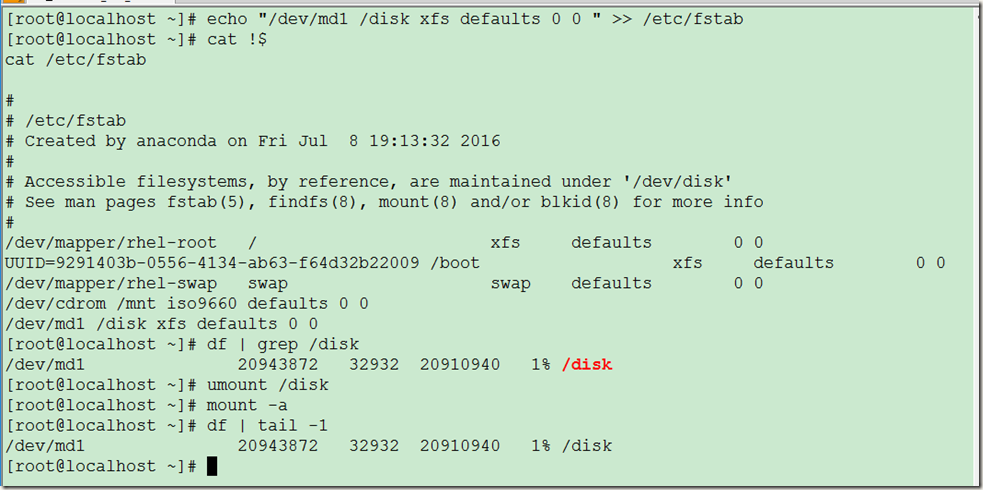
注:也可使用 mount –av 查看挂载信息

第六步:RAID1磁盘故障模拟及修复
模拟RAID磁盘故障:
[root@localhost ~]# mdadm -D /dev/md1 #查看/dev/md1状态
/dev/md1:
Version : 1.2
Creation Time : Sun Aug 21 01:26:17 2016
Raid Level : raid1
Array Size : 20954112 (19.98 GiB 21.46 GB)
Used Dev Size : 20954112 (19.98 GiB 21.46 GB)
Raid Devices : 2
Total Devices : 3
Persistence : Superblock is persistent
Update Time : Sun Aug 21 01:43:47 2016
State : clean
Active Devices : 2
Working Devices : 3
Failed Devices : 0
Spare Devices : 1
Name : localhost.localdomain:1 (local to host localhost.localdomain)
UUID : 9f8c8a03:8036f47c:788bd593:8c0c83cd
Events : 17
Number Major Minor RaidDevice State
0 8 17 0 active sync /dev/sdb1
1 8 33 1 active sync /dev/sdc1
2 8 49 - spare /dev/sdd1
[root@localhost ~]# mdadm /dev/md1 -f /dev/sdb1 #设置/dev/sdb1损坏
mdadm: set /dev/sdb1 faulty in /dev/md1
[root@localhost ~]# mdadm -D /dev/md1 #查看/dev/md1状态
/dev/md1:
Version : 1.2
Creation Time : Sun Aug 21 01:26:17 2016
Raid Level : raid1
Array Size : 20954112 (19.98 GiB 21.46 GB)
Used Dev Size : 20954112 (19.98 GiB 21.46 GB)
Raid Devices : 2
Total Devices : 3
Persistence : Superblock is persistent
Update Time : Sun Aug 21 01:44:50 2016
State : clean, degraded, recovering
Active Devices : 1
Working Devices : 2
Failed Devices : 1
Spare Devices : 1
Rebuild Status : 3% complete
Name : localhost.localdomain:1 (local to host localhost.localdomain)
UUID : 9f8c8a03:8036f47c:788bd593:8c0c83cd
Events : 19
Number Major Minor RaidDevice State
2 8 49 0 spare rebuilding /dev/sdd1
1 8 33 1 active sync /dev/sdc1
0 8 17 - faulty /dev/sdb1
[root@localhost ~]#
模拟RAID磁盘故障:
1、停用RAID1磁盘阵列
2、清除/dev/sdb1超级块标识
3、激活RAID1磁盘阵列
4、添加/dev/sdb1到磁盘阵列中
详情如下:
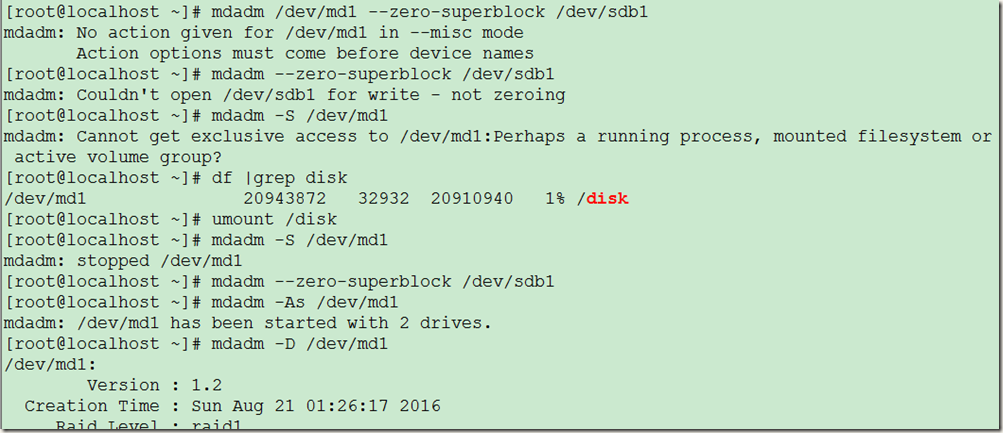
[root@localhost ~]# mdadm /dev/md1 --zero-superblock /dev/sdb1
mdadm: No action given for /dev/md1 in --misc mode
Action options must come before device names
[root@localhost ~]# mdadm --zero-superblock /dev/sdb1 #磁盘阵列挂载并且激活状态下,去除标志是不会成功的
mdadm: Couldn't open /dev/sdb1 for write - not zeroing
[root@localhost ~]# mdadm -S /dev/md1 #停用RAID1磁盘阵列
mdadm: Cannot get exclusive access to /dev/md1:Perhaps a running process, mounted filesystem or active volume group?
[root@localhost ~]# df |grep disk
/dev/md1 20943872 32932 20910940 1% /disk
[root@localhost ~]# umount /disk
[root@localhost ~]# mdadm -S /dev/md1 #停用RAID1磁盘阵列
mdadm: stopped /dev/md1
[root@localhost ~]# mdadm --zero-superblock /dev/sdb1 #清除/dev/sdb1超级块标识
[root@localhost ~]# mdadm -As /dev/md1 #激活RAID1磁盘阵列
mdadm: /dev/md1 has been started with 2 drives.
[root@localhost ~]# mdadm -D /dev/md1
/dev/md1:
Version : 1.2
Creation Time : Sun Aug 21 01:26:17 2016
Raid Level : raid1
Array Size : 20954112 (19.98 GiB 21.46 GB)
Used Dev Size : 20954112 (19.98 GiB 21.46 GB)
Raid Devices : 2
Total Devices : 2
Persistence : Superblock is persistent
Update Time : Sun Aug 21 01:49:16 2016
State : clean
Active Devices : 2
Working Devices : 2
Failed Devices : 0
Spare Devices : 0
Name : localhost.localdomain:1 (local to host localhost.localdomain)
UUID : 9f8c8a03:8036f47c:788bd593:8c0c83cd
Events : 36
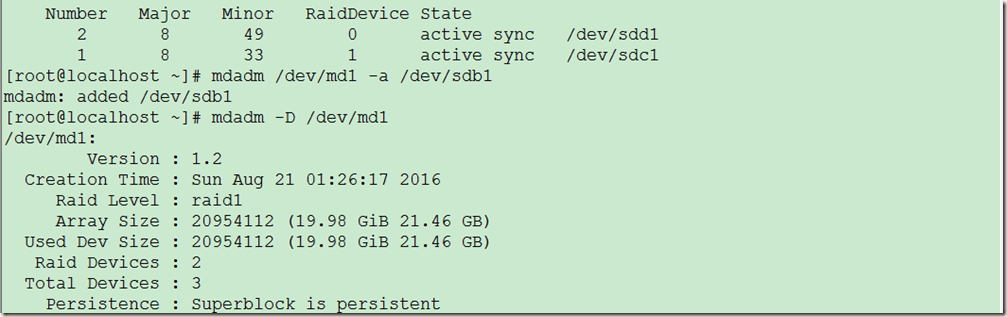
Number Major Minor RaidDevice State
2 8 49 0 active sync /dev/sdd1
1 8 33 1 active sync /dev/sdc1
[root@localhost ~]# mdadm /dev/md1 -a /dev/sdb1 #添加/dev/sdb1到磁盘阵列中
mdadm: added /dev/sdb1
[root@localhost ~]# mdadm -D /dev/md1
/dev/md1:
Version : 1.2
Creation Time : Sun Aug 21 01:26:17 2016
Raid Level : raid1
Array Size : 20954112 (19.98 GiB 21.46 GB)
Used Dev Size : 20954112 (19.98 GiB 21.46 GB)
Raid Devices : 2
Total Devices : 3
Persistence : Superblock is persistent
Update Time : Sun Aug 21 01:50:15 2016
State : clean
Active Devices : 2
Working Devices : 3
Failed Devices : 0
Spare Devices : 1
Name : localhost.localdomain:1 (local to host localhost.localdomain)
UUID : 9f8c8a03:8036f47c:788bd593:8c0c83cd
Events : 37
Number Major Minor RaidDevice State
2 8 49 0 active sync /dev/sdd1
1 8 33 1 active sync /dev/sdc1
3 8 17 - spare /dev/sdb1
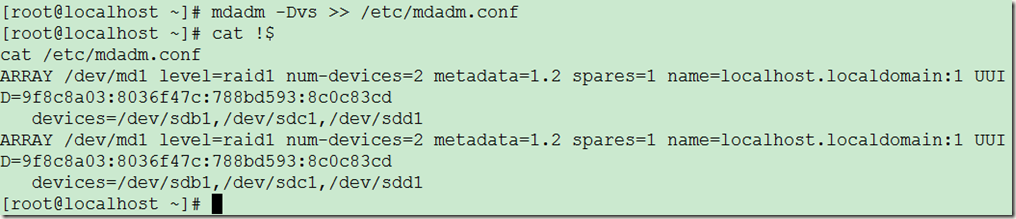
[root@localhost ~]# mdadm -Dvs >> /etc/mdadm.conf #重新生成配置信息,在磁盘阵列信息发生改变后,要重新生成配置信息
[root@localhost ~]# cat !$
cat /etc/mdadm.conf
ARRAY /dev/md1 level=raid1 num-devices=2 metadata=1.2 spares=1 name=localhost.localdomain:1 UUID=9f8c8a03:8036f47c:788bd593:8c0c83cd
devices=/dev/sdb1,/dev/sdc1,/dev/sdd1
ARRAY /dev/md1 level=raid1 num-devices=2 metadata=1.2 spares=1 name=localhost.localdomain:1 UUID=9f8c8a03:8036f47c:788bd593:8c0c83cd
devices=/dev/sdb1,/dev/sdc1,/dev/sdd1
[root@localhost ~]#
1-15-2-RAID1 企业级RAID磁盘阵列的搭建(RAID1、RAID5、RAID10)的更多相关文章
- 1-15-2-RAID10 企业级RAID磁盘阵列的搭建(RAID1、RAID5、RAID10)
RAID10的搭建: 有两种方法, 第一种:直接使用四块磁盘,创建级别为10的磁盘阵列 第二种:使用四块磁盘先创建两个RAID1,然后在用RAID1创建RAID0 第一步:添加五个磁盘到虚拟机 开机后 ...
- 1-15-2-RAID5 企业级RAID磁盘阵列的搭建(RAID1、RAID5、RAID10)
RAID5的搭建 第一步:添加四个磁盘,开机并检查(略过) 第二步:使用fdisk命令分别对四个磁盘进行分区,效果如下图: 第三步:使用mdadm命令创建RAID5磁盘阵列 [root@localho ...
- RAID磁盘阵列的搭建(以raid0、raid1、raid5、raid10为例)
mdadm工具的使用 -C或--creat 建立一个新阵列 -r 移除设备 -A 激活磁盘阵列 -l 或--level= 设定磁盘阵列的级别 -D或--detail 打印阵列设备的详细信息 -n或-- ...
- 1-15-1 RAID磁盘阵列的原理和搭建
大纲: 1.1-1-企业级RAID磁盘阵列 RAID磁盘阵列的原理 RAID0,1,5,10的搭建 硬件RAID卡 1.2-1-使用廉价的磁盘搭建RAID磁盘阵列 实战-配置RAID0带区卷 ==== ...
- RAID磁盘阵列及CentOS7系统启动流程
磁盘阵列(Redundant Arrays of Independent Disks,RAID),有“独立磁盘构成的具有冗余能力的阵列”之意,,数据读取无影响.将数据切割成许多区段,分别存放在各个硬盘 ...
- Linux系统的RAID磁盘阵列
RAID概念 磁盘阵列(Redundant Arrays of Independent Disks,RAID),有“独立磁盘构成的具有冗余能力的阵列”之意. 磁盘阵列是由很多价格较便宜的磁盘,以硬件( ...
- Linux下RAID磁盘阵列的原理与搭建
RAID概念 磁盘阵列(Redundant Arrays of Independent Disks,RAID),有"独立磁盘构成的具有冗余能力的阵列"之意. 磁盘阵列是由很多价格较 ...
- RAID磁盘阵列技术
RAID磁盘阵列技术 1.RAID概述 RAID(Redundant Array of Independent Disk),从字面意思讲的是基于独立磁盘的具有冗余的磁盘阵列,其核心思想是将多块独立磁盘 ...
- 快速理解几种常用的RAID磁盘阵列级别
我发现周围不少人在学习和理解RAID磁盘阵列的原理时,找了很多专业的资料来看,但是因为动手的机会比较少,因此看完以后还是似懂非懂,真正遇到实际的方案设计的时候,还是拿不定主意. 因此,我结合自己在过去 ...
随机推荐
- PAT 1118 Birds in Forest [一般]
1118 Birds in Forest (25 分) Some scientists took pictures of thousands of birds in a forest. Assume ...
- CentOS 7 安装vsftpd 服务器
在CentOS7上安装ftp服务器用于保存服务端上传的图片. 1.CentOS卸载vsftpd的方法 如果服务器上已经安装了vsftpd服务,配置出错需要卸载vsftpd服务. 1.1 查找vsftp ...
- opencv:vs2015添加了包含目录依然无法打开‘opencv2/core/core.hpp’ 解决方法
安装环境 win10 vs2015 出错和改错 按网上的教程,配置好opencv后,包括已经把以下内容添加到'包含目录'了: E:\openCV\opencv\build\include E:\ope ...
- CCTV-2《遇见大咖》专访雷军----笔记记录
与央视记者约好两点采访,但因为公司会议拖到了三点.雷军对此表示抱歉,解释了一天的行程,并说:“今天不算密的,密的平均一天应该有十一个会.然后我现在基本每天中午饭,大概就是三分钟的时间.” 因为要上镜, ...
- Mock Server 之 moco-runner 使用指南二
文章出处http://blog.csdn.net/crisschan/article/details/53335234 moco-runner 安装配置 1. 下载jar https://repo1. ...
- (二)无状态的web应用(单py的Django占位图片服务器)
本文为作者原创,转载请注明出处(http://www.cnblogs.com/mar-q/)by 负赑屃 阅读本文建议了解Django框架的基本工作流程,了解WSGI应用,如果对以上不是很清楚,建议结 ...
- js自动类型转换
<script> testeq0 = null == undefined; testeq1 = "0" == 0; //比较前字符串转换为数字 testeq2 = 0 ...
- obj比较
<script> var obj1={name:'one',age:30}; var obj2={name:'one',age:30}; //比较两个字符串对象的[值]是否相等 Objec ...
- 前端虚拟接口mockjs的使用
最近在学习VueJS,也进一步学习了ES6,看了一遍之后,难免手痒,所以想仿写点什么,但是数据是个问题,你总不能写个分页,写个轮播吧,但是在公司做自己的东西找后台要接口也不那么像回事,怎么办呢? 无意 ...
- Django学习笔记之Django ORM相关操作
一般操作 详细请参考官方文档 必知必会13条 <> all(): 查询所有结果 <> filter(**kwargs): 它包含了与所给筛选条件相匹配的对象 <> ...